WARRIOR WINCHES S2500EN Electric Winch Instruction Manual
INTRODUCTION
Congratulations on your purchase of a winch. We design and build winches to strict specifications and with proper use and maintenance should bring you years satisfying service.
WARNING – Read, study and follow all instructions before operating this device. Failure to heed these instructions may result in personal injury and/or property damage.
Your winch can develop tremendous pulling forces and if used unsafely or improperly could result in property damage, serious injury or death. Throughout this manual you will find the following symbols for caution, warning and danger. Pay particular attention to the notes preceded by these symbols as they are written for your safety. Ultimately, safe operation of this device rests with you, the operator
CAUTION: Indicates a potentially hazardous situation which, if not avoided, may result in minor or moderate injury. This notation is also used to alert against unsafe practices.
WARNING: Indicates a potentially hazardous situation which, if not avoided could result in death or serious injury.
INCLUDED WITH YOUR WINCH
| DESCRIPTION | QUANTITY | |
| 1 | Winch Assembly with Wire Rope | 1 |
| 2 | Cap Bolt M10 × 35 | 4 |
| 3 | Lock Washer Ø10 | 4 |
| 4 | Thinck Flat Washer Ø1 | 4 |
| 5 | Hex Flange Nut M10 | 4 |
| 6 | Clevis Hook w/Pin | 1 |
| 7 | Control box of S2500EN (Supplied for Prototype | 1 |
| 8 | Power Switch supplied by your choice | |
| 9.1 | R1, Remote control | 1 |
| 9.2 | R2, Remote control | 1 |
| 9.3 | R3, Remote control | 1 |
| 9.4 | Wireless Remote Control | 1 |
| THE FOLLOWING DESCRIPTIONS ARE OPTIONAL | ||
| 01 | Snatch Block/Pulle | 1 |
| 02 | Roller Fairlead and Screws | 1 |
| 03 | Mounting Channel | 1 |
| 04 | SWR Tensioner | 1 |
WINCH ACCESSORIES YOU WILL NEED
NOT INCLUDED WITH YOUR WINCH
Gloves – For handling the wire rope and hook strap.
Anchor Strap/Chain – Tree saver anchor straps are made of high quality nylon with high tensile strengths up to 15000lbs.
Heavy Blanket – place on the cable to absorb energy should the wire rope break.
GETTING TO KNOW YOUR WINCH
Your winch is a powerful piece of machinery. It is important that you understand the basics of its operation and specifications so that when you need to use it, you can use it with confidence and safety. Below is a list of the components of your winch and their use. Practices using your winch before you are in a situation to need to use it.
- Motor: Your 6hp motor is powered by a 12/24 volt battery and provides power to the gear mechanism which turns the drum and winds the wire rope;
- Winch Drum: The winch drum is the cylinder on which the wire rope is stored. It can feed or wind the rope depending on the remote winch switch.
- Wire Rope: Your winch has a 13/32″X83.7′ galvanized aircraft cable designed specifically for load capacity of 12000lbs. The wire rope feeds onto the drum in the “under wind” position through the roller fairlead and is looped at the end to accept the clevis hook pin.
- Roller Fairlead: When using the winch at an angle the roller fair lead acts to guide the wire rope onto the drum and minimizes damage to the wire rope from abrasion on the winch mount or bumper.
- Mechanic Gear System: The reduction gears convert the winch motor power into extreme pulling forces.
- Braking System: Braking action is automatically applied to the winch drum when the winch motor is stopped and there is a load on the wire rope. The braking action is applied by a separate mechanical brake.
- Free Spooling Clutch: The clutch allows the operator to manually disengage (“Out”) the spooling drum from the gear train, free spool. Engaging the clutch (“In”) locks the winch into the gear system.
- Solenoid: Power from the vehicle battery flows through the weather sealed switch before being directed to the winch motor.
- Remote Switch: The Power switch lead has a dual switch for powering in or powering out your winch drum. The Power switch leads allow you to stand clear of the wire rope when the winch is under load.
- Wireless Remote Control: allow you control winch far from 50 Ft away.
- Universal Flat Bed Mounting Channel: Your winch has been optional supplied with a flat bed mounting channel that can be mounted to most flat surfaces such as trailers, step bumpers, truck beds, etc. The mounting channel also has holes to accept your roller fairlead.
- Snatch Block: If Your winch were supplied with a snatch block that, used properly, can double the pulling power of winch, or change your pulling direction without damaging the wire rope. We recommend you to use double line and snatch block for pulling over 85% related line pull.
WINCH ASSEMBLY AND MOUNTING
S2500EN:
- Your winch is designed with a bolt pattern that is standard in this class of winch. Many winch mounting kits are available that utilize this bolt pattern for the most popular vehicle and mounting channels. If you cannot find a kit locally, contact us and we will provide you with the name of a dealer near you. If you will utilize the mounting channel you must ensure that it is mounted on a flat surface so that the three major sections (motor, drum and gear housing) are properly aligned. Proper alignment of the winch will allow even distribution of the full rated load.
- Start by connecting the Roller Fairlead (Part# 250900) to the winch using 2 each of the Cap Bolt M10 X 35 (Part# 250002), Flat Washer (Part# 250004), Lock Washer (Part# 250003) and securing with M10 Nut(Part# 250005) (Make sure the bolt is placed through the mounting channel and roller fairlead from inside the channel. This will allow enough clearance for the winch to be placed in the channel without obstruction.)
- Assemble the winch to the Mounting Channel by first pulling and releasing theclutch knob to “Off” position (Free Spooling). Pull out a few inches of cable from the drum and feed the wire loop through the opening in the front of the mounting channel and roller fairlead. Now, using the remaining M10 x 35 Cap Bolts, Flat Washer, Lock Washer and Nut M10 secure the winch to the mounting channel.
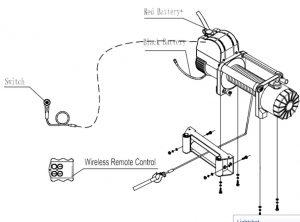
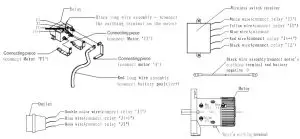
- Connect the battery and motor leads as the drawing above every type of winch is different each other.
- Connect the winch motor leads as detailed below:
 CAUTION:Batteries contain gases which are flammable and explosiveWear eye protection during installation and remove all jewelry. Do not lean over battery while making connections.
 - Assemble the Clevis Hook to the cable. Take off the pin from the Clevis Hook, connect the Clevis Hook to the cable and mount the pin back to the Clevis Hook.
- Always use the Hand Saver when free-spooling and re-spooling the wire rope. Using the Hand Saver keeps your hands and fingers away from the rotating drum.
- Check for proper drum rotation. Pull and turn the clutch knob to the “off”position (Free-spooling). Pull out some cable from the drum, and then turn the clutch knob to the “In” position to engage the gears. Press the cable out button on the power switch. If the drum is turning and releasing more cable then your connections are accurate. If the drum is turning and collecting more cable then reverse the leads on the motor. Repeat and check rotation.
 CAUTION:Batteries contain gases which are flammable and explosiveWear eye protection during installation and remove all jewelry. Do not lean over battery while making connections.
SAFETY PRECAUTIONS
![]() WARNING
WARNING
- WARNING – DO NOT EXCEED RATED CAPACITY.
- WARNING – Intermittent use only.
- WARNING – Do not use winch in lifting or moving or persons.
- WARNING – A minimum of five wraps of cable around the drum barrel is necessary for pulling and holding the rated load. The cable clamp is not designed to hold the load without 5 wraps of cable around the barrel.
- WARNING – Keep yourself and others a safe distance to the side of the cable when under tension.
- WARNING – The wire rope may break before the motor stalls.For heavy loads at or near rated capacity, use a pulleyblock/snatch block to reduce the load on the wire rope.
- WARNING -Never step over a cable, or near a cable under load.
- WARNING – Don’t move the vehicle to pull a load (towing) on the winch cable. This could result in cable breakage.
- WARNING-Disconnect the remote control and battery leads or always isolate winch when not in use.
- WARNING- Do not exceed maximum pull rating. Avoid “shock loads” by using the control switch intermittently to take up the slack in the wire rope. “Shock loads” can far exceed the rate capacity for the wire rope and drum.
- WARNING- Do not exceeds maximum line pull ratings shown on the tables.
- WARNING- When re-spooling the cable, ensure that the cable spools in the under-wind position with the cable entering the drum from the bottom, not the top. To re-spool correctly, and while wearing gloves, keep a slight load on the cable while pushing the remote button to draw in the cable. Walk toward the winch not allowing the cable to slide through your hands.Do not let your hands get within 12″of the winch while respooling. Turn off the winch and repeat the procedure until a few feet of cable is left. Disconnect the remote control andfinish spooling by hand by rotating the drum by hand with the clutch disengaged. Keep hands clear of the fairlead and drum while the winch is under power.
- Do not use as a hoist. Do not use for overhead lifting. Failure to heed these warnings may result in personal injury and/or property damage.
- WARNING – Use gloves to protect hands when handling the cable. Never let the cable slide through your hands.
- WARNING – Never connect the cable back to itself. Apply blocks to the wheels of the vehicle when on an incline. No modifications, alterations, or deviation to the winch are authorized by the manufacturer and SHALL not be made. Duration of winching pulls should be kept as short as possible. If the motor becomes uncomfortably hot to the touch, stop winching immediately and let it cool down for a few minutes. Do not pull for more than one minute at or near the rated load.
- CAUTION – If the motor stalls do not maintain power to the winch. Electric winches are designed and made of intermittent use and should not be used in constant duty applications.
- CAUTION – Never release the free-spool clutch when there is a load on the winch.
- CAUTION – Use hand saver hook when handling the hook for spooling or un-spooling the wire rope.
GENERAL TIPS FOR SAFE OPERATION
- The vehicle engine should be kept running during operation of the winch to minimize battery drain and maximize power and speed of the winch. If the winch is used for a considerable time with the engine off the battery may be drained and too weak to restart the engine
- Get to know your winch before you actually need to use it. We recommend that you set up a few test runs to familiarize yourself with rigging techniques, the sounds your winch makes under various loads, the way the cable spools on the drum, etc.
- Inspect the wire rope and equipment before each use. A frayed or damaged rope shall be replaced immediately. Use only manufacturer’s specifications. identical replacement rope with the exact
- Inspect the winch installation and bolts to ensure that all bolts are tight before each operation.
- Never connect the cable back to itself. This will cause cable damage. Always use a snatch block, sling or chain of suitable strength as shown in the illustrations.
- Store the remote control inside your vehicle in a place that it will not be damaged.
- Any winch that appears to be damaged in any way, is found to be worn, or SERVICE necessary facility. Pull only operates abnormally SHALL BE REMOVED FROM UNTIL REPAIRED. repairs be made by a It is recommended that the manufacturer’s authorized repair
- on areas of the vehicle as specified by the vehicle manufacturer.
- Only attachments and/or adapters supplied by the manufacturer shall be used.
RIGGING TECHNIQUES
Self Recovery
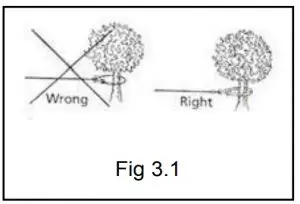
- Locate a suitable anchor such as a strong tree trunk or boulder. Always use a sling as an anchor point. CAUTION Do not attach the clevis hook back onto the cable as this could cause damage to the cable. As shown in Fig 3.1
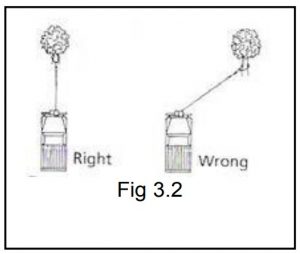
- Do not winch from an acute angle as the wire rope will pile up on one side of the drum causing damage to wire rope and the winch. Fig 3.2 Short pulls from an angle can be used to straighten the vehicle. Long pulls should be done with the wire rope at a 90° angle to the winch/vehicle.
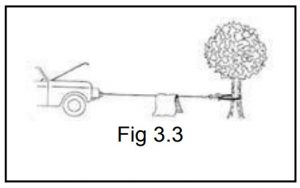
- When pulling a heavy load, place a blanket or jacket over the wire rope five or six feet from the hook. In the event of a broken cable it will dampen the snap back. For additional protection open the hood of the vehicle as shown in Fig 3.3
- WARNING – Never use your winch for overhead hoisting or for lifting people or moving people.

WINCHING TECHNIQUES A-Z
- a. Take time to asses your situation and plan your pull.
- b. Put on gloves to protect your hands.
- c. Disengage the clutch to allow free-spooling and also save battery power.
- d. Attach the hand saver hook to the clevis hook.
- e. Pull out the wire rope to your desired anchor point using the hand saver hook.
- f. Secure the clevis hook to the anchor point: Sling, chain or snatch block. Do not attach the hook back onto the wire rope.
- g. Engage the clutch.
- h. Connect the remote control to the winch.
- i. Start your engine to ensure power is being replenished to the battery.
- j. Power in the wire rope guiding the wire under tension to draw up the slack in the wire. Once the wire is under tension stand well clear. Never step over the wire rope.
- k. Double check your anchors and make sure all connections are secure.
- l. Inspect the wire rope. Make sure there are at least 5 wraps of wire rope around the winch drum.
- m. Drape a blanket or jacket over the wire rope approximately 5 to 6 feet from the hook. Open the hood for added protection.
- n. Clear the area. Make sure all spectators all well back and that no one is directly in front or behind the vehicle or anchor point.
- o. Begin winching. Be sure that the wire rope is winding evenly and tightly around the drum. The vehicle that is being winched can be slowly driven to add assistance to the winching process. Avoid shock loads; keep the wire rope under tension.
- p. The vehicle to be winched should be placed in neutral and the emergency brake released. Only release the brake pedal when under full tension. Avoid shock loads to the winch. This can damage the winch, rope and vehicle.
- q. The winch is meant for intermittent use. Under full load with a single line rig do not power in for more than a minute without letting the motor cool down for a few minutes and then resume the winching operation.
- r. The winching operation is complete once the vehicle is on stable ground and is able to drive under its own power.
- s. Secure the vehicle. Be sure to set the brakes and place the vehicle in park.
- t. Release the tension on the wire rope. The winch is not meant to hold the vehicle for long periods of time.
- u. Disconnect the wire rope from the anchor.
- v. Rewind the wire rope. Make sure that any wire already on the drum has spooled tightly and neatly. If not, draw out the wire and re-spool from the point where the rope is tight.
- w. Keep your hands clear of the winch drum and fairlead as the wire rope is being drawn in.
- x. Secure the hook and hook strap.
- y. Disconnect the remote control and store in a clean, dry place.
- z. Clean and inspect connections and mounting hardware for next winching operation.
MAINTENANCE
- Periodically check the tightness of mounting bolts and electrical connections. Remove all dirt or corrosion and always keep clean.
- Do not attempt to disassemble the gear box. Repairs should be done by the manufacturer or an authorized repair center.
- The gear box has been lubricated using a high temperature lithium grease and is sealed at the factory. No internal lubrication is required.
REPLACING THE WIRE ROPE
- 1. If the wire rope has become worn or is beginning to show signs of strandsbreaking, it must be replaced before being used again. To do this, remove thedefective rope by free spooling. Remove the bolt (Part# 250008) M6x10 on the drum and release the rope.
- Insert the end of the new rope and secure the M6 x 10 mm bolt tightly.
- Engage the clutch and re-spool the new rope on the drum keeping tension on the rope as it spools. Ensure that the rope is respooling in the under wind position.WARNING – Only replace the wire rope with the identical replacement part recommended by the manufacturer.
TROUBLE SHOOTING
| SYMPTOM | POSSIBLE CAUSE | SUGGESTED ACTION |
|
Motor does not turn on |
-Switch Assembly not connected properly
-Loose battery cable connections |
-Insert Switch Assembly all the way into the connector.
-Tighten nuts on all cable connections. |
| -Defective Switch Assembly | -Replace Switch Assembly. | |
| -Defective motor | -Check for voltage at armature port with Switch pressed. If voltage is present, replace motor. | |
| -Water has entered motor | -Allow to drain and dry. Run in short bursts without load until completely dry. | |
| Motor runs but cable drum does not turn | -Clutch not engaged | -Turn clutch to the “In” position. If problem persists, a qualified technician needs to check and repair. |
| Motor runs slowly or without normal power | -Insufficient current or voltage | -Battery weak, recharge. Run winch with vehicle motor running.
-Loose or corroded battery cable connections. Clean, tighten, or replace. |
| Motor overheating | -Winch running time too long | -Allow winch to cool down periodically. |
| Motor runs in one direction only | -Defective Switch Assembly | -Loose or corroded battery cable or motor cable connections. Clean and tighten.
-Repair or replace switch assembly. |
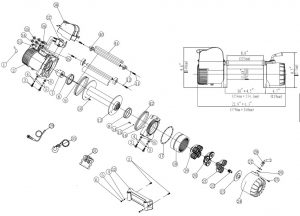
WINCH PARTS LIST (S2500EN)
| No. | Part # | Qty | Description | Remark |
| 1 | 250001 | 1 | Terminal Protect | |
| 2 | 250100 | 1 | Motor Assembly | |
| 3 | 250002 | 6 | Cap Screw M10 x 35 | |
| 4 | 250003 | 6 | Lock Washer Φ10 | |
| 5 | 250004 | 6 | Think Flat Washer Φ10 | |
| 6 | 250005 | 6 | HeX Flange Nut M10 | |
| 7 | 250200 | 1 | Break / Shaft Assembly | |
| 8 | 250006 | 2 | Bushing—Drum | |
| 9 | 250007 | 2 | Tie Bar | |
| 10 | 250008 | 1 | Cap Screw M6 x 10 | |
| 11 | 250009 | 4 | Think Flat Washer Φ8 | |
| 12 | 250010 | 4 | Cap Screw M8 x 30 | |
| 13 | 250300 | 1 | Drum Assembly | |
| 14 | 250011 | 10 | Screw M4 x 25 | |
| 15 | 250012 | 10 | Lock Washer Φ4 | |
| 16 | 250013 | 1 | End Bearing | |
| 17 | 250014 | 1 | Gasket | |
| 18 | 250015 | 1 | Gear—Ring | |
| 19 | 250400 | 1 | Gear Carrier Assembly(Input) | |
| 20 | 250500 | 1 | Gear Carrier Assembly(Intermediate) | |
| 21 | 250600 | 1 | Gear Carrier Assembly(Output) | |
| 22 | 250016 | 1 | Gear—Input Sun | |
| 23 | 250017 | 1 | Trust Washer | |
| 24 | 250018 | 1 | Gear—Housing | |
| 25 | 250019 | 1 | Clutch Screw | |
| 26 | 250020 | 1 | Ring Seals | |
| 27 | 250021 | 1 | Clutch Cover | |
| 28 | 250022 | 1 | Clutch | |
| 29 | 250RS | 1 | Remote Control Switch(R3) | |
| 30 | 250800 | 1 | Cable Assembly | |
| 31 | 250WRS | 1 | Wireless Remote Control Switch | |
| 32 | 250900 | 1 | Roller Fairlead | |
| 33 | 250033 | 1 | Mounting Play | |
| 34 | 250034 | 1 | Connecting Piece | |
| 35 | 250035 | 1 | Connecting Piece | |
| 36 | 251300 | 1 | Wireless Switch Receiver | |
| 37 | 251400 | 1 | Relay With Screw Assembly | |
| 38 | 251500 | 1 | Cover With Screw Assembly | |
| 39 | 250036 | 1 | Connecting Piece | |
| 40 | 250037 | 4 | Connecting Block | |
| 41 | 250038 | 2 | Connecting Rod Sets | |
| 42 | 250039 | 2 | Ring Seals |
S2500EN SPECIFICATION
| Rated line pulls: | 2500KG |
| Gear reduction ratio: | 230:1(12V, 24V) |
| Motor: | Series Wound (Input Power)6.5HP/4.6KW |
| Overall dimensions: | 580(L) mm X 160(W) mm X 219 (H) mm |
| Drum size: | Ø 72(D) mm ×223(L) mm |
| Cable: | Ø 8mm (D) x 23m (L) |
| Weight: | 40kgs |
DUTY CYCLE
Line speed and motor current (First layer)
| Line pull | Line speed ft/min (m/min) | Motor current Amps (Max) |
| LB(KG) | 12V DC | 12V DC |
| 0 | 26.2(8.0) | 70 |
| 2500(227) | 12.8(3.9) | 180 |
| 4500(2041) | 9.5(2.9) | 220 |
| 5500(2495) | 7.9(2.4) | 260 |
| LB(KG) | 24V DC | 24V DC |
| 0 | 6.5 | 40 |
| 2500(227) | 4.0 | 82 |
| 4500(2041) | 3.4 | 112 |
| 5500(2495) | 3.0 | 132 |
WARRANTY
Your Power Equipment winch has been manufactured and tested to the highest standards. Please ensure you read and understand the assembly and operating instructions before use. Failure to comply with these instructions or any improper use of the equipment will terminate the warranty.
Please ensure you record the information below:
- Distributor: ________________________
- Date of Purchase: ___________________
- Invoice No:_________________________
- Serial No:__________________________
In the unlikely event you experience problems, contact the distributor with this information.
[xyz-ips snippet=”download-snippet”]