![]() BerzerkCreative Distortion PluginUser Guide
BerzerkCreative Distortion PluginUser Guide
Introduction
Waves Berzerk is a flexible tool for anyone who wants to use distortion for more than just enhancing an instrument. It’s a powerful plugin that provides detailed control of all aspects of a distortion effect. It combines distortion, feedback, dynamics, EQ, and a certain amount of craziness, to help you give a track a whole new personality.
Components
There are two Berzerk Distortion components: mono and stereo.
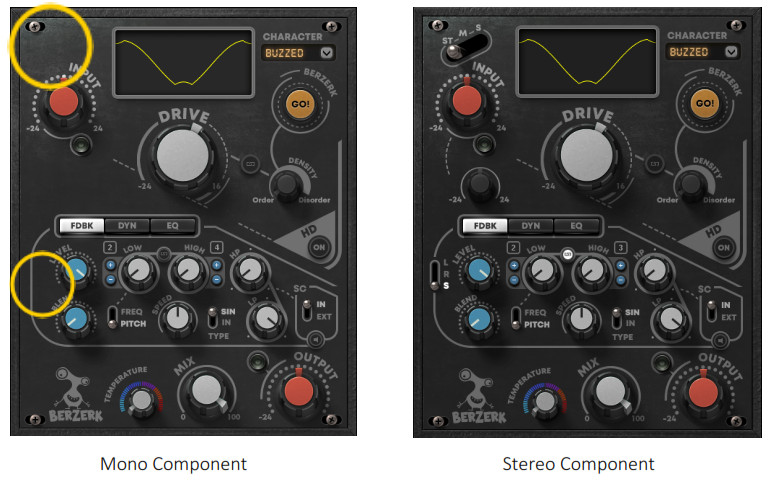
The components are identical except for the number of channels. Note that the mono component does not have a Stereo Mode selector in the Input section or a Channel selector in the Feedback section.Both components use very little CPU, even when up-sampling.
Getting Started
Berzerk PresetsTo make getting started fast and easy, we’ve provided several presets that help you round out, edge up, fit, distort, and otherwise mold your sound. In many cases, you’ll find just the right effect by loading a preset whose name sounds like (or “feels” like) what you’re looking for. Starting with a preset has two advantages:
- It’s fast. Begin with a preset whose name makes sense for what you want to do. This might be all you need.
- It’s a good way to learn. Load a preset and see how the controls are set. Listen, change some settings, and notice how it affects the sound. Load another preset, note the
settings, make some changes, and listen. Do this a few times and you’ll understand what the controls do and how the sections work together.Below are a few examples of how Berzerk presets can help you solve a problem or create a new sound. All of these presets use the “Crushed” character set, so that they are easier to compare. Change the character and you’ll understand the importance of this basic setting.Presets are loaded from the WaveSystem Toolbar, just above the plugin. To learn more, click the icon at the upper right corner of the window and open the WaveSystemGuide.PRESET: M/S PROCESSINGIssue: I want to distort the kick and snare but keep the loop cymbals clean.
Stereo Input Mode: Mid; moderate input levelDrive: Full, Density: OrderFDBK: Blend off, effectively bypassing thesection DYN: BypassedMix: 100%
The interesting part of this plugin is the Input section. Switch between St, M, and S, and listen to how different parts of the sound are emphasized. Setting the Input mode to M limits distortion processing to the middle, where logically you’ll find the kick and snare. If the cymbals are on the sides of the stereo image, then they will largely go unprocessed. Try changing the overall input level, as well as the M level.
PRESET: RIDERIssue: There’s too much of a brick wall feeling. Can it be more dynamic? Do I need to automate the output to achieve this?
Stereo Input Mode: ST; moderate input levelDrive: full, Density: OrderFDBK: Blend off, effectively bypassing the sectionDYN: Blend full; Down/RiderMix: 100%
The Down/Rider combination compresses only the sounds above the threshold, leaving the quieter sounds unchanged. Use the Threshold and Blend controls to contour the sound that is feeding the Drive section (not the output). Since the Rider tracks the signal amplitude, you do not need to automate the output level.
PRESET: EXPLODEIssue: The effect is too gentle.
Stereo Input Mode: ST; moderate input levelDrive: full, Density: OrderFDBK: Blend off, effectively bypassing the sectionDYN: Blend full; Up/DynMix: 100%
The Up/Dyn can produce a pumping sound, raising the floor between notes. Like the Rider preset, this preset distorts mostly the sounds above the threshold.
PRESET: IMPLODEIssue: It’s not crazy enough!
Stereo Input Mode: Stereo; moderate input levelDrive: full, Density: OrderFDBK: Blend and Level set relatively high; Low D (octave 1), High E (octave 5), moderate speed; track sine.Dynamic; Down/DownMix: 100%
The Feedback section is the star of this preset. There’s a rather wide low/high range, and the speed is low enough to allow the “laser shots” to peek through. In the Dynamics section, experiment with the Threshold and Blend to control the tightness of the effect.That ought to make it crazy enough.Getting Started from ScratchIf you want to forgo presets and dive right in, we suggest that you start by following these steps:INPUT: INPUT GAIN AND STEREO MODE
- Adjust the Input level. Increasing or decreasing the level will influence the behavior of the entire plugin. A LED above the input knob indicates peak level. If it is occasionally red, you probably won’t encounter trouble. But if you see continuous red, lower the input level. If the level is too low, the dynamics section may not work properly.
- Choose a Stereo Mode. This determines which part of the signal will be processed: stereo (ST), mid (M), sides (S). Adjust the level of the sides or mid with the small knob.
- DRIVE: A GAIN SHAPER THAT GENERATES DISTORTION
- Choose a Character from the drop-down menu. This sets the basic waveform type, which establishes the core sound of the effect. Turn the Drive knob to adjust the amount of shaper gain introduced to the sound.
- Click the Go! button. This takes the current Character and produces a unique variation each time you click the button. If you like this new waveform variation, save it as a preset, since you’ll never again get the exact same one.
- Adjust the Density. This controls the amount of randomness applied to the distortion shape. Usually, the lower the setting, the “cleaner” the selected character feels.FEEDBACK/DYNAMICS/EQ PANEL: CLICK TABS TO ACCESS EACH PROCESSOR
- The Feedback section is an oscillator that produces a sinus curve that follows the input signal amplitude. Its output is sent back to the Drive section. It is not part of the output audio.a. Choose a Feedback Input Source (L, R, S).b. Set the Low and High limits of pitch motion. Speed controls how long it takes the pitch to move from the Low value to the High value.c. Adjust the sidechain filters and choose INT or EXT sidechain.d. Level controls the output of the Feedback section. Blend is the mix of Feedback and Drive.DYNAMICS SECTION
- This controls the dynamics of the signal sent to the Drive section. It is not part of the output audio. In addition to the Threshold control, there are two switches.a. The switch on the right controls the Type of dynamics (e.g., low-frequency compressor, gain riding, soft gate).b. The switch on the left sets what happens to the signal as a result of the Type. This is explained later in this guide. But for now, experiment with the switches and the Threshold to get an idea of how they affect the sound.
- At this point, go back to the Drive section. The adjustments you made with Feedback and Dynamics will have likely changed the sound of the Drive.EQ SECTION
- Use the three-band EQ to adjust the color of the post-Shaper, post-Feedback, and post-Dynamics signal. It sits just before the Output section.OUTPUT SECTION
- Use the Output section to color the plugin output, set the wet/dry mix, and the output level. The plugin output t is limited, so the feel of the plugin changes if you increase the output gain considerably.
Once you’re happy with your settings, create a user preset.
Interface and Controls
Interface Sections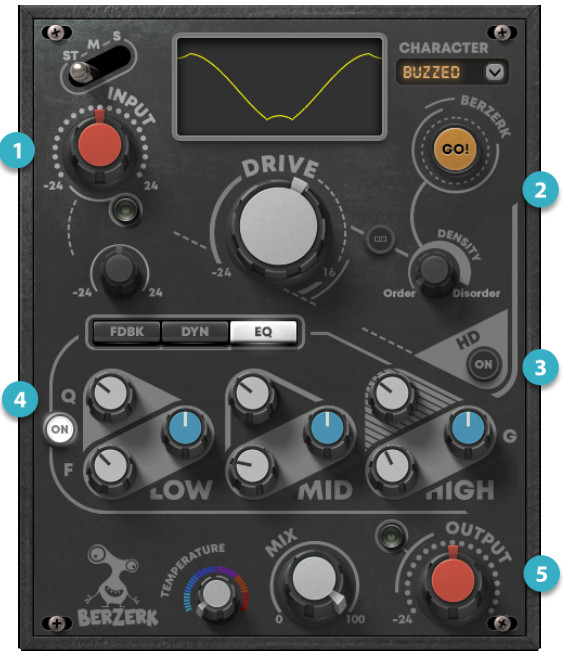
- Input sets input level from the DAW.
- The Drive section determines the nature and amount of the distortion.
- High Definition Switch provides an improved output of low-level signals.
- The processing section provides feedback, dynamics, and EQ processing.
- Output section sets the level and mix of the return to the host. It also lets you control the temperature of the output signal.
Processing sections work interactively. The output of the central processing section, for example, feeds back to the Drive section, whose output will once again be sent to the processors. Keep in mind that after setting one section you may need to adjust other sections.
Controls
Input Section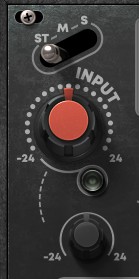
INPUT CONTROLControls input level from the DAW. The adjacent LED indicates input peak level. Generally, green peaks indicate an appropriate input level. Occasional red peaks will usually not result in unwanted distortion, but if the LED is steady red, reduce the Input setting or lower the output from the DAW.Range: -24 dB to +24 dBDefault: 0 dB
ST (STEREO) INPUT MODESets how a stereo signal will be processed:
- In Stereo mode, the entire stereo image is processed, so the middle of the image is processed in the same manner as the sides.
- In M mode, the middle of the stereo image is processed. The sides are not processed.
- In S mode, the sides of the stereo image are distorted. The middle is not processed.
MID OR SIDE MODE INPUT LEVELWhen the Input section is set to Middle or Side, this knob controls the input level of the M or S signal, independent of the plugin input. A letter following “Input M” or “Input S” identifies whether the gain of M or S is being controlled. When Stereo input is selected, this control is grayed out.Range: -24 dB to +24 dBDefault: 0 dB
Drive Section
The Drive section serves as a gain shaper that applies a selected waveform to the input signal.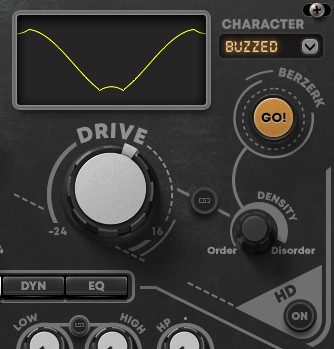 CHARACTERThis drop-down menu establishes the overall shape of the distortion waveform. Changing the Character setting will result in a significant change in the overall effect. So if you’re after a specific sound, it’s generally best to select a Character and then adjust the rest of the controls.Drive Controls the amount of generated distortion based on the selected Character type.Range: -24 dB to +16 dBDENSITYControls the amount of randomness applied to the currently loaded Character. It adds complexity, disarray, and “edge” to the waveform, as seen in the Shaper display. TheThe density knob is initially grayed out—it is active only once Go! has been clicked. Click the small Link button between the Drive and Density knobs to move the two controls together. Range: 0 to 100, Default: Disabled until Go! is clicked.SHAPER DISPLAYShows the waveform being used to create distortion. The basic waveform shape reflects the selection in the Character menu. As Drive is increased, waveform amplitude increases. As Density is increased, the waveform becomes more jagged. The Shaper Display also displays the activity in the Dynamics section.GO!Creates a randomly generated, unique variation of the current waveform. It keeps the same fundamental shape as the one it’s derived from. This is an essential part of the creative process of the plugin. You don’t need Go! to create distortion, but you do need it to create a unique distortion.HQ ON/OFF(On) enables x8 up-sampling of the output signal. With low-resolution files, low and high-frequency parts of a signal tend to collapse, and compression can be perceived as edgy. Up-sampling provides more room for these parts of the signal and can result in a more pleasant sound. When HQ is Off, you can get a grittier sound.
Central Processing Section
The Central Processing Section is made up of three processors that influence the post-distortion signal. It includes Feedback, Dynamics, and EQ modules.Feedback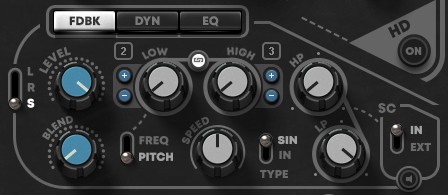 The Feedback module is an oscillator. It generates a sine wave that tracks the amplitude of the input section. The Feedback module is fed to the Drive and Drive is fed back to the oscillator. The module is not part of the audio chain.When the input of the Dynamics section has low dynamics, there will be little or no modulation of the generated signal. Greater dynamic range results in increased modulation.The overall feedback Character level is determined by the distortion Type and the Density settings.STEREO SOURCESets which channel of a stereo signal will be processed in the Feedback section. This is useful when the left and right channels are appreciably different, which can result in misalignment of the pitch in the left and right channels. This is not necessarily a problem—it may be just what you want. You can, however, choose to use just one channel for pitch tracking.
- In Stereo mode, both the left and right sides of the stereo signal are processed.
- In R mode, only the right side of the signal is used for processing.
- In L mode, only the left side of the signal is used for processing.
This control is available only when the Stereo Input Mode switch in the Input section is set to Stereo.LEVELControls the output level of the feedback processor to the Drive section.BLENDSets the mix between the output of the Drive section and the feedback section.
LOW/HIGHSets the range within which the pitch moves. Values can be viewed in musical notation (pitch) or frequency. Hover over a knob to see its value.Freq Range: (Low) 20 Hz to 20,000 Hz, (High) 20 Hz to 20,000 HzPitch: (Low and High) C0 to C8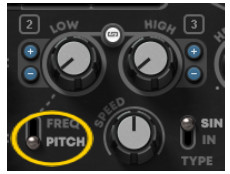 FREQ/PITCH SWITCHSelects if Low and High controls are gauged in frequency or pitch. When Pitch is selected, small plus (+) and minus (–) buttons appear. Use these to move up or down in one-octave increments A number indicates the current octave.LINKThe small button between the Low and High controls links them so that they move together.Existing offsets are maintained.SPEEDSpecifies the time it takes the pitch to cycle between the Low and High values.Low/High values define the maximum range of pitch motion, but the pitch may not travel by the full specified range. This is likely because the envelope’s level is too low, or its amplitude is too small. To provide better resolution, the envelope is normalized prior to modulation. If the dynamic range is still inadequate for modulation, the pitch will notcover the selected range. In certain cases, the pitch will remain static.TYPESets what is being modulated: the input signal or the generated sine signal.SIDECHAIN SOURCESelects between an internal or external side chain source.SIDECHAIN FILTERSHP and LP sidechain filtersRange: 5 Hz to 22 kHzSIDE CHAIN LISTENClick to solo the side chain. The panel blinks white when Sidechain Listen is engaged.DynamicsThe Dynamics section allows you to control the dynamic characteristics of the signal fed to the Drive section for distortion processing. It does not affect the dynamics of the audio signal sent to the output.
 BLENDA mix between the Drive signal and the Dynamics section. Note that as the Blend value increases, the waveform in the ShaperDisplay becomes increasingly complex.THRESHOLDThreshold control for Rider and Dynamics modes.DYNAMICS MODESThere are two switches that determine the mode and effects of dynamic processing.RIDER/DYNDetermines which dynamic part of the signal we will perceive as distorted.
- Dynamic: Primarily, low-level sounds will be returned to the Drive section for distortion processing.
- Rider: Primarily, high-level sounds will be returned to the Drive section for distortion processing.
UP/DOWNSets whether the signal is raised or lowered when level passes the threshold.
DYNAMICS CONTROLS COMBINATIONS
| Up/Down | Rider/Dyn | Effect |
| Up | Dynamic | Sounds that exceed the threshold will be distorted. This can yield a pump-type distortion sound. |
| Up | Rider | Soft signals below the threshold will be distorted. Louder sounds will not be distorted. |
| Down | Dynamic | Sounds above the threshold will receive downward compression, thus less distortion. |
| Down | Rider | Sounds above the threshold are compressed: lower-level sounds are not compressed. |
EQThe three-band EQ colors the sound of the distorted signal. It is located just before the output section and is not fed back to the Drive section.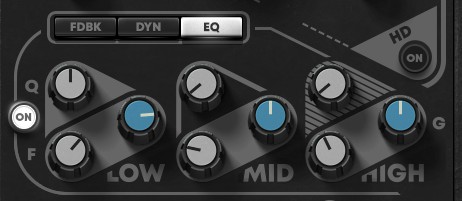 Low bandQ: 0.5 to 100; Gain: -12 dB to +12 dB; Freq: 60 Hz to 550 HzMid bandQ: 0.5 to 100; Gain: -12 dB to +12 dB; Freq: 800 Hz to 2500 HzHigh bankQ: 0.5 to 100; Gain: -12 dB to +12 dB; Freq: 3000 Hz to 11,000 HzThe On/Off button bypasses the section.
Output Section
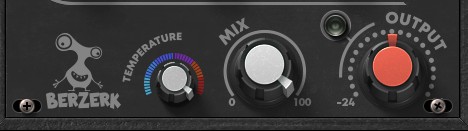 TEMPERATUREAdjusts the overall color and feel of the output of the plugin. Higher settings generally result in a roomier, darker, and smoother sound. Lower settings usually provide more presence and more articulation. Temperature does have the same effect as the EQ section control; it tends to have a greater impact on the “air” surrounding the sound.Range: 0–100Default: 0MIXControls the balance between total distortion processing and the input signal.Range: 0% to 100%Default: 100%OUTPUTThe sets output level of the plugin. An output limiter is set to -0.9 dB is placed before the output gains control. The LED next to the knob indicates limiter activity. Red indicates excessive limiting, which may color the output sound. Raising output gain after the limiter can clip the signal sent to the DAW.Range: -24 dB to +24 dBBecause Berzerk is, well, Berzerk, there are certain unusual conditions where controls don’t behave as you’d expect. For example, decreasing any gain-related control (e.g., Drive) or selecting a different Character may result in a higher level, and vice versa. This behavior also depends on the audio source and its dynamics. Don’t worry, it’s just Berzerk’sbehavior. Pick a different Character or adjust another control and the odd behavior will likely go away.WaveSystem ToolbarUse the bar at the top of the plugin to save and load presets, compare settings, undo and redo steps, and resize the plugin. To learn more, click the icon at the upper-right corner of the window and open the WaveSystem Guide.
[xyz-ips snippet=”download-snippet”]