![]() WAVESBUTCH VIG VOCALSUser Guide
WAVESBUTCH VIG VOCALSUser Guide
Chapter 1 – Introduction
1.1 Welcome
Thank you for choosing Waves! In order to get the most out of your new Waves plugin, please take a moment to read this user guide.To install software and manage your licenses, you need to have a free Waves account. Sign up at www.waves.com. With a Waves account, you can keep track of your products, renew your Waves Update Plan, participate in bonus programs, and keep up to date with important information.We suggest that you become familiar with the Waves Support pages: www.waves.com/support. There are technical articles about installation, troubleshooting, specifications, and more. Plus, you’ll find company contact information and Waves Support news.
1.2 Product Overview
The Waves Signature Series is our exclusive line of application-specific audio processors, created in collaboration with the world’s top producers, engineers, and mixing engineers. Every Signature Series plugin has been precision-crafted to capture the artist’s distinct sound and production style. No matter whether you are an experienced or an aspiring audio professional, the Waves Signature Series allows you to dial up the sound you’re looking for quickly, without interrupting the creative flow.
1.3 Components
WaveShell technology enables us to split Waves processors into smaller plugins which we call components. Having a choice of components for a particular processor gives you the flexibility to choose the configuration best suited to your material. The Waves Butch Vig Vocals plugin has two components:
- Butch Vig Vocals Mono – mono into mono out
- Butch Vig Vocals Stereo – stereo into stereo out
1.4 A Few Words from Butch Vig
The Butch Vig Vocals plugin is based on what I consider the core parameters of getting a vocal to sit in the mix, to sound really focused. I went back and looked at my notes on albums I have worked on over the last 20 years, and discovered there are some basic parameters I default to time and time again. I designed this plug so you can open it and quickly dial in the vocal. The filters and MidDip are used for cutting unwanted frequencies. The EQ section is designed to boost frequencies but can be used as a cut if needed. Both the EQ and the De-esser are set to specific fixed frequencies.
- Filters (LoCut, MidDip, HiCut)
- Dynamics (DeEsser, Compression)
- EQ (Lows, Presence, Air)
- Focus 1 & 2 (Mid Band EQ Compression )
- Harmonic Saturation (Tube, Solid State)
I was lucky to have a great variety of sessions to use when designing the BVV, and listened to some great singers: Shirley Manson, Dave Grohl, Billy Corgan, Freedy Johnston, Billie Joe Armstrong, Laura Jane Grace, Kurt Cobain, and Christofer Drew. Special thanks to Billy Bush and Ross Hogarth for their ears, and Mike Fradis from Waves for his technical expertise and guidance.
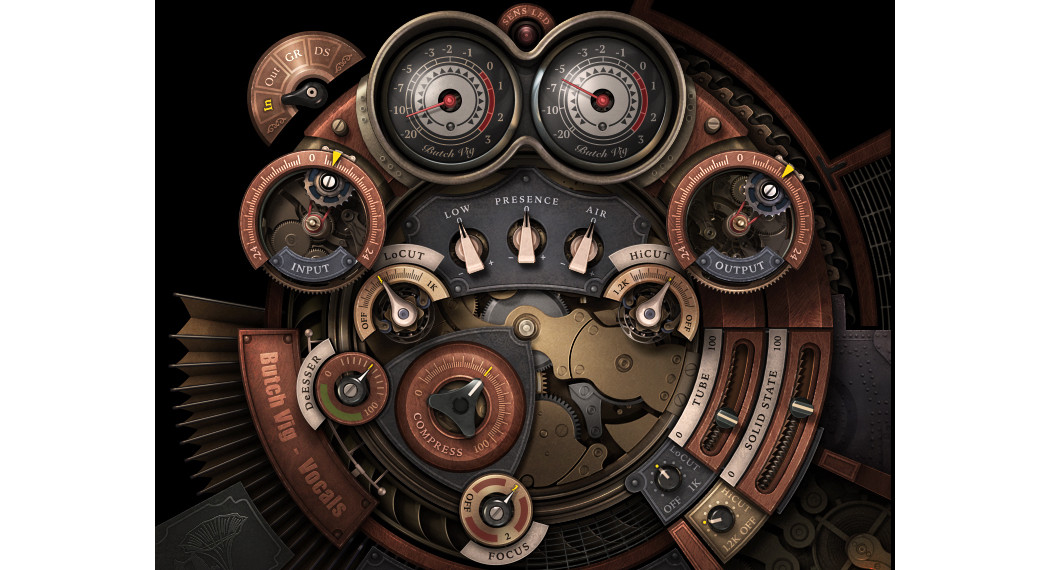
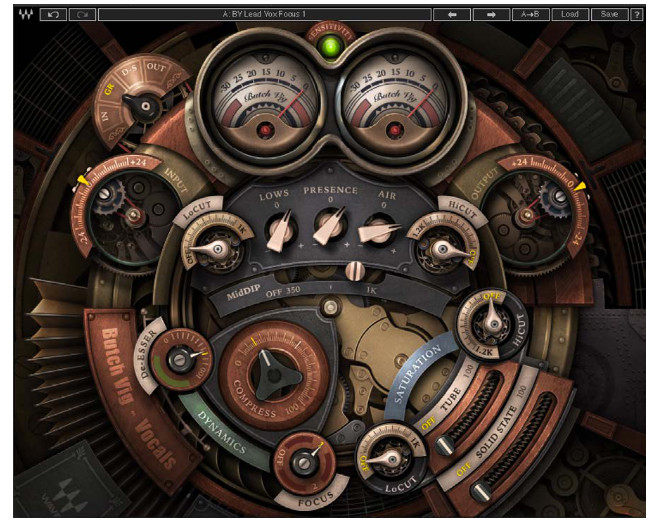
A word about the GUI design: I was looking for something that had a “Retro/Sci-Fi” look, inspired by films like Twenty Thousand Leagues Under the Sea, Brazil and Blade Runner. Thanks to Dani Bar-Shlomo for his beautiful design!
Chapter 2 – Quick Start Guide
- Insert the Butch Vig Vocals plugin on the track you wish to process.
- Adjust the input so that the sensitivity LED is solid green/yellow on the loudest part of the track.
- Adjust the LoCut filter to a place where you feel it has cleaned the lows without removing needed fundamental frequencies. Do the same with HiCut if needed.
- If you feel your vocals have a boomy, nasal or mushy sound, use the MidDip control to clean it up.
- Adjust the DeEsser to remove harsh sibilance.
- Use Compress to compress the vocal and bring it forward.
- Adjust the Lows/Presence/Air frequency to get the vocal sound you are going for.
- Engage the Focus control if you are missing some focus in the 1K-2K area of the vocal.
- Add a blend of Tube or Solid State to taste.
- Use the Saturation section’s LoCut and HiCut controls to shape the saturation sound. Use the HiCut control to remove the sizzle you get on the upper frequencies.
- Adjust the Output to offset any gain lost or boosted as a result of the processing. A good way to start is to go over the presets supplied, begin with something you like, and adjust if needed.
Chapter 3 – Interface and Controls

Controls
Sensitivity LEDThe Sensitivity LED’s three colors indicate when appropriate levels have been reached:
- LED Off (too low)
- Green (good)
- Yellow (optimal)
- Red (very hot)
Turn the Input Control until the LED lights up. For best results, use the section of your track with the highest peaks/loudest volume.
Input
This control will adjust you input level prior to any processing. Use this control to adjust the input level so the sensitivity LED will show optimal levels. We recommend you do the input adjustment on the loudest part on your track.Range: +24 dB to -24 dB in 0.1-dB incrementsDefault: 0
Filter Section
The Filters are first in the vocal chain and are used to cut unwanted frequencies.
Butch Vig: “I almost always use a LoCut on the vocal. (Unless you’re Barry White, there’s not a lot of fundamental frequencies in the vocal below 80 Hz). Setting it between 60 and 120 Hz will usually tighten up the vocal. The HiCut will filter off the top end. Both filters sweep to around 1 kHz to let you do some extreme EQ sculpting. Depending on the singer’s voice, the MidDip can be used to remove a problem frequency, either in the 300–600 Hz range to get rid of cloudy or mushy tone or in the 600 Hz–1 kHz range to get rid of too much nasal twang or throat. The MidDip has a fixed 6.5-dB cut.”
- LoCut filters up from 17 Hz to 1000 kHz (with an Off option)
- MidDip is set to -6.5 dB, sweepable from 301 Hz to 1000 kHz (with an Off option)
- HiCut filters down from 21 kHz to 1.2 kHz (with an Off option)
Dynamics SectionDeEsserBV: “The DeEsser is set to 6 kHz, which I find to be a very useful area. I don’t like dressing at lower frequencies because I feel it can start to take away the non-sibilant fundamental tone from a vocal performance. If the vocal sibilance is lower, you can always use a dedicated dresser.”Range: 0 (Off) to 100Default: Off
Compress
BV: “The compression is set to be smooth when engaged at lower levels and very aggressive at higher levels. It is based on some of my favorite compressors, the Summit TLA-100 and the 1176.”Range: 0 to 100Default: 0Note that the compression threshold is set low, but on a very loud track, it might trigger compression even when set to 0.
EQ
BV: “The EQ section has three fixed frequencies I repeatedly default to with vocals. They are designed for a boost in EQ, but can also be used to cut if needed. They are based on classic EQs I have used over the years: Pultec, Neve, Trident A-Range, Sontec, Avalon.”
- Lows: 300 Hz
- Presence: 3 kHz
- Air: 15 kHz
Focus
BV: “I like to use single-band EQ/compression to focus on where a lot of the fundamental tone of the vocal is. The Focus is a mid-band compressor that boosts information in the 1Kor 2K range. The Focus control uses mid-band shaping and aggressive compression to bring out the front end of each vocal note and to compress the sustains, with a slow attack and fairly quick release. As a result, the front end has very little compression and is emphasized, while the sustain is compressed to clear up the added vocal path.”
- Focus 1 is centered at 1 kHz
- Focus 2 is centered at 2 kHz
Saturation
BV: “I love to add harmonic distortion to a vocal. Sometimes just a small amount will thicken the vocal and give it character. There are two types of saturation at the end of the chain: Tube and Solid State. They will add some subtle color at lower settings and will get quite extreme as you turn them up. I added a lot and HiCut to clean up the distortion. When I saturate a lot, I usually filter the top and bottom to tighten up the distortion, filter the frizz off the top, and take out the mud on the bottom.”The Saturation section includes two controls, each with HiCut/LoCut filters:
- Tube: 0 (Off) to 100, Default: Off
- Solid State: 0 (Off) to 100, Default: Off
Meter Section
The Meter switch toggles meter monitoring between Input, GR (Gain Reduction), D-S (DeEsser) and Output modes. The Clip LED lights up when levels reach 0 dBFS. Click to reset.
Output
Adjusts the overall output level of the plugin. Use the Output control to make up for any gain lost as a result of the processing.
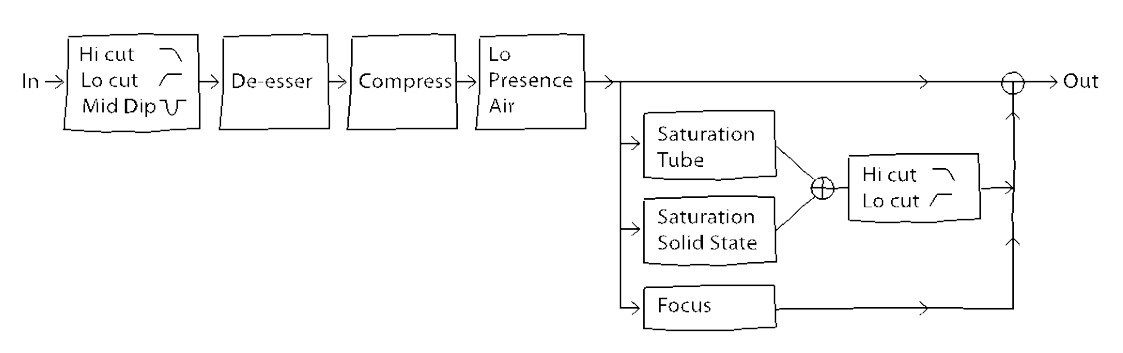
Butch Vig Vocals Signal Flow
WaveSystem Toolbar
Use the bar at the top of the plugin to save and load presets, compare settings, undo and redo steps, and resize the plugin. To learn more, click the icon at the upper-right corner of the window and open the WaveSystem Guide.
Waves Butch Vig VocalsUser Guide
References
[xyz-ips snippet=”download-snippet”]