WAVES J37 Tape Saturation Plugin User Guide
Introduction
Welcome
Thank you for choosing Waves! In order to get the most out of your new Waves plugin, please take a moment to read this user guide.
To install software and manage your licenses, you need to have a free Waves account. Sign up at www.waves.com. With a Waves account you can keep track of your products, renew your Waves Update Plan, participate in bonus programs, and keep up to date with important information.
We suggest that you become familiar with the Waves Support pages: www.waves.com/support. There are technical articles about installation, troubleshooting, specifications, and more. Plus, you’ll find company contact information and Waves Support news.
Product Overview
Waves and Abbey Road Studios present the J37, a tape saturation plugin that is a precision model of the very machine used to record many of the masterpieces of modern music. With a variety of user adjustable controls—including Tape Speed, Bias, Noise, Saturation, Wow, and Flutter—the Waves / Abbey Road J37 faithfully recreates the unrivaled sonic signature of the original machine. In addition, three exclusive oxide tape formulas have been modeled. Specially developed by EMI during the ‘60s and ‘70s, each formula has its own unique frequency response and harmonic distortion behavior.
The Waves / Abbey Road J37 tape emulation plugin brings stunning analog warmth to your digital recordings, delivering a level of hardware realism never before experienced “in the box.”
About the J37
The original J37 was a one-inch 4-track recorder designed by Swiss recording pioneer Will Studer. It was Studer’s first multitrack—a true technological breakthrough that embodies versatility, functionality, and simplicity in what was then a state-of-the-art machine.
In 1965 Abbey Road Studios purchased four new J37s, which were used on almost all of their recordings until 8-track recorders were introduced to Abbey Road Studios in 1969.
Before adopting the J37, Abbey Road had used a 4-track Telefunken tape recorder, a large and cumbersome machine that required a separate machine room. Since the producer and tape operator were in separate spaces, communication problems were common, which complicated and prolonged the recording process. In contrast, the J37 was small enough to be placed directly in the control room, opening up the creative potential for multitrack recording.
Following the rigorous testing process required by EMI of all equipment used at Abbey Road, a few modifications were made to the J37s. Wheels were added to make the units easily transportable. A Bulgin 3-prong socket was installed to enable connecting an oscillator, which was handy when using the machine at non-standard speeds. A reverse switch was added to the back of the J37 to enable easy playback of tapes recorded on the old Telefunken recorders, since these machines wound the tape with the oxide facing outwards. Finally, the EQ preset switch, which originally offered the option of NAB (American) or CCIR (European) broadcast curves, was locked to CCIR, the EMI-approved curve.
The frequency response of the J37 was outstanding, with a nearly flat response up to 18 kHz. This, along with its 52 vacuum tubes, enabled it to produce a rich spectrum of tonal colors. During the ‘60s and ‘70s, Abbey Road Studios developed a distinctive sound. This was partly due to special tape formulas developed by EMI for exclusive use in its studios: EMI TAPE 888 (early ‘60s), EMI TAPE 811 (mid to late ‘60s) and EMI TAPE 815 (early ‘70s). Each formula had its own unique frequency response and harmonic distortion behavior, which lent a distinctive timbre to the recordings for which they were used.
While the J37 was used on many famous recordings, it is perhaps best known for its innovative use on “Sgt. Pepper’s Lonely Hearts Club Band.” Producer George Martin utilized the machine not only for recording but also as a creative production tool, bouncing tracks between two J37s and creating layer upon layer of sound to achieve groundbreaking sonic textures.
Concepts and Terminology
An understanding of the following terms will help you achieve the best results using your J37 plugin.
- Wow refers to frequency modulation caused by speed irregularities of the tape machine motor. The J37 plugin includes controls for both Wow Rate and Wow Depth.
- Flutter refers to amplitude modulation caused by movement of the tape in relation to the machine’s recording heads. The J37 plugin includes controls for both Flutter Rate and Flutter Depth.
- Bias refers to the inaudible ultrasonic high frequency tone (usually a sine wave ranging from 40 kHz to as much as 100 kHz) that’s added to improve the fidelity of analog magnetic recordings. Magnetic tape has a nonlinear response at low signal strengths, so the bias increases recording quality by pushing the signal upward into the linear zone of the tape’s transfer function. The J37 plugin includes a Bias level control.
- Speed refers to the speed at which the tape moves across the heads. The J37 lets you choose between 15 ips (inches per second), which delivers better high frequency response and less THD (Total Harmonic Distortion), and 7.5 ips, which delivers somewhat tighter low frequencies at the price of reduced high frequency. .
- Tape Formulas refers to the chemical structures of the different tape media developed by EMI and modeled for the J37 plugin.
- EMI TAPE 888 (early ‘60s) – Considered “lo-fi” and “grainier” compared to the other formulas, with more distortion between 1 kHz and 8 kHz.
- EMI TAPE 811 (mid to late ‘60s) – Offers better high frequency response and slightly less distortion than the 888 formula.
- EMI TAPE 815 (early ‘70s) – Delivers flatter high frequency response and less distortion than the 811. Recommended when minimal coloration is desired.
These tape formulas were developed during the 1960s and 1970s, when recording levels were considerably lower than they are today, so pay attention to the levels at which your signal “hits the tape.” In general, average input levels of -3 – 0 VU will ensure proper gain structure within the plugin
Components
Wave Shell technology enables us to split Waves processors into smaller plugins, which we call components. Having a choice of components for a particular processor gives you the flexibility to choose the configuration best suited to your material. J37 includes the following components:
- J37 Mono
- J37 Stereo
Quick Start
The most common use of the J37 is to add character to a dull track, and compress the audio without using compressor. The “tape compression” that the J37 introduces has no time constants and thus no pumping or other unwanted artifacts common to conventional compressors. Use it, for example, to smooth transients or harsh high frequencies of an acoustic guitar. For a dirtier feel try going to the older formulas (888/811) and lower speeds. Increasing saturation can give a cleanly recorded electric guitar a creamy, mildly distorted sound. It can help shape kick drums to a very 60s sound, and enrich samples and make them more real.
The possibilities with the J37 are vast. A good way to get to know it is to go over the presets supplied with the plugin; they will give you a good idea of what you can do with it.
Use the Input level control (in its linked state) and the VU meters to adjust the input level. Make sure the peak program material does not exceed +1VU – +2VU. These are good recording levels for the virtual analogue “tape.”
The J37 default setting is: Formula 815, 15 ips, NOM Bias, which is the “flattest” possible setting. Try changing the formula to experiment with more pronounced effects.
In general, use 15 ips for program material that requires more sensitive handling of high frequency (acoustic guitars, vocals, strings, brass, etc.).
Use 7.5 ips for program material that is more oriented toward the low frequencies (kick drums, bass guitars, celli, electric guitars). For a dirtier sound switch to the 888 Formula.
Experiment with the linked Level control and listen to the differences in harmonic distortion and compression effect—the higher the input, the more compressed/distorted the result, the lower the input level, the clearer it gets.
In the Stereo mode, the default processing uses Modeled Tracks 2+3. This gives a wider stereo image and better reflect what would happen with a stereo track recorded to Tape. If this effect is too severe, choose Modeled Track 2 or 3, which will apply the same process to both tracks and thus minimize the effect.
If you want your sound to be even dirtier, then increase the saturation (SAT) level. Try it on clean guitars or dubbing vocal tracks.
For extreme effects, experiment with the Wow and Flutter controls
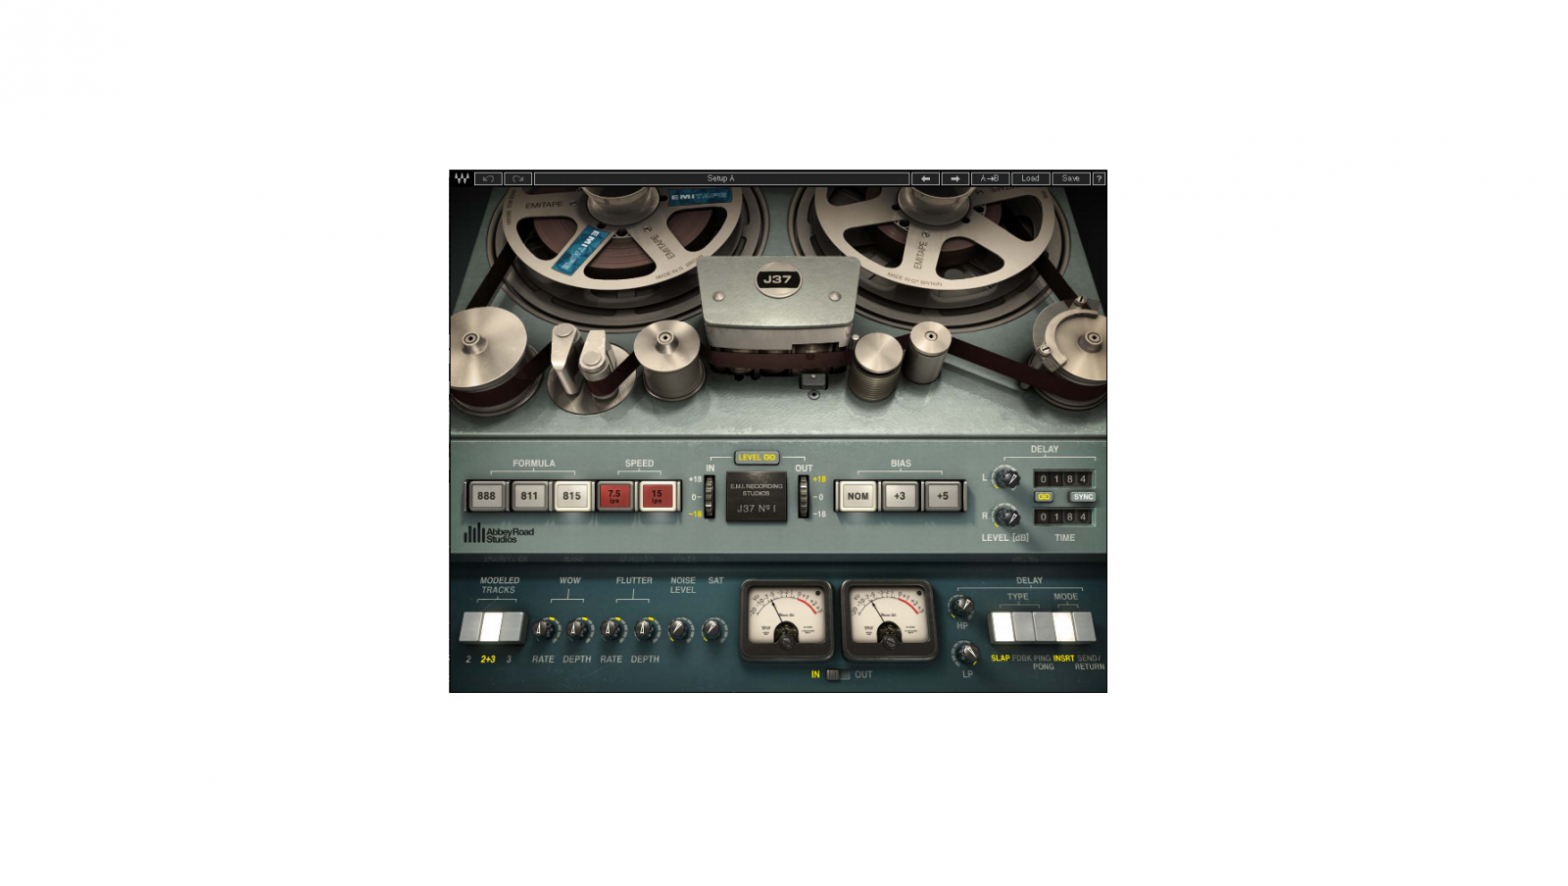
Interface and Controls
Interface
Controls
INPUT LEVEL determines the level at which the signal hits the virtual tape. Higher levels result in increased harmonic distortion, saturation, and compression.Range: – 18 – +18 dBDefault: -9 dB
OUTPUT LEVEL controls the total signal output level.Range: -18 dB – +18 dBDefault: 9 dB
Please note: Default Input and Output Level settings were chosen to accommodate contemporary signal loudness. Input and Output Level settings of 0 will result in the closest approximation of “The Abbey Road Sound.”
LEVEL LINK gangs the Input and Output Level controls. The link relationship is inversely proportional, so an increase in the Input Level results in a corresponding decrease in Output Level and vice versa.Range: On, OffDefault: On
TAPE FORMULA determines the type of modeled recording formula.Range: 888, 811, 815Default: 815
SPEED selects the simulated tape speed.Range: 7.5 ips, 15 ipsDefault: 15 ipsWhen switching between the two speeds, the noise and frequency response will change accordingly. At 15 ips, high frequency response is increased and noise is one octave higher than at 7.5 ips.
BIAS controls the level of the ultrasonic bias signal.Range: Nominal, +3 dB Over Bias, +5 dB Over BiasDefault: Nominal (+1.5 dB bias)
MODELED TRACKS determines which modeled tracks are used for processing.
- Mono componentRange: 2, 3Default: 2
- Stereo componentRange:
- 2 (Track 2 processing applied to both left and right channels)
- 2 + 3 (Track 2 processing applied to left channel, Track 3 processing applied to right channel)
- 3 (Track 3 processing applied to both left and right channels) Default: 2 + 3
WOW DEPTH controls the amount of frequency modulation applied to the signal. Default setting is the average wow measured on the original J37. Negative range values lower the amount of Wow effect; positive values raise it. Since wow varies according to tape speed, user-selected vales yield different results at 15 ips and 7.5 ips.Range: Off (-50) – +50Default: 0
WOW RATE controls the amount of deviation from the default Wow frequency setting. Default setting is the wow measured on the original J37. Negative Range values lower the amount of Wow effect; positive values raise it. Since wow varies according to tape speed, user-selected vales yield different results at 15 ips and 7.5 ips.Range: -50 – +50Default: 0
FLUTTER DEPTH controls the amount of Flutter effect applied to the signal. Default setting is the average flutter measured on the original J37. Negative Range values lower the amount of Flutter effect; positive values raise it. Since flutter varies according to tape speed, user-selected vales yield different results at 15 ips and 7.5 ips.Range: Off (-50) – +50Default: 0
FLUTTER RATE controls the amount of deviation from the default Flutter rate. Default setting is the average flutter measured on the original J37. Negative Range values lower the amount of Flutter effect; positive values raise it. Since flutter varies according to tape speed, user-selected vales yield different results at 15 ips and 7.5 ips.Range: -50 – +50Default: 0
NOISE LEVEL controls the level of added modeled noise, including noise modulations and signal additive noise.Range: – 24 dB – +24 dBDefault: Off
SATURATION LEVEL controls the amount of saturation applied to the signal. This results in a different type of saturation than that achieved by raising the Input Level and lowering the Output Level. Both types may be used simultaneously.Range: 0 – 30Default: 0
DELAY TYPE toggles between delay types.Range: Slap, Feedback (all components), Ping-Pong (stereo component only)Default: Slap
DELAY MODE toggles between delay modes.
- In Insert mode, the delay is added to the direct signal.
- In Send/Return mode, the direct signal is removed from the output and only the processed signal is sent to the output.Range: Insert, Send/ReturnDefault: Insert
DELAY LEVEL controls the amount of delay, depending on Delay Type. When using the Slap type, delay is expressed in dB, while in Feedback and Ping-Pong delay types, delay is expressed as a percent. Perceived loudness level is preserved when moving between Delay Types. For example, if Slap Level is set to -6 dB, then switching to Feedback/Ping-Pong will change the level to 50% (equivalent to -6 dB).
When using the Slap type delay and changing from Insert mode to Send/Return mode: the level will default to 0 dB
- SLAP level is represented in decibels.Range: Off (-40 dB) – 0 dBDefault: Off
- FEEDBACK/PING-PONG level is represented as a percentage.Range: Off – 100Default: Off
DELAY TIME controls the time of the tape delay effect.Range: 1 ms – 2000 msDefault: 184 ms (which reflects the distance between record and playback heads @ 7.5ips)
DELAY LINK links the Delay Level and Delay Time controls. If there is an offset between them, this offset is preserved when Delay Link is activated.Range: On, OffDefault: On
DELAY SYNC controls synchronization to the host tempo.Range: 1/64T – 1/1 (Whole Note)Default: Off
Please note:
- Delay is limited to 2 seconds. Therefore, at tempos below 120 BPM, Whole Not duration is not available.
- Please note – when Delay Level is set to 50% and above, there is a chance to create infinite feedback due to the tape’s transfer function and the tonality of the input signal
DELAY HP controls the high-pass cutoff frequency on the delay path only.Range: 16.1 Hz – 21357 HzDefault: Off (16 Hz)
DELAY LP controls the low-pass cutoff frequency on the delay path only.Range: 21203.9 Hz – 16 HzDefault: Off (21357 Hz)
VU METER displays the input or output level, depending on your selection.Range: -20 VU – +3 VU
VU CALIBRATION controls the VU meter headroom calibration. It’s represented by the small screw head below the VU meter display and does not have a visible label. For most users, the default headroom setting of 18 dB should be the best choice. (On the Stereo component, use the screw located on the left to calibrate both meters.)Range: 8 dB – 24 dBDefault: 18 dB
METER I/O determines the metering mode.Range: Input, OutputDefault: Input
CLIP INDICATOR indicates peak clipping.
Wave System Toolbar
Use the bar at the top of the plugin to save and load presets, compare settings, undo and redo steps, and resize the plugin. To learn more, click the icon at the upper-right corner of the window and open the Wave System Guide

References
[xyz-ips snippet=”download-snippet”]