
WAVES Primary Source Expander Plugin User Guide
Introduction
Thank you for choosing Waves! In order to get the most out of your new Waves plugin, please take a moment to read this user guide. To install software and manage your licenses, you need to have a free Waves account. Sign up at www.waves.com. With a Waves account you can keep track of your products, renew your Waves Update Plan, participate in bonus programs, and keep up to date with important information.We suggest that you become familiar with the Waves Support pages: www.waves.com/support. There are technical articles about installation, troubleshooting, specifications, and more. Plus, you’ll find company contact information and Waves Support news. The Waves Primary Source Expander (PSE) is a tool that helps you to reduce stage noise and increase gain before feedback without distorting the tonality of your source. PSE is valuable to sound engineers in live shows as well as in the studio. When mixing live material, use PSE to reduce extraneous noises without losing the natural ambience of your location. At the heart of this tool is a precision expander, tailored especially for melodic sources such as vocals, strings, woodwinds, brasses, guitars, and more. PSE works like a fader that lowers a channel’s level when the source goes below a certain threshold. Both threshold and attenuation are user-defined. This simple but effective tool has only a few controls, which for the most part you can “set and forget” for your channel.
Basic Operation
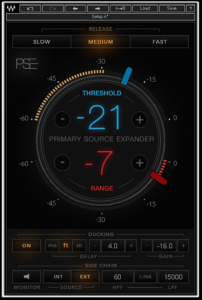
Think of the PSE as a very smooth expander: Its most important controls are Threshold, which establishes a certain level threshold for your source (for example a vocal), and Range, which sets the amount of gain reduction to be applied when the source is below that threshold. Release Time is set according to the nature of the source. In this example we’re using Primary Source Expander on a vocal track, but it just as easily could be a speaker or an instrument.
- Insert PSE on the desired channel.
- Raise the Threshold fader so that the side chain input meter is solidly blue during sung phrases. Between phrases the meter should drop to orange. Use the + and – Threshold buttons to fine-tune the Threshold point.
- Set the Range to around -6 dB, meaning that when the singer doesn’t sing (between phrases), the level can be reduced by up to -6 db.
- Release should initially be set to SLOW to avoid cutting off the ends of words.
- Pay attention to whether it seamlessly reduces the level. If everything sounds smooth you can increase the Range slowly, up to -12 dB, to maximize feedback and noise reduction, but be gentle to achieve natural results.
- Play with the Release radio buttons to match the source signal. More “legato” sounds will need the SLOW mode, while “staccato” sounds will work better with the FAST release time.
Side chain options can be used to further improve gain reduction between phrases and reduce sensitivity to feedback.
Primary Source Expander Controls and Displays
Dynamics Section
THRESHOLD
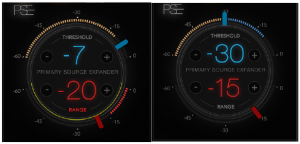
Determines at what level PSE begins to lower the volume. The side chain input meter is orange when the source audio level is below the Threshold value (left), and blue when above it (right). When the audio level is above the Threshold, the audio is not affected at all. Use the + and – Threshold momentary toggles to fine tune the Threshold setting by 1 dB per click. Range: -60–0 dB
RANGE
Determines how much the level is reduced when the input signal falls below the Threshold. The Range meter is red and shows how much the audio level is lowered, in dB. The reduction level never goes below the Range control value. Use + and – Range momentary toggles to fine tune the Range position by 1 dB per click. Range: -60–0 dB

RELEASE
Three radio buttons are used to set the release time. Choose one depending on your source material.Options: Slow: approximately 500 millisecondsMedium: approximately 250 millisecondsFast: approximately 100 milliseconds
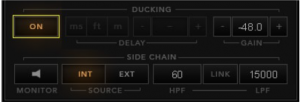
Ducking Section

Ducking provides gain reduction during periods of relative silence. It exhibits different behavior depending on Ducking/Side Chain
Ducking Delay
Introduces a delay in order to align the side chain source with the PSE channel.Delay UnitsSets units used for Ducking Delay input and display. Changing the Delay Unit setting does not affect the amount of delay,only the way it’s presented.Range: Milliseconds, feet, metersDelay ValueSets the value of side chain delay. Selected value is shown in the middle of the panel.Range: 0 – 50 ms.settings. Uses and examples are shown in the next section.Ducking On/Off Turns the section on and off. Range: ON and Off
Ducking Gain
Sets the amount of Ducking gain. Higher Ducking Gain settings will result in greater gain reduction. Range: -48 to +12 dB
Side Chain Section

SC MON
Use the SC MON button to monitor the side chain source. Range: ON and OFF
SC SOURCE
Sets the side chain source.Range: INTernal or EXTernal
HPF/LPF/LINK (Side Chain)Use HPF and LPF to filter the side chain source. HPF and LPF affect only the side chain source that triggers the PSE. They do not affect your actual sound. The LINK button links HPF and LPF values so that they move together.Note: When Side Chain is set to INT, Ducking Delay is not relevant and is deactivated.

Using PSE
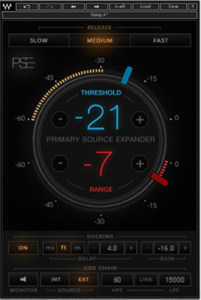
The Primary Source Expander (PSE) plugin operates in four modes, each designed for a different kind of scenario. This article explains the differences between these four modes and when to use each in order to make the most of the plugin and get the best results.
Mode 1 – Source INT, Ducking OFF

This is PSE’s default mode, in which the plugin is set to an internal sidechain source (INT), without ducking. In this mode, PSE will reduce gain whenever the input signal drops below the selected threshold. The gain will be reduced by the amount set by the Range control.
Usage Example:
Problem: An electric guitar amplifier makes noise even when the guitar is not playing.Solution: Insert PSE on the guitar channel to reduce noise whenever the guitar is not playing and the amp is idle.
Mode 2 – Source INT, Ducking ON
You can improve the internal sidechain behavior by using this mode, with ducking on. This is especially useful in situations where the environmental noise is inconsistent and thus prevents PSE from reducing gain in a smooth way. In the INT Side Chain mode, ducking adds DC (direct current) to the sidechain detector. This effectively raises the sidechain’s noise floor and makes low-level detection smoother.Increasing ducking gain improves PSE’s stability when lowering gain between phrases and contributes to consistent gain reduction. Adjust the ducking gain manually until you achieve sufficient gain reduction between phrases. Try to avoid too much ducking gain, since this can truncate the beginnings and endings of musical phrases. Use the Ducking On/Off toggle to quickly assess the results.
Usage Example:
Problem: The vocal microphone picks up a lot of stage noise when it’s idle or when the performer tries to sing in front of the PA speakers.
Solution: Insert PSE on the vocal channel, adjust the Threshold and Range as you desire, then gently add ducking gain for consistency
Mode 3 – Source EXT, Ducking OFF

When the sidechain is set to an external source (EXT), PSE still attenuates the gain of the channel on which it is inserted by the amount of gain reduction set by the Range control. However, in this mode, PSE is triggered by the external source (a different channel), such that attenuation occurs only when the external sidechain input level is below a certain threshold that you’ve set. When the external sidechain input level rises above that threshold, PSE will not attenuate. (In this mode the input meter behind the Threshold control represents the EXT sidechain input level.)
Usage Example:
Problem: You’re mixing a choir, where all the members are singing together. Usually choirs are amplified by very sensitive condenser microphones, and we want to make sure that when the choir is not singing the idle mics will be attenuated to avoid stage noise leakage.Solution: Use a “trigger” mic, as follows. Give the most powerful singer a lavaliere microphone. That microphone will not be amplified in the PA: instead, it will be used only as a trigger. Route the choir microphones to a group, insert PSE on this group, set it to EXT Side Chain, and then choose the “trigger” lavaliere microphone as the external sidechain input. Whenever the “trigger” singer is not singing, the choir mics will be attenuated by PSE; whenever the “trigger” singer does sing, there will be no attenuation.
Mode 4 – Source EXT, Ducking ON

This is a mixed mode. As in the first mode (Source INT, Ducking OFF) PSE attenuates gain when the input signal drops below the selected threshold. The gain is attenuated by an amount set by the Range control.
But in addition, whenever a loud stage source prevents PSE from attenuating consistently, this mode uses a sidechain input that triggers added attenuation, in order to help PSE attenuate between phrases. The amount of added attenuation depends on the amount of ducking gain you set. Higher ducking gain values will result in increased gain reduction. Avoid excessive ducking gain, as this might truncate the beginnings and endings of musical phrases. Use the Ducking On/Off toggle to quickly assess the results.
Usage Example:
Problem: PSE is inserted on a vocal channel, but a snare drum is bleeding into the vocal mic, preventing PSE from lowering the vocal gain between sung phrases.Solution: To prevent this interference, route the snare channel into PSE’s external sidechain input. Switch to EXT Source and turn Ducking on. Adjust the delay settings so that the direct sound arrives at the same time as the sound bleeding into the vocal mic. Delay units can be displayed in meters, feet, or time (in milliseconds). If, for example, the snare is located six feet away from the vocal microphone, set Delay Units to FEET and adjust Ducking Delay to “6.”When routing multiple sources to the PSE sidechain input, set Ducking Delay according to the closest source. For example, if the electric guitar and the snare are bleeding prominently into the vocal mic, route both instrument channels into PSE’s Side Chain Input. If the electric guitar is physically closer to the vocal mic, set Ducking Delay to the distance between the guitar amp and the vocal microphone. If the snare is closer, set Ducking Delay to the distance between the snare and the vocal mic.
Presets and Settings
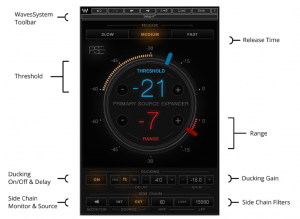
Wave System Toolbar
Use the bar at the top of the plugin to save and load presets, compare settings, undo and redo steps, and resize the plugin. To learn more, click the icon at the upper-right corner of the window and open the WaveSystem Guide.
Read More About This Manual & Download PDF:
References
[xyz-ips snippet=”download-snippet”]