WAVES R-LIVE Convolution Reverb Plugin
Introduction
Welcome
Thank you for choosing Waves! In order to get the most out of your new Waves plugin, please take a moment to read this user guide.
To install software and manage your licenses, you need to have a free Waves account. Sign up at www.waves.com. With a Waves account you can keep track of your products, renew your Waves Update Plan, participate in bonus programs, and keep up to date with important information.
We suggest that you become familiar with the Waves Support pages:www.waves.com/support. There are technical articles about installation, troubleshooting, specifications, and more. Plus, you’ll find company contact information and Waves Support news.
Product Overview
Waves IR-Live is an impulse response-based convolution reverb designed with the live sound engineer in mind. IR-Live delivers quick results with easy access to mission critical controls, and includes presets by leading FOH engineers, providing the go-to reverb sounds they’ve developed over their years of professional experience.
SoundGrid® and MultiRack Native compatible, IR-Live can be used with leading live digital consoles, in conjunction with dedicated SoundGrid DSP Servers designed to handle the requirements of real-time low-latency performance.
Concepts and Terminology
A convolution reverb blends together (or “convolves”) an input signal with another type of audio signal called an “impulse response.” In the world of audio, these impulse responses (IRs) contain the sampled characteristics of a particular performance space or device. IRs are imported into the IR-Live, which uses them as filters consisting of thousands of reflections.
Important Notes
- As mathematical calculations are made whenever you change your pre delay, reverb time or damping, a short transition fade will occur. Therefore, we recommend setting these parameters prior to showtime. Output and mix controls do not require these calculations, and may be safely adjusted during performances.
- If you import your own custom IRs, always remember to take them with you when moving between systems, as IRs are not saved within Waves preset files.
Components
WaveShell technology enables us to split Waves processors into smaller plugins, which we call components. Having a choice of components for a particular processor gives you the flexibility to choose the configuration best suited to your material.
Waves IR-Live includes 3 components each in two channel configurations:
- IR-Live Mono
- IR-Live Mono to Stereo
- IR-Live Stereo
WaveSystem Toolbar
Use the bar at the top of the plugin to save and load presets, compare settings, undo and redo steps, and resize the plugin. To learn more, click the icon at the upper right corner of the window and open the WaveSystem Guide.
Quick Start Guide
IR-Live’s basic preset library contains five halls, three chambers, three rooms, three short plates, three long plates and two spring reverbs.
- Launch Waves IR-Live plugin on your reverb aux buss.
- Send a signal to the reverb aux and listen to it through the default preset, Live Basic Live Hall 1.
- Cycle through presets using the next/previous preset arrow control at the top of the toolbar.
- Once you find a suitable preset, adjust its Reverb Time and Pre-delay controls as needed.
- To avoid conflicting frequencies and/or to tune the overall reverb sound, use the damping controls to shorten or lengthen the high and/or low frequency reverb times.
Interface and Controls
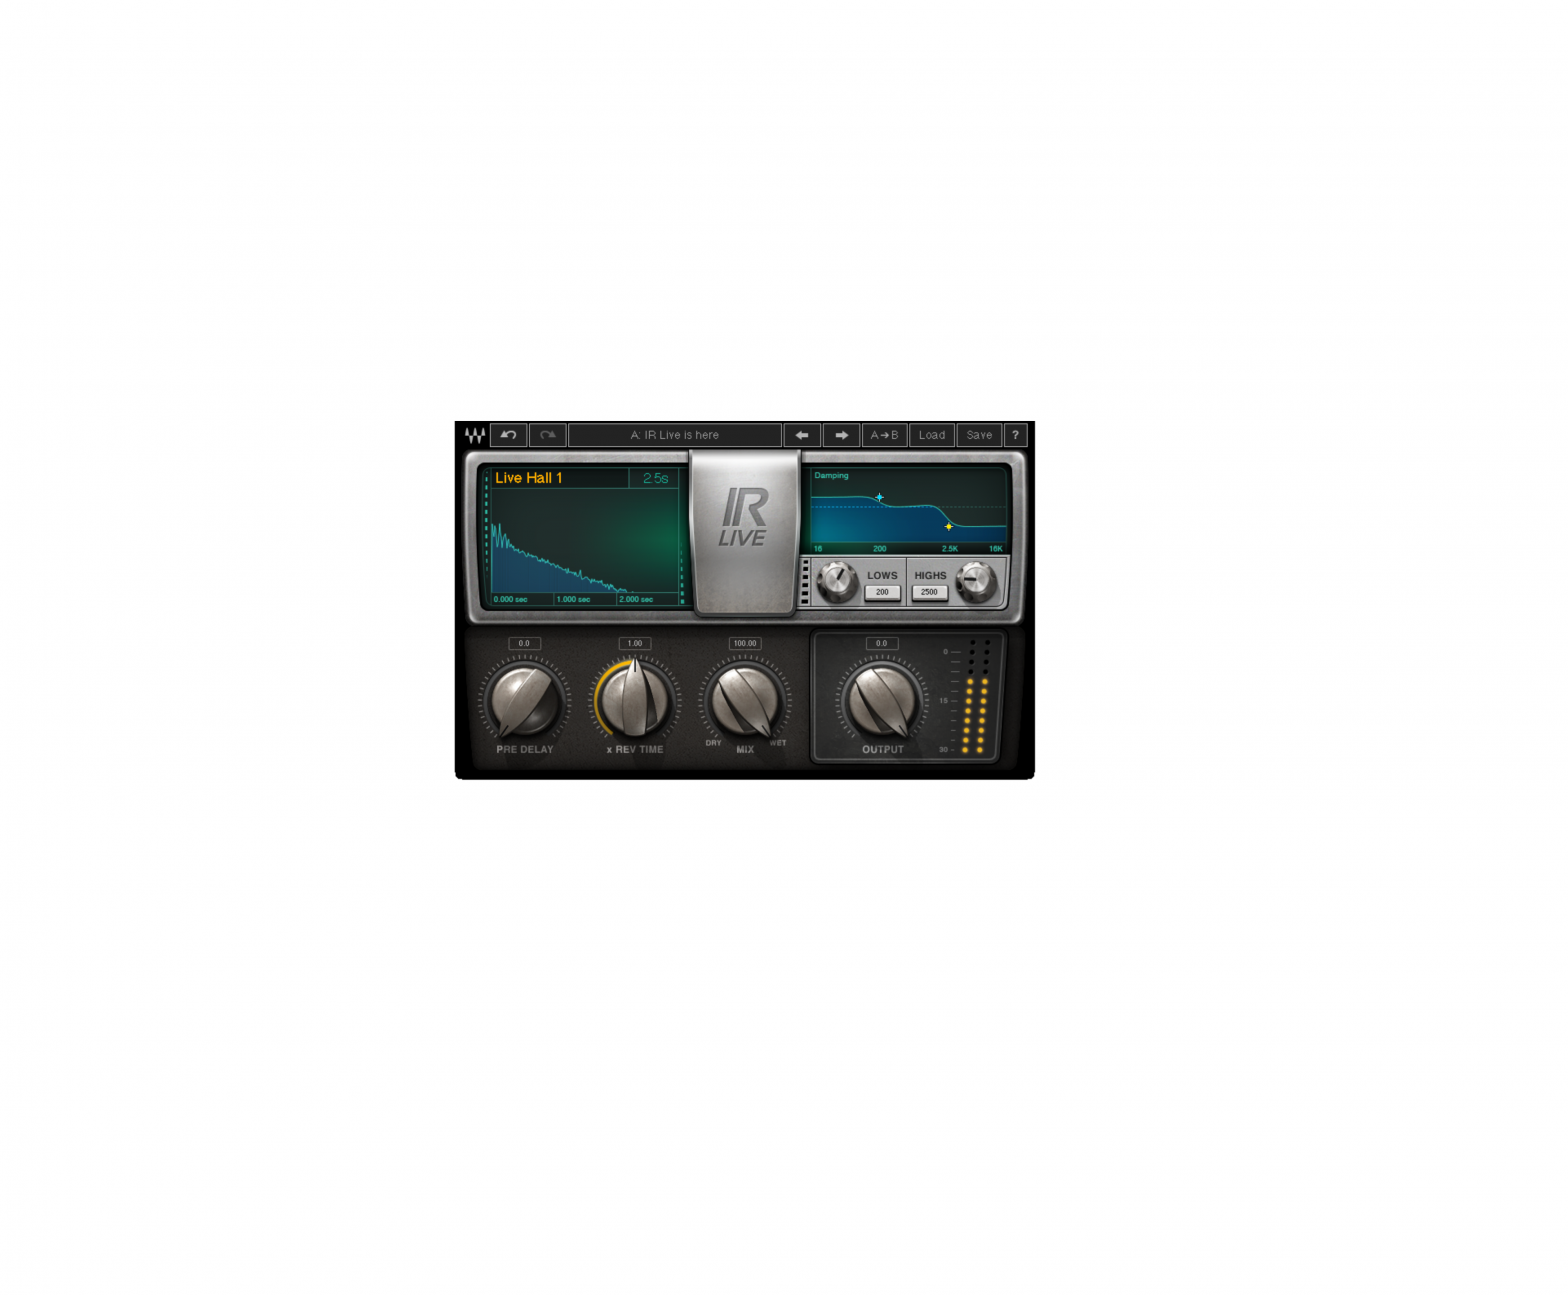
Interface
Controls
PRE DELAY sets the amount of delay between the dry (direct) sound and the wet (reverb) sound.Range: 0 – 500 ms
REV TIME allows you to shorten or lengthen the reverb time of the impulse response.Range: .25 – 4.00 (multiple of the original impulse response time)
MIX sets the balance between the input signal and the reverb effect signal. As an aux send/return configuration, this control should be set to 100% wet; as an insert, set it to achieve the desired amount of reverb. Range: 0 – 100%
LOWS – DAMPING RATIO sets the ratio of reverb time for low frequenciesRange: 0.1 – 2.00 (multiple of the original impulse response time)
LOWS – DAMPING FREQUENCY sets the cutoff frequency below which damping occurs.Range: 16 – 1600 Hz
HIGHS – DAMPING RATIO sets the ratio of reverb time for high frequencies.Range: 0.1 – 2.00 (multiple of the original impulse response time)
HIGHS – DAMPING FREQUENCY sets the cutoff frequency above which damping occurs.
Range: 1000 – 21000Hz
OUTPUT controls the output gain.Range: -50 – 0 dBFS

References
[xyz-ips snippet=”download-snippet”]