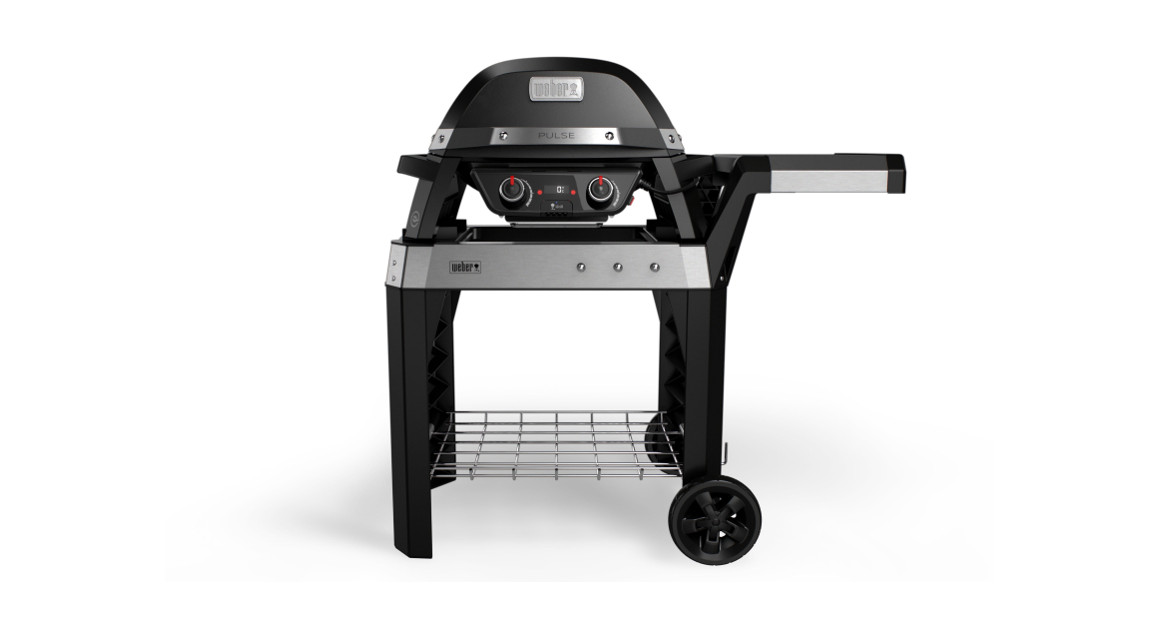
![]() PULSE 2000 with Cart
PULSE 2000 with Cart
REGISTER TODAY.We are so glad that you have joined us on the journey to barbecuing greatness. Register your grill and gain access to fun and engaging WEBER information, including tips, tricks, and how to get the most out of your barbecuing experience.


IMPORTANT SAFEGUARDS
DANGER, WARNING, and CAUTIONstatements are used throughout this Owner’s Manual to emphasize critical and important information. Read and follow these statements to help ensure safety and prevent property damage. The statements are defined below.![]() DANGER: Indicates a hazardous situation that, if not avoided, will result in death or serious injury.
DANGER: Indicates a hazardous situation that, if not avoided, will result in death or serious injury.![]() WARNING: Indicates a hazardous situation that, if not avoided, could result in death or serious injury.
WARNING: Indicates a hazardous situation that, if not avoided, could result in death or serious injury.![]() CAUTION: Indicates a hazardous situation that, if not avoided, could result in minor or moderate injury.California Proposition 65
CAUTION: Indicates a hazardous situation that, if not avoided, could result in minor or moderate injury.California Proposition 65![]() WARNING: This product can expose you to chemicals including nickel, which is known to the state of California to cause cancer. For more information go to www.P65Warnings.ca.gov.
WARNING: This product can expose you to chemicals including nickel, which is known to the state of California to cause cancer. For more information go to www.P65Warnings.ca.gov.
- Read all instructions.
- Household use only.
![]() CAUTION
CAUTION
- To ensure continued protection against the risk of electric shock, connect to properly grounded outlets only.
- Risk of electric shock, keep extension cord connection dry and off the ground.
- Hot surface.
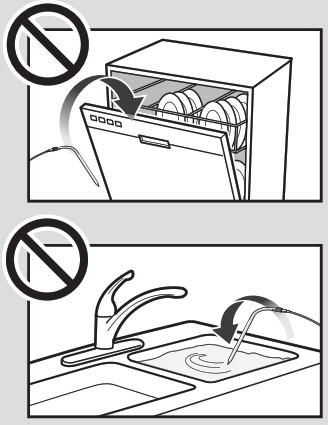
OperationWhen using electrical appliances, basic safety precautions should always be followed including the following:![]() DANGERm To protect against electrical shock do not immerse cords, plugs, portable appliances (or other specific parts or parts) in water or other liquid.
DANGERm To protect against electrical shock do not immerse cords, plugs, portable appliances (or other specific parts or parts) in water or other liquid.![]() WARNING
WARNING
- Use only outdoors in a well-ventilated area. Do not use in a garage, building, covered walkway, tent, or any other enclosed area or beneath overhead combustible construction.
- Do not operate any appliance with a damaged cord or plug or after the appliance malfunctions or is dropped or damaged in any manner. Contact the Customer Service representative in your area using the contact information on our website. Log onto www.weber.com.
- Do not operate the unit if the electrical socket is damaged.
- Operate grill only on a level, heat resistant surface.
- To prevent electric shock, do not spray any liquids heating elements.
- The use of accessories not recommended by WEBER may cause damage or injuries.
- Do not let the cord hang over the edge of the table or counter or touch hot surfaces.
- Where applicable, always attach the temperature controller to the appliance and check that the control is OFF before plugging the cord into a wall outlet. To disconnect, turn the control to OFF, then remove the plug from the wall outlet.
- Do not use appliances other than intended use.
- Fuel, such as charcoal briquettes, is not to be used with appliances.
- Use only on the properly grounded outlet.
- Use extreme caution when removing the tray or disposing of hot grease.
- Do not leave the grill unattended when in use.
- Do not use as a heater.
- Do not use this barbecue unless all of the parts are in place and the barbecue was assembled according to the assembly instructions.
- Use this barbecue only as described in this manual. Misuse may cause fire, electric shock, or injury.
- Do not build this model of the grill in any built-in or slide-in construction.
- Your electric grill is not intended for installation in or on recreational vehicles, SUVs, and/or boats.
- Do not use grill within 10 feet (3 m) of any body of water, such as a pool or pond.
- Do not use the grill within 24 inches (61 cm) of combustible materials. This includes the top, bottom, back, and sides of the grill.
- Locate power cable away from traffic areas. Arrange the cable so that it will not be pulled or tripped over.
![]() CAUTION
CAUTION
- Do not exceed the wattage of the electrical socket.
- Make sure no other high-wattage appliances are plugged into the same circuit when using the grill.
- Do not touch surfaces that may be hot. Use handles or knobs provided.
- Close supervision is necessary when any appliance is used by or near children. Storage and/or Non-use
![]() DANGER
DANGER
- Make sure the appliance is OFF and remove the plug from the outlet when not in use, before putting on or taking off parts, and before cleaning. Allow cooling before handling.
![]() WARNING
WARNING
- Always unplug by pulling the plug. Do not pull on the cable.
![]() CAUTION
CAUTION
- Store Temperature Controller indoors when not in use – out of the reach of children.
- Allow the appliance to cool before moving, cleaning, or storing it.
- Cover the grill only when it is cool.
SAVE THESE INSTRUCTIONS
Grounding InstructionsThis appliance shall be grounded while in use to protect the operator from electric shock. The appliance is equipped with a 3-conductor cord and a 3-prong grounding-type plug o fit the proper grounding-type receptacle. Plug into a GFI-protected outdoor receptacle, where available.Extension Cords![]() CAUTION: To minimize the risk of property damage and/or personal injury, do not use an extension power supply cable unless it conforms to the specifications listed in this manual.
CAUTION: To minimize the risk of property damage and/or personal injury, do not use an extension power supply cable unless it conforms to the specifications listed in this manual.
- If it is necessary to use an extension cord it must be connected to a grounded socket. Plug type: NEMA 5-15R to NEMA 5-15P; Gauge: 16 AWG; Rating: 125 volts at 13 amps. The maximum length for the extension cord is 20 feet (6 meters). Keep the extension cord as short as possible.
- Keep the connections dry.
- Observe all local laws and regulations when using this appliance.
- Use only 3-wire extension cords that have 3-prong grounding-type plugs and 3-pole cord connectors that accept the plug from the appliance.
- Only extension cords surface marked with the suffix letter “W” and identified by the marking “Suitable for use with outdoor appliances” shall be used outdoors.
- Use only extension cords having an electrical rating not less than the rating of the appliance.
- Do not use damaged extension cords. Examine the extension cord before using and replace if damaged. Do not abuse the extension cord and do not tug on any cord to disconnect. Keep the cord away from heat and sharp edges.
- The cord should be arranged so that it will not drape over the countertop or tabletop where it can be pulled on by children or tripped over unintentionally.
Weber Connect TechnologyVisit www.weber.com to learn more about the device compatibility and the languages supported by the WEBER CONNECT app. Please read this manual – especially the safety information – before using the device for the first time, and be sure to follow the instructions while using the device.
- Intended use: This appliance is for outdoor barbecuing use only and users must follow all safety and use guidelines as outlined in this Owner’s Manual. Any other use may cause damage. The manufacturer or retailer is not liable for injuries/damage arising from improper use.
- Note: The device is not to be used by children or persons with reduced physical, sensory or mental capabilities.
This appliance is rated for 120 V – 50/60HzOutput Power (Watts): PULSE 2000 = 1560 WUse only the WEBER PULSE temperature controller plug.
HELLO!We are so glad that you have joined us on the journey to barbecuing happiness. Please take some time to read through this Owner’s Manual to ensure that you are up and barbecuing quickly and easily. We want to be with you for the life of your grill, so please take just a couple of minutes to register your grill. When you sign up for a WEBER-ID as part of your registration, we will deliver special grill-related content just for you to enjoy.So, come along and join us online, on your smart device, or however else you’d like to stay in touch.Thank you for choosing WEBER.We are happy you are here.
![]()
Even your grill can update its status
- DOWNLOAD THE FREE APP
- INSERT PROBE
- CONNECT AND
- MONITOR
- PERFECT RESULTS
| FEATURE | BENEFIT |
| REMOTE GRILL MONITOR | WI-FI AND BLUETOOTH® GRILL MONITORINGRemote grilling access gives you the freedom to walk away and monitor the heat from your smart device. |
| STEP-BY-STEP GRILLING | PERFECTLY GRILLED FOODKnow when it’s time to flip, rest, and serve directly from your smart device.Receive notifications on everything from when it’s time to flip food, to a countdown that displays when it’s ready. |
| APP ENABLED FOOD THERMOMETERS | INSTANT FOOD STATUS READOUTView food temperature & doneness without lifting the lid. The food probes monitor doneness from beginning to end and will notify you via the app when it’s time to flip, rest, and serve. |
| RECIPES & INSTRUCTION | WEBER RECIPESWeber recipes that provide real-time, step-by-step grilling instructions specific to your cook preference and cut of meat. Personalize the recipe by selecting flavor enhancers, doneness level, and type of meat. |
| LED DISPLAY | TEMPERATURE READOUTThe easy-to-read, weatherproof LED screen displays grill temperatures, along with connectivity indications. |
The WEBER Promise (5-year voluntary warranty) At WEBER, we pride ourselves on two things: making grills that last and providing a lifetime of excellent customer service.
WarrantyThank you for purchasing a WEBER product. WeberStephen Products LLC, 1415 S. Roselle Road, Palatine, Illinois 60067 and its Americas Business units (“WEBER”) prideourselves on delivering a safe, durable, and reliable product.This is WEBER’s Voluntary Warranty provided to you at no extra charge. It contains the information you will need to have your WEBER product repaired or replaced in the unlikely event of a failure or defect.Pursuant to applicable laws, the Owner has several rights in case the product is defective. Those rights include supplementary performance or replacement, abatement of the purchasing price, and compensation. These and other statutory rights remain unaffected by this Warranty provision. In fact, this Warranty grants additional rights to the Owner that are independent of statutory Warranty provisions.WEBER’s Voluntary WarrantyWEBER warrants, to the purchaser of the WEBER product (or in the case of a gift or promotional situation, the person for whom it was purchased as a gift or promotional item) (“Owner”), that the WEBER product is free from defects in material and workmanship for five 5) years from the date of purchase when assembled and operated in accordance with the accompanying Owner’s Manual, normal wear and tear excluded. (Note: If you lose or misplace your WEBER Owner’s Manual, a replacement is available online at www.weber.com.) WEBER agrees within the framework of this warranty to repair or replace the part that is defective in material or workmanship subject to the limitations, and exclusions listed below. TO THE EXTENT ALLOWABLE BY APPLICABLE LAW, THIS WARRANTY IS EXTENDED ONLY TO THE ORIGINAL PURCHASER AND IS NOT TRANSFERABLE TO SUBSEQUENT OWNERS, EXCEPT IN THE CASE OF GIFTS AND PROMOTIONAL ITEMS AS NOTED ABOVE.WEBER stands by its products and is happy to provide you with the Warranty described for material defects in the grill or its relevant components, normal wear and tear excepted.
- Normal wear and tear’ includes cosmetic and other immaterial deterioration that may come with ownership of your grill over time, such as surface rust, dents/scratches, etc.However, WEBER will honor this Warranty for the grill or its relevant components where damage or dysfunction results from a material defect.
- ‘Material defect’ includes rust through or burn through of certain parts, or other damage or failure inhibiting your ability to safely / properly use your grill.
Owner’s Responsibilities Under this Warranty / Exclusion of WarrantyTo ensure trouble-free Warranty coverage, it is important (but not required) that you register your WEBER product online at www.weber.com. Please also retain your original sales receipt and/or invoice. Registering your WEBER product confirms your warranty coverage, will expedite any Warranty claims you may need to make, and provides a direct link between you and WEBER in case we need to contact you. If you have not had time to register your grill before calling for Warranty service, please have the following information available when you do call:Name – Address – Phone Number – Email – SerialNumber – Purchase Date – Purchase Dealer – Model –Color – Primary IssueThe above warranty only applies if the Owner takes reasonable care of the WEBER product by following all assembly instructions, usage instructions, and preventative maintenance as outlined in the accompanying Owner’s Manual unless the Owner can prove that the defect or failure is independent of non-compliance with the above- mentioned obligations. If you live in a coastal area or have your product located near a pool, maintenance includes regular washing and rinsing of the exterior surfaces as outlined in the accompanying Owner’s Manual.This WARRANTY lapses if there are damages, deteriorations, discolorations, and/or rust for which WEBER is not responsible caused by:
- Abuse, misuse, alteration, modification, misapplication, vandalism, neglect, improper assembly or installation, and failure to properly perform normal and routine maintenance;
- Insects (such as spiders) and rodents (such as squirrels);
- Exposure to salt air and/or chlorine sources such as swimming pools and hot tubs/spas;
- Severe weather conditions such as hail, hurricanes, earthquakes, tsunamis or surges, tornadoes or severe storms.
- Acid rain and other environmental factorsThe use and/or installation of parts on your WEBER product that are not genuine WEBER parts will void this Warranty, and any damages that result hereby are not covered by this Warranty.
Warranty ProcessingIf you believe that you have a part that is covered by this Warranty, please contact WEBER Customer Service using the contact information on our website (www.weber.com). WEBER will, upon investigation, repair or replace (at its option) a defective part that is covered by this Warranty. In the event that repair or replacement are not possible, WEBER may choose (at its option) to replace the grill in question with a new grill of equal or greater value. WEBER may ask you to return parts for inspection, shipping charges to be pre-paid by the Owner.
DisclaimersAPART FROM THE WARRANTY AND DISCLAIMERS AS DESCRIBED IN THIS WARRANTY STATEMENT, THERE ARE EXPLICITLY NO FURTHER WARRANTY OR VOLUNTARY DECLARATIONS OF LIABILITY GIVEN HERE WHICH GO BEYOND THE STATUTORY LIABILITY APPLYING TO WEBER. THE PRESENT WARRANTY STATEMENT ALSO DOES NOT LIMIT OR EXCLUDE SITUATIONS OR CLAIMS WHERE WEBER HAS MANDATORY LIABILITY AS PRESCRIBED BY STATUTE.NO WARRANTIES SHALL APPLY AFTER THE FIVE (5) YEAR PERIOD OF THIS WARRANTY. NO OTHER WARRANTIES GIVEN BY ANY PERSON, INCLUDING A DEALER OR RETAILER, WITH RESPECT TO ANY PRODUCT (SUCH AS ANY “EXTENDED WARRANTIES”), SHALL BIND WEBER. THE EXCLUSIVE REMEDY OF THIS WARRANTY IS THE REPAIR OR REPLACEMENT OF THE PART OR PRODUCT.IN NO EVENT UNDER THIS VOLUNTARY WARRANTY SHALL RECOVERY OF ANY KIND BE GREATER THAN THE AMOUNT OF THE PURCHASE PRICE OF THE WEBER PRODUCT SOLD.YOU ASSUME THE RISK AND LIABILITY FOR LOSS, DAMAGE, OR INJURY TO YOU AND YOUR PROPERTY AND/OR TO OTHERS AND THEIR PROPERTY ARISING OUT OF THE MISUSE OR ABUSE OF THE PRODUCT OR FAILURE TO FOLLOW INSTRUCTIONS PROVIDED BY WEBER IN THE ACCOMPANYING OWNER’S MANUAL. PARTS AND ACCESSORIES REPLACED UNDER THIS WARRANTY ARE WARRANTED ONLY FOR THE BALANCEOF THE ABOVE-MENTIONED ORIGINAL FIVE (5) YEAR WARRANTY PERIOD.THIS WARRANTY APPLIES TO PRIVATE SINGLE-FAMILY HOME OR APARTMENT USE ONLY AND DOES NOT APPLY TO WEBER GRILLS USED IN COMMERCIAL, COMMUNAL, OR MULTI-UNIT SETTINGS SUCH AS RESTAURANTS, HOTELS, RESORTS, OR RENTAL PROPERTIES. WEBER MAY FROM TIME TO TIME CHANGE THE DESIGN OF ITS PRODUCTS. NOTHING CONTAINED IN THIS WARRANTY SHALL BE CONSTRUED AS OBLIGATINGWEBER TO INCORPORATE SUCH DESIGN CHANGES INTO PREVIOUSLY MANUFACTURED PRODUCTS, NOR SHALL SUCH CHANGES BE CONSTRUED AS AN ADMISSION THAT PREVIOUS DESIGNS WERE DEFECTIVE.Weber-Stephen Products LLCCustomer Service Center1415 S. Roselle RoadPalatine, IL 60067The U.S.A.For replacement parts, call: 1-800-446-1071

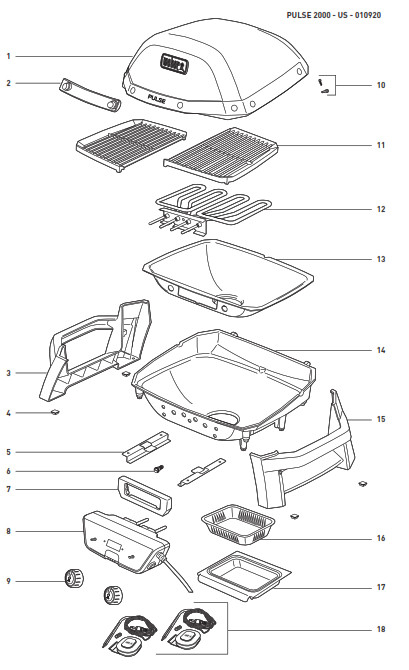
Parts List
PULSE 2000
Assembly
These instructions will give you the minimum requirements for assembling your WEBER electric grill. Improper assembly can be dangerous.![]() WARNING: Do not modify the appliance. Modifications are unsafe and will void your warranty.
WARNING: Do not modify the appliance. Modifications are unsafe and will void your warranty.
- Any parts sealed by the manufacturer must not be opened or altered by the user.
- Do not cover any parts of the grill with aluminum foil. It may negatively impact the performance of your grill.
 The grills that are illustrated in this Owner’s Manual may vary slightly from the model purchased.
Product Features
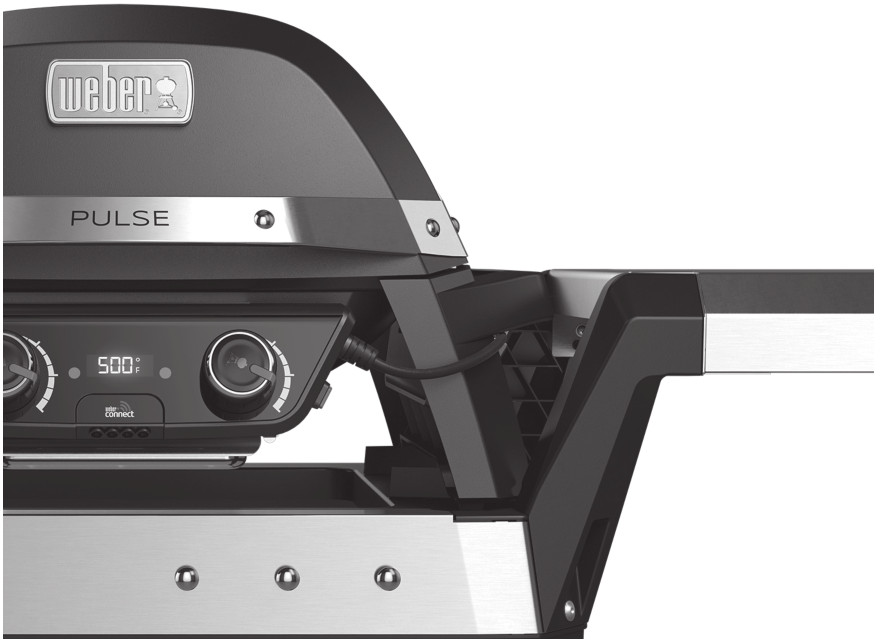
PULSE 2000 Features

| A. Removable Temperature ControllerB. Digital ThermometerC. Temperature Status Indicator Light(s)D.Wi-Fi and Bluetooth® Status Indicator Lights | E.Tall LidF.Cable RoutingG.Power On/Off ButtonH.Grease Management SystemI.Food Probe Ports for WEBER CONNECT Technology |
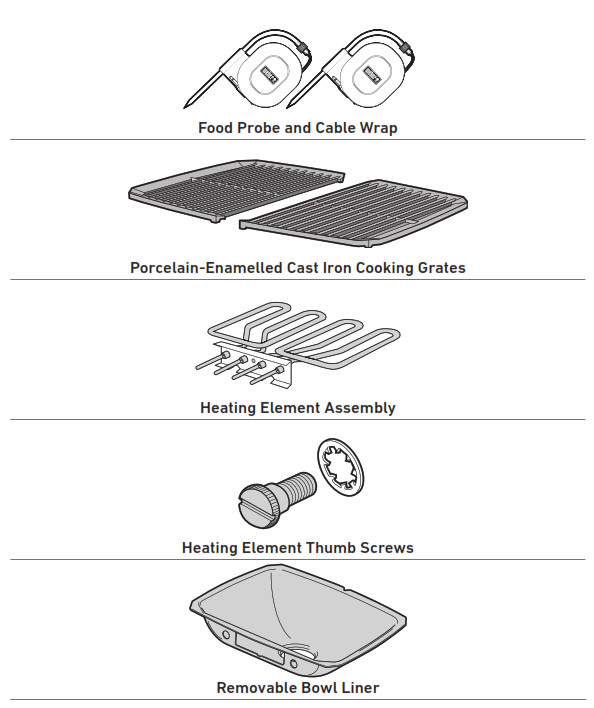
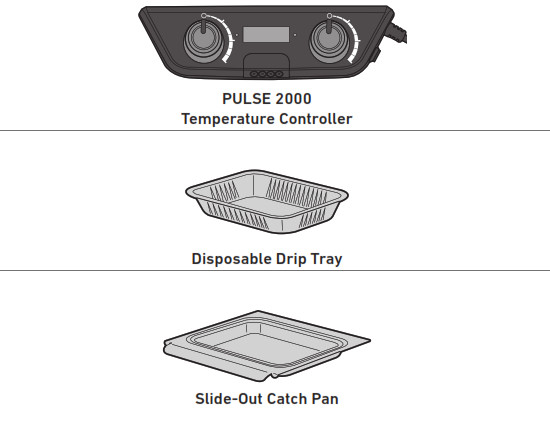
Feature DescriptionsRemovable Temperature ControllerThe temperature controller is designed to be easily removed in order to make storage and cleaning easy. The controller should be stored indoors in the box provided.Digital ThermometerAn LED screen serves as a digital thermometer displaying the grill temperature. This ensures a precise and accurate temperature reading of your grill.Status Indicator LightsThe PULSE has red status indicator lights on the temperature controller to let you know that your grill is heating up and when it is ready to barbecue.Indicator lights on the LED screen illuminate when the controller has connected to a Wi-Fi network, or when the grill has successfully paired with your Bluetooth® enabled smart device.Tall LidThe lid of the grill is tall enough to provide ample room for barbecuing whole chickens and roasts.Cable RoutingAn integrated clip on the right leg of the grill allows for easy routing of the cable from the temperature controller to the back of the grill.Power On/Off ButtonThe push-button on/off switch is easy to use. When the temperature controller is on, the button is recessed and when it is off, the button protrudes.Grease Management SystemThe grease management system helps with the removal of grease and is designed to help prevent flare-ups. Drippings that are not vaporized are funneled into the drip tray,which is located within the catch pan under the cook box.Food Probe Ports for WEBER CONNECT TechnologyConfidently tend to the grill and your guests while using the integrated WEBER CONNECT a feature that employs food probes allowing you to monitor the temperature of your food and your grill from across the garden or inside your kitchen via your Wi-Fi network, or your smart device’s Bluetooth® connection.The app allows you to view, on your mobile device, the real-time core temperature of the food and the temperature of your grill. Once you’ve downloaded the WEBER CONNECT app, connect the food probes from your grill to the food. From the app you have the ability to change the display on the Temperature controller to Fahrenheit or Celsius.Removable Components for Easy Cleaning Cooking grates, bowl liner, and grease tray are removable for easy cleaning. The bowl liner is dishwasher safe.Porcelain-enameled Cast Iron Cooking GratesPorcelain-enameled cast-iron cooking grates evenly retain heat to create those beautiful sear marks that we all strive for. The heat retention quality of the cast iron creates a faster recovery time after the lid has been lifted.Dual Zone GrillingSimultaneously grill different foods in two temperature zones. Sear a steak over high heat on one side of the grill while your side dish cooks slowly over low heat on the other side of the grill.
Operation
Getting Started
Attach Temperature Controller1) Plug the temperature controller into the grill by pushing it straight onto the mounting bracket (A). Do not force the temperature controller into the mounting bracket. Ensure that the heating element pins are aligned with the temperature controller for proper attachment (B).2) Route the power cable under the right handle and secure it in the cable clips. (C).3) Make sure that the red power button located on the right side of the temperature controller is in the OFF position.4) Plug the power cable into a grounded socket.

 Preheat the GrillPreheating the grill is critical to successful barbecuing. Preheating helps to prevent food from sticking to the cooking grate and gets the cooking grate hot enough to sear properly. It also burns off the residue of a previously cooked meal.
- Push the red power button located on the right side of the temperature controller to turn ON the grill (D).
- Turn the temperature control knob(s) to the high position by turning them clockwise. The digital LED screen will display the temperature of the grill.
- Preheat the grill with the control knob(s) in the high position (E). The red status indicator lights will flash to indicate that the grill is preheating and the temperature display will increase as the grill heats up. When the selected temperature setting is reached, the temperature controller will beep momentarily. The status indicator lights will stop flashing and remain lit. When the temperature registers 500°F (260°C) the grill is preheated. This will take approximately 20 to 30 minutes depending on ambient conditions.
- To grill at a lower temperature: Preheat as outlined above. Turn the knob counter-clockwise to the desired setting. Start barbecuing.Reference the grilling guides in the WEBER CONNECT app for approximate grilling times and settings for the cuts of meats listed (adjust for conditions).
Ambient Conditions
Grilling in a colder climate or at a higher altitude will extend your cooking time. Sustained wind will lower the grill’s internal temperature. Place grill so the wind blows against the front of the grill.
Perform an Initial Burn-OffHeat the grill on the highest setting, with the lid closed, for at least twenty minutes prior to grilling for the very first time.
![]() WARNING
WARNING![]() Use heat-resistant grill mitts or gloves when operating the grill.
Use heat-resistant grill mitts or gloves when operating the grill.![]() Should a grease fire occur, close the lid, turn the power button off, unplug the grill from the socket and leave the lid closed until the fire is extinguished. Do not use liquid to extinguish flames.
Should a grease fire occur, close the lid, turn the power button off, unplug the grill from the socket and leave the lid closed until the fire is extinguished. Do not use liquid to extinguish flames.
WEBER CONNECT App

First things first.Download the WEBER CONNECT app.To fully activate and update your new PULSE grill, it is important to first download the WEBER CONNECT app.Download, connect, and register to receive:
- Flip and Serve Notifications
- Food Readiness Countdowns
- Custom Food Doneness Alerts
- Step-by-step Grilling Assistance
Connecting Your Grill To Bluetooth® or Wi-Fi Network
To connect your WEBER PULSE grill via Bluetooth® or to your local Wi-Fi network, follow these steps:NOTE: WEBER recommends that your smart device be running the latest version of its operating system before attempting to connect your grill to Bluetooth® or your Wi-Fi network.
- Push the red power button located on the right side of the temperature controller to turn ON the grill.
- Verify that your smart device is connected to Bluetooth® or your local Wi-Fi network.
- From your smart device, download the new WEBER CONNECT app from the App Store on Apple devices or the Play Store on Android devices.
- Open the WEBER CONNECT app and follow the in-app instructions for connecting to your PULSE grill.
NOTE: In order to successfully connect your smart device to your grill via a local Wi-Fi network, first make sure your grill is paired via Bluetooth® and that your grill is within range of your Wi-Fi router. If your attempts to connect have been unsuccessful, try moving the grill within range of the Wi-Fi router or adding a signal extender for a stronger signal.
 |
 |
Probe UsageThe colored probe indicators are for visual identification of the probe(s) within the app.
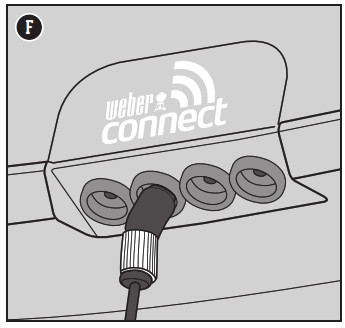
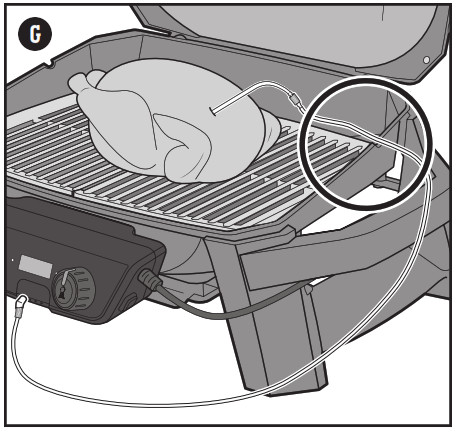
- To ensure an accurate reading, please insert the probe a minimum depth of 0.4 inches (10 mm) into the center of the meat (H). For poultry, it’s best to place the probe in the thickest part of the thigh or breast, avoiding the bone. For thick cuts of flat meat, insert the probe into the middle of the meat from the top or the sides.
To ensure safe usage of the meat probe and to prevent damage to the probe:
- Do not expose the probe or its wiring to direct contact with the cooking grate.
- Route food probe cables through the side channel on the grill to ensure that the grill lid closes.
- Do not submerge the probe or its wiring in liquid.
- The probe is not dishwasher safe.
Important Note: When using a probe, be sure to route the wire where it will not be exposed to flames or temperatures exceeding 715° F (380° C). Avoid exposing the probe to temperatures below -22° F (-30° C). Temperatures below -22° F (-30° C) or above 572° F (300° C) will not display in the app and will cause the probe to disappear from the connection.

Cool DownWhen finished grilling, turn control knob(s) off, unplug the power cable and allow the temperature controller to cool. Remove the temperature controller and store it indoors in the storage box when not in use.
![]() WARNING
WARNING![]() Risk of injury! The probes are very sharp. Please be careful when handling probes.
Risk of injury! The probes are very sharp. Please be careful when handling probes.![]() Risk of burns! Handling the food probes without hand protection will result in severe burns. The colored probe indicators are not intended to be touched with bare hands while using the grill as they are not heat-insulated. Please wear heat-resistant gloves at all times while using this product in order to avoid being burned.
Risk of burns! Handling the food probes without hand protection will result in severe burns. The colored probe indicators are not intended to be touched with bare hands while using the grill as they are not heat-insulated. Please wear heat-resistant gloves at all times while using this product in order to avoid being burned.
Meal-to-Meal MaintenanceKeep it CleanAccumulated dirt and grease may reduce grill performance. Factors such as altitude, wind, and outside temperature can affect cooking times.Check for GreaseYour grill was built with a grease management system that funnels grease away from food and into a disposable container. As you cook, grease is channeled down to the slide-out catch pan and into a disposable drip pan that lines the catch pan. This system should be cleaned each and every time you grill in order to prevent fires.
- Confirm that the grill is off and cool.
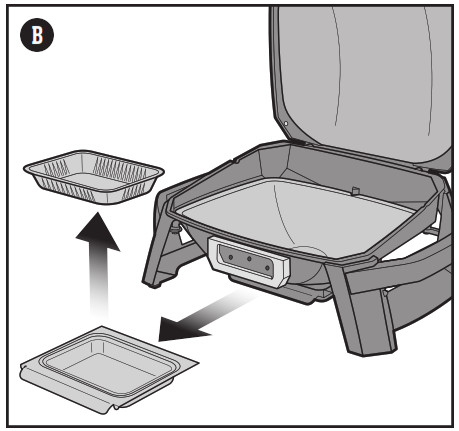
- Unplug and remove the temperature controller by pulling it side-to-side slightly until it releases from the mounting bracket (A).

- Remove the slide-out catch pan by pulling it forward (B).
- Check for grease in the disposable drip pan that lines the slide-out catch pan. Discard disposable drip pan when necessary and replace it with a new one.
- Reinstall all components.

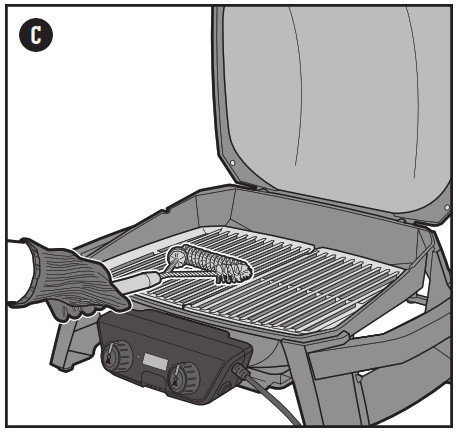
Clean the Cooking GrateAfter preheating, any bits of food or debris left over from a previous use will be easier to remove. Clean cooking grates will also prevent your next meal from sticking.
- Brush the cooking grates with a stainless steel bristle grill brush immediately after preheating (C).
 Cleaning the Temperature ControllerWipe down the temperature controller with a microfiber cloth dampened with water. Do not use cleaners or brushes as they will scratch the surface. Never use glass cleaners on plastic. It will damage the surface.Storing the Temperature ControllerAllow the temperature controller and probes to cool before wiping them clean. Store the temperature controller and food probes indoors in the storage box provided (D).

![]() WARNING
WARNING![]() The grill should be thoroughly cleaned on a regular basis.
The grill should be thoroughly cleaned on a regular basis.![]() Do not line the slide-out catch pan or any part of the grill with aluminum foil.
Do not line the slide-out catch pan or any part of the grill with aluminum foil.![]() Use caution when removing the catch pan and disposing of hot grease.
Use caution when removing the catch pan and disposing of hot grease.![]() Check the slide-out catch pan for grease build-up before each use. Remove excess grease to avoid a grease fire.
Check the slide-out catch pan for grease build-up before each use. Remove excess grease to avoid a grease fire.![]() Grill brushes should be checked for loose bristles and excessive wear on a regular basis. Replace brush if any loose bristles are found on cooking grates or brush. WEBERrecommends purchasing a new stainless steel bristle grill brush at the beginning of every spring.
Grill brushes should be checked for loose bristles and excessive wear on a regular basis. Replace brush if any loose bristles are found on cooking grates or brush. WEBERrecommends purchasing a new stainless steel bristle grill brush at the beginning of every spring.
![]() CAUTION
CAUTION![]() Temperature controller should be removed from grill and stored in the box and indoors when grill is not in use – out of the reach of children.
Temperature controller should be removed from grill and stored in the box and indoors when grill is not in use – out of the reach of children.
Food Probe CareCleaning the Food ProbeClean probe before first use. The probes should be cleaned by wiping them down with a damp cloth.The probes are not dishwasher safe. The probes are not waterproof and damage may result from water exposure. Never submerge the probes in water. Take care not to expose the wiring of the probes or the area where the probes’ wiring meets the probe to liquid.
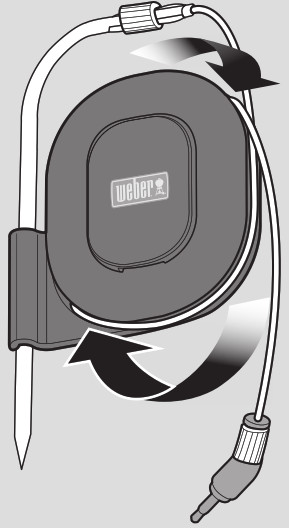
Probe WrapNeatly wrap the probe when it is not in use.Store the probe in the storage box with the Temperature controller.
 |
 |
Searing SetupTurn the control knob(s) to the high setting and preheat the grill to 500°F (260°C). Brush the cooking grates clean with a stainless steel bristle grill brush. Adjust settings to the temperature noted in the recipe. Place food on cooking grates and close the lid of the grill. Turn your food only once during the grilling time. Lift the lid only to turn the food or check for the doneness at the end of the recommended grilling time.

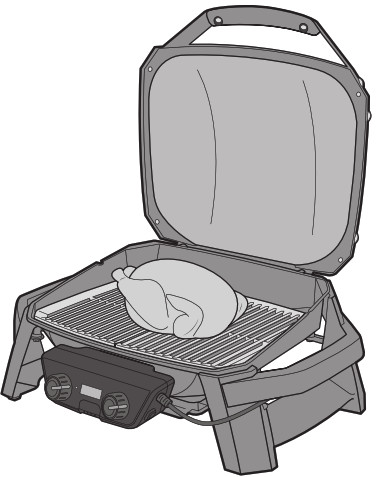
Roasting SetupTurn the control knob(s) to the high setting and preheat the grill to 500°F (260°C). Brush the cooking grates clean with a stainless steel bristle grill brush. Reduce heat by turning control knob(s) to medium. Place large foods, such as whole chickens or roasts, horizontally in the center of the grill.
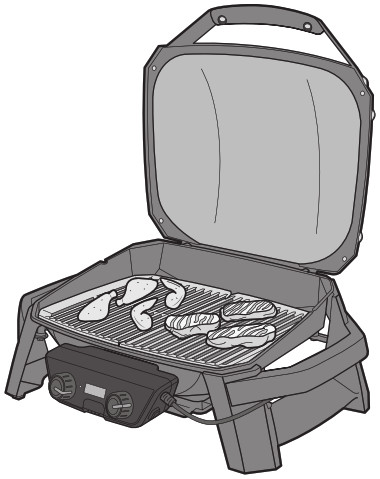
Dual Zone GrillingTurn the control knobs to the high setting and preheat the grill to 500°F (260°C).Adjust the temperature of each control knob to the preferred setting for each zone. Brush the cooking grates clean with a stainless steel bristle grill brush.If you are grilling one item for longer than the other, it is recommended that you adjust both control knobs to the preferred temperature of the first item to be grilled and place the item on the left side of the grill. Ten minutes prior to adding the second item, adjust the temperature of the right control knob to the preferred cooking temperature and allow the temperature in the area to adjust. Please note that the temperature controller will display the average temperature inside of the grill and not the individual zones.Turn your food only once during the grilling time. Lift the lid only to turn the food or check for the doneness at the end of the recommended grilling time.
 |
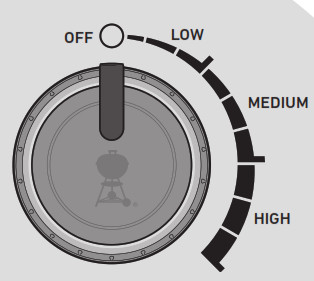 |
PULSE Grill Temperature Range:LOW between 200° and 300°F (93° – 149°C)MEDIUM between 350° and 450°F (176° – 232°C)HIGH between 500° and 600°F (260° – 316°C)
![]() WARNING
WARNING![]() To avoid overheating, the appliance must not be covered by any solid or flexible material such as an aluminum tray, aluminum foil or trays made of other heat resistant material. Any item must be placed centrally on the grill to allow sufficient ventilation. Larger coverage with such items or materials on the grate would impair the safety of the product and could lead to serious damage.
To avoid overheating, the appliance must not be covered by any solid or flexible material such as an aluminum tray, aluminum foil or trays made of other heat resistant material. Any item must be placed centrally on the grill to allow sufficient ventilation. Larger coverage with such items or materials on the grate would impair the safety of the product and could lead to serious damage.
Tips and Hints
Grilling Do’s and Don’tsPreheat grill each and every time.If the cooking grates are not hot enough, the food will stick and you will likely never have a chance of searing your food properly or developing those handsome sear marks. Even if a recipe calls for medium or low heat, always preheat the grill on the highest setting first.Don’t grill on dirty grates. Placing food onto the cooking grates before they have been cleaned is never a good idea. Leftover residue on the grates acts like glue, binding it to the grates and to your food. To avoid tasting last night’s dinner on today’s lunch, make sure that you are barbecuing on a clean cooking grate. Once the grates are preheated, use a stainless steel bristle grill brush to make a clean, smooth surface.Be present in the process. Before starting your grill, make sure that everything you need is within your arm’s reach. Don’t forget your essential barbecuing tools, such as oiled and seasoned food, glazes or sauces and clean cooking platters for the cooked food. Having to run back to your kitchen not only means missing out on the fun, but it could also result in burning your food. French chefs call this ‘mise en place’ (meaning, ‘put in place’). We call it ‘being present.
Create a little elbow room.Packing too much food onto the cooking grates restricts your flexibility. Leave at least one-quarter of the cooking grates clear with plenty of space between each food item in order to get your tongs in there and easily move the food around. Sometimes barbecuing involves split-second decisions and the need to move food from one area of the grill to another. So give yourself enough room to grill.Try not to peek.The lid on your grill is for more than just keeping the rain out. Most importantly, it’s for preventing too much air from getting in and too much heat and smoke from getting out. When the lid is closed, the cooking grates are hotter, the cooking times are faster and the smoky tastes are stronger. Use the WEBER CONNECT app to quickly monitor the heat of your grill and the core temperatures of your food so that you don’t need to open the grill until it’s time for dinner. So put a lid on your grill!Only flip once.What’s better than a juicy steak with a deep sear and plenty of beautifully caramelized bits?The key to accomplishing these results is to keep your food in the place. Sometimes we have the tendency to flip our food before it reaches the desired level of color and flavor. In nearly all cases, you should turn food just once. If you are moving it more than that, you are probably also opening the lid too often which causes its own set of problems. So tep back and trust the grill.
FCC COMPLIANCE STATEMENT
CAUTION: Changes or modifications not expressly approved could void your authority to use this equipmentThis device complies with Part 15 of the FCC Rules. The operation to the following two conditions:
- This device may not cause harmful interference, and
- This device must accept any interference received, including interference that may cause undesired operation
FCC RADIO FREQUENCY (RF) EXPOSUREThis equipment complies with FCC radiation exposure limits set forth for an uncontrolled environment. The user should avoid prolonged exposure within 20cm of the antenna, which may exceed the FCC radio frequency exposure limits.INDUSTRY CANADA STATEMENTThis device complies with Industry Canada license-exempt RSS standard(s). Operation is subject to the following two conditions:
- This device may not cause interference, and
- This device must accept any interference, including interference that may cause undesired operation of the device.
Product Care
Deep Cleaning and MaintenanceCLEANING THE INSIDE OF THE GRILLOver time, the performance of your grill can diminish if it has not been maintained properly.Low temperatures, uneven heat, and food sticking to cooking grates are all signs that cleaning and maintenance are overdue. When your grill is off and cool, start by cleaning the inside from the top down.A thorough cleaning is recommended after every five cooks. Consistent use may require more frequent cleanings.Cleaning the LidFrom time to time you may notice ‘paint-like flakes on the inside of the lid. During use, grease and smoke vapors slowly change into carbon and deposit on the inside of your grill’s lid. These deposits will eventually peel and look very similar to paint. These deposits are non-toxic, but the flakes could fall onto your food if you do not clean the lid regularly.
- Use a plastic scraper to remove carbonized grease from inside the lid (A).
Cleaning the Bowl Liner and Cook box
Look inside the cook box for any grease accumulation or leftover food particles. Excessive accumulation can cause a fire.It is recommended to use gloves when removing heating elements as they will be dirty.
- Remove the temperature controller.
- Remove cooking grates (B).Do not use metal brushes to clean heating elements.
- Remove the heating elements by turning the thumbscrew(s) on the front of the grill counterclockwise until the screw releases (C).
- Slide the heating elements towards the back of the grill. Taking care not to bend the heating element, tilt it upwards, and remove it (D).
- Use a plastic scraper to scrape debris off of the sides and bottom of the bowl liner into the opening in the bottom of the cook box (E). This opening funnels debris into the slide-out catch pan.
- Remove and clean the slide-out catch pan. Refer to ‘Meal-to-Meal Maintenance’.


The bottom liner of the grill can be removed and washed with warm soapy water. The bowl liner is dishwasher safe. Take care not to bend the bowl liner. After cleaning, reinstall the bowl liner. Do not operate the grill without the bowl liner. To reinstall the heating elements, insert the heating elements into the corresponding holes inside the front of the grill. Reattach by turning thumbscrews to the right. Do not over-tighten. Clean heating elements by allowing food to burn off.
CLEANING THE OUTSIDE OF THE GRILLThe outside of your grill may include aluminum, stainless steel and plastic surfaces.WEBER recommends the following methods based on the surface type:Cleaning Stainless Steel Surfaces Clean stainless steel using a grease-cutting soap. Use a microfibre cloth to clean in the direction of the grain of the stainless steel. Rinse with clear water and dry thoroughly. Do not use paper towels. Do not use bleach or chlorinated cleaning products on stainless steel.Note: Do not risk scratching your stainless steel with abrasive pastes. Pastes do not clean or polish. They will change the color of the metal by removing the top chromium oxide film coating.Cleaning Painted Surfaces and Plastic ComponentsClean painted and plastic components with grease-cutting soap.Rinse with clear water and dry thoroughly.
Cleaning the Outside of Grills that are in Unique EnvironmentsIf your grill is subject to a particularly harsh environment, you will want to clean the outside more often. Acid rain, pool chemicals and salt water can cause surface rusting to appear. Wipe down the outside of your grill with warm soapy water. Follow up with a rinse and thorough drying. Additionally, for stainless steel parts only, you may want to apply a stainless steel polish cleaner weekly to prevent surface rust.
![]() WARNING
WARNING![]() Turn your grill off and wait for it to cool before thoroughly cleaning it.
Turn your grill off and wait for it to cool before thoroughly cleaning it.![]() Do not spray liquid on the heating element or controller.
Do not spray liquid on the heating element or controller.![]() Do not immerse in water when cleaning.
Do not immerse in water when cleaning.![]() CAUTION
CAUTION![]() Disconnect the appliance from the supply circuit and remove the temperature controller before performing cleaning and maintenance.
Disconnect the appliance from the supply circuit and remove the temperature controller before performing cleaning and maintenance.![]() Do not use any of the following to clean your grill: abrasive stainless steel polishes or paints, cleaners that contain acid, mineral spirits, or xylene, oven cleaner, abrasive cleaners (kitchen cleaners), or abrasive cleaning pads.
Do not use any of the following to clean your grill: abrasive stainless steel polishes or paints, cleaners that contain acid, mineral spirits, or xylene, oven cleaner, abrasive cleaners (kitchen cleaners), or abrasive cleaning pads.![]() Do not use metal brushes to clean heating elements. Allow food to burn off during preheating.
Do not use metal brushes to clean heating elements. Allow food to burn off during preheating.
Troubleshooting
![]() WARNING
WARNING![]() Do not attempt to make any repair to electric components or structural components without contacting Weber-Stephen Products LLC, Customer Services Department.
Do not attempt to make any repair to electric components or structural components without contacting Weber-Stephen Products LLC, Customer Services Department.![]() Failure to use genuine WeberStephen parts for any repair or replacement will void all warranty protection.
Failure to use genuine WeberStephen parts for any repair or replacement will void all warranty protection.
ELECTRIC GRILL DOES NOT TURN ONSYMPTOM
- The heating element does not heat when following the instructions in the ‘Operation’ section of this Owner’s Manual.
| CAUSE | SOLUTION |
| The temperature controller may not be properly inserted into the housing. | Remove and reinstall the temperature controller.Always plug the temperature controller into the grill before plugging the power cable into the socket. |
| There is a problem with the power flowing from the socket. | Check the electrical power supply. |
| The GFI safety device that is built-in to the temperaturecontroller may have interrupted the power to the grill. | If the digital thermometer display and the temperature status indicator light(s) are not on, move the red power button on the temperature controller to the OFF position in order to ‘reset’ the GFI safety device. Wait 30 seconds, then move the red power button to the ON position. |
ERROR CODE APPEARS ON DISPLAYSYMPTOM
- During start-up or barbecuing, an error code appears on the digital display.
| CAUSE | SOLUTION |
| The temperature controller is a device that is sensitive to certain external factors. Variations in the power supply or radiofrequency may affect operation. | First, turn the temperature controller off using the red power button. Unplug the power cable from the power outlet and remove the temperature controller from the grill.Wait 30 seconds, then attach the temperature controller fully onto the grill before plugging the power cable into the outlet. Move the red power button to the ON position. |
ELECTRIC GRILL IS EXPERIENCING CONNECTIVITY ISSUESSYMPTOM
- Wi-Fi is having trouble maintaining connectivity with a Wi-Fi network.
| CAUSE | SOLUTION |
| The grill is out of range of the Wi-Fi network signal. | In order to successfully connect your smart device to your local Wi-Fi network, your grill must be within range of your Wi-Fi router. If your attempts to connect have been unsuccessful, try moving the grill within range of the Wi-Fi router or adding a signal extender for a stronger signal. |
SYMPTOM
- Bluetooth® is having trouble maintaining connectivity or pairing with a smart device.
| CAUSE | SOLUTION |
| Bluetooth® is a short-range signal only. | When the temperature controller is on, it is ready to pair. Make sure that Bluetooth® on the smart device is turned on and that the device is near the grill. |
| Bluetooth® has already been paired to another smart device. | If the Bluetooth® indicator light is on but is not flashing, it means that it is already paired to a smart device. Turn off Bluetooth® on any smart device that you do not wish to have paired to the grill. |
Replacement Parts
PULSE 2000
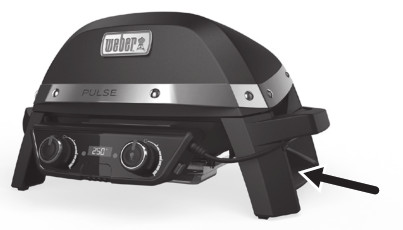
SERIAL NUMBERWrite your grill’s serial number in the box above for future reference. The serial number appears on the data label that is located on the right leg of the grill frame.
U.S.:1-800-446-1071Canada:1-800-446-1071

Apple and the Apple logo are trademarks of Apple Inc., registered in the U.S. and other countries.App Store is a service mark of Apple Inc. Android is a trademark of Google LLC. Google Play and the Google Play logo are trademarks of Google LLC.The Bluetooth® word mark and logos are registered trademarks owned by Bluetooth SIG, Inc. and any use of such marks by Weber-Stephen Products LLC is under license. Other trademarks and trade names are those of their respective owners.© 2020 Designed and engineered by Weber-Stephen Products LLC,1415 S. Roselle Road, Palatine, Illinois 60067 USA.
References
[xyz-ips snippet=”download-snippet”]