Westinghouse 16” Vintage Metal Stand Fan Instruction Manual![]()
SAFETY INFORMATION
![]() WARNING
WARNING
When using electrical appliances, basic safety precautions should always be followed, including the following
IMPORTANT SAFEGUARDS
Read these safety instructions before using the fan for the first time and store them in a safe place. They contain important information on basic safety precautions that must be followed.
- Use this appliance only as described in this manual. Using the appliance for other purposes may cause a fire or electric shock.
- Only connect the appliance to a mains socket that matches the voltage specified on the rating plate of the appliance (120V / 60Hz).
- This product is intended for household use only and not for commercial, industrial or outdoor use.
- To prevent the risk of an electrical shock, do not place the appliance near a window where it may be exposed to rain. Never immerse the appliance, power cord or plug in water or spray the appliance with liquids.
- This appliance can be used by children aged 8 and above and by people with reduced physical, sensory or mental capabilities or lack of experience and knowledge if they have been givensupervision or instructions concerning the use of the appliance in a safe way and understand the hazards involved. Children must not play with the appliance. Cleaning and maintenance must not be done by children unless they are older than 8 years of age and supervised by an adult.
- Close supervision must be provided when the appliance is used by or near children.
- WARNING! Only use this appliance after it has been properly assembled.
SAFETY INFORMATION
- WARNING! The metal fan blades have sharp edges. Handle with care.
- DANGER! Avoid contact with moving parts. Never insert fingers, pencils or other objects into the rotating fan blades or any openings on the appliance, as this may cause an injury,electric shock, fire, or damage to the appliance. Keep hands, hair, clothing, or jewelry away from the protective guards during operation to prevent injury.
- Use the appliance upright on a dry, level and hard surface.
- DANGER! KEEP OUT OF REACH CHILDREN AND PETS. Do not let the power cord hang over the edge of a table or counter. Ensure that the power cord is not in a position where it may be pulled by children or pets, or tripped over.
- CAUTION! To prevent the risk of fire, always keep the air inlets and outlets of the appliance clear of obstructions. Do not cover the appliance or use it in close proximity to curtains, tablecloths, etc.
- WARNING! Always unplug the appliance from the wallsocket before:– assembling or disassembling any parts,– adjusting the vertical tilt,– moving the appliance from one location to another,– cleaning and storing.
- To disconnect the appliance from the mains, grip the plug and pull it from the wall outlet. Do not pull on the cord.
- Do not use the appliance in the presence of explosive and/or flammable fumes.
- Do not place the appliance or any parts near open flames, or next to cooking or other heating appliances.
- This appliance has a 3-PIN UL plug (without fuse). This is Class I product. To reduce the risk of electric shock, plug the power cord into a grounded (earthed) electricaloutlet that is easily accessible. This is a Class I product.
SAFETY INFORMATION
- DANGER OF ELECTROCUTION! Never use the appliance in the bathroom, near any source of water or heavy moisture (e.g. near a swimming pool, bathtub, basin, or in a dampbasement, etc.). Do not place any objects filled with liquids, such as vases, near or on the appliance.
- Do not use the appliance in high ambient temperatures (exceeding 40 ⁰C) or humid conditions.
- Do not use the appliance if any part is damaged or missing.
- Only use the appliance with the original accessories and parts supplied. The use of accessories or fittings other than those supplied with this appliance may result in an injury, fire or damages and will void the warranty.
- DANGER OF ELECTROCUTION! This appliance has no userserviceable parts. Never attempt to dismantle or repair theappliance yourself. The warranty will not cover any claim for damage due to mishandling.
- WARNING! Never use a damaged appliance. Do not use the appliance after it malfunctions, or has been dropped or damaged in any manner. In case of malfunction or damage, unplug the appliance and contact an authorized service centre to arrange a repair.
WARNING!
- Before assembling the appliance, check that it is unplugged from the wall socket.
- Choking Hazard – Keep small parts and safety screws away from children and pets.
HOW TO USE
DESCRIPTION OF PARTS

- Carry handle
- Locking clips
- Fan head
- Tilt adjustment knob
- Extension pole
- Height adjustment knob
- Outer pole
- Base with base weight
- Oscillation knob
- Control knob (O-Off/I/II/III)

- Front guard
- Fan blades
- Rear guard
- Motor shaft
- Motor unit
HOW TO USE
HOW TO USE
BASE ASSEMBLY
- Remove the L-shaped screw and metal washer from the outer pole (7) by turning the L-shaped screw anti-clockwise.
- Insert the outer pole (7) into the top of the base (8) (Fig. 1).
- Insert the base weight and then the metal washer into the bottom of the base (8), and tighten the L shaped screw clockwise to secure the assembled parts to the base (Fig. 2, 3).
- Turn the height adjustment knob (6) clockwise to tighten the extension pole (5) in the outer pole (7).
MOTOR UNIT AND BASE ASSEMBLY
- Remove the tilt adjustment knob (4), long screw, small screw and small knob from the bottom of the motor unit (15).
- Align the 4 screw holes on the bottom of the motor unit (15) with the 4 screw holes on the top of the extension pole (5).
- Insert the long screw through the bottom screw holes and tighten with the tilt adjustment knob (4) (Fig. 4, 5).
- Tighten the small screw in the screw hole above the tiltadjustment knob (4) by turning clockwise with the screwdriver.Then tighten the small knob in the remaining screw hole. (Fig. 6).
FAN HEAD ASSEMBLY
- Insert the back of the rear guard (13) into the motor shaft (14).
- Align the 4 screw holes on the rear guard (13) with the 4 screw holes on the motor unit (15) (Fig. 7), ensuring that the carry handle (1) is at the top. Tighten the 4 screws (provided)clockwise with the screwdriver (Fig. 8).
HOW TO USE
- Loosen the screw on the back of the fan blades (12) and align it with the flat indentation on the motor shaft (14) (Fig. 9). Insert the fan blades into the motor shaft until the screw isright on top of the flat indentation (Fig. 10). Tighten the screw clockwise with the screwdriver.
- Carefully rotate the fan blades (12) a few turns with your hand to make sure that they are levelled and spin smoothly. Reassemble if necessary.
- Open the locking clips (2) around the rim of the front guard (11) and hook the top onto the rear guard (13).
- Align the screw holes on the bottom of both guards, and use the screwdriver to tighten the screw clockwise.
- Close the locking clips (2) to lock the guards.
![]() WARNING!
WARNING!
- The metal fan blades have sharp edges. Handle with care.
- Before using the appliance, always ensure that all parts of the appliance are properly assembled to avoid a hazard.
OPERATING INSTRUCTIONS
- Place the fan upright on a dry, level and stable surface.
- To adjust the vertical tilt, hold the fan head (3) with one hand and, with the other hand, slowly turn the tilt-adjustment knob (4) anti-clockwise to loosen it. Push the fan head (3) up/downto adjust the tilt to your desired angle (70⁰ tilt), and tighten the tilt-adjustment knob (4).
- To adjust the fan height, hold the extension pole (5) firmly with one hand and carefully loosen the height adjustment knob (6) anti-clockwise with the other. Adjust the fan to yourdesired height (adjustable from 34.5” – 48.5”), and tighten the height adjustment knob (6) clockwise. Do not over extend the extension pole (5).
- Turn the Control knob (10) to the “O” (Off) position, and plug the appliance into a suitable wall socket.
- Turn the Control knob (10) to the desired speed setting.I = Low speedII = Medium speedIII = High speed
- To start the automatic left-right oscillation, press the oscillation knob (9). To stop the automatic left-right oscillation, pull the oscillation knob (9).
- Once you have finished using the fan, turn the Control knob (10) to the “O” (Off) position, and unplug the fan from the wall socket.
IMPORTANT: Always unplug the appliance from the wall socket after use to disconnect it completely from the power supply.
WARNING! Never adjust the tilt or height of the fan while the appliance is on.
CLEANING AND MAINTENANCE
![]() DANGER OF ELECTROCUTION!
DANGER OF ELECTROCUTION!
Before cleaning, always unplug the appliance from the wall socket.WARNING! To avoid electrical hazards, never immerse the appliance, power cord or plug in water or any other liquids. Never rinse them under the tap. Keep all electrical parts dry.NOTE: Never use solvents, chemical or abrasive cleaning agents, wire brushes, sharp objects or scouring pads to clean the appliance.
- Make sure that water does not get into the motor while cleaning.
- General cleaning – To remove dust and dirt, wipe down the exterior of the appliance with a soft cloth/sponge moistened with water or mild soapy water. Dry the appliance completely after cleaning.
- Thorough cleaning – To clean dust accumulated in the fan blades and guards, follow these steps:– Disassemble the fan head (3) by following the steps in the“HEAD ASSEMBLY” section in the reverse order.– Wipe the motor unit (15) with a soft cloth moistened with water or mild soapy water. Dry well.– Clean the front guard (11), rear guard (13) and fan blades (12) in mild soapy water with a soft cloth/sponge. Rinse well and dry with a soft cloth. Allow all parts to dry completely beforereassembling them onto the motor unit (15).
DISPOSAL
Proper disposal of this product.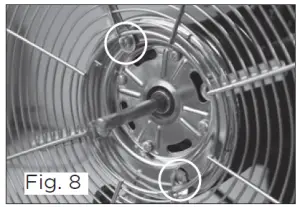 This symbol indicates that this appliance may not be treated as household waste. Instead, it should be taken to the appropriate collection point for recycling electrical andelectronic equipment. Please use the return or collections services available in your community or contact the retailer where you purchased this product.
INFORMATION AND SERVICE
report this adIf you have questions or concerns about your product, please visit our website: www.westinghousehomeware.com, or contact our overseas offices/agents. In line with our policy of continuous product development, we reserve the right to change the product, packaging and documentation specifications without prior notice. Model: WSFS1601SV Voltage: 120 V/AC, 60 Hz Power: 50 W
Read More About This Manual & Download PDF:
References
[xyz-ips snippet=”download-snippet”]