Westinghouse AR400FW Rangehood Flue Extension Instructions
In order to correctly install your appliance please refer to the user manual supplied with your rangehood for full details or download the user manual by scanning the below QR code.
To install your flue cover extension, please follow steps 1-8 below (as per the user manual).
Upon completion of step 8, please follow step 9a and 9b below to replace the upper flue cover which is included with your rangehood, with this accessory flue cover extension.
You will need to replace the upper flue cover which is included with your rangehood, with this accessory flue cover extension.
NOTE: The flue cover extension MUST be used in conjunction with the lower flue cover.
Scan the QR code below to download the full WRC604 rangehood user manual:
Installation
- Using a spirit level mark a vertical centre line on the wall where the hood is to be positioned, and a horizontal line at the hood base position.NOTE: The height of the underside of the hood body must be a minimum of 600mm* to a maximum height of 800mm.
- If the instructions of the hob specify a greater distance than the minimum above, then that shall be the minimum height for installation.
- Mark the location for the flue cover wall mounting brackets and rangehood mounting points and anti-tilt fixing points above the hood base using the hood base as a reference point.
Fig. 5
 WARNINGFailure to install the screws or fixing device in accordance with these instructions may result in electrical hazards.
 - 3. Install flue cover wall mounting brackets with suitable fasteners. Suitable fasteners must be used for rangehood mounting points. Refer to Fig.5 for dimensions. If installation is for recirculation mode refer to Item 6a and Fig.9.Fig. 6
- Fit the dampers to the exhaust air outlet. Slight bending of the dampers will be required for the fitment.Fig. 7
- Hang the body hood on the mounting screws then secure at the anti-tilt locations(2 places) as indicated in Fig 8.Fig. 8Depending on the preferred installation/ducting mode, follow step 6a or 6b below.
-
- 6a. Recirculating mode (Fig.9)
- Fix the T-piece to the top mounting bracket by using the 4 screws supplied as dimension indicated Fig 5.
- Adhere two sponge to the outlet of T-piece.
- Using the centre line, install the recirculating T-piece and mounting bracket to the wall.
- Install flexible pipe between T- piece and air outlet
- Use cable ties or suitable duct tape to secure flexible pipe to T-piece and outlet of the hood.(Fig.10)NOTE: When installed in recirculating mode, it is recommended to use a charcoal filter to prevent odours being emitted back into the room.
For instructions on fitting charcoal filter, please refer to user manual.Replacement Charcoal filter part number 09070400082
Fig. 9Fig. 10
- 6b. Ducted mode (Fig.11)Insert flexible pipe and secure flue tape to air outlet with suitable duct tape.NOTE: For ducted mode we recommended to extend the flue pipe through the roof cladding(with appropriate flashing) to an external roof cowl, venting the exhaust externally.
To ensure optimum performance of the rangehood, the use of bends should be avoided. Straight, rigid and short ducting is recommended to use. All ducting must be fire retardant.
WARNINGExhaust air must not be discharged into a wall cavity, unless the cavity is designed for the purpose.Fig. 11
- 6a. Recirculating mode (Fig.9)
- Insert the power cord to the power outlet. Fig. 12
- Insert the flue cover section to the body hood.Fig. 13Installing the Flue Cover Extension (Accessory)
- 9a. Separate the upper and lower flue covers by sliding the upper cover out of the lower cover.9b. Discard upper flue cover and replace with new extension piece as per diagram below.
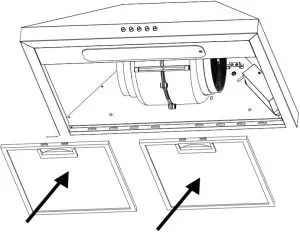
- Install the filters to the hood.Fig. 15
 Fig. 6
 Fig. 11
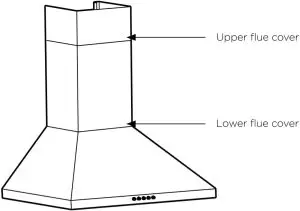 9b. Discard upper flue cover and replace with new extension piece as per diagram below.
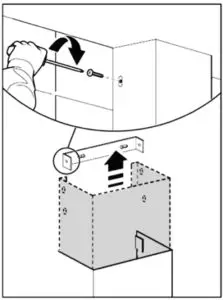
Technical Support
 Customer Care Centre
Contact us if you need more help
Australiatelephone: 13 13 49email: [email protected]web: westinghouse.com.au
New Zealandtelephone: 0800 436 245email: [email protected]web: westinghouse.co.nz
![]() and WESTINGHOUSE are trademarks of Westinghouse Electric Corporation. Used under license by Electrolux Home Products Pty Ltd. All Rights Reserved.
and WESTINGHOUSE are trademarks of Westinghouse Electric Corporation. Used under license by Electrolux Home Products Pty Ltd. All Rights Reserved.
© 2020 Electrolux Home Products Pty Ltd. ABN 51 004 762 341. W_INS_AR400FW_Nov20
report this ad
References
[xyz-ips snippet=”download-snippet”]