![]()
![]()
Digital Cool Mist Ultrasonic Tower HumidifierInstruction ManualWSHUJ2158B
SAFETY INFORMATION
![]() DANGER – Immediate hazards which WILL result in severe personal injury or death
DANGER – Immediate hazards which WILL result in severe personal injury or death![]() WARNING – Hazards or unsafe practices which COULD result in severe personal injury or death
WARNING – Hazards or unsafe practices which COULD result in severe personal injury or death![]() CAUTION – Hazards or unsafe practices which COULD result in minor personal injury
CAUTION – Hazards or unsafe practices which COULD result in minor personal injury![]() WARNINGWhen using electrical appliances, basic safety precautions should always be followed, including the following
WARNINGWhen using electrical appliances, basic safety precautions should always be followed, including the following
IMPORTANT SAFEGUARDS
Read this instruction manual carefully before using the appliance and keep it for future reference.
 Use the appliance only for its intended purpose. Improper use may result in an electric shock, fire or serious injury and may void the warranty.
- Before connecting the appliance to the power supply, check that the voltage indicated on the appliance corresponds with the voltage in your home. If this is not the case, do not use the appliance and contact the retail outlet immediately.
- Only connect the appliance to an earthed wall socket. The power cord has a short design to prevent accidents. Do not use an extension cord.
- This appliance is for household use only. It is not suitable for commercial, industrial, or outdoor use.
- This appliance is intended to be used in households and similar applications such as:– staff kitchen areas in shops, offices, and other working environments; – farm houses;– by clients in hotels, motels, and other residential type environments;– bed and breakfast type environments.
- Ensure the vapor nozzle and water tank are firmly attached to the base before each use. Do not open the vapor nozzle or water tank when the appliance is switched on.
- Do not move the appliance when it is switched on and/or full of water.
- Only use the humidifier with the power base supplied.
- The use of accessories or fittings other than the original parts supplied with this appliance may result in an injury, fire or damages and will void the warranty.
- Do not add water into the base directly.
- Only use aromatherapy or essential oil products with this humidifier.
- Do not add the oil directly into the water tank or base of the humidifier as it may damage the plastic seals and cause leaks.
- If the appliance gives off an abnormal odor or makes abnormal sounds, immediately turn it off and unplug it from the power supply.
- Do not use the appliance when the water tank is empty.
- Do not use the appliance in extreme cold temperatures when the liquid inside may freeze, as this can cause damage to the appliance. If frozen, wait until the ice has fully melted before use.
- Follow the cleaning and maintenance instructions detailed in the CLEANING AND CARE section of this instruction manual.
- Do not immerse the appliance or electrical parts of the appliance in water or any other liquids. Never place them under running water (see CLEANING AND CARE).
- To prevent spillages, do not fill the humidifier above its capacity of 6.5 liters.
- This appliance can be used by children aged from eight years and above and by persons with reduced physical, sensory or mental abilities, or lack of experience or knowledge, if they are properly supervised or instructed how to use the appliance in a safe way and understand the hazards involved. Children should not play with the appliance. Cleaning, maintenance or connecting the appliance to the power supply should not be made by children under the age of eight.
- KEEP OUT OF REACH OF BABIES AND CHILDREN – Keep the appliance and its cord out of the reach of children younger than eight years of age.
- Children must be supervised to ensure that they do not play with the appliance.
- Never leave the appliance unattended while it is switched on.
- DANGER OF ELECTROCUTION! Do not expose the appliance or electrical parts of the appliance to dripping or splashing water.
- DANGER OF ELECTROCUTION! Do not touch or operate the appliance with wet hands or while standing on a wet floor.
- Do not connect this appliance to an external timer or remote control system.
- To unplug, pull the adapter plug out. Do not pull on the cord.
- If the power cord or adapter plug is damaged, do not use the appliance. The power cord must be replaced by the manufacturer, an authorized service agent or a similarly qualified person.
- Use only spare parts supplied by the manufacturer or an authorized service center.
- Do not under any circumstances attempt to repair the appliance. For servicing and repairs, contact the retail outlet, the manufacturer, or an authorized service center.
- RISK OF SUFFOCATION! KEEP OUT OF REACH OF CHILDREN – Keep all packaging materials out of the reach of babies and children.
- CAUTION! To avoid an electric shock, fire, or injury:– Make sure the appliance cannot be knocked over or upset and no water spillage can occur when you are connecting it to the power supply.– Keep the humidifier and the power cord away from the edge of tables or countertops and out of the reach of children.– Always unplug the appliance before refilling with water, overfilling, cleaning, storing, and immediately after use.– Do not let water splash into the electric components inside the base.
BATTERIES
![]() WARNING:
WARNING:
- Keep new and used batteries out of children’s reach.
- Do not leave batteries lying around; there is a risk that they could be swallowed by children or pets. If swallowed, consult a doctor immediately.
- Leaking or damaged batteries can burn skin. Use a cloth or protective gloves to remove the batteries and dispose of them in accordance with local regulations. If you do get battery acid on your skin, wash with soap and water immediately. Neutralize with lemon juice, vinegar, or another mild acid.
- If battery acid gets into your eyes, consult a doctor immediately.
- Batteries can not be reactivated, disassembled, burned, buried, or short-circuited. There is a risk of explosion!
- Do not recharge normal, non-rechargeable batteries. There is a risk of explosion! Only charge rechargeable batteries that are intended for this purpose; use suitable rechargeable battery chargers.
- The batteries must be replaced correctly using an identical or equivalent battery.
- The batteries must be inserted with the correct polarity (+ and -).
- Dispose of batteries in accordance with local regulations.
- Do not expose batteries to heat sources such as sunlight or naked flames. Keep at room temperature.
- Do not throw batteries into a fire as they could burst or release toxic substances.
- If the battery compartment does not close correctly, stop using the unit and keep it out of children’s reach.
- Always remove batteries before cleaning, inspecting, or performing any maintenance on the appliance.
- Remove used batteries immediately from the unit and discard them in accordance with local regulations.
- Remove the batteries when you are not using the unit for a long time.
INSTALLATION LOCATION
- Do not place this product close to a heat source such as a stove to prevent it from being damaged or causing a fire or injury.
- Place the appliance at least 1.67 feet away from the furniture. Make sure there is at least 4.17 feet of space above the appliance.Ensure the appliance is at least 6.67 feet away from other household electrical appliances such as a TV.
- Always place the appliance on a stable, flat, dry, and heat-resistant surface.
- Never allow the power cord to hang over the edge of a worktop or table or touch any hot surface.
- Do not allow the power cord to touch any sharp edges or corners.
NOTE: Neither Westinghouse nor the dealer can accept any liability for damage to the product or personal injury resulting from failure to observe the correct electrical connection procedures.
RETAIN THESE INSTRUCTIONS FOR FUTURE REFERENCE HOUSEHOLD USE ONLY
HOW TO USE
DESCRIPTION OF PARTS

| Humidifer | Remote control and control panel |
| 1. AC adapter cord and plug | 23. POWER button |
| 2. Aroma oil tray | 24. HUMIDITY button |
| 3. AC adapter connector (on the back of the base) | 12. Vapor level indicator – high, medium, and low |
| 4. Base | 13. Power on / off icon |
| 5. Water tank | 14. Float ball |
| 6. Vapor nozzle | 15. Foam packaging (remove) |
| 7. LED screen | 16. Ceramic ball filter slot |
| 8. Control panel | 17. Ceramic ball filter |
| 9. Timer icon | 18. Oscillator |
| 10. Humidity icon | 19. Air intake |
| 11. Temperature icon | 20. Low water level indicator |
| Remote control and control panel | 21. Temperature/humidity display |
| 23. POWER button | 22. Timer settings |
| 24. HUMIDITY button | 25. TIMER button |
NOTE: All images shown are for illustrative purposes only and may not be an exact representation of the product model.
BEFORE FIRST USE
• Remove all packaging from the appliance taking care to locate the smaller items such as:
- The remote control which is in the wrapping on top of the humidifier.
- The package stored in the base which contains the ceramic ball filter and adapter.• Unpack all parts and check for damage that may have occurred during transport. If any parts are damaged or missing, do not use the appliance and return it to your retail outlet immediately.
SETTING UP THE REMOTE CONTROLPull the plastic film from the battery compartment. The battery is now active, and you can use the remote control. CHANGING THE BATTERY
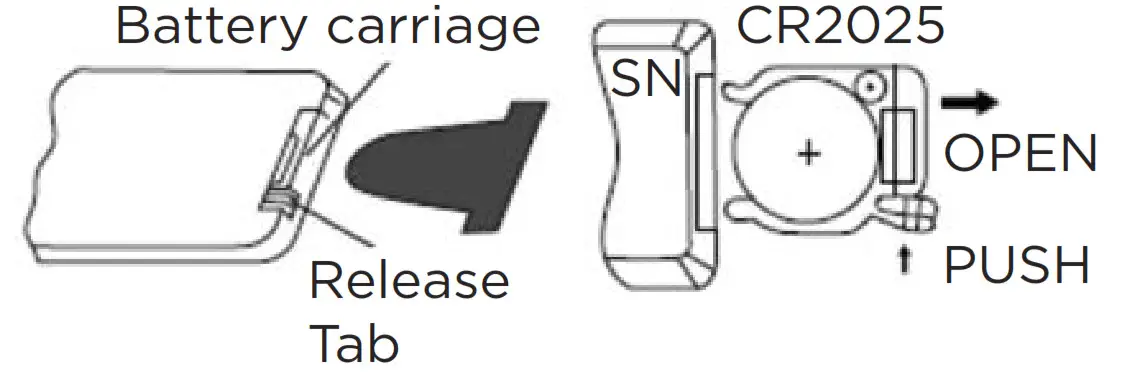
- Push the release button inwards and pull the battery casing out. Remove the old battery.
- Insert 1 x CR2025 3V battery into the battery casing ensuring you follow the polarity (+ and -) marked on the casing.
- Slide the battery casing back into the remote control until you hear it click firmly into place.
GETTING TO KNOW YOUR HUMIDIFIER
- The humidifier takes 6.5 liters of water, which provides 15 to 27 hours of humidifying action (depending on the vapor level you choose).
- The humidifier has 3 vapor levels – high, medium, and low, and can be set to maintain your desired humidity level.
- The timer keeps the humidifier on for a set time up to 8 hours.
- An aromatherapy oil or essential oil can be used to gently perfume the room.
SETTING UP THE HUMIDIFIER
- Find a location for the humidifier where the appliance is:• On a stable, even surface where it cannot be easily knocked over.• Place the appliance at least 1.67 feet away from furniture. Make sure there is at least 4.17 feet of space above the appliance. Make sure the appliance is at least 6.67 feet away from other household electrical appliances such as a TV.• Away from windows and is not used for long periods in a closed room as condensation may occur.
- Lift off the vapor nozzle from the water tank. Separate the base from the water tank.
- In the base, remove the foam packaging from the float ball.
- Place the water tank on the base.
- Make sure the foam packaging has been removed from the ceramic ball filter. Push the filter into the filter slot in the bottom of the water tank.NOTE: Replace the ceramic ball filter after 3000 hours of use.
- Use a jug to fill the water tank with clean water (no warmer than room temperature). The tank takes approximately 6.5 liters of water. NOTE: We recommend you use distilled water to prevent the build-up of scale that will occur if tap water is used.
- Put the vapor nozzle back onto the water tank making sure that the vapor nozzle is facing forwards. Wipe off any excess water from the exterior.NOTE: If the humidifier has been stored in a particularly cool place i.e. below 5°C, wait 30 minutes to warm up before turning it on.
- Plug the power cord into the base of the humidifier and then plug the adapter into the mains socket. The humidifier will beep and the power-on icon will light up. The humidifier is now in standby mode.
OPERATING INSTRUCTIONS
NOTE: The buttons for operating the appliance on the humidifier’s control panel and the remote control are the same.
- Touch the ON / OFF button repeatedly to turn the humidifier on and select one of the vapor settings:
Vapor Level Indicator Meaning Up to 7 bars High level vapor Up to 5 bars Medium level vapor Up to 3 bars Low level vapor LED screen is off and only the power on icon displays The humidifier is off and in standby mode When the humidifier is on, the relative humidity and temperature will display alternately on the LED screen.
- Touch the HUMIDITY button repeatedly to set the humidity level from 40% to 85%. The humidity level increases in increments of 5%. NOTE: To confirm a setting, do not press any buttons for a few seconds and the setting will be confirmed and the screen will automatically go back to showing the current humidity and temperature. The vapor will turn on and off as necessary to maintain the set humidity level.
- Touch the TIMER button repeatedly to set the timer to turn the vapor off in 1, 2, 4 and 8 hours as shown on the LED screen. NOTE: Once you have completed the setting, do not press any buttons for a few seconds and the screen will automatically go back to showing the current humidity and temperature, as well as the timer icon and the number of hours.
- When the water level is low, the low water level indicator will appear red on the LED screen and 10 beeps will sound. Make sure you refill the water tank or turn off the appliance.NOTE: If the water level is too low for a prolonged period, the humidifier’s inbuilt protection system will turn the humidifier off.
- To turn off the humidifier at any time, touch the ON / OFF button until the LED screen turns off.
- Unplug the power cord from the base of the humidifier and then unplug the adapter from the mains socket to fully turn off the humidifier. The power on icon will no longer display.
USING THE REMOTE CONTROLThe remote control’s buttons function in the same way as the buttons on the humidifier’s control panel. Please refer to the OPERATING INSTRUCTIONS section for more information on the buttons.Point the remote control at the humidifier making sure there are no obstacles between the remote control and humidifier’s infrared sensor. The remote control can connect to the humidifier within 16.5 feet. The operating range may vary depending on the brightness of the room.NOTE: Do not expose the infrared remote sensor to direct sunlight or other strong light, such as a florescent light.
USING THE AROMA OIL DIFFUSER
![]() IMPORTANT – Always make sure the humidifier is turned off before adding the aromatherapy or essential oil.
IMPORTANT – Always make sure the humidifier is turned off before adding the aromatherapy or essential oil.
- Pull out the aroma oil tray and if not already inserted, put in the sponge.
- Add the aromatherapy or essential oil until the sponge is soaked. If some oil spills outside the aroma oil tray, wipe it up before proceeding.NOTE: We recommend using aromatherapy or essential oils with antibacterial and antifungal properties.
- Slide the tray back into place and turn on the humidifier.NOTE: Do not add the aromatherapy or essential oil directly in the water tank or base of the humidifier.

CLEANING AND CARE
- CAUTION – Always unplug the humidifier from the mains socket and let it cool down before cleaning.
- Do not immerse the base or power cord in water/liquids or allow moisture to come into contact with these parts.
- Never use solvents, bacteriostat, chemical or abrasive cleaning agents, wire brushes, sharp objects or scouring pads to clean the product.
CLEANING
- Clean the appliance every 2 to 3 days to remove any film or scale build-up.
- Regular cleaning increases the lifespan of the humidifier.
- Always clean the appliance before storing it for a long time.
- Store the appliance in its original packaging or in a cool, dustfree, dry environment away from direct sunlight.
CLEANING THE BASE
- Remove the water tank from the base.
- Pour off any water away from the air intake to ensure that it does not flow into the inside of the base and damage the internal components.
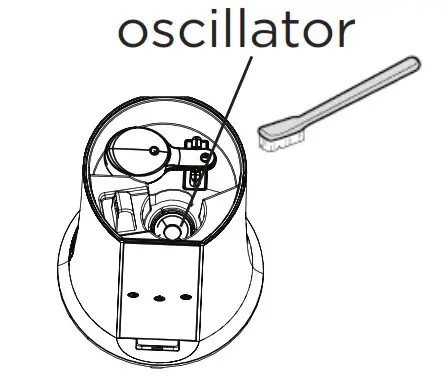
- Clean the ceramic surface of the oscillator in the base with a soft toothbrush. For stubborn stains or scale, use a small amount of the vinegar solution (1 part vinegar to 3 parts water) to clean the oscillator.
- Use a dry cloth to clean the inside of the base. Make sure you remove any scale particularly around the float ball and the oscillator.
- A damp cloth can be used to clean the outside of the base.
- Take out the aroma oil tray and sponge from the base and wash in a mild detergent solution. 7. Reassemble only when all parts are thoroughly dry.
CLEANING THE WATER TANK
- Remove the vapor nozzle from the water tank.
- Separate the water tank from the base.
- Lift out the ceramic ball filter in the bottom of the water tank. Remove it and rinse well in water.
- Use a solution of 1 part vinegar to 3 parts water to clean the vapor nozzle and water tank. Alternatively, a warm, mild detergent solution can be used to clean these parts.
- Rinse the items thoroughly.
- Using a clean cloth, wipe any deposits and excess water from the parts and dry thoroughly.NOTE: Clean the water tank and vapor nozzle with a vinegar solution once a week.

REPLACING THE FILTER
- Remove the vapor nozzle from the water tank.
- Separate the water tank from the base.
- Pull the filter out of the filter slot in the bottom of the water tank.
- Put the new filter into the filter slot and push until is firmly secured in place.
- Reassemble the humidifier.NOTE: We recommend that you replace the filter after 3000 hours of use under normal circumstances. If the water in your area is hard, you will need to change the filter more frequently to prevent a build-up of limescale in the appliance and reduce the potential for white limescale powder being emitted from the vapor nozzle.
TROUBLESHOOTING
| Problem | Possible Cause | Solution |
| The appliance will not turn on. | • The power cord or adapter plug is loose or not connected. | • Check the power cord and adapter plug. Make sure they are firmly connected to the mains socket and base, respectively. |
| The appliance is not working. | • There is not enough water in the water tank.• There is too much water in the water tank.• The water tank is incorrectly connected to the base.• The appliance is tilting.• The appliance is not producing enough vapor. There is a build-up of dust or scale.• The ceramic ball filter is dirty and water is not coming into the water basin.• The appliance is not producing enough vapor as the water is too cold. | • Refill the tank.• Remove some of the water.• Firmly reattach the water tank to the base.• Place the appliance on a stable, even surface.• Touch the POWER button to increase the vapor level.• Clean the vapor nozzle, the inside of the base and the water tank (see CLEANING AND CARE).• Check the float ball and oscillator in the base are working and not damaged. Clean if necessary (see CLEANING AND CARE). If damaged, take the appliance to a qualified service provider for repair.• Rinse the ceramic ball filter under tap water.• Put some warm water in the water tank. |
| The vapor has an odor. | • The appliance may be dirty. | • Clean the oscillator, the inside of the base and the water tank (see CLEANING AND CARE).• Replace the old water in the tank with clean water. |
| There is a leak. | • The water tank or vapor nozzle are loose or incorrectly assembled. | • Check and reinstall the water tank and vapor nozzle. |
DISPOSAL
Proper disposal of this product.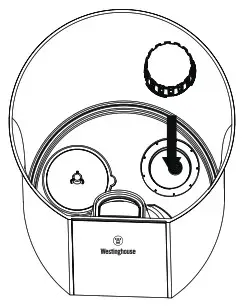 This symbol indicates that this appliance may not be treated as household waste. Instead, it should be taken to the appropriate collection point for recycling electrical and electronic equipment. Please use the return or collections services available in your community or contact the retailer where you purchased this product.
INFORMATION AND SERVICE
If you have questions or concerns about your product, please visit our website: www.westinghousehomeware.com, or contact our overseas offices/agents.In line with our policy of continuous product development, we reserve the right to change the product, packaging and documentation specifications without prior notice.Model: WSHUJ2158BHumidifierRating: 24VDC, 1.0AVolume: ≥240 ml / hrCapacity: 6.5 LSize (W x D x H): 8.07 x 8.07 x 27.75 inchesRemote controlBattery: CR2025 3V x 1 (included)Operating range: 16.5 feet
![]() INNOVATION YOU CAN BE SURE OF
INNOVATION YOU CAN BE SURE OF
 report this ad
![]() WESTINGHOUSE, and INNOVATION YOU CAN BE SURE OF are trademarks of Westinghouse Electric Corporation, a USA company.Used under license by Westinghouse Homeware (HK) Co. All Rights Reserved.
WESTINGHOUSE, and INNOVATION YOU CAN BE SURE OF are trademarks of Westinghouse Electric Corporation, a USA company.Used under license by Westinghouse Homeware (HK) Co. All Rights Reserved.
WSHUJ2158B
References
[xyz-ips snippet=”download-snippet”]