
WESTON MEAT CUBER/TENDERIZER JERKY SLICER INSTRUCTION MANUAL
DUE TO CONSTANT FACTORY IMPROVEMENTS, THE PRODUCT PICTURED MIGHT DIFFER SLIGHTLY FROM THE PRODUCT IN THIS BOX.

IMPORTANT SAFEGUARDS
When using electrical appliances, basic safety precautions should always be followed to reduce the risk of fire, electric shock, and/or injury to persons, including the following:
- Read all instructions.
- NEVER REACH INTO the Tenderizer/Jerky Slicer. Doing so could cause serious injury. ALWAYS USE THE PROVIDED TONGS.
- KEEP FINGERS CLEAR OF THE BLADES AT ALL TIMES. Failure to do so may result in personal injury. The Cutting Blades/Blade Assembly is very sharp. Wear Kevlar, cut-resistant gloves (Sold Separately) when handling the Blades.
- DO NOT press or push meat into the Chute with your fingers or any other object. Doing so may cause personal injury and/or damage to the unit.
- NEVER use fingers to scrape food away from the Tenderizer/Jerky Slicer while in operation. SEVERE INJURY MAY RESULT.
- DO NOT push the Tongs or other utensils into the Blades.
- NEVER LEAVE THE Tenderizer/Jerky Slicer UNATTENDED. Close supervision is necessary when any appliance is used near children. This appliance is NOT to be used by children.
- NEVER use any accessories or parts from other manufacturers. Doing so will VOID YOUR WARRANTY.
- Thoroughly clean all parts that will come into contact with food before using the Tenderizer/Jerky Slicer. Wash all parts by hand and dry thoroughly. Protective/cut-resistant gloves are recommended whenever handling the Blades.
- DO NOT attempt to tenderize or slice meat with bones or other hard items. Damage to the machine will occur.
- TIE BACK loose hair and clothing, and roll up long sleeves before operating the Tenderizer/Jerky Slicer. REMOVE ties, rings, watches, bracelets, or other jewelry before operating.
- DO NOT use the Tenderizer/Jerky Slicer while under the influence of drugs, medications or alcohol.
SAVE THESE INSTRUCTIONS
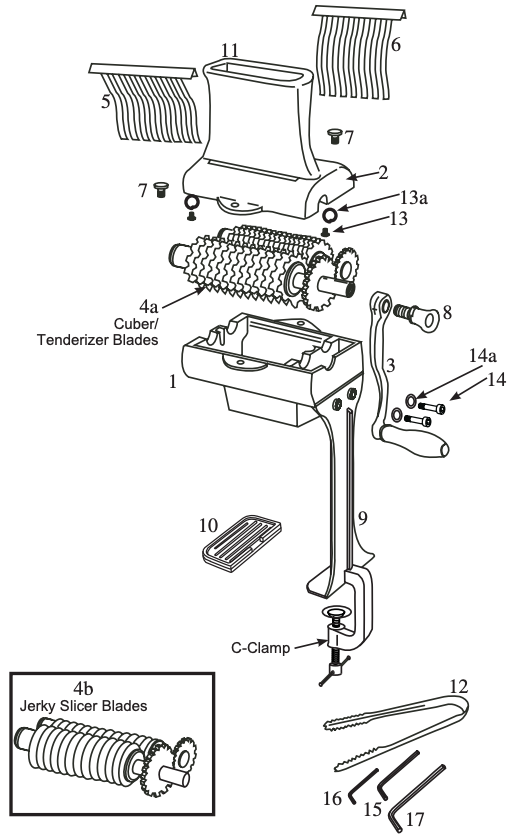
COMPONENT LIST
| DIAGRAM NUMBER | PART DESCRIPTION |
| 1 | BOTTOM HOUSING |
| 2 | TOP HOUSING |
| 3 | HANDLE |
| 4A | CUBER/TENDERIZER BLADE RACK ASSEMBLY |
| 4B | JERKY SLICER BLADE RACK ASSEMBLY |
| 5 | STAINLESS STEEL LEFT COMB |
| 6 | STAINLESS STEEL RIGHT COMB |
| 7 | HOUSING THUMBSCREW (2) |
| 8 | HANDLE THUMBSCREW |
| 9 | SUPPORT LEG |
| 10 | COUNTERTOP PROTECTOR PAD |
| 11 | CHUTE |
| 12 | STAINLESS STEEL TONGS |
| 13 | CHUTE SCREW (2) |
| 13A | CHUTE LOCK WASHERS (2) |
| 14 | LEG SCREW (2) |
| 14A | LEG SCREW WASHERS (2) |
| 15 | ALLEN WRENCH/CHUTE SCREWS |
| 16 | ALLEN WRENCH/LEG SCREWS |
| 17 | ALLEN WRENCH/BLADES |
If any components of this unit are broken, the unit does not operate properly or you need a replacement instruction manual, visit us on the web atWestonBrands.com
CLEANING INSTRUCTIONS
- Thoroughly wash all parts in soapy water. Rinse with clean water. Dry all parts immediately. NOTE: DO NOT immerse the Blade Assembly in sudsy water where they cannot be seen. To prevent injury, keep the Blade Assembly visible at all times.
- Coat all metal parts with a food grade silicone spray.
HELPFUL HINT: A long, skinny brush is helpful when cleaning the Blade Assembly.
ASSEMBLY INSTRUCTIONS
![]()
Cut Hazard. Blades are sharp, use care when handling. The use of cut-resistant gloves is suggested.
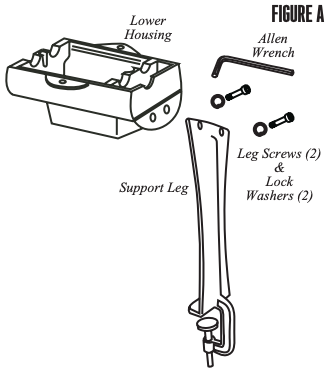
- Using an Allen Wrench and 2 Leg Screws and Lock Washers, attach the Support Leg to the Lower Housing (FIGURE A). The C-Clamp should be facing inward.

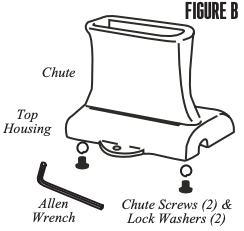
- Install the Chute to the Top Housing using an Allen Wrench and the 2 Chute Screws and Lock Washers (FIGURE B).
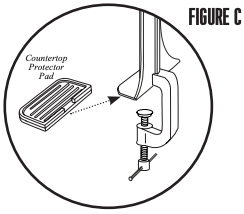
- Attach the Countertop Protector Pad to the Support Leg (FIGURE C).
- Open the C-Clamp by turn the screw clockwise to open the C-Clamp. Place the C-Clamp onto the work surface, then turn the screw counter-clockwise until firmly tightened.
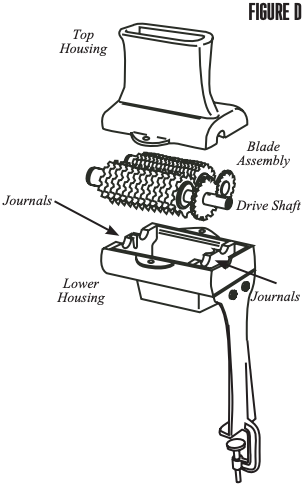
- Insert the Blade Assembly into the Lower Housing, guiding the Drive Shaft into the journals. Make sure the gears and the blades of the Blade Assembly are properly meshed together and resting in the journals (FIGURE D). NOTE: The Tenderizer Blade is a 2-piece set. The Jerky Slicer Blade is a single piece.
- Position the Top Housing onto the Lower Housing and line up the screw holes.
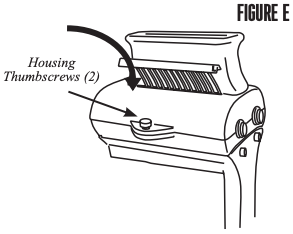
- Secure the Top Housing to the Lower Housing using the 2 Housing Thumbscrews. DO NOT OVERTIGHTEN! (FIGURE E).
- Insert the Left Comb and Right Comb into the Top Housing (FIGURE E).NOTE: The Left Comb is marked with an “L” on the upper portion of the Comb. The Top Housing is marked with an “L Comb” and “R Comb” to aid in Comb installation.
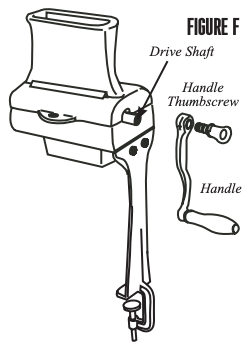
- Install Handle onto the Blade Drive Shaft. Secure the Handle to Drive Shaft with the Handle Thumbscrew (FIGURE F).
- To change Blades, follow “Assembly Instructions” 4-8 as outlined.
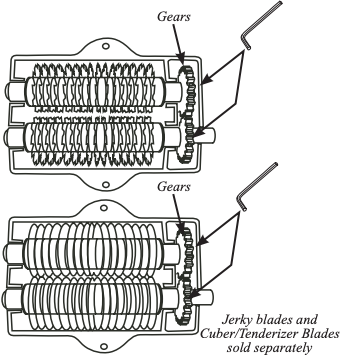
NOTE: Periodically the gears on the Blades need to be tightened. Use the Allen Wrench to tighten the screw on the gears.
DIRECTIONS FOR USE
![]()
Cut Hazard. Keep fingers out of feed opening. Always use the provided tongs.
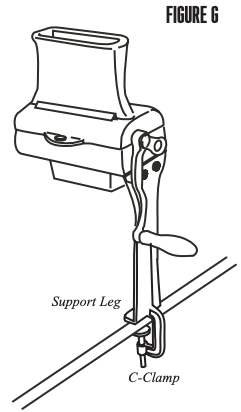
- With the Support Leg secured to the work surface with the C-Clamp, make sure the Handle can freely rotate (FIGURE G).
- Make sure the Combs are properly installed. DO NOT use the Tenderizer/Jerky Slicer without the Combs in place.
- Meat cuts should be 1¼” (3.2 cm) thick or less. Cuts of meat that are too thick may damage the Blades. Remove all bones or hard items in the meat before tenderizing or cubing. Damage to the unit may occur if bones or hard objects are pushed through.
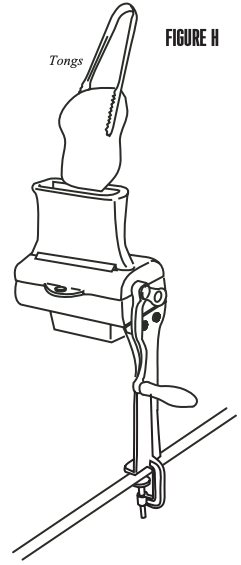
- Using the Tongs, insert meat into the opening at the top of the Chute until the meat contacts the Blades. Do not allow the Tongs to contact the Blades (FIGURE H).
- While facing the Tenderizer/Jerky Slicer with the Handle to the right, rotate the Handle CLOCKWISE to tenderize or slice the meat. The Blades will pull meat through the Tenderizer/Jerky Slicer. DO NOT force meat into the Blades.
- It may be necessary to pass the meat through the Cuber/Tenderizer several times to obtain the desired results. You may also pass the meat through at different angles if a different result is desired.
FOOD SAFETY
There are basic rules to follow when handling food.They are COOK, SEPARATE, CLEAN, and CHILL.
COOK
It’s crucial to cook food to a safe internal temperature to destroy bacteria that is present. The safety of hamburgers and other foods made with ground meat has been receiving a lot of attention lately, and with good reason. When meat is ground, the bacteria present on the surface is mixed throughout the ground mixture. If this ground meat is not cooked to at least 160°F to 165°F (71°C to 74°C), bacteria will not be destroyed and there’s a good chance you will get sick.
Solid pieces of meat like steaks and chops don’t have dangerous bacteria like E. coli on the inside, so they can be served more rare. Still, any beef cut should be cooked to an internal temperature of at least 145°F (63°C) (medium rare). The safe temperature for poultry is 165°F (74°C) and solid cuts of pork should be cooked to 145°F (63°C).
SEPARATE
Foods that will be eaten uncooked and foods that will be cooked before eating MUST ALWAYS be separated. Cross-contamination occurs when raw meats or eggs come in contact with foods that will be eaten uncooked. This is a major source of food poisoning. Always double-wrap raw meats and place them on the lowest shelf in the refrigerator so there is no way juices can drip onto fresh produce. Then use the raw meats within 1-2 days of purchase, or freeze for longer storage. Defrost frozen meats in the refrigerator, not on the counter.
When grilling or cooking raw meats or fish, make sure to place the cooked meat on a clean platter. Don’t use the same platter you used to carry the food out to the grill. Wash the utensils used in grilling after the food is turned for the last time on the grill, as well as spatulas and spoons used for stir-frying or turning meat as it cooks.
Make sure to wash your hands after handling raw meats or raw eggs. Washing hands with soap and water, or using a pre-moistened antibacterial towelette is absolutely necessary after you have touched raw meat or raw eggs. Not washing hands and surfaces while cooking is a major cause of cross-contamination.
CLEAN
Wash your hands and work surfaces frequently when you are cooking. Washing with soap and warm water for at least 15 seconds, then dry with a paper towel.
CHILL
Chilling food is very important. The danger zone where bacteria multiply is between 40°F and 140°F (4°C and 60°C). Your refrigerator should be set to 40°F (4°C) or below; your freezer should be 0°F (-18°C) or below. Simple rule: serve hot foods hot, cold foods cold. Use chafing dishes or hot plates to keep food hot while serving. Use ice water baths to keep cold foods cold. Never let any food sit at room temperature for more than 2 hours – 1 hour if the ambient temperature is 90°F (32°C) or above. When packing for a picnic, make sure the foods are already chilled when they go into the insulated hamper. The hamper won’t chill food – it just keeps food cold when properly packed with ice. Hot cooked foods should be placed in shallow containers and immediately refrigerated so they cool rapidly. Make sure to cover foods after they are cool.
NOTE: Special considerations must be made when using venison or other wild game, since it can become heavily contaminated during field dressing. Venison is often held at temperatures that could potentially allow bacteria to grow, such as when it is being transported. Refer to the USDA Meat and Poultry Department for further questions or information on meat and food safety.
ONE-YEAR LIMITED WARRANTY
This warranty applies to products purchased and used in the U.S. and Canada. This is the only express warranty for this product and is in lieu of any other warranty or condition.
This product is warranted to be free from defects in material and workmanship for a period of one (1) year from the date of original purchase. During this period, your exclusive remedy is repair or replacement of this product or any component found to be defective, at our option. If the product or component is no longer available, we will replace with a similar one of equal or greater value. This warranty does not cover unauthorized repairs or service to products, products sold “as-is” by retailers, glass, filters, wear from normal use, use not in conformity with the printed directions, or damage to the product resulting from accident, alteration, abuse, or misuse. This warranty extends only to the original consumer purchaser or gift recipient and is not transferable. Keep the original sales receipt, as proof of purchase is required to make a warranty claim. This warranty is void if the product is subjected to any voltage and waveform other than as specified on the rating label (e.g., 120V ~ 60 Hz).
We exclude all claims for special, incidental and consequential damages caused by breach of express or implied warranty. All liability is limited to the amount of the purchase price. Every implied warranty, including any statutory warranty or condition of merchantability or fitness for a particular purpose, is disclaimed except to the extent prohibited by law, in which case such warranty or condition is limited to the duration of this written warranty.
This warranty gives you specific legal rights. You may have other legal rights that vary depending on where you live. Some states or provinces do not allow limitations on implied warranties or special, incidental, or consequential damages, so the foregoing limitations may not apply to you.
To make a warranty claim, do not return this appliance to the store. Please call 1.800.814.4895 (001.216.901.6801 outside the US) or visit WestonBrands.com. For faster service, locate the model, type, and series numbers on your appliance.
ATTENTION!
PLEASE INSPECT THIS PACKAGE THOROUGHLY FOR MISSING PARTS OR ANY PRODUCT DAMAGE.IF YOUR PRODUCT CONTAINS SHIPPING DAMAGE, PLEASE CONTACT RETAILER FOR ASSISTANCE.
For all other questions regarding product usage, missing parts, product damage, difficulty or warranty activation, please contact the Weston Brands Customer Service Team:
WestonBrands.comCustomer.[email protected]Weston Brands, LLC, Southern Pines, NC 28387
Please DO NOT return this item to the retailer before contacting Weston Brands Customer Service.
SAVE THESE INSTRUCTIONS!Refer to them often and use them to instruct others.
References
[xyz-ips snippet=”download-snippet”]