
ASSEMBLY INSTRUCTIONS
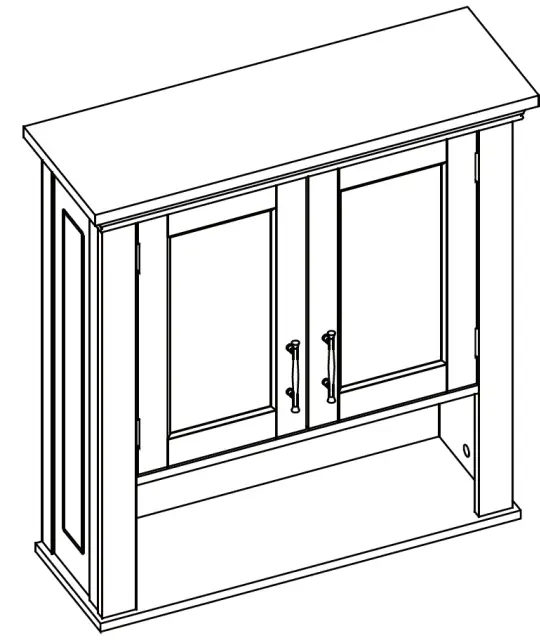 2-Door Wall Cabinet
ADULT ASSEMBLY REQUIREDThis product requires assembly by an adult because of small parts. Care should be taken in unpacking and assembling this item to keep small parts away from children. During assembly children should be kept away from the product due to the possible risk of injury.
WARNING ![]() SEE FULL WARNING ON PAGE 2Young children can be seriously injured or killed if furniture tips over. Don’t use this item for a TV stand or place heavy objects on top of the item. Always use angle braces or anchors to secure furniture to the wall.
SEE FULL WARNING ON PAGE 2Young children can be seriously injured or killed if furniture tips over. Don’t use this item for a TV stand or place heavy objects on top of the item. Always use angle braces or anchors to secure furniture to the wall.
THIS SHELF UNIT WILL HOLD UP TO 25 POUNDS PER SHELF OR A TOTAL OF 75 POUNDS. DO NOT LOAD EACH SHELF WITH MORE THAN 25 POUNDS OR 75 POUNDS TOTAL WEIGHT. IF OVERLOADED WITH MORE THAN 25 POUNDS PER SHELF OR 75 POUNDS TOTAL WEIGHT, SHELF MAY TIP FROM WALL AND CAUSE SERIOUS INJURY OR DEATH.
![]() WARNINGSERIOUS OR FATAL INJURIES CAN OCCUR FROM FURNITURE TIP-OVER. TO HELP PREVENT TIP-OVER:
WARNINGSERIOUS OR FATAL INJURIES CAN OCCUR FROM FURNITURE TIP-OVER. TO HELP PREVENT TIP-OVER:
- Always use tip over restraints and/or wall anchors to secure furniture to the wall
- Place heaviest items in the lowest drawers/bins or shelves
- Do not set TV’s or other heavy objects on top of this product
- Never allow children to climb or hang on to the drawers/bins, doors, or shelves of furniture
- Never open more than one drawer at a time or defeat or remove any drawer interlock system
PARTS LIST

| NO | QTY | DESCRIPTION |
| 1 | 1PC | Left Door |
| 2 | 1PC | Right Door |
| 3 | 1PC | Right Side Panel |
| 4 | 1PC | Left Side Panel |
| 5 | 1PC | Cross Bar |
| 6 | 1PC | Shelf |
| 7 | 1PC | Top Board |
| 8 | 1PC | Bottom Board |
| 9 | 1PC | Upper Back Board |
| 10 | 1PC | Middle Back Board |
| 11 | 1PC | Lower Back Board |
| 12 | 1PC | Adjustable Shelf |
| 13 | 1PC | Right Support Board |
| 14 | 1PC | Left Support Board |
| NO | PARTS | QTY | DESCRIPTION |
| A | 16PCS | Wood Dowel | |
| B | 12PCS | Cam Bolt | |
| C | 12PCS | Cam Lock | |
| D | 18PCS | Screw (3x12mm) | |
| E | 4PCS | Hinge | |
| F | 2PCS | Magnet Plate | |
| G | 24PCS | Screw (2.5x12mm) | |
| H | 1SET | Magnet with 2 Screws | |
| I | 4PCS | Shelf Holder | |
| J | 4PCS | Machine Screw (4x12mm) | |
| K | 2PCS | Handle | |
| L | 2PCS | Plastic Anchor | |
| M | 2PCS | Screw (4x45mm) | |
| N | 1PC | Plastic Connection Strip | |
| 1PC | Wall Mounting Paper Template |
TOOLS NEEDED FOR ASSEMBLY: FLAT & PHILLIPS SCREWDRIVER (NOT INCLUDED) THE USE OF A POWER SCREWDRIVER IS NOT RECOMMENDED FOR ASSEMBLY DO NOT USE ITEM IF ANY PARTS ARE MISSING OR DAMAGED
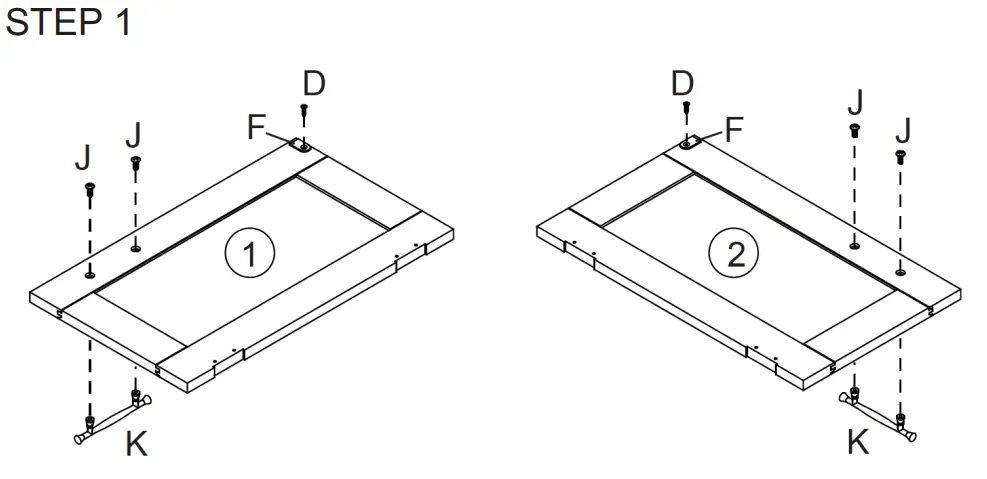
- Attach 1 magnet plate (F) to left door (1) by inserting 1 screw (D) through hole on magnet plate (F), then tighten to left door (1).
- Attach 1 handle (K) to left door (1) by inserting 2 machine screws (J) through holes on left door (1), then tighten to handle (K).
- Repeat above steps to assemble another magnet plate (F) and handle (K) to right door (2).
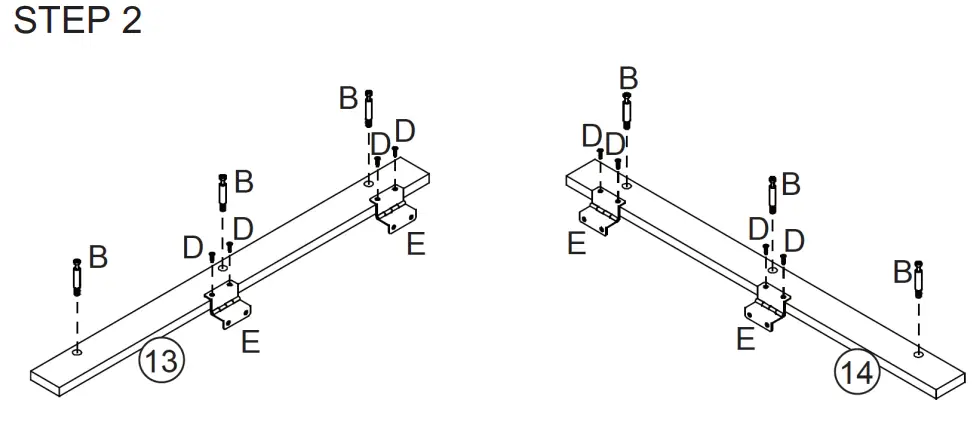
- Screw 3 cam bolts (B) into cam bolt holes on the right support board (13).
- Attach 2 metal hinges (E) to the right support board (13) by inserting 4 screws (D) through holes on metal hinges (E), then tighten to the right support board (13).
- Repeat the above steps for the left support board (14).
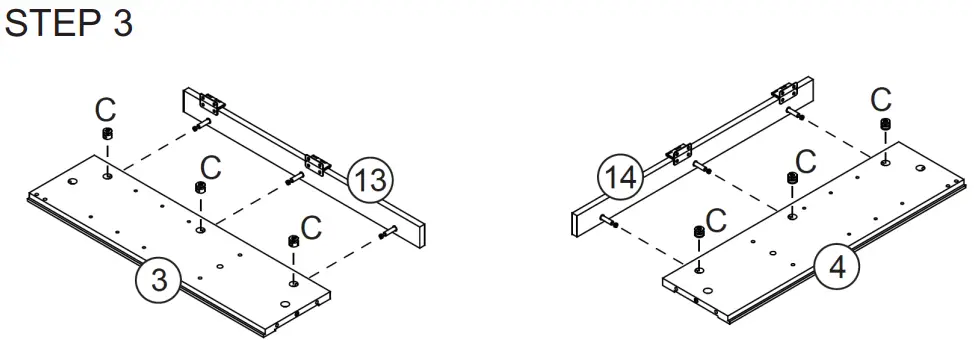
- Attach left support board (14) to the left side panel (4) by inserting 3 cam bolts (B) into cam lock holes on the left side panel (4).
- Insert 3 cam locks (C) into cam lock holes on the left side panel (4), then rotate clockwise to secure cam bolts (B) in place.
- Repeat the above steps to assemble right-side panel (3) and right support board (13).

- Screw 2 cam bolts (B) into cam bolt holes on the left side panel (4) and right-side panel (3).
- Insert 8 wood dowels (A) into dowel holes on the left side panel (4) and right-side panel (3).
- Attach crossbar (5) to the left side panel (4) by inserting wood dowels (A) into dowel holes on the crossbar (5).
- Attach shelf (6) to the left side panel (4) by inserting 1 cam bolt (B) and 2 wood dowels (A) into holes on the shelf (6), then insert 1 cam lock (C) into the cam lock hole on the shelf (6) and rotate clockwise to secure cam bolt (B) in place.
- Attach right side panel (3) to the crossbar (5) and shelf (6) by inserting wood dowels (A) into holes on the crossbar (5), and inserting cam bolt (B) and wood dowels (A) into holes on the shelf (6).
- Insert 1 cam lock (C) into the cam lock hole on the shelf (6) and rotate clockwise to secure the cam bolt (B) in place.

- Screw 2 cam bolts (B) into the cam bolt holes on the bottom board (8).
- Insert 4 wood dowels (A) into dowel holes on the bottom board (8).
- Attach bottom board (8) to the left side panel (4) and right-side panel (3) by inserting cam bolts (B) and wood dowels (A) into holes on the left side panel (4) and right-side panel (3).
- Insert 2 cam locks (C) into cam lock holes on the left side panel (4) and right-side panel (3), then rotate clockwise to secure cam bolts (B) in place.
- Attach magnet (H) to the top board (7) by inserting 2 screws (H) through holes on a magnet (H), then tighten to bottom of top board (7).
- Screw 2 cam bolts (B) into cam bolt holes on top board (7).
- Insert 4 wood dowels (A) into dowel holes on the bottom of the top board (7).
- Attach top board (7) to the left side panel (4) and right-side panel (3) by inserting 4 wood dowels (A) and 2 cam bolts (B) into dowel holes and cam lock holes on the left side panel (4) and right-side panel (3).
- Insert 2 cam locks (C) into cam lock holes on the left side panel (4) and right-side panel (3), then rotate clockwise to secure cam bolts (B) in place.
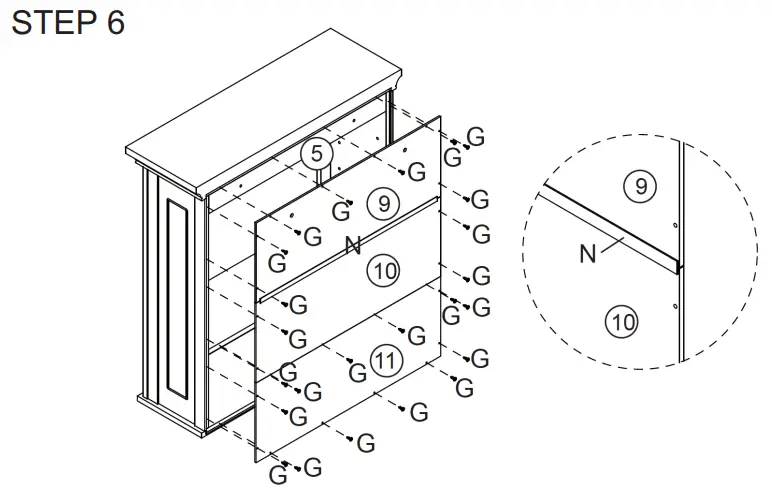
- Attach upper backboard (9) and middle backboard (10) together by sliding into a plastic connection strip (N).
- Attach upper backboard (9) and middle backboard (10) to the cabinet by inserting screws (G) through holes on the upper backboard (9) and middle backboard (10), then tighten into the cabinet.
- Attach lower backboard (11) to the cabinet by inserting screws (G) through holes on the lower backboard (11), then tighten into the cabinet.
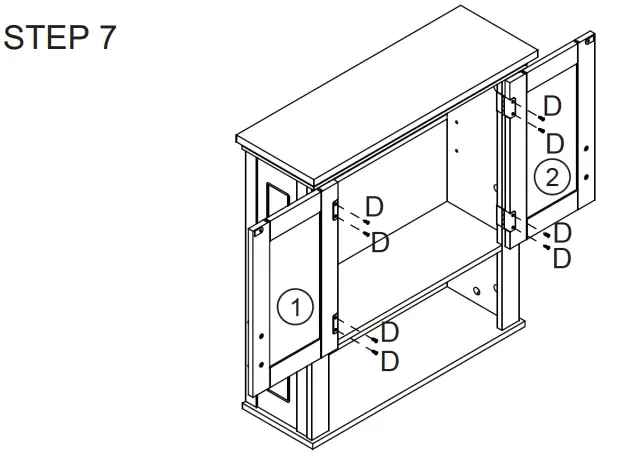
- Attach left door (1) to left support panel (14) by inserting 4 screws (D) through holes on metal hinges (E), then tighten to left door (1).
- Repeat above step to assemble right door (2).
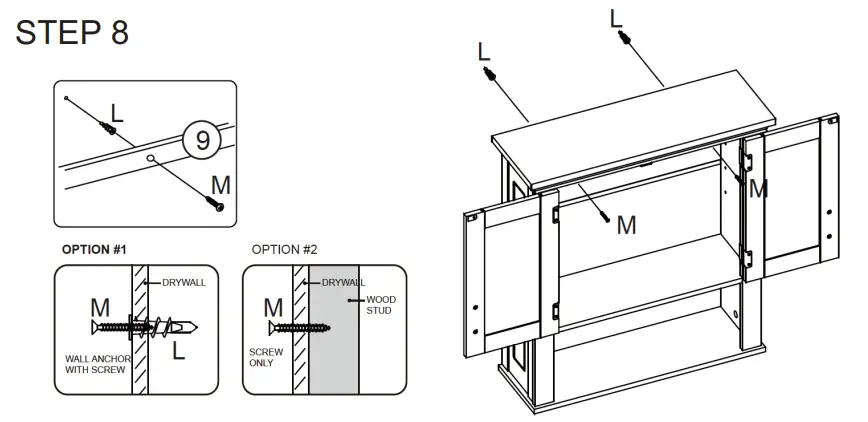
Option #1: Securing to Drywall
- Using wall mounting paper template to determine position, screw 2 plastic anchors (L) into drywall.
- Insert 2 screws (M) through holes on the inside of the cabinet and into plastic anchors (L) and tighten.
Option #2: Securing to Drywall and Wood Stud
- Insert 2 screws (M) through holes on the inside of the cabinet, then tighten through drywall and into wood stud.
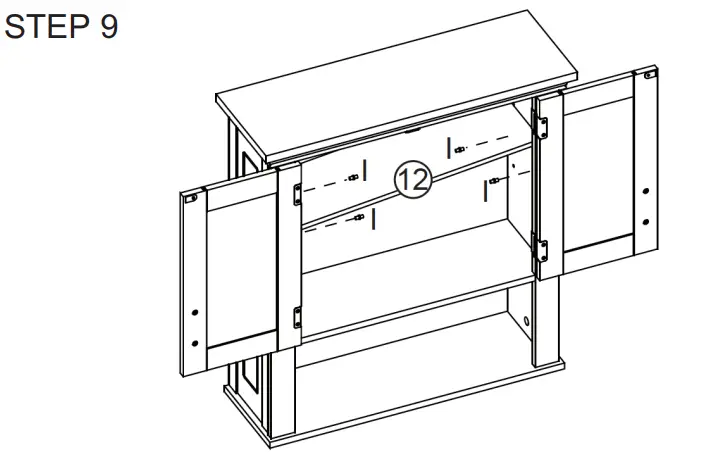
- Insert 4 shelf holders (I) into holes on left side panel (4) and right-side panel (3) at desired shelf heights.
- Place adjustable shelf (12) onto shelf holders (I).
ATTENTION ADULTS: Cabinet should be checked periodically for damage or loose screws/parts. Take appropriate action necessary to correct hazards such as tightening of screws and taking any damaged parts away from children.
WARNING![]() Please make sure your item is secured to the wall, per assembly instructions.
Please make sure your item is secured to the wall, per assembly instructions.
CARE INSTRUCTIONS:Wipe clean with a water-dampened cloth. Wipe dry with a clean cloth.
IMPORTANT:Keep assembly instructions for future reference.
[xyz-ips snippet=”download-snippet”]