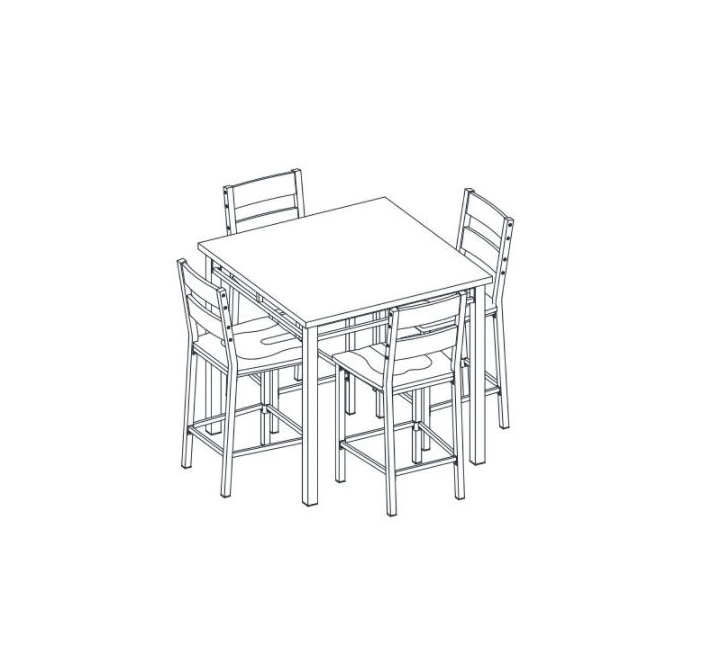
Whalenstyle Austen 5pc Counter Height Dining

ADULT ASSEMBLY REQUIREDIf you have any questions regarding assembly or if parts are missing, DO NOT return this item to the store where it was purchased. Please call our customer service number and have your instructions and parts list ready to provide the model name, part name, or factory number: 866-942-5362Pacific Standard Time: 8:30 a.m. – 4:30 p.m., Monday – FridayOr visit our website 24 hours a day, 7 days a week for product assistance atwww.whalenstyle.comOr e-mail your request to [email protected]THIS INSTRUCTION BOOKLET CONTAINS IMPORTANT SAFETY INFORMATION. PLEASE READ AND KEEP IT FOR FUTURE REFERENCE. Date 2019-01-10 Rev. 0001-A
MAXIMUM RECOMMENDED WEIGHT LOADSMANUFACTURER: Whalen Furniture ManufacturingCATALOG: Austen 5pc Counter Height DiningMODEL # BH16-084-499-03MADE IN MALAYSIA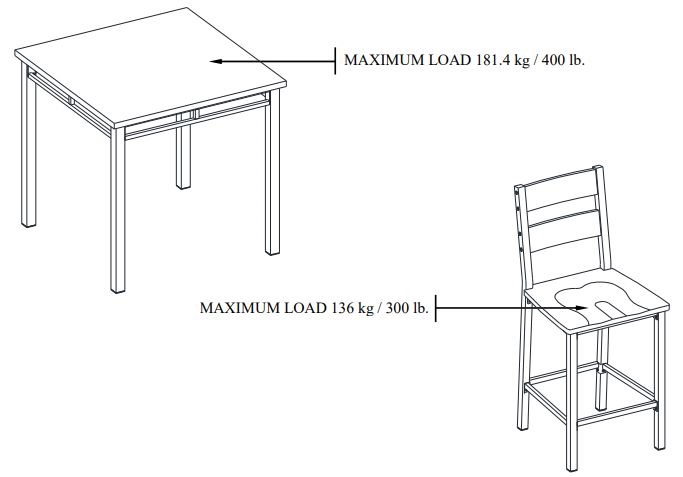
![]() THIS UNIT IS INTENDED ONLY FOR USE WITHIN THE MAXIMUM WEIGHTS INDICATED. USE WITH HEAVIER THAN THE MAXIMUM WEIGHTS INDICATED MAY RESULT IN INSTABILITY CAUSING POSSIBLE INJURY.
THIS UNIT IS INTENDED ONLY FOR USE WITHIN THE MAXIMUM WEIGHTS INDICATED. USE WITH HEAVIER THAN THE MAXIMUM WEIGHTS INDICATED MAY RESULT IN INSTABILITY CAUSING POSSIBLE INJURY.
GENERAL INFORMATION, TIPS, AND TRICKS
- Please read the Assembly Instructions prior to assembling the unit.
- To avoid damage, assemble the unit on a sturdy, level, and non-abrasive surface.
- Keep all hardware parts out of reach of children.
- Please wait until all steps are completed before tightening bolts.
- Make sure all bolts are tightly fastened before the unit is used.
Parts and Hardware List
Please read completely through the instructions and verify that all listed parts and hardware are present before beginning assembly.
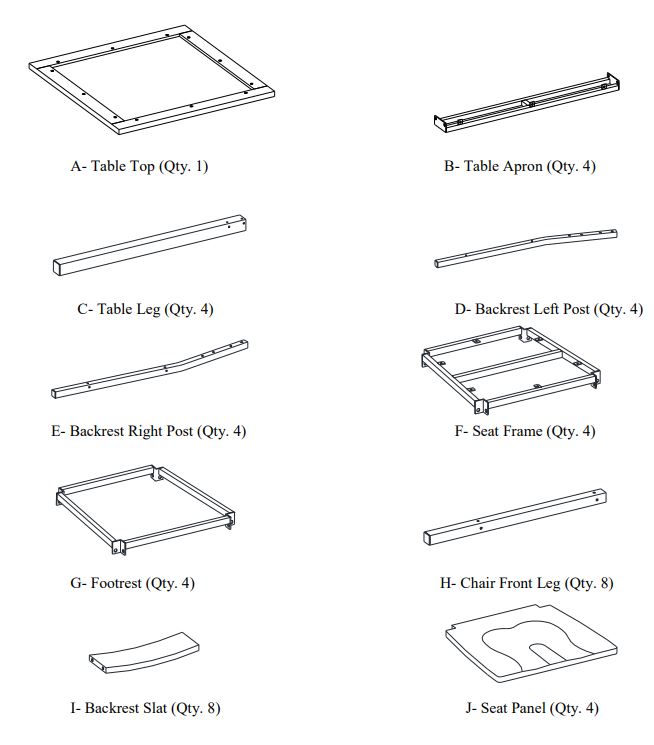
Please read completely through the instructions and verify that all listed parts and hardware are present before beginning assembly.
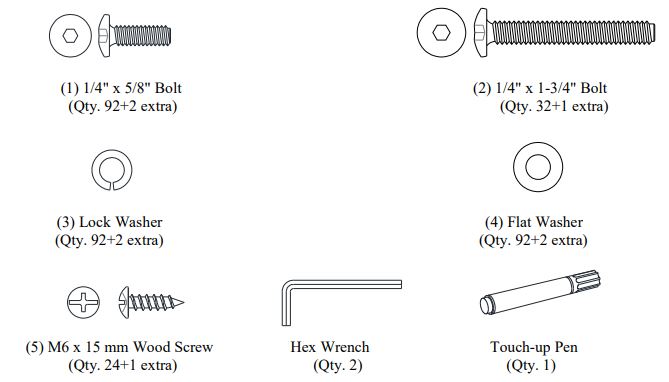
Tools required: Hex wrench (provided) and Phillips screwdriver (not provided).
Assembly Instructions for Table
![]() DO NOT fully tighten the bolts initially until all the bolts are ready to assemble. To avoid causing damages to the thread, DO NOT over-tighten the bolts.
DO NOT fully tighten the bolts initially until all the bolts are ready to assemble. To avoid causing damages to the thread, DO NOT over-tighten the bolts.
- Unpack the unit and confirm that you have all the hardware and required parts.
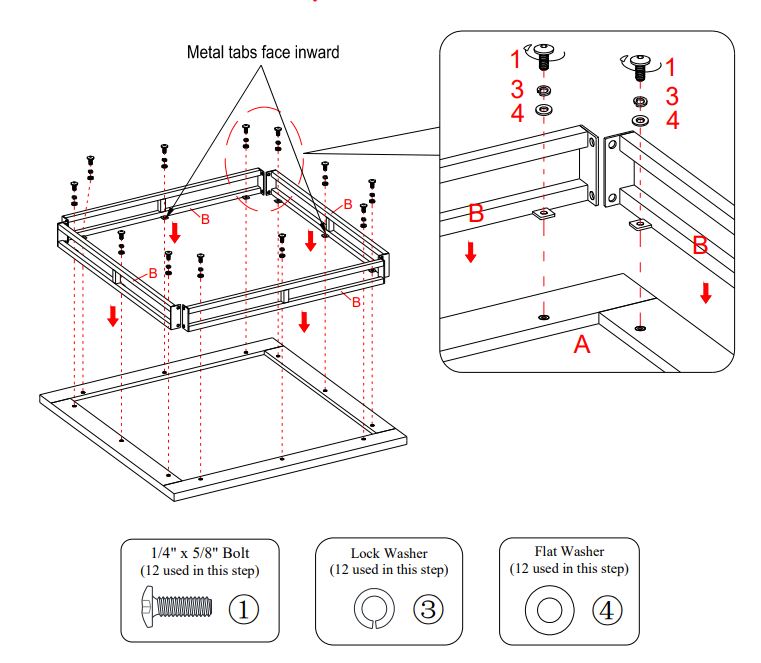
- Position the Table Top (A) upside down on a level and protected surface.
- Attach four Table Aprons (B) to the Table Top (A) by inserting twelve 5/8″ Bolts (1) with Lock Washers (3) and Flat Washers (4) through the metal tabs and screw them into place. DO NOT fully tighten the bolts.
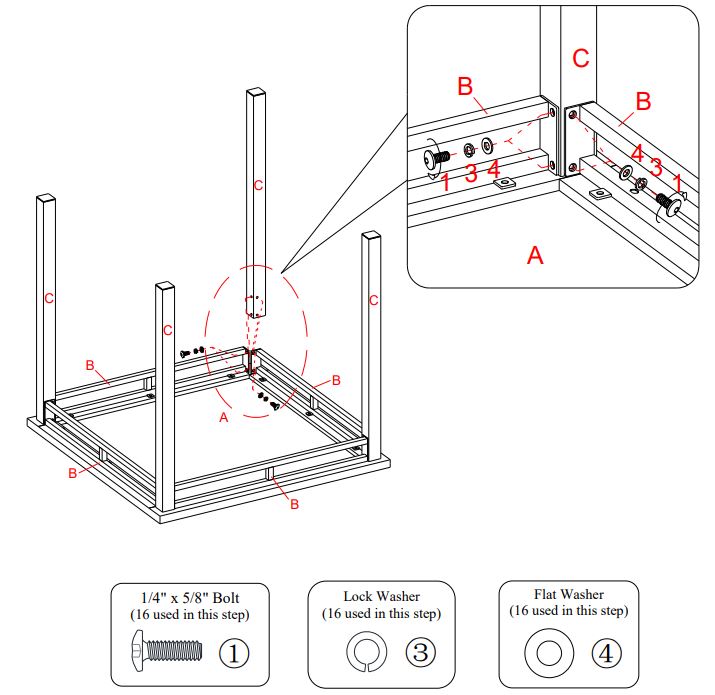
 Attach four Legs (C) to the Aprons (B) with sixteen 5/8″ Bolts (1) and sixteen Washers (3 and 4).
- Stand the unit upright and place it at the desired location.
- Combine two Backrest Slats (I) between the Backrest Left and Right Posts (D and E) with eight 1-3/4″ Bolts (2).
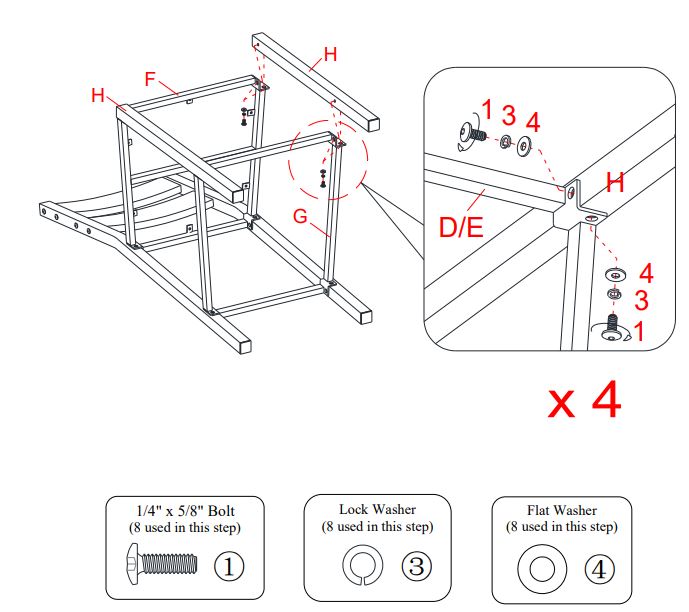
- attach the Seat Frame (F) and Footrest (G) to the assembled backrest with eight 5/8″ Bolts (1) and eight washers (3 and 4).
- Proceed to attach the two Chair Front Legs (H) to the Seat Frame (F) and Footrest (G) with eight 5/8″ Bolts (1) and eight washers (3 and 4).
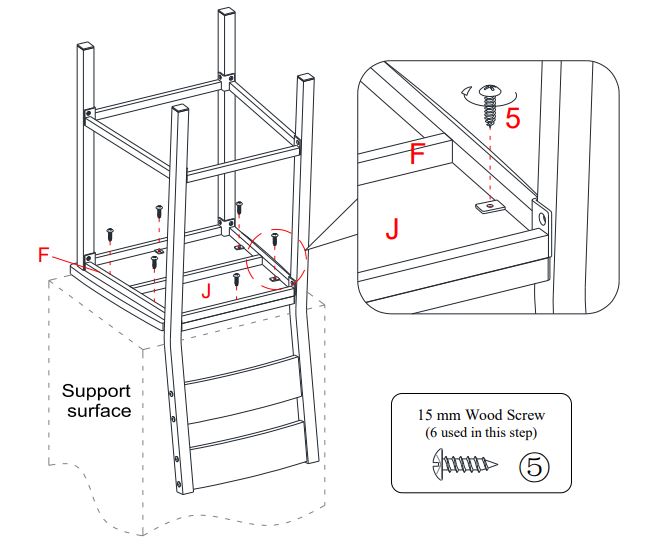
- Place one Seat Panel (J) upside down on the carton or other support surface as shown.NOTE: Place a protective cover (like the bubble wrap packing material) over the carton or other support surface to prevent scratching.
- Flip the assembled chair frame upside down and fit the Backrest Posts (D and E) into the notches of the Seat Panel (J). Push the Seat Panel (J) all the way back against the Backrest Posts (D and E) and fasten to the Seat Frame (F) with six 15 mm Wood Screws (5). Tighten all the screws with a Phillips screwdriver.
- Stand the assembled unit upright on a flat surface. Press down the Seat Panel (G) to even all legs. Now, tightly fasten all bolts with the provided hex wrench.
- Repeat the same process to assemble the other chairs.
 Attach four Legs (C) to the Aprons (B) with sixteen 5/8″ Bolts (1) and sixteen Washers (3 and 4).
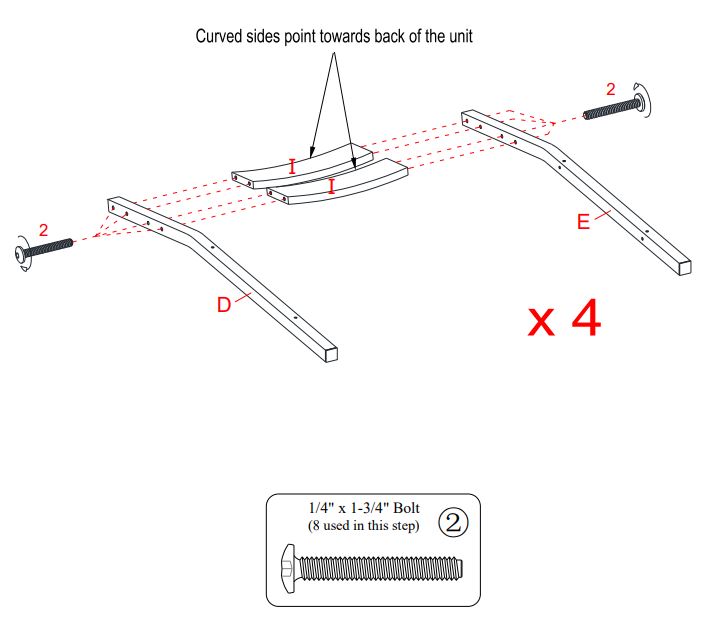 Combine two Backrest Slats (I) between the Backrest Left and Right Posts (D and E) with eight 1-3/4″ Bolts (2).
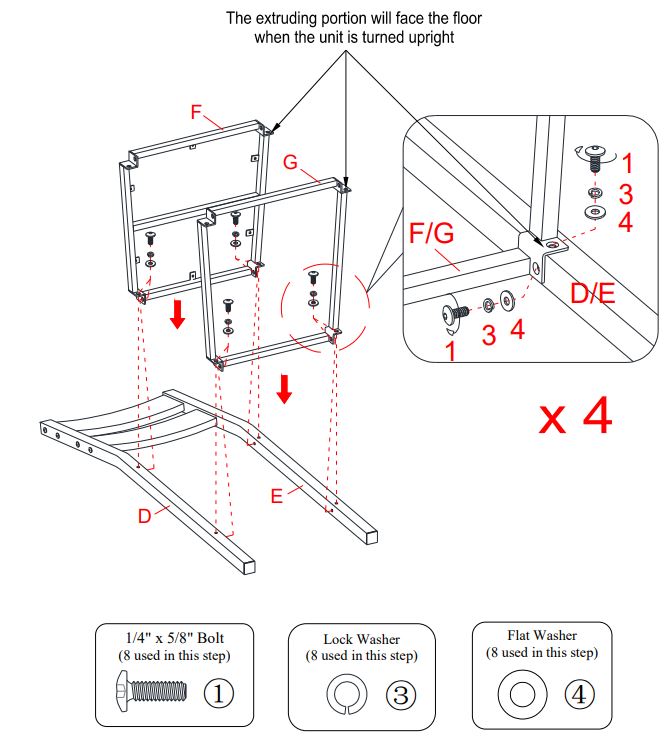
Care and Maintenance
- Use a soft, clean cloth that will not scratch the surface when dusting.
- Use of furniture polish is not necessary. Should you choose to use polish, test first in an inconspicuous area.
- Using solvents of any kind on your furniture may damage your furniture’s finish.
- Never use water to clean your furniture as it may cause damage to the finish.
- Always use coasters under beverage glasses and flowerpots. Liquid spills should be removed immediately. Using a soft, clean cloth, blot the spill gently. Avoid rubbing. Always use protective pads under hot dishes and plates. Heat can cause chemical changes that may create spotting within the furniture finish.
- In the event that your furniture is stained or otherwise damaged during use, we recommend that you call a professional to repair your furniture.
- Check bolts/screws periodically and tighten them if necessary.
Further Advice about Wood Furniture CareIt is best to keep your furniture in a climate-controlled environment. Extreme temperature and humidity changes can cause fading, warping, shrinking, and splitting of wood. It is advised to keep furniture away from direct sunlight as the sun may damage the finish.Proper care and cleaning at home will extend the life of your purchase. Following these important and helpful tips will enhance your furniture as it ages.A touch-up pen has been provided to minimize the small nicks or scratches that may occur during assembly or shipping.We hope you enjoy your purchase for many years. Thank you for your purchase!
QUALITY GUARANTEEWe are confident that you will be delighted with your Whalen Furniture purchase.Should this product be defective in workmanship or materials or fail under normal use, we will repair or replace it for up to one (1) year from the date of purchase. Every Whalen Furniture product is designed to meet your highest expectations. We guarantee that you will immediately see the value of our fine furniture. This warranty gives you specific legal rights and you may also have other rights which vary from State to State.
Customer Service: 866-942-53628:30 a.m. – 4:30 p.m., PST, Monday to Fridaywww.whalenstyle.com
[xyz-ips snippet=”download-snippet”]