Wharfedale Aeroline Vocal Uhf Handheld
Wireless Microphone System User Manual
FEATURES
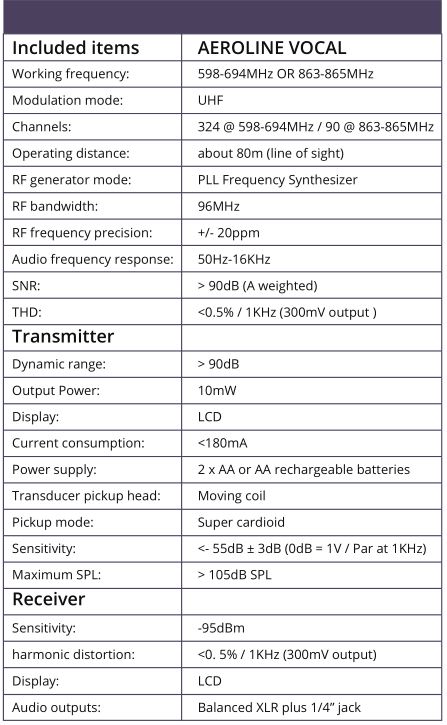
- Industry-leading digital true diversity design ensures signal stability.
- PLL dual-channel phase-locked loop design with automatic frequency offset correction.
- Unique intelligent ID recognition technology. No crosstalk and no risk of eavesdropping.
- Digital analog hybrid transmission. No audio transmission delay.
- Dual-core internal audio processing. The sound quality is pure.
- Up to 324 channels. The frequency distribution is easy to set.
- Simple infrared frequency design.
- LCD liquid crystal display giving system status at a glance.
- Balanced and unbalanced audio outputs making connections to other audio equipment easy.
- The LCD on the receiver shows the parameters of the transmitter (mic). Handy to keep an eye on the system.
- Sturdy and durable microphone design.
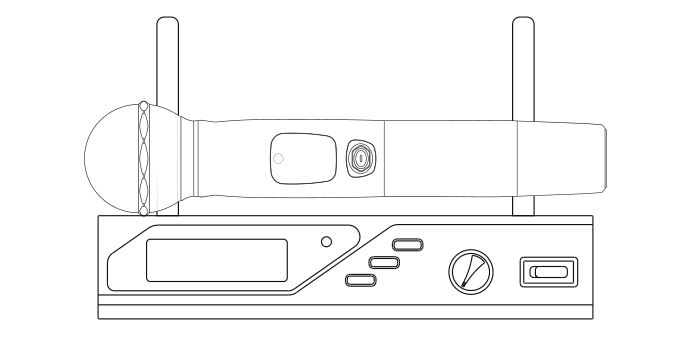
Aeroline is suitable for professionals and for professional audio applications. It uses UHF bands for wireless transmission and the audio path has been refined to deliver the highest possible audio quality. To get the most from your Aeroline Vocal, please read this manual carefully before use and keep it in a safe place for future reference Aeroline accessories, such as the antennae and power supply, are specific to Aeroline. Do not use other accessories as it may affect the use, or even cause damage. In some regions a license may be required to use this wireless equipment. Always check with your local government regulations before use.
- When in use there may be high voltage inside the chassis. Do not remove the cover yourself!
- Before use, please check if the local voltage matches the voltage of the power adapter of the unit!
- When the device is not working properly, please disconnect the power and remove the batteries from the transmitter. Contact yourWharfedale Pro retailer or distributor.
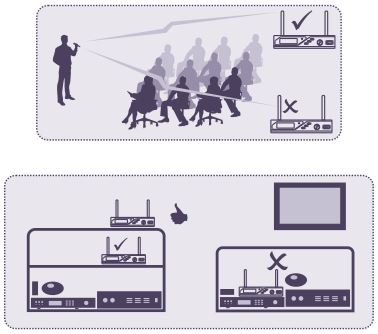
- This product is a wireless product. When using it, the receiver should be away from electronic products with strong electromagneticradiation (such as: HD box, karaoke machine, walkie-talkie, WiFi). etc., otherwise it may interfere with the receiver’s work!
Safety and warning
- The transmitter part is powered by 2 x AA batteries or rechargeable batteries of the same specification. Poor batteries may damage the equipment.
- Do not expose to the sun or fire Do not store or use in an overheated environment.
- This product is a precision equipment. Non-professionals should not disassemble, modify or repair this product!
- This product is suitable for indoor use only. Do not expose to high temperature, rain and humidity.
- Do not place liquid objects such as cups and vases on the receiver.
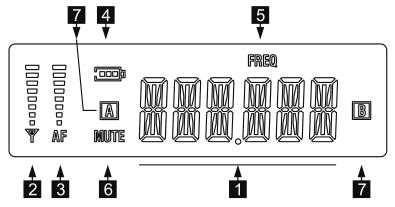
Receiver LCD display
- Channel and other functions display
- Shows the strength of the wireless signal received from the transmitter (mic)
- Shows the strength of the received audio signal
- Handheld microphone battery indicator
- Displays the channel frequency adjustment
- Mute indicator (including no signal received)
- Shows the status of the HF receiving systems depending on the antennas used. When the ” A/B ” flashes it shows that the high-frequency system is in use.
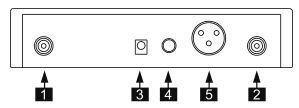
Rear panel
1 – Antenna B connector2 – Antenna A connector3 – DC Power input4 – 6.35mm unbalanced audio output5 – XLR balanced audio output
Front panel
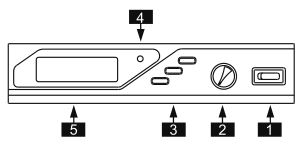
1 – Power switch2 – Output Volume knob3 – Function buttons4 – Infrared frequency sync window5 – LCD liquid crystal display window
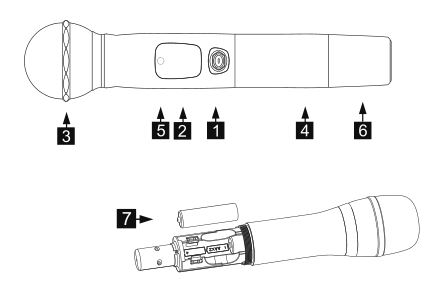
The microphone (transmitter)
- Power switch button. (Short press – power on; long press for about 2 seconds – power off;)
- Backlit LCD display. The backlight goes off after about 2 seconds.
- Mesh grille with a protective sponge inside.
- Lower tube body. This is removed by unscrewing to access the battery compartment.
- Infrared frequency window.
- Antenna. Do not hold the antenna section in your hand as it will affect transmission range.
- With 2 x good quality AA batteries the mic has a continuous working time of around 6 hours. When the battery indicator is low, replace the batteries. First make sure the transmitter is off ! Then unscrew the lower tube (4) and replace the batteries. When replacing batteries make sure the polarities are correct.
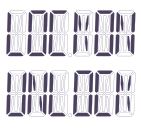
Microphone (transmitter) LCD
 Battery level indicator. When the battery symbol is flashing – it is about to run out !
- Shows the working channel. This will be the same as the paired receiver after the frequency is matched.
- Frequency Display.
RECEIVER CONNECTION
- Insert the receiving antennae into the receiver base and turn the antennae plugs to the right until they are tightened. Position or rotate the antennae until they are perpendicular to the ground.
- Connect the power output plug of the supplied power adapter into the power socket of the receiver.
- Use an unbalanced 6.35mm audio cable to connect the unit to the amplifier, or for better results, use the balanced XLR line output socket to connect to other audio equipment with balanced inputs.
- This machine adopts Digital True Diversity design. When starting up, the system needs to compare the A and B signals. This means startup time can be longer.
- Turn the receiver power button to “ON”. The LCD shows “UHF” and the channel is displayed after 10 seconds. The receiver enters the ready state.
- If you are not using the receiver for a long time, unplug the power adapter from the AC outlet.
QUICK SETUP
- Fix the antennae on to the receiver.
- Connect the device to the external audio equipment (amplifier / mixer etc).
- Do not turn on the power of the audio device (such as external amplifier).
- Turn on the power of the receiver, then turn on the power of the transmitter (mic) For Transmitter and receiver frequency pairing, please refer to the `pair frequency’ section of this manual.
- Look at the receiver LCD. Speak into the microphone and the AF signal bar changes. This indicates that the wireless microphone is working properly. Turn on the power of other external devices, adjust the volumes, and start performing!
- Important order for switching on : Receiver – preamplifier – power amplifier. Before starting the first time, please turn down all volumes to minimum. For shutdown always turn system off in this order : Amplifier – Preamp – Receiver.
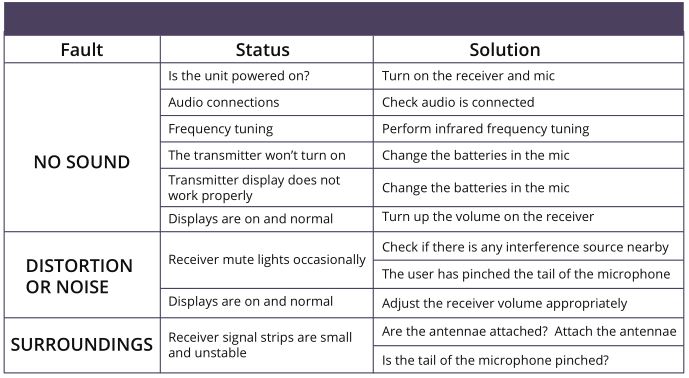
- If there is a possible fault please see the troubleshooting guide in this user manual or contact your Wharfedale Pro retailer or distributor.
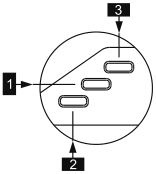 1 – Frequency setting / module setting2 – Key Lock / down button3 – Frequency adjust / up button
It is recommended that the receiver is locked after completing the setup to prevent others from changing it.
Panel locking
- In the unlocked state, press the “” button and hold for about 1 second. The display shows “LOCKON” for about 1 second, then displays the frequency.
- At this time, the channel button is locked and short pressing on all the buttons will display “LOCKON” for about 1 second, and then display the channel.
- In the locked state, long press “” button and hold for about 1 second. The display shows “UNLOCK” for about 1 second, then the channel is displayed.
 In the unlocked state, press the “
Channel adjustment setting
 – When the buttons are not locked (see Panel lock), press the “SET/TUNE” button. The display will show “TUNECH” for about 1 second, then display the channel.At the same time, “FREQ” icon flashes. Now press “∧” to increase the channel, press “∨” to decrease the channel.
– After the adjustment is complete, press the “SET/TUNE” button twice. The display will show “EXIT” for about 1 second, “FREQ” will stop flashing and then will Display the channel. Exit the channel adjustment status, and save the Channel settings.
Note: Press the “SET/TUNE” button twice, or adjust the channel and press the “SET/TUNE” button once to display “GROUP”. This function is not supported because there is no preset module in this unit.
Frequency Note:
- This system uses infrared automatic frequency matching. This quickly and accurately matches the frequency between the receiver and transmitter.
- For channel adjustment, please refer to the previous instructions.
 This system uses infrared automatic frequency matching. This quickly and accurately matches the frequency between the receiver and transmitter.
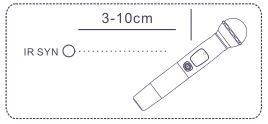
IR SYNCING
When the receiver completes the channel setting, it needs to update the transmitter’s frequency to make the system work normally. With the buttons unlocked, give a short press on the ” SYNC ” button. The receiver’s infrared frequency window lights up for about 4 seconds. This indicates that the mode is enabled. The receiver will be muted and the display will not change.
At this point, keep the transmitter (microphone) within 3-10cm of the receiver’s pair of lights. When the lights go off the transmitter’s display will light up and the bar displays will be full. This indicates that the frequency setup has been completed. Check that the channel of the receiver and microphone are the same. If they are not then repeat the operation above.
Channel setting
- There are 12 groups (C29-C40) in each channel. Each group has 27 channels (001-027) leading to a total of 324 channels.
- For best results, start from the channel in the middle of the group as much as possible.
- Check the results by using the system and listen carefully incase of any environment signal interference. Watch the receiver signal bar, to make sure signal is strong and that there is no interference.
- When there is interference in the selected channel, please adjust it to a channel with no interference;
- It is recommended not to more than 8 devices together.
- Always try to stay away from sources of the interference and try to keep the transmitter in `line of sight’ of the receiver.

Wharfedale Pro Limited Warranty
Wharfedale Pro products are warranted of manufacturing or material defects for a period of one year from the original date of purchase. In the event of malfunction, contact your authorised Wharfedale Pro dealer or distributor for information.
Please be aware that the warranty details may differ from country to country. Contact your dealer or distributor for information (available at www.wharfedalepro.com). These terms do not infringe your statutory rights.

References
[xyz-ips snippet=”download-snippet”]