![]()
COMPACTOR USER INSTRUCTIONS FOR CONSOLE MODELS
THANK YOU for purchasing this high-quality product. If you should experience a problem not covered in the TROUBLESHOOTING section, please visit our website at www.whirlpool.com or call us at 1-800-253-1301. You will need your model and serial number, located on the right-hand side, behind the compactor drawer.
COMPACTOR SAFETY
Your safety and the safety of others are very important.We have provided many important safety messages in this manual and on your appliance. Always read and obey all safety messages. This is the safety alert symbol.This symbol alerts you to potential hazards that can kill or hurt you and others.All safety messages will follow the safety alert symbol and either the word “DANGER” or “WARNING.” These words mean:
|
DANGER |
You can be killed or seriously injured if you don’t immediately follow instructions. a You can be killed or seriously injured if you don’t follow instructions.
|
DANGER |
All safety messages will tell you what the potential hazard is, tell you how to reduce the chance of injury, and tell you what can happen if the instructions are not followed.
IMPORTANT SAFETY INSTRUCTIONS
WARNING: When using an electrical appliance, basic precautions should always be followed, including the following:
■ Read all instructions before using the compactor.■ Close supervision is necessary when used by or near children. Do not allow it to be used as a toy, or to run unattended at any time. Lock Key Switch when not in use and store key out of reach of children.■ Do not touch moving parts.■ Do not operate with a damaged cord set, plug, motor, or after damage in any manner. Have the compactor examined, repaired, or adjusted by an authorized service person.■ Use only for intended use as described in this manual. Do not use anything other than the manufacturer’s recommended attachments.■ Do not compact toxic or volatile Flammable material such as oily rags and insect sprays. Do not compact lighted cigarettes, cigars, or other hot or burning items. Do not overload the compactor.■ Do not take apart the compactor. Incorrect reassembly can cause electric shock when subsequently used.■ Handle a loaded trash bag with care. Sharp objects can pierce the bag and cause injury. Do not overload the trash bags with heavy material such as glass.■ This compactor is intended for household use only.■ Unplug the compactor before servicing.■ Do not modify the plug attached to the compactor; use only with a grounded receptacle.
SAVE THESE INSTRUCTIONS
State of California Proposition 65 Warnings:WARNING: This product contains one or more chemicals known to the State of California to cause cancer.WARNING: This product contains one or more chemicals known to the State of California to cause birth defects or other reproductive harm.
INSTALLATION REQUIREMENTS
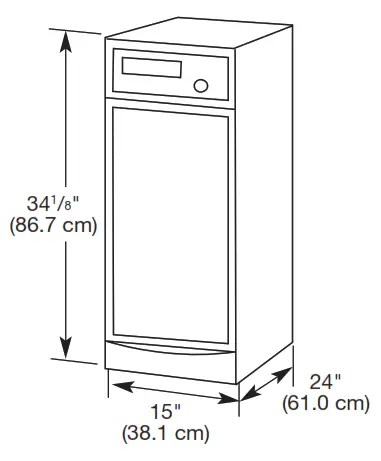
Location RequirementsProduct Dimensions
Cutout Dimensions
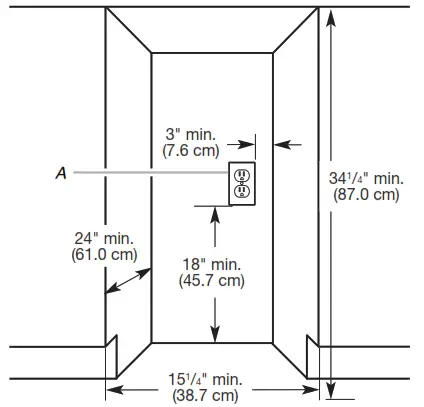
A. Grounded electrical outlet must be a minimum of 3″ (7.6 cm) away from surrounding cabinets or nearby walls as shown. It can be placed either to the left or the right side of the compactor.
Clearance Dimensions
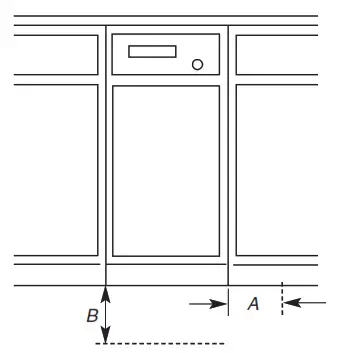
A. Leave 6″ (15.2 cm) of clearance space to the right side of the compactor in order to remove the compactor bags.B. Leave 23″ (58.4 cm) of clearance in front of the compactor in order to fully open or remove the compactor drawer.Electrical Requirements
|
|
 |
| Electrical Shock HazardPlug into a grounded 3 prong outlet.Do not remove the ground prong.Do not use an adapter.Do not use an extension cord.Failure to follow these instructions can result in death, fire, or electrical shock. |
Recommended Grounding Method
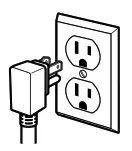 This compactor is for use on a single-phase, 115 volts, 60 Hz, AC only, 15 or 20 amp fused and properly grounded circuit, and is equipped with a grounding plug as shown below. It is recommended that a separate circuit serving only this appliance be provided.This compactor must be grounded while in use to reduce the risk of electric shock. The compactor is equipped with a three-conductor cord and 3 prong grounding-type plug to fit the proper grounding-type receptacle. The green (or green and yellow) conductor in the cord is the grounding wire. Do not connect the green (or green and yellow) wire to a live terminal. Do not modify the plug attached to the compactor; use it with a grounded receptacle.
ToolsInstaller: Leave User Instructions with the homeowner.Homeowner: Keep User Instructions for future reference and for local electrical inspector’s use if required.Tools neededGather the required tools and parts before starting installation:
| • Level• Tape measure• Pliers• Scissors | • Phillips No. 2 screwdriver• Flat-head screwdriver• 5/16″ box-end wrench• Utility knife |
Unpacking
![]() WARNING
WARNING
Excessive Weight HazardUse two or more people to move and install a compactor.Failure to do so can result in back or another injury.IMPORTANT: Do not grasp the control panel to move the compactor began in the room where the compactor will be located.
- Remove compactor from the shipping carton. Follow the instructions on the shipping carton.
- Remove all packaging materials, such as tape and shipping pads.
- Use a mild detergent and warm water to remove waxy residue caused by shipping material.
- Dry thoroughly with a soft cloth. For more information, see “Cleaning” in the “Compactor Use” section.
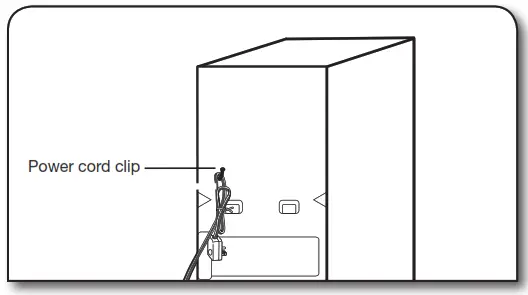
- Be sure the power cord is attached to the cord clip on the rear of the compactor.

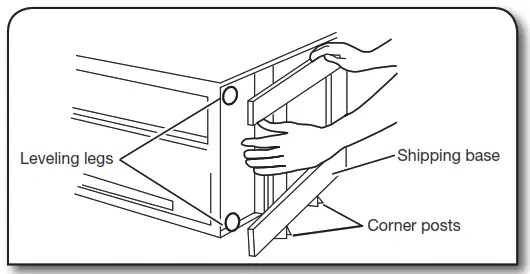
- Place two of the four corner posts from the packaging on the floor near the compactor.
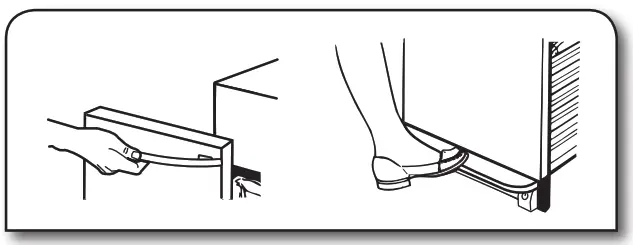
- Press the foot pedal or use the handle to open the compactor drawer and remove any shipping materials or other items from the drawer.NOTE: Do not remove the compactor bag.
- Grasp the front of the drawer and tilt it back slightly while pulling forward to clear the drawer stops.
- Grasp the drawer handle or sides of the drawer and lift the drawer out of the compactor.
- Place the drawer on the two corner posts.
- Place the other two corner posts on the floor to the side of the compactor.
- Grasp the sides of the compactor cabinet and place the compactor on its side on top of the second set of corner posts.
- Remove the shipping base from the bottom of the compactor.

NOTE: Before returning the compactor to the upright position, adjust the height of the compactor as necessary using the following “Height Adjustment” instructions.
Height AdjustmentHeight adjustment of the rear rollers is not required for a freestanding installation. You can install a freestanding unit under counter. For non-under counter installation, you only need to adjust the front leveling legs and level the unit.
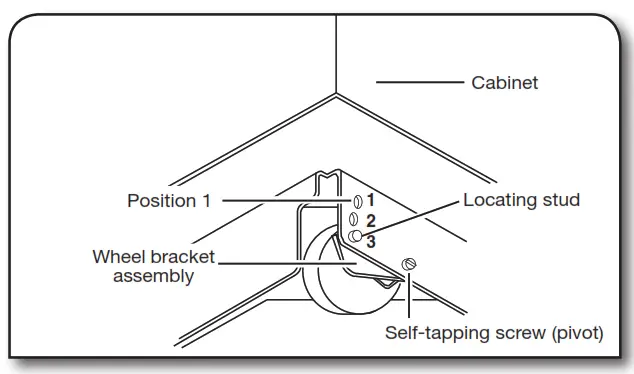
- Measure the height of your cabinet opening. The top of the compactor mounting screw head should be at least 1/8″ (3 mm) from the top of the cabinet opening.The rear wheels are preset for a cabinet height of 34 1 /4″ (87 cm). See “Position 1” in the following picture.To adjust for cabinet opening heights greater than 34 1 /4″:• Loosen self-tapping screw just enough to clear stud from a hole in Position 1.• Move the rear wheel and stud to Position 2 or 3 as needed for your cabinet opening measurement: Position 2: 34 7 /16″ to 34 11 /16″ (87.5 to 88.1 cm) Position 3: 34 13 /16″ to 35″ (88.4 to 88.9 cm)NOTE: To level the compactor in position 3, you may need to add shims under the front leveling legs. The shims should be approximately 1/4″ (6 mm) thick.• Tighten screw.
- Stand the compactor upright. Move the corner posts to the opposite side and lay the compactor on its other side. Adjust the other rear wheel.
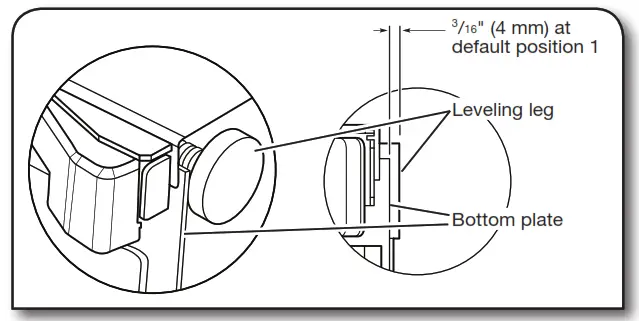
- Use pliers to lower the front leveling legs away from the compactor cabinet. Adjust the leveling legs to match the position of the rear wheels.Rear Wheel position:Position 1: 3/16″ (4 mm) from the bottom platePosition 2: 9/16″ (14 mm) from the bottom platePosition 3: 3/4″ (19 mm) from the bottom plate
- Stand the compactor upright. Dispose of/recycle all packaging materials.
Freestanding Installation
- Move the compactor close to its final location.
- Plug into a grounded 3 prong outlet.
- Slowly move the compactor into its final position.
- Adjust the front leveling legs until the compactor is level. Repeat Step 1 if necessary.
- Grasp sides of compactor drawer and place the wheels of the drawer into the tracks.
- Lift at the handle so the drawer will go over the drawer stops.
- Close the drawer.
- Make sure the drawer opens and closes freely. If the toe plate rubs against the floor, see the “Adjusting the Toe Plate” section for further instructions.
Undercounter Installation
Proper installation is your responsibility. Make sure you have everything necessary for correct installation. It is the personal responsibility and obligation of the customer to contact a qualified installer to assure that electrical installation meets all national and local codes and ordinances.NOTE: Installation hardware is not provided for the freestanding models. See the “Accessories” section to order a conversion kit.
IMPORTANT:
• Do not grasp the control panel to move the compactor.• To avoid damaging floor covering, slide compactor onto cardboard or hardboard before moving compactor across the floor.• Do not allow the rear frame of the compactor to touch the floor covering when lifting or moving the compactor.
- Move the compactor close to its final location.
- Remove cord clip from the back of the compactor. Plug into a grounded 3 prong outlet.
- Determine if you want the compactor cabinet frame or drawer front flush with the kitchen cabinet face.
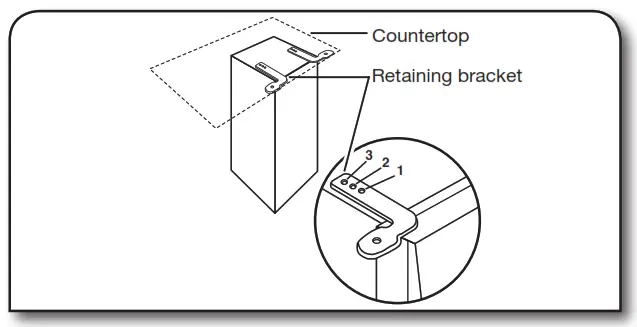
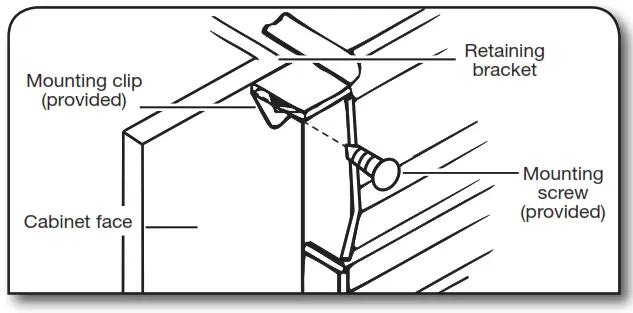
- Rotate the two top retaining brackets (supplied with conversion kit) 180°.The screws are supplied in position 2. If desired, adjust the brackets to position 1 or 3 as described below:• If the compactor frame is to be flush with the cabinet front, place retaining bracket screws through 1.• If the compactor drawer front is to be flush with the cabinet front, place retaining bracket screws through 3.• If the compactor is to be midway between 1 and3. leave the retaining bracket screws through 2.
- Slowly lift the front slightly and roll the compactor into the cabinet opening.
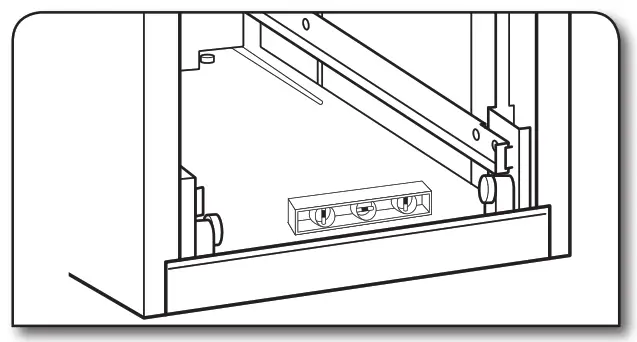
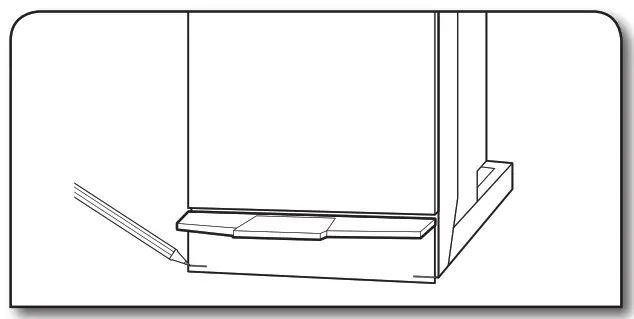
- Adjust the leveling legs until the compactor is level and stable. Place a level inside the bottom of the cabinet as shown. Check the compactor leveling side to side and front to rear.
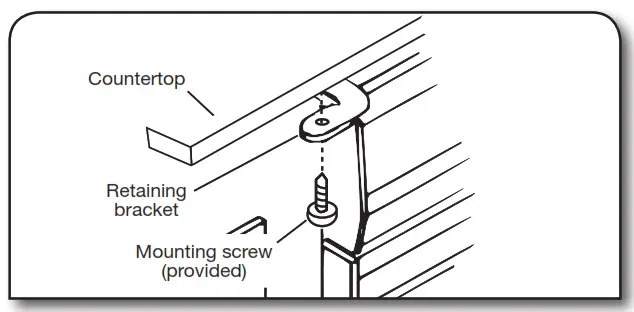
- Using the two #8-18 x 1/2″ (13 mm) screws (provided), fasten the retaining brackets to the countertop with the mounting screws.
- Grasp sides of compactor drawer and place the wheels of the drawer into the tracks. Lift at the handle so the drawer will go over the drawer stops. Close the drawer. Make sure the drawer opens and closes freely.If the toe guard rubs against the floor, see “Adjusting the ToeGuard” for further instructions.
Countertop Mounting
NOTE: If the retaining brackets cannot be attached to the underside of the countertop, see the “Cabinet-face Mounting” section.Cabinet-face Mounting(Use if countertop mounting is not possible.)
Adjusting the Toe GuardIf the toe guard rubs the floor covering, the toe guard clearance may be changed as follows:
- Mark on each side of the toe guard the amount of toe guard that rubs the floor covering.
- Remove the drawer from the compactor. (See steps 8 and 9 in the “Unpacking” section.)
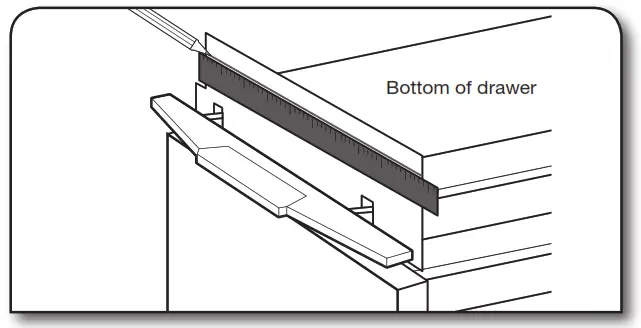
- Use a ruler and a pencil or chalk to draw a line between the marks on each side of the toe guard. Use scissors or a utility knife to cut the toe guard along the line.
- Replace drawer. If toe guard still rubs floor covering, repeat steps 1-3.
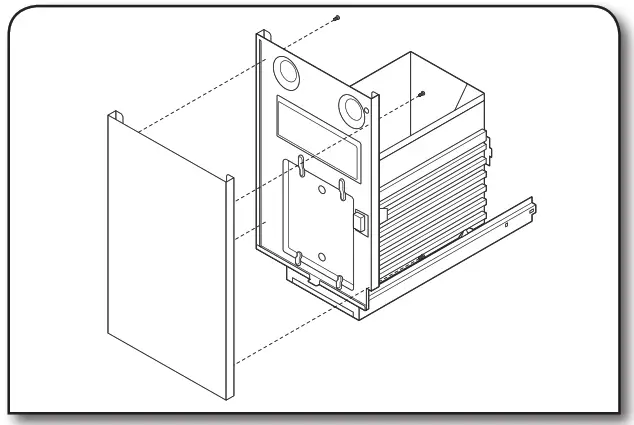
Installing a Custom Panel
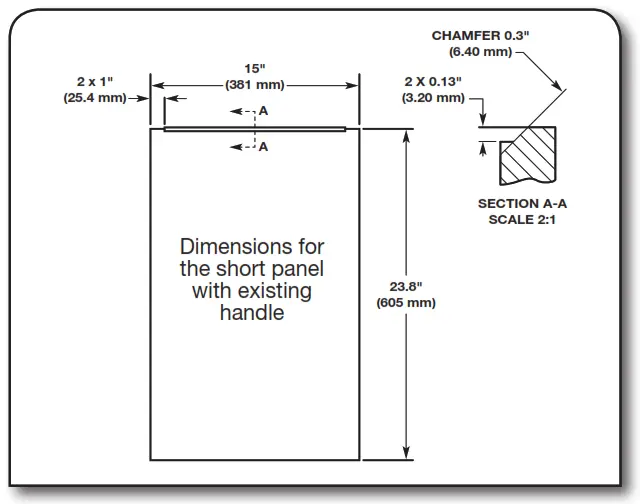
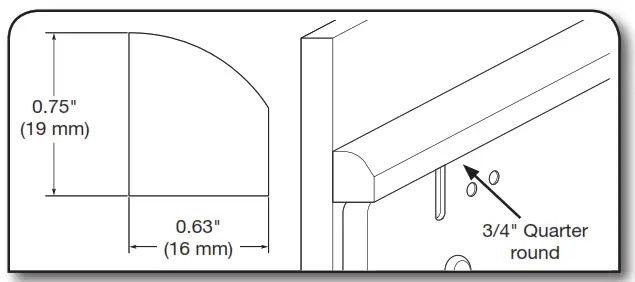
DimensionsCustom panel thickness should be 1/2″ (13 mm) to 5/8″ (16 mm).A panel thicker than 5/8″ will interfere with the foot pedal operation.Dimensions shown are for the short panel.
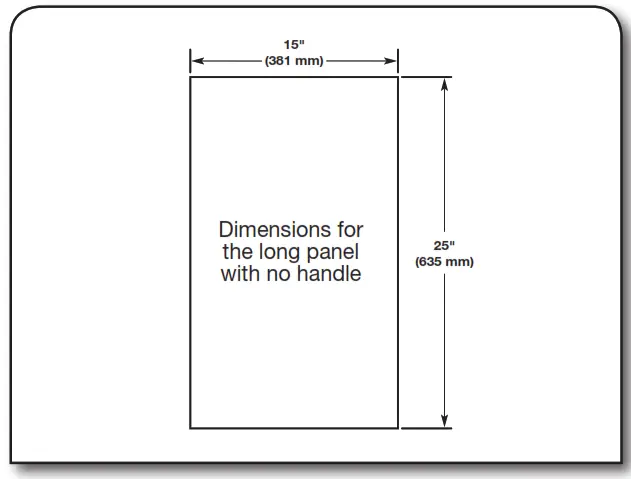
 Dimensions shown are for the long panel. The long panel cannot use the supplied handle.
Preparing for Custom Panel Installation
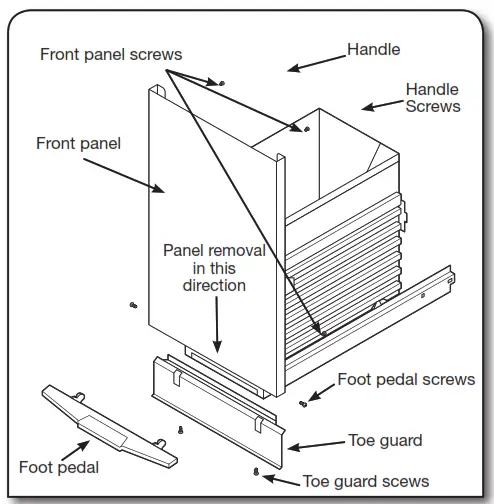
- If installing the longer panel, remove the handle by removing the three screws.
- Turn the drawer upside down for this procedure. Do not put too much pressure on the handle if turning the drawer over.It is best to place the drawer on a bench or elevated item to avoid putting pressure on the handle.
- Remove the foot pedal by removing the two screws.
- Remove toe guard by removing the two screws.
- Remove the four front panel screws.
- Slide the front panel out and place it aside.
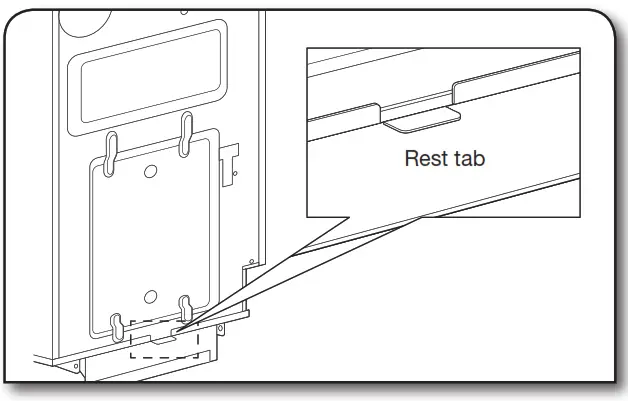
- Locate the rest tab on the bottom of the drawer front panel.Bend this tab 90 degrees as shown.
- Place the custom panel against the container front and rest it on the tab.
- Use 4 #8 x 1″ wood screws to attach the custom panel as shown below. If you are installing the long panel (handle removed) you will have three holes available, for a total of seven screws to attach to the custom panel.
- Long Panel Only: A 3/4″ quarter round molding with the following dimensions is suggested to fill the gap left by the removed handle
- Reattach the toe guard with the two screws.
- Reattach the foot pedal with the two screws.
 Bend this tab 90 degrees as shown.
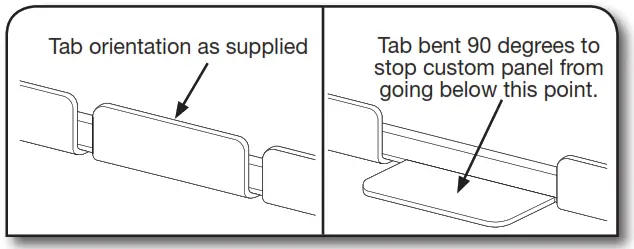
COMPACTOR USE
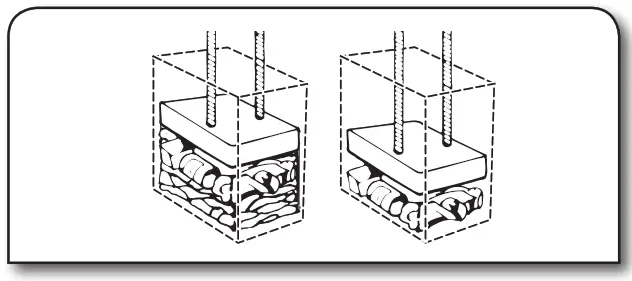
How Your Compactor WorksThe compacting ram is the part of the compactor which compresses the trash.IMPORTANT: The compacting ram stops 7″ (18 cm) from the bottom of the drawer. You will not see compacting of trash until the drawer is more than half full.You may hear a noise when glass breaks. Strong glass bottles may not break. The trash in a full compactor bag will be about a quarter the size of its original bulk.
Loading
 |
| Cut HazardDo not push items down into the compactor with hands or feet.Doing so can result in cuts. |
NOTE: You will not see compacting of trash the first few times you load the compactor. The compactor drawer should be at least half full before the compactor can begin compressing the load.
- Open the drawer. Lift and pull the handle or press the foot pedal to open the drawer.NOTE: Pressing the foot pedal opens the drawer only 3″ to 6″ (7.6 cm to 15.2 cm), dependent upon the load.
WARNING
Cut HazardCover glass items when compacting to better contain fragments.Failure to do so can result in cuts. - Place trash in a compactor.• Wrap or cover wet or messy trash.• Do not compact items that may develop offensive odors, such as raw meat, fish, grapefruit rinds, disposable diapers, or personal hygiene items.• Load bulky trash in the center of the drawer.• Load bottles and cans on their sides in the center of the drawer. Do not load bottles in an upright position.
- Close the drawer.
 NOTE: Pressing the foot pedal opens the drawer only 3″ to 6″ (7.6 cm to 15.2 cm), dependent upon the load.
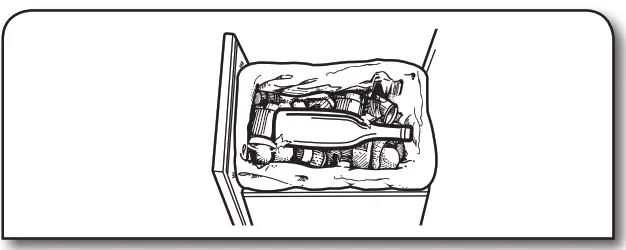 • Wrap or cover wet or messy trash.• Do not compact items that may develop offensive odors, such as raw meat, fish, grapefruit rinds, disposable diapers, or personal hygiene items.• Load bulky trash in the center of the drawer.• Load bottles and cans on their sides in the center of the drawer. Do not load bottles in an upright position.
Starting Your Compactor
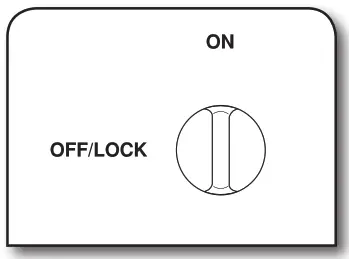
- Turn the Key-knob, located behind the drawer, to the On position.
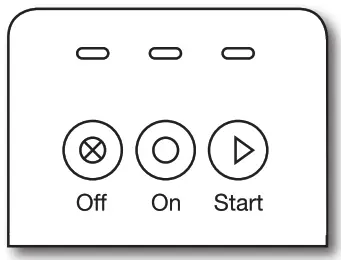
- Push the ON button.
- Press the START button and a compression cycle will complete.NOTE: The Key-knob is removable. Remove the Key-knob to deny children access to operate the compactor.
Removing a Filled Bag
![]() WARNINGExcessive Weight HazardTwo people may be required to remove and transport the compacted bag.Unlock latch to assist in the removal of the bag.Failure to do so can result in back or another injury.When the trash is compacted to the top of the drawer, remove the bag. If the bag is too heavy, compact less trash before emptying it in the future.
WARNINGExcessive Weight HazardTwo people may be required to remove and transport the compacted bag.Unlock latch to assist in the removal of the bag.Failure to do so can result in back or another injury.When the trash is compacted to the top of the drawer, remove the bag. If the bag is too heavy, compact less trash before emptying it in the future.
|
| Cut HazardDo not push items down into the compactor with hand or feet.Doing so can result in cuts. |
- To open the drawer, lift and pull the handle or press the foot pedal.
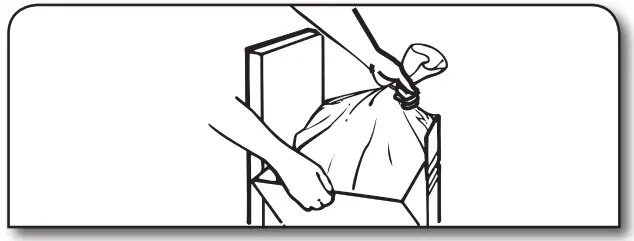
- Remove the top of the bag from bag retainer buttons. Pull up all four bag cuffs. Close bag with a twist tie.
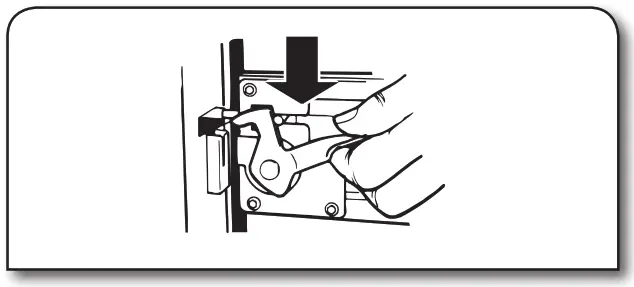
- Release drawer side latch. Tilt drawer to the right. This releases pressure on the bag, making it easier to remove the bag.
- Lift out bag.
- Latch the drawer if it was unlatched.


Installing a New Bag
Do not use any kind of bag other than those designed specifically for use in your compactor. Order replacement compactor bags through your local dealer or by calling the toll-free number on the cover or in the “Accessories” section.IMPORTANT:Before installing a new bag, be sure:• The drawer latch is securely locked.
 • The drawer is clean and free of debris.NOTE: An unlatched drawer can cause the drawer monitor switch to stay open. This will make the ram return and the compactor will continue to run. Attempt to push the drawer inwards to stop the compactor. The continuous running of the compactor can also be attributed to debris in the drawer area. If it is difficult to open or close the drawer, this may be due to either the drawer latch not being locked or debris in the drawer area.
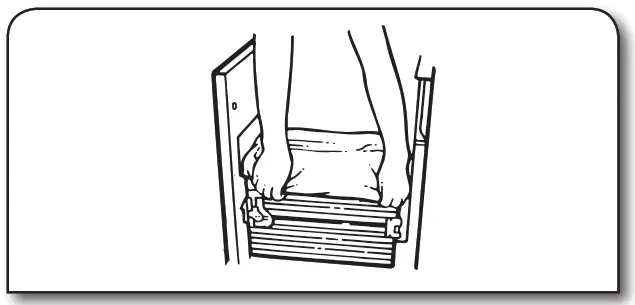
- Place the folded bag into the drawer. Open the bag and pull top edges over the drawer top.
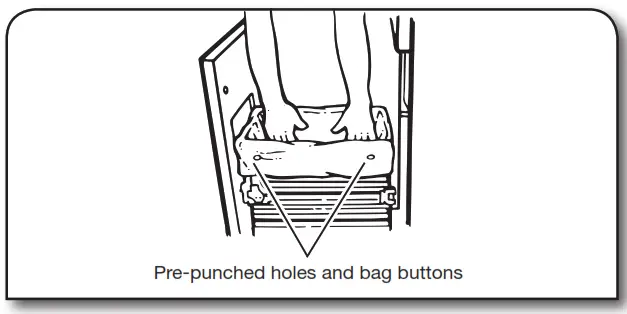
- Lock bag in place by pulling the four pre-punched holes over the bag retainer buttons. Holes will expand over the buttons without damaging the bag.
- Press inside of bag against the drawer bottom, sides, and corners for a smooth fit.NOTE: The ram can and will tear improperly installed bags.
 NOTE: The ram can and will tear improperly installed bags.
COMPACTOR CARE
Your new compactor is designed to give you many years of dependable service. However, there are a few things you are expected to do in order to properly maintain your compactor.This section will tell you how to clean and care for your compactor.NOTE: Any services other than those outlined in this section should be performed by an authorized service representative.
Cleaning
|
| Cut HazardWear gloves when cleaning inside the drawer or cabinet, or the ram.Failure to do so can result in cuts. |
Before cleaning the compactor, open the drawer and turn theKey-knob to the OFF position and remove it.
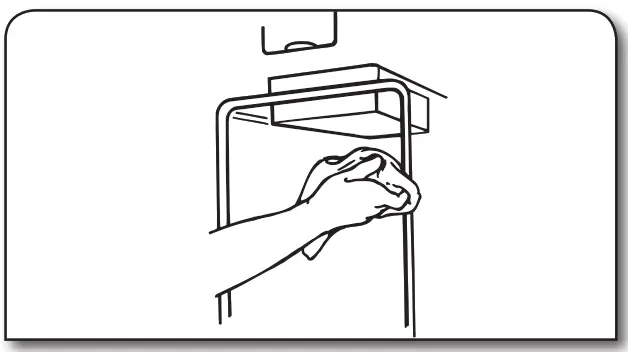
Cleaning Exterior Surfaces
- Wash exterior surfaces (including stainless steel) with a clean sponge or soft cloth and a mild detergent in warm water. Do not use abrasive or harsh cleaners. Rinse and dry thoroughly with a soft cloth.
- Wipe up spills immediately. Some foods can damage the finish if left on the compactor surface.
Cleaning Inside the Drawer
- Pull the drawer out until it stops.
- Remove the bag. See the “Removing a Filled Bag” section.
- Optional: Remove the drawer side. Hold the drawer latch open and tilt the side of the drawer out until the latch clears the drawer front.Remove the drawer side by lifting it out of the drawer.
- Wash the interior of the drawer with a clean sponge or soft cloth and a mild detergent in warm water. Rinse and dry thoroughly with a soft cloth.
- If the drawer side was removed, slide it back into the tilted position.
- Press the drawer latch down while pushing the drawer side to the upright position.
- Latch the drawer side.
- Close the drawer.
 Remove the drawer side by lifting it out of the drawer.
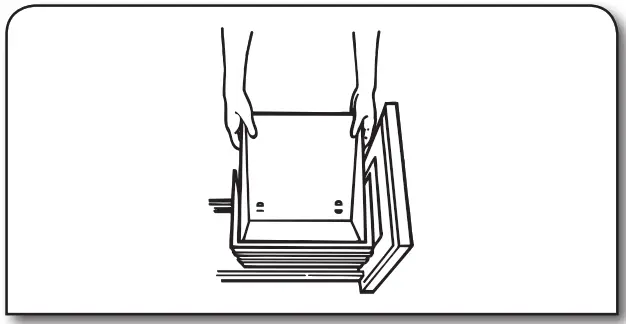
Cleaning Inside the Cabinet
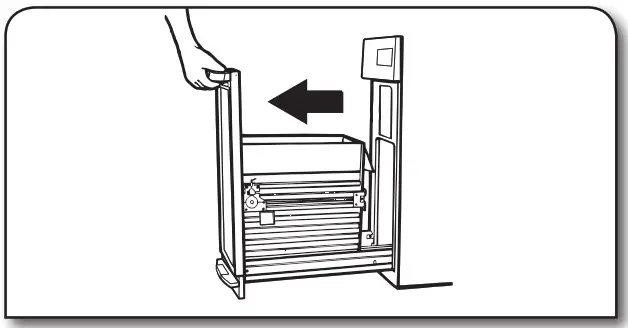
- Pull the drawer out until it stops.NOTE: Look to see how the drawer rollers move in the tracks and disengage. It will be easier to replace the drawer after you have finished cleaning.
- Lift the front of the drawer to clear the stops.
- Grasp the handle or drawer on the sides and pull it out the rest of the way. Set the drawer down gently.
- Vacuum the inside of the cabinet. Liquid spills or wet trash should be cleaned up by hand, or by using a vacuum designed to pick up liquids.
- Wash the inside of the cabinet with a clean sponge or soft cloth and a mild detergent in warm water. Rinse and dry thoroughly with a soft cloth.
- To replace the drawer, grasp it by the sides and insert the rollers onto the tracks.
- Lift the front of the drawer and push it in fully past the stops.
 NOTE: Look to see how the drawer rollers move in the tracks and disengage. It will be easier to replace the drawer after you have finished cleaning.
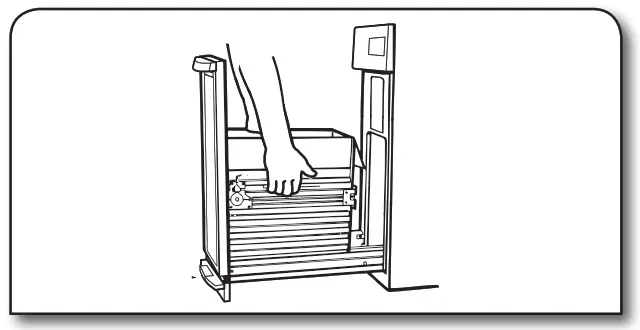
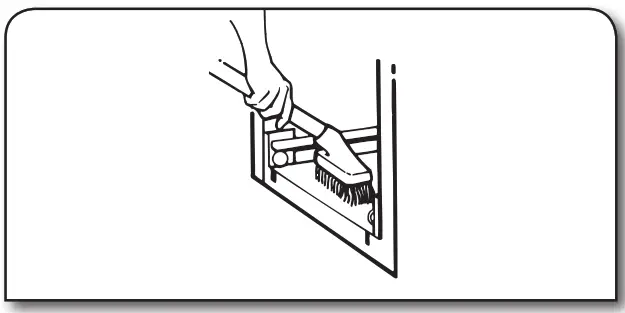
Cleaning the Ram
- Wipe glass particles off of the ram cover with a cloth or paper towel. Throw the towel away.
- Remove foods with a clean sponge or soft cloth and a mild detergent in warm water. Rinse and dry thoroughly with a soft cloth.
Cleaning Before a VacationIf you will be away for more than a few days, remove the compactor bag. Remove the Key-knob and store it out of children’s reach.AccessoriesTo order, contact your local authorized dealer. In the U.S.A. visit our webpage www.whirlpool.com or call 1-800-253-1301.In Canada, visit our webpage www.whirlpoolparts.ca or call:1-800-807-6777.Replacement bags15-pack – Part Number W10165295RP60-pack – Part Number W10165294RB180-pack – Part Number W10165295BUBag Carrier Service – Part Number 13030RPInstallation Hardware Freestanding to Undercounter:Conversion Kit – Part Number 9870118A
TROUBLESHOOTING
| WARNING |
|
| Electrical Shock HazardPlug into a grounded 3 prong outlet.Do not remove the ground prong.Do not use an adapter.Do not use an extension cord.Failure to follow these instructions can result in death, fire, or electrical shock. |
| PROBLEM |
POSSIBLE SOLUTION |
| COMPACTOR WILL NOT OPERATE | Check that the power supply cord is plugged into a grounded 3 prong outlet.Check the type of wall plug the compactor is plugged into. It is possible the compactor power cord is plugged into an outlet controlled by a wall switch. This can occur when the wall switch was meant for a garbage disposal outlet.A household fuse may have blown, or a circuit breaker tripped. Replace the fuse or reset the circuit breaker. If the problem continues, call an electrician.Check that the drawer is completely closed. Open the drawer to ensure the latch is locked. Close the drawer firmly and start the compactor.Check that the Key-knob is set to ON. See the “Starting Your Compactor” section. |
| TRASH IS NOT COMPACTING | Drawer must be more than half full before trash is compacted. The ram stops 7″ (17.8 cm) from the bottom of the drawer. |
| THE DRAWER WILL NOT OPEN | Push on the drawer front in an attempt to raise the ram. Be sure the latch is locked. Press ON, then press START. |
| THERE IS NOT ENOUGH COMPACTION OR FORCE | Press OFF halfway through the cycle. Press ON, then START to complete the cycle. |
| BOTTLES DO NOT BREAK | Bottles will not break every time. Factors that affect bottle breakage: The thickness of the bottle’s glass and the content of the trash load below it may keep the bottle from breaking. |
| COMPACTOR WILL NOT TURN OFF | Push on the drawer front to attempt to engage the drawer monitor switch. Open the drawer and be sure the latch is locked.Debris in the drawer area will cause the door to disengage from the drawer monitor switch, causing the compactor to keep running. This can also keep the compactor from starting. |
| DRAWER IS HITTING THE CABINET | The cabinet opening should be 151/4″(38.7 cm) minimum with at least a 1/8″ (3.2 mm) clearance on either side.Check that the compactor is centered in the cabinet opening.Check that the latch is locked. An unlatched drawer will cause the front door to be wobbly and offset from the center.Check for debris on the drawer tracks or under the drawer. Debris may cause the drawer to lean to one side or not sit properly on the tracks.The compactor may be set too high or not level. The compactor can be raised or lowered with front leveling. |
| COMPACTOR MOVING DURING OPERATION | Check that the retaining brackets are installed to the cabinet. See the “Countertop Mounting” or “Cabinet-face Mounting” sections. |
| DRAWER IS WOBBLY OR LOOSE | NOTE: By design, it is normal for the drawer to move slightly from side to side.An unlatched door will wobble more than normal. Check that the door latch is in the locked position.The screws on the drawer front (door) may be loose. With a Phillips screwdriver, check to ensure the screws holding the door to the drawer are secure. |
| COMPACTOR IS NOISY | The noise could be a normal operation: The compactor is driven by a steel chain and steel sprockets. |
NOTES
WHIRLPOOL ® MAJOR APPLIANCE LIMITED WARRANTY
ATTACH YOUR RECEIPT HERE. PROOF OF PURCHASE IS REQUIRED TO OBTAIN WARRANTY SERVICE.Please have the following information available when you call theCustomer eXperience Center:■ Name, address, and telephone number■ The model number and serial number■ A clear, detailed description of the problem■ Proof of purchase, including dealer or retailer name and address
IF YOU NEED SERVICE:
- Before contacting us to arrange service, please determine whether your product requires repair. Some questions can be addressed without service. Please take a few minutes to review the Troubleshooting section of the Use and Care Guide or visit producthelp.whirlpool.com.
- All warranty service is provided exclusively by our authorized Whirlpool Service Providers. In the U.S. and Canada, direct all requests for warranty service to:
Whirlpool Customer eXperience CenterIn the U.S.A., call 1-800-253-1301. In Canada, call 1-800-807-6777.If outside the 50 United States or Canada, contact your authorized Whirlpool dealer to determine whether another warranty applies.
 report this ad
WHAT IS COVERED
For one year from the date of purchase, when this major appliance is installed, operated, and maintained according to instructions attached to or furnished with the product, Whirlpool Corporation or Whirlpool Canada LP (hereafter “Whirlpool”) will pay for factory specified replacement parts and repair labor to correct defects in materials or workmanship that existed when this major appliance was purchased or, at its sole discretion, replace the product. In the event of product replacement, your appliance will be warranted forthe remaining term of the original unit’s warranty period.
YOUR SOLE AND EXCLUSIVE REMEDY UNDER THIS LIMITED WARRANTY SHALL BE PRODUCT REPAIR AS PROVIDED HEREIN. Service must be provided by a Whirlpool designated service company. This limited warranty is valid only in the United States or Canada and applies only when the major appliance is used in the country in which it was purchased. This limited warranty is effective from the date of the original consumer purchase. Proof of original purchase date is required to obtain service under this limited warranty.
ONE YEAR LIMITED WARRANTYWHAT IS NOT COVERED
- Commercial, non-residential, multiple-family use, or use inconsistent with the published user, operator, or installation instructions.
- In-home instruction on how to use your product.
- Service to correct improper product maintenance or installation, installation not in accordance with electrical or plumbing codes, or correction of household electrical or plumbing (e.g., house wiring, fuses, or water inlet hoses).
- Consumable parts (e.g., light bulbs, batteries, air or water filters, preservation solutions).
- Defects or damage caused by the use of non-genuine Whirlpool parts or accessories.
- Conversion of products from natural gas or propane gas.
- Damage from accident, misuse, abuse, fire, floods, acts of God, or use with products not approved by Whirlpool.
- Repairs to parts or systems to correct product damage or defects caused by unauthorized service, alteration, or modification of the appliance.
- Cosmetic damage including scratches, dents, chips, and other damage to the appliance finishes, unless such damage results from defects in materials and workmanship and is reported to Whirlpool within 30 days.
- Discoloration, rust, or oxidation of surfaces resulting from caustic or corrosive environments including,but not limited to, high salt concentrations, high moisture or humidity, or exposure to chemicals.
- Food or medicine loss due to product failure.
- Pickup or delivery. This product is intended for in-home repair.
- Travel or transportation expenses for service in remote locations where an authorized Whirlpoolservicer is not available.
- Removal or reinstallation of inaccessible appliances or built-in fixtures (e.g., trim, decorative panels, flooring, cabinetry, islands, countertops, drywall) that interfere with servicing, removal, or replacementof the product.
- Service or parts for appliances with original model/serial numbers removed, altered, or not easilydetermined. The cost of repair or replacement under these excluded circumstances shall be borne bythe customer.
DISCLAIMER OF IMPLIED WARRANTIESIMPLIED WARRANTIES, INCLUDING ANY IMPLIED WARRANTY OF MERCHANTABILITY OR IMPLIED WARRANTY OF FITNESS FOR A PARTICULAR PURPOSE, ARE LIMITED TO ONE YEAR OR THE SHORTEST PERIOD ALLOWED BY LAW. Some states and provinces do not allowlimitations on the duration of implied warranties of merchantability or fitness, so this limitation may not apply to you. This warranty gives you specific legal rights, and you also may have other rights that vary from state to state or province to province.DISCLAIMER OF REPRESENTATIONS OUTSIDE OF WARRANTYWhirlpool makes no representations about the quality, durability, or need for service or repair of this major appliance other than the representations contained in this warranty. If you want a longer or more comprehensive warranty than the limited warranty that comes with this major appliance, you should ask Whirlpool or your retailer about buying an extended warranty.LIMITATION OF REMEDIES: EXCLUSION OF INCIDENTAL AND CONSEQUENTIAL DAMAGESYOUR SOLE AND EXCLUSIVE REMEDY UNDER THIS LIMITED WARRANTY SHALL BE PRODUCT REPAIR AS PROVIDED HEREIN. WHIRLPOOL SHALL NOT BE LIABLE FOR INCIDENTAL OR CONSEQUENTIAL DAMAGES. Some states and provinces do not allow the exclusion or limitation of incidental or consequential damages, so these limitations and exclusions may not apply to you. This warranty gives you specific legal rights, and you also may have other rights that vary from state to state or province to province.
®/™ ©2018 Whirlpool. Used under license in Canada. All rights reserved.
References
[xyz-ips snippet=”download-snippet”]