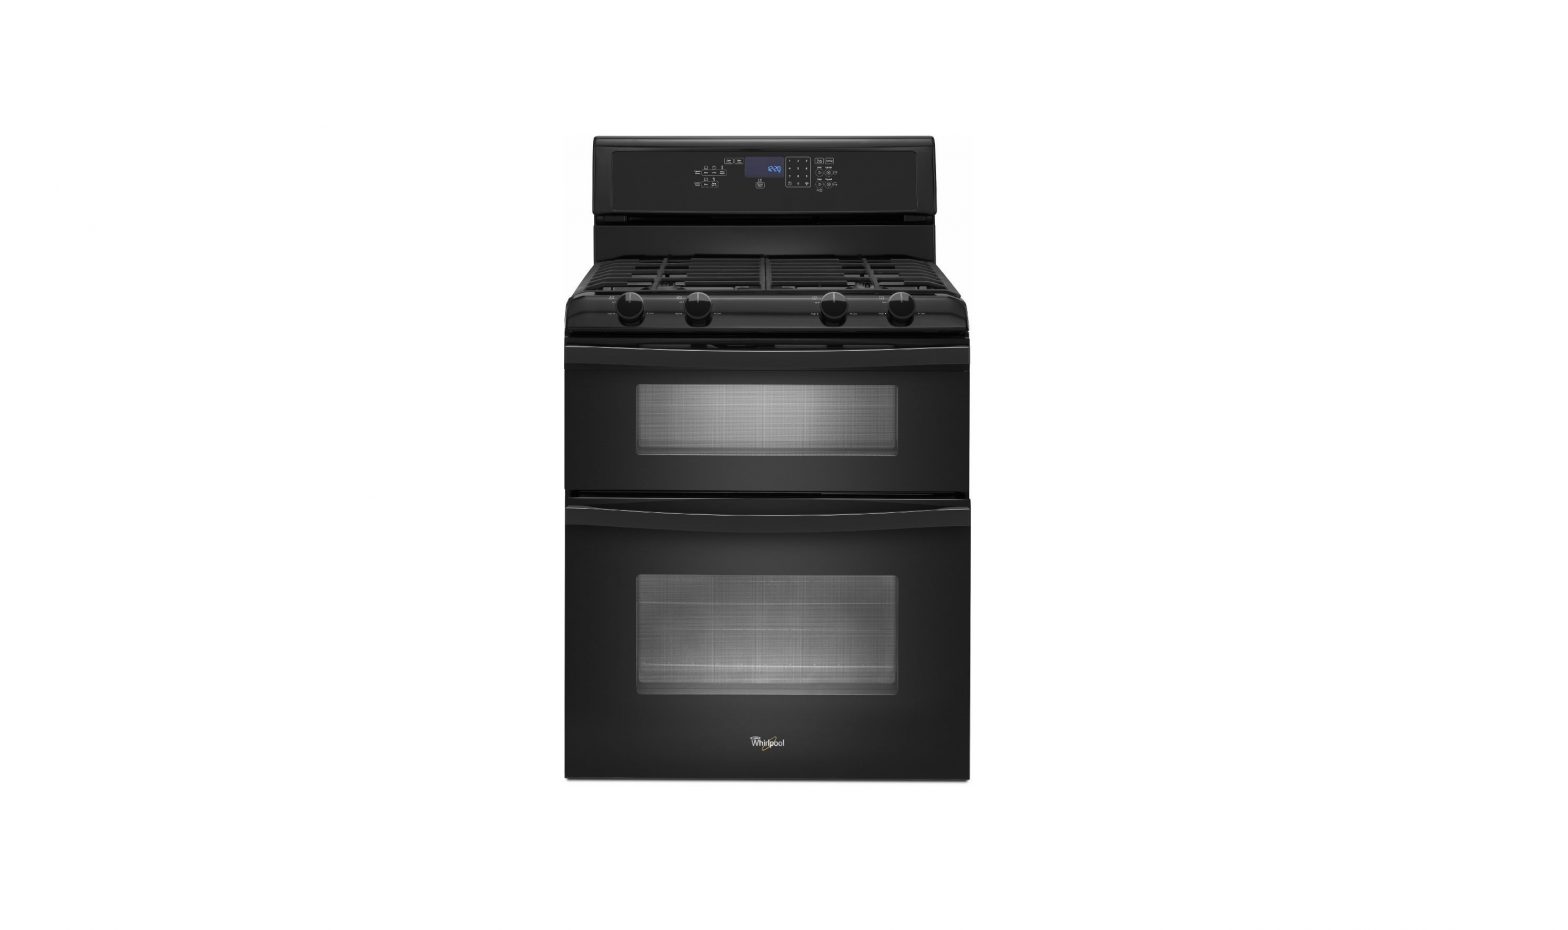
Whirlpool Freestanding Gas Range with Double Ovens User Guide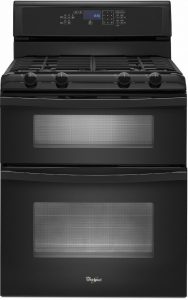
FEATURE GUIDE
WARNING: To reduce the risk of fire, electric shock, or injury to persons, read the IMPORTANT SAFETY INSTRUCTIONS, located in your appliance’s Owner’s Manual, before operating this appliance.
This manual covers several models. Your model may have some or all of the items listed. Refer to this manual or the Product Help section of our website at www.whirlpool.com for more detailed instructions. In Canada, refer to the Product Help Section at www.whirlpool.ca.
![]() WARNINGFood Poisoning HazardDo not let food sit for more than one hour before or after cooking. Doing so can result in food poisoning or sickness.
WARNINGFood Poisoning HazardDo not let food sit for more than one hour before or after cooking. Doing so can result in food poisoning or sickness.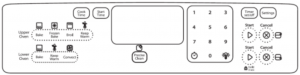
| KEYPAD | FEATURE | INSTRUCTIONS |
| CLOCK |
Clock | This clock can use a 12 or 24 hour cycle. See “Electronic Oven Controls” section.
1. Press the Clock keypad. 2. Press “3” for AM or “6” for PM. 3. Press the number keypads to set the time of day. 4. Press the Clock keypad, START UPPER or START LOWER. |
| Oven Light |
Oven cavity light | While the oven doors are closed, press OVEN LIGHT to turn the lights on or off. The oven lights will come on when an oven door is opened. |
| TIMER SET/OFF | Oven timer | The Timer can be set in hours or minutes up to 9 hours and 59 minutes.
1. Press TIMER SET/OFF. 2. Press the number keypads or Time/Temp + or – keypad to set the length of time in hr-min. Leading zeros do not have to be entered. For example, for 2 minutes, enter “2.” 3. Press TIMER SET/OFF to begin the countdown. If enabled, timer tones will sound at the end of countdown. The display will return to the time of day at the end of countdown. 4. Press TIMER SET/OFF to cancel the Timer and return to the time of day. Do not press the Cancel keypads because the oven will turn off. |
| START UPPER START LOWER | Cooking start | The Start keypads begin any oven function. If Start is not pressed within 2 minutes after pressing a keypad, the function is canceled and the time of day is displayed. |
| CANCEL UPPER | Range | Cancel Upper and Cancel Lower keypads stop any oven function except the Clock, Timer, |
| CANCEL LOWER | function | and Control Lock in the selected oven. |
| BAKE UPPER | Baking and roasting | Press BAKE for the desired oven.
Press the number keypads or Time/Temp + or – keypad to set the desired temperature. Press and hold to scroll quickly. If the temperature entered is not in the range of the temperatures allowed, the minimum or maximum allowed temperature will be displayed. Enter a temperature in the allowable range. Press START or Press START LOWER (Lower oven, single rack baking only), Rapid Preheat will begin. IMPORTANT: Rapid Preheat should be used only for single-rack baking. (Multiple-rack baking) Press START for the desired oven. Press START for the desired oven again to cancel Rapid Preheat. To change the temperature, repeat Step 2. Press START for the change to take effect NOTE: If cooking in both ovens, press any number on the keypad, then follow the on-screen prompts to select the desired oven before entering temperature. Press CANCEL for the selected oven when finished. |
| BAKE LOWER | ||
| FROZEN BAKE (upper only) | Prepackaged food
|
1. Position the food on a flat rack in the oven on rack position 1. See the “Positioning Racks and Bakeware” section.
NOTE: Cook only 1 package of frozen food at a time when using Frozen Bake™ Technology. 2. Press FROZEN BAKE. 3. Press the number keypad to select the desired food option. 4. Press the number keypads to set the temperature as recommended on the food packaging. 5. Press COOK TIME. 6. Press the number keypads to set the maximum cook time as recommended on the food packaging. 7. Press START. The range will calculate the best cook time based on the current oven temperature. NOTE: The cook time that appears in the display is the estimated required cook time as calculated by the oven control. It may be different than the time you entered. A beep will alert you to check the food’s doneness with at least 2 minutes remaining on the timer. Follow the prompts on the display to select more time if desired. 8. At the end of the cook time, a beep will alert you to check the food’s doneness. Follow the prompts on the display to select more time if desired. Unless more time is selected, the bake element turns off.
|
| BROIL (upper only) | Broiling | Press BROIL.
Press the number keypads set the desired temperature. If the temperature entered is not in the range of the temperatures allowed, the minimum or maximum allowed temperature will be displayed. Enter a temperature in the allowable range. Press START for the selected oven. No preheating is necessary. Position the cookware in the oven. Close the door. Press CANCEL UPPER when finished. |
| CONVECT (lower only) |
Convection |
1. Press CONVECT until the desired mode is displayed, and then press START LOWER.
2. Press the number keypads to set the desired temperature. If the temperature entered is not in the range of the temperatures allowed, the minimum or maximum allowed temperature will be displayed. Enter a temperature in the allowable range. 3. Press START LOWER. 4. To change the temperature, repeat Step 2. Press START LOWER for the change to take effect. NOTE: If cooking in both ovens, press any number on the keypad, then follow the on-screen prompts to select the desired oven before entering temperature. 5. Press CANCEL LOWER when finished. |
| KEEP WARM UPPER | Hold warm | Food must be at serving temperature before placing it in the warmed oven.
Press KEEP WARM for the desired oven. Press the number keypads to set the desired temperature. If the temperature entered is not in the range of the temperature allowed, the minimum or maximum temperature will be displayed. Enter a temperature in the allowable range. Press START. To change the temperature, repeat steps 2 and 3. Press CANCEL for the selected oven when finished |
| KEEP WARM LOWER |
| KEYPAD | FEATURE | INSTRUCTIONS |
| START TIME | Delayed start | The Start Time keypad is used to enter the starting time for an oven function with a delayed start. Start Time should not be used for foods such as breads and cakes because they may not bake properly. To set a Timed Cook or a Delayed Timed Cook, see the “Cook Time” section. |
| COOK TIME | Timed cooking | Cook Time allows the oven to be set to turn on at a certain time of day, cook for a set length of time, and/or shut off automatically. To set a Cook Time or Delayed Cook Time, see the “Cook Time” section. |
| NOTE: If cooking in both ovens, press any number on the keypad, then follow the on-screen prompts to select the desired oven before entering temperature. | ||
| PRECISE CLEAN | Self-cleaning cycle | See the “Self-Cleaning Cycle” section in the Owner’s Manual. |
| START hold 3 sec. to lock | Oven control lockout | Check that the ovens and timers are off. Press and hold START for 3 seconds.
If enabled, a tone will sound and “CONTROL LOCKED” will be displayed. Repeat to unlock. No keypads will function with the controls locked. |
| SETTINGS | Oven use functions | Enables you to personalize the audible tones and oven operation to suit your needs. See the “Oven Use” section |
Surface Burners
NOTE: Do not obstruct the flow of combustion and ventilation air around the burner grate edges.
Always keep the burner cap in place when using a surface burner. A clean burner cap will help avoid poor ignition and uneven flames. Always clean the burner cap after a spillover, and routinely remove and clean the caps according to the “General Cleaning” section in the Owner’s Manual.
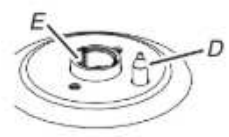
Alignment: Be sure to align the gas tube opening in the burner base with the orifice holder on the cooktop and the igniter electrode with the notch in the burner base.
- (A) Burner cap

- (B) Gas tube opening
- (C) Burner base
- (D) Igniter electrode
- (E) Orifice holder
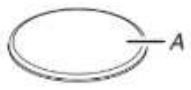
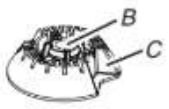
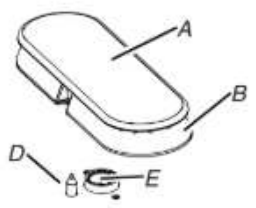
NOTE: The oval burner base is permanently attached to the burner cap.Gas tube opening: Gas must flow freely throughout the gas tube opening for the burner to light properly. Keep this area free of soil and do not allow spills, food, cleaning agents or any other material to enter the gas tube opening. Keep spillovers out of the gas tube opening by always using a burner cap.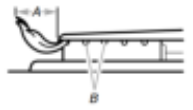
- (A) 1-1 1/2″ (2.5-3.8 cm)
- (B) Burner ports
To Clean:IMPORTANT: Before cleaning, make sure all controls are OFF and the cooktop is cool. Do not use oven cleaners, bleach, or rust removers. Do not wash in the dishwasher
- Remove the burner cap and the burner base, and clean according to “General Cleaning” section in the Owner’s Manual.
- Clean the gas tube opening with a damp cloth.
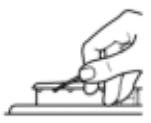
- Clean clogged burner ports with a straight pin as shown.Do not enlarge or distort the port. Do not use a wooden toothpick. If the burner needs to be adjusted, contact a trained repair specialist.
- Replace the burner base. The burner bases and caps must be properly positioned before cooking. Your range comes with three sizes of burners and caps. See the following illustration for burner positions.(A) Small (AUX)(B) Large (UR)(C) Oval(D) Medium (SR)(E) Large (UR)
- Replace the burner cap, making sure it is properly aligned with the burner base. If burner caps are not properly positioned, surface burners will not light. The burner cap should not rock or wobble when properly aligned.(A) Incorrect(B) CorrectIMPORTANT: The bottom of the small and medium caps are different. Do not put the wrong size burner cap on the burner base.Small cap (AUX)Medium cap (SR)Large cap (UR
- Turn on the burner. If the burner does not light, check cap alignment. If the burner still does not light, turn off the burner. Do not service the burner yourself. Contact a trained repair specialist.
 (A) Small (AUX)(B) Large (UR)(C) Oval(D) Medium (SR)(E) Large (UR)
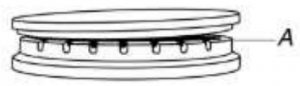 (B) Correct
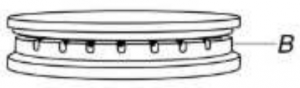 IMPORTANT: The bottom of the small and medium caps are different. Do not put the wrong size burner cap on the burner base.Small cap (AUX)
 Medium cap (SR)
 Large cap (UR
EZ-2-Lift™ Hinged Cast Iron Grates
The grates must be properly positioned before cooking. In the proper position, the grates should be flush and level. Improper installation of the grates may result in chipping or scratching of the cooktop.
Your cooktop comes with hinged grates for easier cleaning. The grates pivot upward and toward the sides of the cooktop for easy access under the grates.
The grates will stop once they are moved to their vertical (fully open) position. A 20″ (50.8 cm) minimum clearance from the countertop to the bottom of the upper cabinets/appliances is needed to fully open the grates. Be sure to return the grates to their normal (down) position once cleaning is complete. The grates are removable for cleaning.
To attach the grates to their hinges, insert the grate slot over the hinge pin on the side of the cooktop. Be sure to keep the grate angled above the cooktop to avoid scratching the cooktop until the grate is seated on the hinge pin. Then position the grate down onto the cooktop.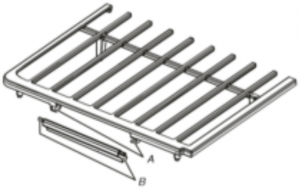
(A) Grate slot(B) Hinge pi
Although the burner grates are durable, they will gradually lose their shine and/or discolor due to the high temperatures of the gas flame.
Cookware
IMPORTANT: Do not leave empty cookware on a hot surface cooking area, element, or surface burner.
Ideal cookware should have a flat bottom, straight sides, and a well-fitting lid, and the material should be of medium-to-heavy thickness.
Rough finishes may scratch the cooktop or coils. Aluminum and copper may be used as a core or base in cookware. However, when used as a base, they can leave permanent marks on the grates.
Cookware material is a factor in how quickly and evenly heat is transferred which affects cooking results.Cookware with nonstick surfaces should not be used under the broiler.
Check for flatness by placing the straight edge of a ruler across the bottom of the cookware. While you rotate the ruler, no space or light should be visible between it and the cookware.
Use the following chart as a guide for cookware material characteristics.
| COOKWARE | CHARACTERISTICS |
| Aluminum |
|
| Cast iron |
|
| Ceramic or Ceramic glass |
|
| Copper |
|
| Earthenware / Stoneware |
|
| Porcelain enamel-on-steel or cast iron |
|
| Stainless steel |
|
For best results, the cookware should be centered above the burner with the bottom sitting level on the grate. The flame should be adjusted so that it does not extend up the sides of the pan.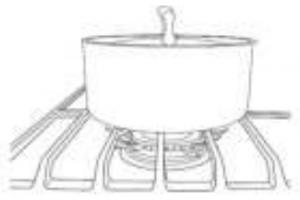
Home Canning
When canning for long periods, alternate the use of surface burners between batches. This allows time for the most recently used areas to cool.
- Center the canner on the grate above the burner.
- Do not place canner on 2 surface burners at the same time.
- For more information, contact your local agricultural extension office, or refer to published home canning guides. Companies that manufacture home canning products can also offer assistance.
OVEN USE
Odors and smoke are normal when the oven is used the first few times or when it is heavily soiled.IMPORTANT: The health of some birds is extremely sensitive to the fumes given off. Exposure to the fumes may result in death to certain birds. Always move birds to another closed and well ventilated room
Electronic Oven Controls
Control DisplayThe display will flash when powered up or after a power loss. Press Cancel to clear. When oven is not in use, the time of day is displayed.
TonesTones are audible signals, indicating the following:One Tone
- Valid keypad press
- Oven is preheated (long tone).
- Kitchen timer (long tone with reminder tone every minute).
- Function has been entered.
Three Tones
- Invalid keypad press
Four Tones
- End of cycle (with reminder tone every minute) Use the Settings or Options keypad to change the tone settings.
SettingsMany features of the oven control can be adjusted to meet your personal needs. These changes are made using the Settings keypad.
Use the Settings keypad to scroll through the features that can be changed. Each press of the Settings keypad will advance the display to the next setting. After selecting the feature to be changed, the control will prompt you for the required input. Details of all of the feature changes are explained in the following sections.
Press CANCEL UPPER or CANCEL LOWER to exit Settings.
Fahrenheit and Celsius
The temperature is preset to Fahrenheit but can be changed to Celsius.
- Press SETTINGS until “TEMP UNIT” is displayed.
- The current setting will be displayed.
- Press the “1” keypad to adjust the setting.
- Press CANCEL UPPER or CANCEL LOWER to exit and display the time of day.
Audible Tones DisableTurns off all tones, including the end of cycle tone and key press tones.
- Press SETTINGS until “SOUND” is displayed.
- The current setting will be displayed.
- Press the “1” keypad to adjust the setting.
- Press CANCEL UPPER or CANCEL LOWER to exit and display the time of day.
Sound VolumeSets the pitch of the tone to either high or low.
- Press SETTINGS until “SOUND VOLUME” is displayed.
- The current setting will be displayed.
- Press the “1” keypad to adjust the setting.
- Press CANCEL UPPER or CANCEL LOWER to exit and display the time of day.
End of Cycle ToneActivates or turns off the tones that sound at the end of a cycle.
- Press SETTINGS until “END TONE” is displayed.
- The current setting will be displayed.
- Press the “1” keypad to adjust the setting.
- Press CANCEL UPPER or CANCEL LOWER to exit and display the time of day
Key press TonesActivates or turns off the tones when a keypad is pressed.
- Press SETTINGS until “KEYPRESS TONE” is displayed.
- The current setting will be displayed.
- Press the “1” keypad to adjust the setting.
- Press CANCEL UPPER or CANCEL LOWER to exit and display the time of day.
Reminder Tones DisableTurns off the short repeating tone that sounds every 1 minute after the end-of-cycle tones.
- Press SETTINGS until “REMINDER TONE” is displayed.
- The current setting will be displayed.
- Press the “1” keypad to adjust the setting.
- Press CANCEL UPPER or CANCEL LOWER to exit and display the time of day.
12/24 Hour ClockTurns off the short repeating tone that sounds every 1 minute after the end-of-cycle tones.
- Press SETTINGS until “12/24 HOUR” is displayed.
- The current setting will be displayed.
- Press the “1” keypad to adjust the setting.
- Press CANCEL UPPER or CANCEL LOWER to exit and display the time of day.
12 Hour Shut-OffThe oven control is set to automatically shut off the oven 12 hours after the oven initiates a cook or clean function. This will not interfere with any timed or delay cook functions.
- Press SETTINGS until “12-HR SHUT-OFF” is displayed.
- The current setting will be displayed.
- Press the “1” keypad to adjust the setting.
- Press CANCEL UPPER or CANCEL LOWER to exit and display the time of day.
Languages – Scrolling Display TextLanguage options are English, Spanish and French.
- Press SETTINGS until “LANGUAGE” is displayed.
- The current setting will be displayed.
- Press the number keypad to adjust the setting.
- Press CANCEL UPPER
Oven Temperature Offset ControlIMPORTANT: Do not use a thermometer to measure oven temperature. Elements will cycle on and off as needed to provide consistent temperature, but they may run slightly hot or cool at any point in time due to this cycling. Most thermometers are slow to react to temperature change and will not provide an accurate reading due to this cycling. The oven provides accurate temperatures; however, it may cook faster or slower than your previous oven, so the temperature can be adjusted to personalize it for your cooking needs. It can be changed in Fahrenheit or Celsius.
To Adjust Oven Temperature:
- Press SETTINGS until “TEMP CALIB” is displayed.
- The current setting will be displayed. Press the “1” keypad to toggle between the upper and lower ovens.
- Press START UPPER or START LOWER to select the choice displayed in Step 2. Wait 10 seconds for the display to change or press START UPPER or START LOWER, and then continue with Step 4.
- Press the “3” keypad to increase the temperature in 5°F (3°C) increments, or press the “6” keypad to decrease the temperature in 5°F (3°C) increments. The range is from -30°F to +30°F (-18°C to +18°C).
- Press START UPPER or START LOWER.
- Press CANCEL UPPER or CANCEL LOWER to exit and display the time of day.
Demo ModeIMPORTANT: This feature is intended for use on the sales floor with 120 V power connection and permits the control features to be demonstrated without the oven turning on. If this feature is activated, the oven will not heat.
- Press SETTINGS until “DEMO MODE” is displayed.
- The current setting will be displayed.
- Press the “1” keypad to adjust the setting.
- Press CANCEL UPPER or CANCEL LOWER to exit and display the time of day.
Energy SaveThe Energy Save mode deactivates the display to reduce energy consumption. The setting will be activated after being idle for several minutes. Any mode may be used with the range in Energy Save by selecting the desired mode.
- Press SETTINGS until “ENERGY SAVE” is displayed.
- The current setting will be displayed.
- Press the “1” keypad to adjust the setting.
- Press CANCEL UPPER or CANCEL LOWER to exit and display the time of day
Keep Warm
IMPORTANT: Food must be at serving temperature before placing it in the warmed oven. Food may be held up to 1 hour; however, breads and casseroles may become too dry if left in the oven during the Keep Warm function. For best results, cover food. The Keep Warm or warm feature allows hot cooked foods to stay at serving temperature.
To Use:
- Press KEEP WARM for the desired oven.
- Press the number keypads to set the desired temperature. If the temperature entered is not in the range of the temperatures allowed, the minimum or maximum allowed temperature will be displayed. Enter a temperature in the allowable range.NOTE: When cooking in a single oven, the temperature may be changed at any time by pressing the number keypads to enter the desired temperature, and then press START for the selected oven. When cooking in both ovens, press any number on the keypad, then follow the on-screen prompts to select the desired oven. Press the number keypads to enter the desired temperature, and then press START for the selected oven.
- Press START for the selected oven.
- Place food in the oven.
- Press CANCEL for the selected oven when finished.
- Remove food from the oven.
To Cancel Keep Warm:
- Press CANCEL for the selected oven.
- Remove food from oven.
Sabbath ModeSabbath mode sets the oven to remain on in a bake setting until turned off.When the Sabbath mode is set, only the Bake cycle will operate. All other cooking and cleaning cycles are disabled. No tones will sound and the displays will not indicate temperature changes. When the oven door is opened or closed, the oven light will not turn on or off and the heating elements will not turn on or off immediately.
To Enable Sabbath Mode Capability (One Time Only):
- Press SETTINGS until “SABBATH” is displayed.
- Press the “1” keypad. Sabbath mode can be activated for baking.
- Press CANCEL UPPER or CANCEL LOWER to save the setting and exit to display the time of day.NOTE: To disable the Sabbath mode, repeat steps 1 through 3 to change the status from “SABBATH ON” to “SABBATH OFF.”
To Activate Sabbath Mode:
- Press BAKE for the desired oven.
- Press the number keypads to set the desired temperature. If the temperature entered is not in the range of the temperatures allowed, the minimum or maximum allowed temperature will be displayed. Enter a temperature in the allowable range.
- Press START for the selected oven.For timed cooking in Sabbath mode, press COOK TIME, and then press the number keypads to set the desired cook time. Press START for the selected oven.
- (Optional) If Sabbath mode is to be used for both ovens, repeat steps 1 through 3 for the second oven.
- Press SETTINGS. Three tones will sound. Then press “7.” “SAb” will appear in the display.
To Adjust Temperature (when Sabbath mode is running in only one oven):
- Press the number keypad as instructed by the scrolling text to select the new temperature.NOTE: The temperature adjustment will not appear on the display, and no tones will sound. The scrolling text will be shown on the display as it was before the keypad was pressed.
- Press START for the selected oven.
- To Adjust Temperature (when Sabbath mode is running inboth ovens):
- Press BAKE for the desired oven.
- Press the number keypad as instructed by the scrolling text to select the new temperature.NOTE: The temperature adjustment will not appear on the display, and no tones will sound. The scrolling text will be shown on the display as it was before the keypad was pressed.
To Deactivate Sabbath Mode:
Press START for the selected oven. To Deactivate Sabbath Mode: Press SETTINGS, then press “7” to return to regular baking or press CANCEL, CANCEL UPPER or CANCEL LOWER to turn off the range.
Positioning Racks and BakewareUse the following illustrations and charts as a guide for positioning racks.
- Rack Positions – Upper Oven
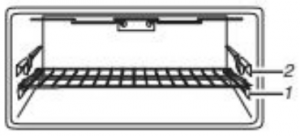
Baking and Broiling
| Food | Rack Position |
| All foods | 1 |
Rack Positions – Lower Oven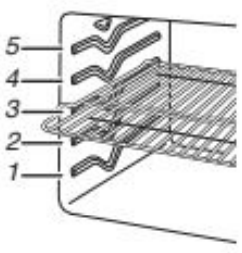
| Food | Rack Position |
| Large roasts or poultry | 1 |
| Roasted meats | 2 |
| Most baked goods, casseroles | 3 |
| Broiled meats, poultry, fish | 4 |
| Broiling/searing meats, hamburgers, steaks | 5 |
Multiple Rack Cooking
2-rack: Use rack positions 2 and 4 for regular baking.2-rack (convection only): Use rack positions 2 and 4 for convection baking.
Bakeware
To cook food evenly, hot air must be able to circulate. Allow 2″ (5.0 cm) of space around bakeware and oven walls. Use the following chart as a guide.
| Number of Pan(s) | Position on Rack |
| 1 | Center of rack |
| 2 | Side-by-side |
| 3 OR 4 | Refer to the Baking Layer Cakes image in the Quick Start Guide |
Baking and Roasting
PreheatingWhen beginning a Bake cycle, the oven will begin preheating after Start is pressed. The oven will take approximately 12 to 15 minutes to reach 350°F (177°C) with all of the oven racks provided with your oven inside the oven cavity. Higher temperatures will take longer to preheat. The preheat cycle rapidly increases the oven temperature. The actual oven temperature will go above your set temperature to offset the heat lost when your oven door is opened to insert food. This ensures that when you place your food in the oven, the oven will begin at the proper temperature. Insert your food when the preheat tone sounds. Do not open the door during preheat before the tone sounds.
Rapid PreheatRapid Preheat can be used to shorten the preheating time. Only one standard flat oven rack should be in the oven during Rapid Preheat. Extra racks should be removed prior to starting Rapid Preheat. The preheating cycle should be completed before placing food in the oven. When the Rapid Preheat cycle is complete, the oven starts a normal Bake cycle.IMPORTANT: Rapid Preheat should be used only for single-rack baking.
Oven TemperatureWhile in use, the oven elements will cycle on and off as needed to maintain a consistent temperature, but they may run slightly hot or cool at any point in time due to this cycling. Opening the oven door while in use will release the hot air and cool the oven which could impact the cooking time and performance. It is recommended to use the oven light to monitor cooking progress.NOTE: On models with convection, the convection fan may run in the non-convection Bake mode to improve oven performance.
AccuBake® Temperature Management SystemThe AccuBake® Temperature Management System electronically regulates the oven heat levels during preheat and bake to maintain a precise temperature range for optimal cooking results. The bake and broil elements or burners cycle on and off in intervals. On convection range models, the fan will run while preheating and may be cycled on and off for short intervals during bake to provide the best results. This feature is automatically activated when the oven is in use.
Before baking and roasting, position racks according to the “Positioning Racks and Bakeware” section. When roasting, it is not necessary to wait for the oven preheat cycle to end before putting food in unless it is recommended in the recipe.
Frozen Bake™ Technology
Frozen Bake™ Technology can be used to cook prepackaged frozen food without needing to preheat the oven and without overbrowning the food. There are 4 preprogrammed food options to choose from: Pizza, Lasagna, Nuggets/Fries, and Pie. Frozen Bake™ Technology should only be used for these foods. Cook only 1 package at a time when using Frozen Bake™ Technology. Use the recommended temperature and maximum recommended time from the packaging. A beep will alert you to check the food’s doneness before the cook time is completed and again at the end of the cook time. The display will prompt you to add to the cook time or end the cycle.
Broiling
Close the oven door while broiling. No preheating is necessary. Position food on grid in a broiler pan, and then place it in the center of the oven rack.NOTE: Odors and smoke are normal the first few times the oven is used or if the oven is heavily soiled. Changing the temperature when broiling allows more precise control when cooking. The lower the broil setting, the slower the cooking. Thicker cuts and unevenly shaped pieces of meat, fish, and poultry may cook better at lower broil settings. Refer to the “Positioning Racks and Bakeware” section for more information. On lower settings, the broil element will cycle on and off to maintain the proper temperature.
- For best results, use a broiler pan and grid. It is designed to drain juices and help avoid spatter and smoke. If you would like to purchase a broiler pan, one may be ordered. Please refer to the Quick Start Guide for contact information
Lower Oven Convection Cooking
In a convection oven, the fan-circulated hot air continually distributes heat more evenly than the natural movement of air in a standard thermal oven. This movement of hot air helps maintain a consistent temperature throughout the oven, cooking foods more evenly, crisping surfaces while sealing in moisture, and yielding crustier breads.
If the oven door is opened during convection cooking, the fan will turn off immediately. It will come back on when the oven door is closed.NOTE: The oven door must be closed for convection broiling.
Position the racks according to the “Positioning Racks and Bakeware” section before starting convection cooking.With convection cooking, most foods can be cooked at a lower temperature or for a shorter length of time.
Cook Time
- To Set a Timed Cook:
- Press the keypad for any cooking function except Self-Clean or Keep Warm.
- Press the number keypads to set the desired temperature. If the temperature entered is not in the range of the temperatures allowed, the minim or maximum allowed temperature will be displayed. Enter a temperature in the allowable range. 3. Press COOK TIME.
- Press the number keypads to enter the length of time to cook.
- Press START for the desired oven. The display will count down the time. When the time ends, the oven will shut off automatically.The temperature and/or time setting can be changed at any time by repeating steps 2 through 5.NOTE: If cooking in both ovens, press any number on the keypad, then follow the on-screen prompts to select the desired oven before entering temperature.
- Press CANCEL for the desired oven to clear the display.
To Set a Delayed Timed Cook:
NOTE: Delayed Timed Cook can only be used for one oven at atime.
- Press START TIME.
- Press the number “1” or “2” keypad to select the desired oven.
- Press the number keypads to enter the number of hours and/or minutes you want to delay the start time.
- Press the keypad for any cooking function except Keep Warm and Frozen Bake ™
- Press the number keypads to set the desired temperature. If the temperature entered is not in the range of the temperatures allowed, the minimum or maximum allowed temperature will be displayed. Enter a temperature in the allowable range.
- Press START for the desired oven or COOK TIME.
- Press the number keypads to enter the length of time to cook.
- Press START for the desired oven.When the start time is reached, the oven will automatically turnon. The temperature and/or time settings can be changedafter the delay countdown by repeating steps 1 through When resetting the time and temperature, it is necessary to press START for the desired oven between steps 4 and 5 to continue making changes.When the set cook time ends, the oven will shut off automatically.
- Press CANCEL for the desired oven to clear the display.
 ®/™ ©2021 Whirlpool. All rights reserved. Used under license in Canada.
References
[xyz-ips snippet=”download-snippet”]