
Whirlpool French Door Bottom Mount Dispensing and Storage User Guide

Overview
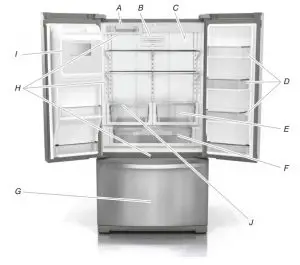
- A. Ice maker
- B. Air filter
- C. Water filter
- D. Door bins
- E. Crispers
- F. Pantry drawer
- G. Freezer drawer
- H. LED ramp-on lighting
- I. In-Door-Ice® ice dispensing system
- J. Slide-Out Shelf / Pull-Out Tray / Platter Pocket (depending on model)
Water and Ice Dispenser Controls
Press Ice/Water to toggle through the following choices in a continuous loop:

- Water (default) – Dispenses water.
- Cubed – Dispenses cubed ice.
- Crushed – Dispenses crushed ice.
TO DISPENSE WATER
- Select water.
- Press a sturdy glass against the water dispenser paddle.NOTE: While dispensing water and for 3 seconds after dispensing has stopped, the digital display will show how much water has been dispensed.
- Remove the glass to stop dispensing.
For crushed ice, cubes are crushed before being dispensed. This may cause a slight delay when dispensing crushed ice. Noise from the ice crusher is normal, and pieces of ice may vary in size.
NOTE: When changing from crushed to cubed, a few ounces of crushed ice will be dispensed along with the first cubes.
- Select the desired type of ice. To switch between cubed ice and crushed ice, press Ice/Water.

- Press a sturdy glass against the dispenser paddle. Hold the glass close to the dispenser opening so ice does not fall outside of the glass.IMPORTANT: You do not need to apply a lot of pressure to the paddle to activate the ice dispenser. Pressing hard will not make the ice dispense faster or in greater quantities.
- Remove the glass to stop dispensing.NOTE: Ice may continue to dispense for several seconds after removing the glass from the dispenser paddle. The dispenser may continue to make noise for a few seconds after dispensing.

Inside Door BinsTo remove and replace the bins:

- Remove the bin by lifting it up and pulling it straight out.
- Replace the bin by sliding it in above the desired support and pushing it down until it stops.
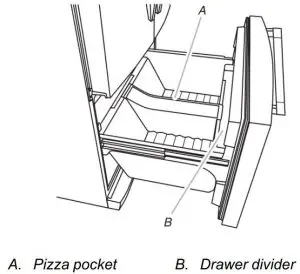
Pizza Pocket and Drawer Divider
The drawer divider is not removable. For storage flexibility, the divider can be moved a few inches to either side allowing you to store larger items in one section of the freezer drawer.
Temperature-Controlled Drawer
IMPORTANT: This control sets the temperature for only this drawer. It does not set the temperature for, or turn off cooling to the refrigerator or freezer compartments.
The full-width, temperature-controlled drawer can be used to store large deli trays, fresh meat, beverages or other items that you want to store at an optimum temperature.
Depending on your model, you will have either an Electronic Control or a Manual Control. Use the directions specific to your model.
NOTE: Do not place leafy vegetables in the temperature-controlled drawer. The colder temperatures could damage leafy produce.
STYLE 1—ELECTRONIC CONTROLFor your convenience, temperatures have been preset for the optimum storage of fresh meat and poultry, cold drinks, and deli and cheese. These preset temperatures cannot be adjusted.
Press the desired temperature setting for the items to be stored in the drawer. As it is pressed, each icon will light up.
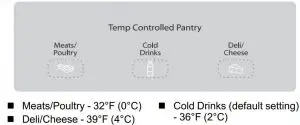
NOTE: If no button is pressed, the control will revert to Cold Drinks, the default setting.
STYLE 2—MANUAL CONTROLSlide the control to the temperature setting best suited for the items stored in the drawer.
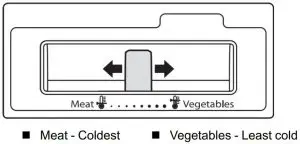
MEAT STORAGE GUIDE
Store most meat in original wrapping as long as it is airtight and moisture-proof. Re-wrap if necessary. See the following chart for storage times. When storing meat longer than the times given, freeze the meat.

Crisper and Crisper Cover
To remove and replace the crisper(s):
- Slide the drawers straight out to the stop. Lift the drawers from the rails and pull them out the rest of the way.
- Replace the drawers by placing them on the rails and pushing them back into position past the drawer stop.
To remove the crisper(s) cover:
- Remove crisper drawers.
- Holding the glass insert firmly with one hand, press up in center of glass insert until it rises above the plastic frame. Gently slide the glass insert forward to remove.
- Lift the cover frame up and remove it.

To replace crisper(s) cover:
- Fit back of cover frame into supports on side walls of the refrigerator and lower the front of the cover frame into place.
- Slide rear of glass insert into cover frame and lower front into place.
- Replace crisper drawers.
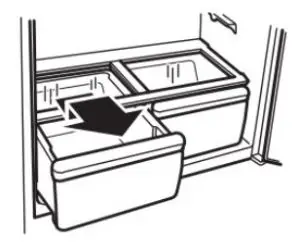
CRISPER DRAWER REMOVAL AND REPLACEMENT
To remove the drawer:
- Push the drawer completely closed.
- Lift up the front of the drawer and pull it straight out.
To replace the drawer:
- Push the metal glide rails to the rear of the refrigerator.
- Place the drawer onto the glide rails. While tilting the rear of the drawer upward, slide the drawer toward the rear of the refrigerator.
CRISPER DRAWER DIVIDER
To remove the divider:
- Pull the drawer out to its full extension.
- Lift the front of the divider and lift the divider out.
To replace the divider:
- Position the divider so that the features on the bottom of the divider align with the matching features in the drawer.
- Lower the divider into place.
Additional Control Panel Descriptions
DOOR AJAR ALARM
 The Door Ajar Alarm feature sounds an alarm when the refrigerator door(s), drawers, or freezer drawer is open for 5 minutes and cooling is turned on. The alarm will repeat every 2 minutes. Close all doors and drawer to turn it off. The feature then is reset and will reactivate when either door is left open again for 5 minutes.
NOTE: To mute the audible alarm while keeping the doors open, such as while cleaning the inside of the refrigerator, press any button on the control panel. The alarm sound will be temporarily turned off, but the Door Ajar icon will still be displayed on the dispenser control panel.
DISABLING SOUNDS
- To turn off control and dispenser sounds, press and hold Ice/ Water and Fast Ice at the same time for 3 seconds. All normal operating tones are disabled. Only alert tones will be audible.
- To turn all sounds back on, press and hold Ice/Water and Fast Ice at the same time for 3 seconds again.
SHOWROOM MODEThis mode is used only when the refrigerator is on display in a retail store. If you unintentionally turn on Showroom mode, the words Showroom Mode will light up on the display. Exit Showroom mode by pressing and holding Light and Lock at the same time for 3 seconds.
®/™ ©2020 Whirlpool. All rights reserved. Used under license in Canada.
[xyz-ips snippet=”download-snippet”]