
Whirlpool ICE MAKER DOOR REVERSAL Instructions
ICE MAKER DOOR REVERSAL INSTRUCTIONS
REVERSE DOOR SWING: SIDE SWING ONLY
Tools Needed
Gather the required tools and parts before starting installation.
- 5/16ʺ wrench
- 1/4ʺ wrench
- Flat putty knife
- Phillips screwdriver

Remove Stainless Steel Door Wrap Panel (on some models)
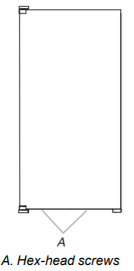
- Remove two hex-head screws (A) Remove the two hex-head screws located under the stainless steel door wrap panel flange on the bottom of the door.
- Pull up and outward on door wrap Pull up and outward on the door wrap panel from the bottom.
- Rotate door wrap panel Rotate the door wrap panel until it separates from the door and pull up.NOTE: Be sure the edge guards do not separate from the door wrap panel.
Door Stop and End Cap Reversal
![]() WARNING
WARNING
 Electrical Shock Hazard Disconnect power before servicing. Replace all parts and panels before operating. Failure to do so can result in death or electrical shock.
- Disconnect power to ice makerUnplug ice maker or disconnect power.
- Remove handle (on some models)Remove the handle screws and handle (on some models).
- Remove hinge pinRemove the hinge pin (A) from the top hinge.
- Remove door from hingesRemove the door from the hinges and replace the top hinge pin (A).
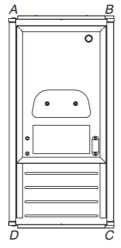
- Remove screw and door stop: (A) and (C)Remove the screw and door stop at corner A. Remove the screw and end cap at corner C. Place the door stop at corner C, and tighten screw. Place the end cap at corner A, and tighten screw.
- Remove screw and door stop: (B) and (D)Remove the screw and door stop at corner D. Remove the screw and end cap at corner B. Place the door stop at corner B, and tighten screw. Place the end cap at corner D, and tighten screw.A. Top corner open (no end cap)B. Beginning top corner end capC. Beginning bottom corner end capD. Bottom corner open (no end cap)
- Set door aside


 A. Top corner open (no end cap)B. Beginning top corner end capC. Beginning bottom corner end capD. Bottom corner open (no end cap)
Reverse Hinges
- Remove top hingeUnscrew and remove the top hinge. Replace the screws in the empty hinge holes.Top Hinge
- Remove bottom hingeUnscrew and remove the bottom hinge screws and hinge. Replace the screws in the empty hinge holes.Bottom Hinge
- Remove bottom screwsRemove the screws from the bottom of the opposite side of the ice maker cabinet. Turn the top hinge upside down so that the hinge pin points up. Place the hinge on the bottom opposite side of the ice maker and tighten screws.
- Remove top screwsRemove the screws from the top of the opposite side of the ice maker cabinet. Turn the hinge upside down so that the hinge pin points down. Place the hinge on the top opposite side of the ice maker and tighten the screws.
- Insert top hinge pinInsert the top hinge pin into the top hinge.


Replace Door
- Place the door on the bottom hinge pin.
- Align the door with the top hinge hole and replace the top hinge pin.
- Replace the handle and handle screws.
Replace Door Wrap (on some models)
- Place the door wrap flange onto the door top and ensure that it fits correctly.
- Rotate the door wrap downward until it covers the door surface completely.
- Install the two hex-head screws into the bottom of the door.
Reverse Door Catch

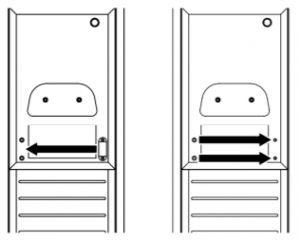
- Remove white screws Remove the white decorative screws from the opposite side of the door and set aside.
- Remove door catch screws Remove the screws from the magnetic door catch and place the door catch and the screws on the opposite side of the door.
- Install white screws on opposite side Install the white decorative screws on the opposite side of the door.WARNINGElectrical Shock HazardPlug into a grounded 3 prong outlet.Do not remove ground prong.Do not use an adapter.Do not use an extension cord.Failure to follow these instructions can result in death, fire, or electrical shock.
- .Plug in ice makerPlug ice maker into a grounded 3–prong outlet.
Troubleshooting
See your Owner’s Manual or visit our website and reference Frequently Asked Questions to possibly avoid the cost of a service call.
Read More About This Manual & Download PDF:
[xyz-ips snippet=”download-snippet”]