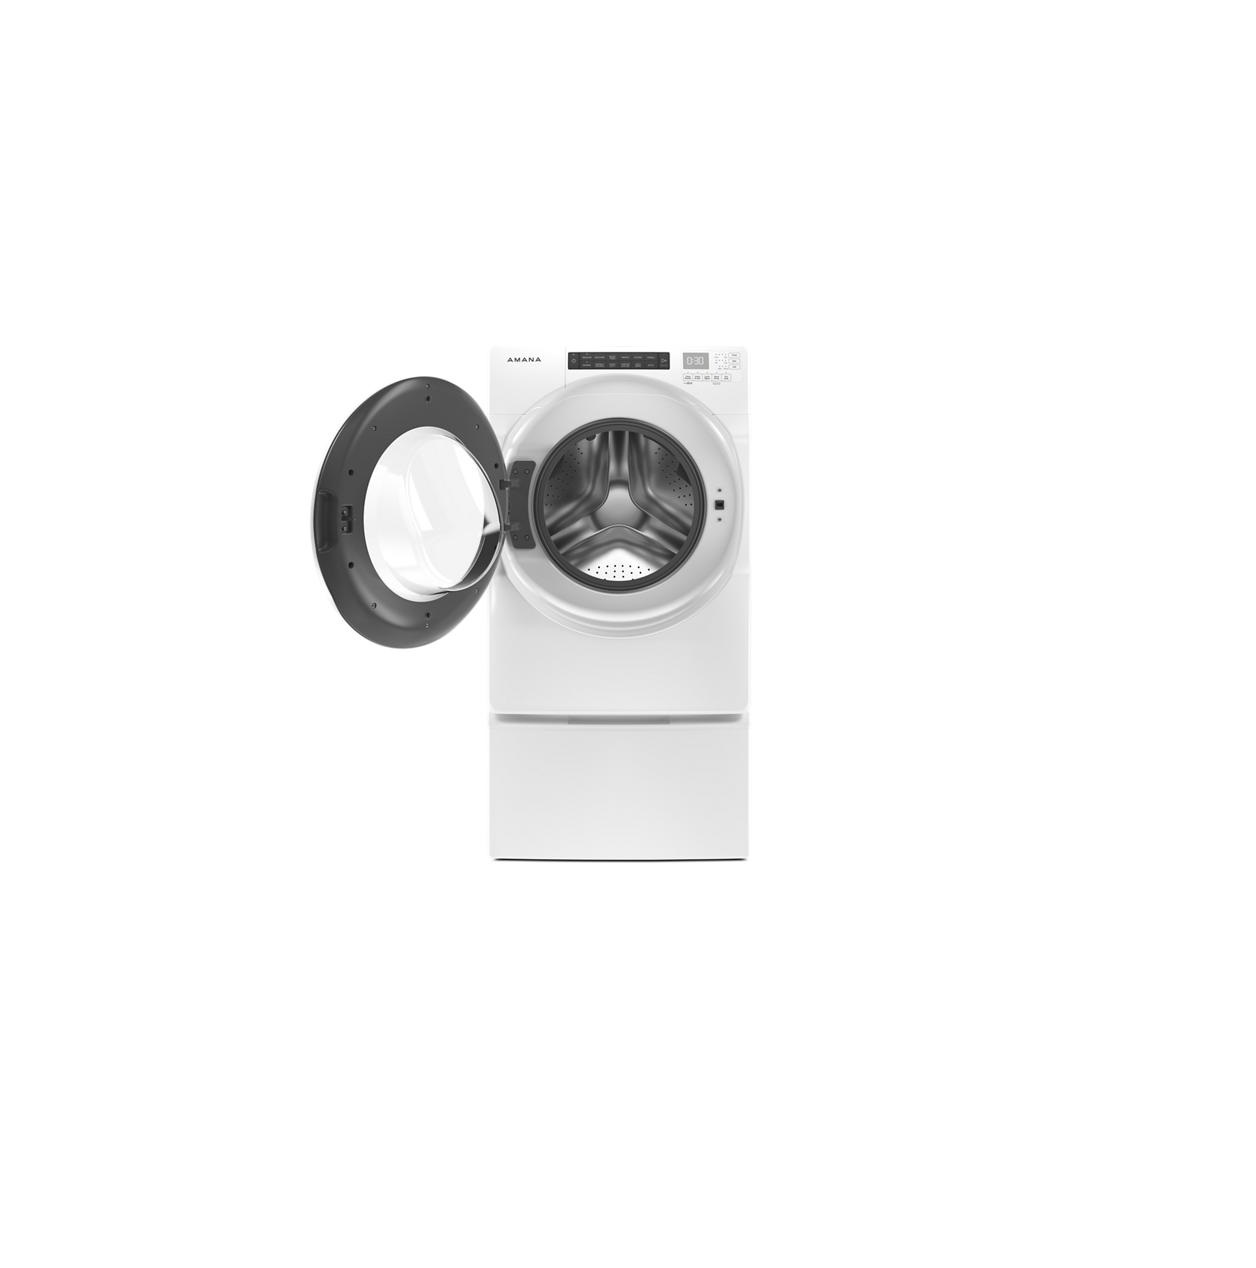
Whirlpool W10347252 15.5″ Pedestal with Front Load Washers and Dryers

PEDESTAL SAFETY
Your safety and the safety of others are very important.We have provided many important safety messages in this manual and on your appliance. Always read and obey all safety messages. This is the safety alert symbol. This symbol alerts you to potential hazards that can kill or hurt you and others. All safety messages will follow the safety alert symbol and either the word “DANGER” or “WARNING.” These words mean: This is the safety alert symbol. This symbol alerts you to potential hazards that can kill or hurt you and others. All safety messages will follow the safety alert symbol and either the word “DANGER” or “WARNING.” These words mean: |
INSTALLATION REQUIREMENTS
LOCATION REQUIREMENTS
 |
 |
|
Explosion Hazard Keep flammable materials and vapors, such as gasoline, away from dryer.Place dryer at least 18 inches (460 mm) above the floor for a garage installation.Failure to do so can result in death, explosion, or fire. |
NOTE: If the washer/dryer and pedestal assembly are located in a garage, 3″ (76 mm) must be added under the pedestal so that the washer/dryer is 18″ (457 mm) above the garage floor.
TOOLS AND PARTS
Gather the required tools and parts before starting installation.
Tools Needed:
|
|
|
|
|
|
|
|
|
 5/16″ hex head ratchet or nut driver 5/16″ hex head ratchet or nut driver |
 Utility knife
 1/4″ hex head ratchet or open-end wrench
 Level
Level 9/16″ open end wrench
 Bucket
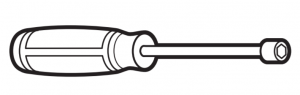 1/4″ nut driver
Additional Items Needed:
|
|
|
 Towel
Towel Sponge
Parts Supplied
|
|
|
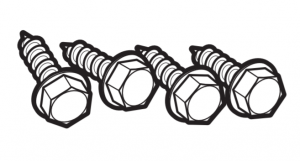 Four #12 x 5/8″ hex-head sheet metal screws
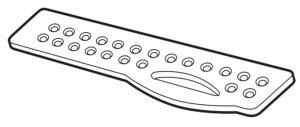 Drawer divider
LOCATION REQUIREMENTS (Dryer)
Recessed Area and Closet Installation InstructionsIMPORTANT: The dryer/pedestal can be installed in an enclosure. Check the locations of the water supply faucets, grounded electrical outlets, and gas supply line connection (gas dryer only). Depending on your application, fill hoses and electric power supply cord longer than those supplied with the dryer may be needed.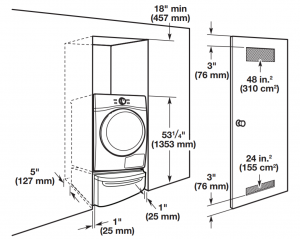 If the water supply faucets, electrical outlets, gas supply line, or power cord need modification, have a qualified plumber, electrician, or gas technician make the changes.
LOCATION REQUIREMENTS (Washer)
Recessed Area and Closet Installation InstructionsIMPORTANT: The washer/pedestal can be installed in an enclosure. Check the locations of the water supply faucets and grounded electrical outlets. Depending on your application, washer fill hoses and electric power supply cord longer than those supplied with the washer may be needed.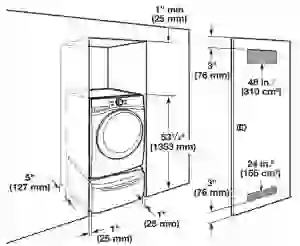 If the water supply faucets, electrical outlets or power cord need modification, have a qualified plumber, or electrician, or make the changes.
UNPACKING THE PEDESTAL
Preparing the pedestal for installation
|
Use two or more people to move and install pedestal.Failure to do so can result in back or other injury. |
IMPORTANT: Set the pedestal box aside for use during installation.
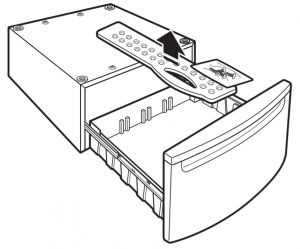
- Empty pedestal drawer
 Open the pedestal drawer as far as possible and remove the contents. The package contains four #12 x 5/8″ hex-head sheet metal screws and a drawer divider.
 - Locate spacer padsThe four spacer pads are installed on the top of the pedestal. These pads reduce vibration between the pedestal and the washer/dryer.NOTE: If your washer/dryer has feet installed, remove them.
- Remove pedestal drawerUsing a 1/4″ nut driver, remove the hex-head screws from both drawer slides and save screws. Remove the drawer from the slides and set aside. Push the slides back into the pedestal.
 Open the pedestal drawer as far as possible and remove the contents. The package contains four #12 x 5/8″ hex-head sheet metal screws and a drawer divider.
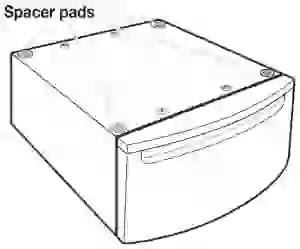 The four spacer pads are installed on the top of the pedestal. These pads reduce vibration between the pedestal and the washer/dryer.NOTE: If your washer/dryer has feet installed, remove them.
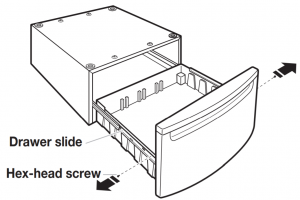 Using a 1/4″ nut driver, remove the hex-head screws from both drawer slides and save screws. Remove the drawer from the slides and set aside. Push the slides back into the pedestal.
BEFORE INSTALLING PEDESTAL
IMPORTANT: If your washer and dryer are already installed, they must be uninstalled.
Uninstalling your washer
To avoid possible damage to the washer, the transport bolts on the back of the washer must be in place before installing the pedestal. For more information on transport bolts see, “Remove Transport System” in washer Use and Care Guide.
|
Use two or more people to move and uninstall washer.Failure to do so can result in back or other injury. |
NOTE: If the washer is to be transported, call your local service center. To avoid suspension and structural damage, your washer must be properly set up for relocation by a certified technician.
- Turn off the hot and cold water faucets.
- Unplug the power supply cord.
- Slowly loosen the fill hoses at the faucets to relieve the water pressure. Use a sponge or towel to absorb the released water.
- Remove the “HOT” and “COLD” fill hoses from the back of the washer. Drain the water from the hoses into a bucket.
- Remove the drain hose from the standpipe or laundry tub and drain any water remaining in the hose into a bucket.
- Pull the washer away from the wall so that you will have enough space for the installation.
Uninstalling your electric dryer
|
Disconnect power before servicing.Replace all parts and panels before operating.Failure to do so can result in death or electrical shock. |

|
Use two or more people to move and uninstall dryer.Failure to do so can result in back or other injury. |
- Unplug the power supply cord or disconnect wiring if dryer is direct wired.
- Pull the dryer away from the wall enough to loosen the vent clamp. Loosen the clamp and gently remove the exhaust vent from the dryer exhaust outlet.
- Pull the dryer away from the wall so that you will have enough space for the installation.
Uninstalling your gas dryer
|
Use two or more people to move and uninstall dryer.Failure to do so can result in back or other injury. |
- Unplug the power supply cord.
- Turn off the gas supply.
- Pull the dryer away from the wall enough to loosen the vent clamp. Loosen the clamp and gently remove the exhaust vent from the dryer exhaust outlet.
- Disconnect the flexible gas supply line from the dryer. Put a piece of tape over the open ends of the gas line connection fittings. 5. Pull the dryer away from the wall so that you will have enough space for the installation.
Installation of new washer/dryer
|
Use two or more people to move and install washer/dryer.Failure to do so can result in back or other injury. |
- Unpack the washer/dryer and move close to the intended installation location.
INSTALLING THE PEDESTAL
Confirm transport bolts are in place
 Locate the transport bolts on rear of washer. Transport bolts must remain in washer before pedestal can be installed. For more information on transport bolts see, “Remove Transport System” in washer Use and Care Guide.
|
Use two or more people to move and install washer/dryer.Failure to do so can result in back or other injury. |
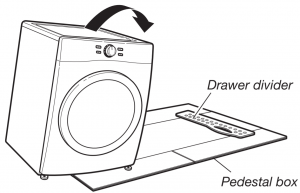
- Place washer on its sideTo avoid floor damage and ease installation and handling, unfold the empty pedestal box flat and place it next to the washer. Position the drawer divider so that it will be near the top of the washer, as shown. Gently tip the washer on its side so the washer is resting on the drawer divider.
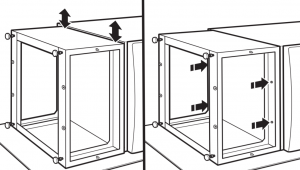
- Prepare the washerPartially install two of the #12 x 5/8″ hex-head sheet metal screws in the indicated holes. Leave a space of about 3/8″ (10 mm) between the screw head and the bottom of the washer.NOTE: If your washer has leveling feet installed, remove them.
- Attach pedestal to washerMove the pedestal against the washer bottom. The front of the pedestal cabinet should align with the washer cabinet as shown below.Slide the pedestal’s keyhole slots over the lower two partially installed screws.View from above
- Secure pedestal to washerPosition the pedestal toward the front of the washer and install the two remaining hex-head sheet metal screws.Do not tighten completely. Now proceed to “Complete the pedestal installation”.
 To avoid floor damage and ease installation and handling, unfold the empty pedestal box flat and place it next to the washer. Position the drawer divider so that it will be near the top of the washer, as shown. Gently tip the washer on its side so the washer is resting on the drawer divider.
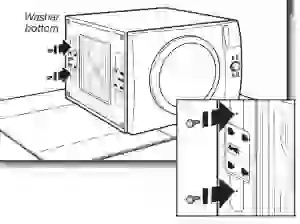 Partially install two of the #12 x 5/8″ hex-head sheet metal screws in the indicated holes. Leave a space of about 3/8″ (10 mm) between the screw head and the bottom of the washer.NOTE: If your washer has leveling feet installed, remove them.
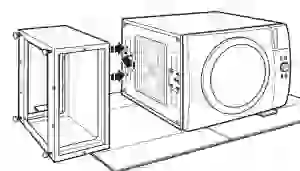 Move the pedestal against the washer bottom. The front of the pedestal cabinet should align with the washer cabinet as shown below.Slide the pedestal’s keyhole slots over the lower two partially installed screws.
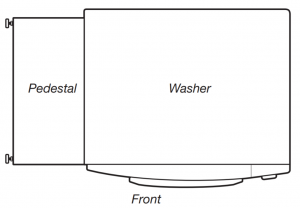 View from above
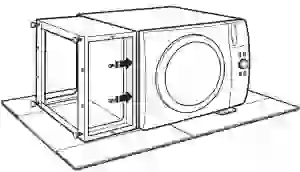
Installing the pedestal on the dryer
- Place dryer on its sideTo avoid floor damage and ease installation and handling, unfold the empty pedestal box flat and place it next to the dryer.Position the drawer divider so that it will be near the top of the dryer, as shown. Gently tip the dryer on its side so the dryer is resting on the drawer divider.
- Prepare the dryerPartially install two of the #12 x 5/8″ hex-head sheet metal screws in the indicated holes. Leave a space of about 3/8″ (10 mm) between the screw head and the bottom of the dryer.NOTE: If your dryer has leveling feet installed, remove them. Do not install the feet that came with the new dryer.
- Attach pedestal to dryerMove the pedestal against the dryer bottom. The front of the pedestal cabinet should align with the dryer cabinet as shown below.Slide the pedestal’s keyhole slots over the lower two partially installed screws.View from above
- Secure pedestal to dryerPosition the pedestal toward the front of the dryer and install the two remaining hex-head sheet metal screws. Do not tighten completely. Now proceed to “Complete the pedestal installation”.
 To avoid floor damage and ease installation and handling, unfold the empty pedestal box flat and place it next to the dryer.Position the drawer divider so that it will be near the top of the dryer, as shown. Gently tip the dryer on its side so the dryer is resting on the drawer divider.
 Partially install two of the #12 x 5/8″ hex-head sheet metal screws in the indicated holes. Leave a space of about 3/8″ (10 mm) between the screw head and the bottom of the dryer.NOTE: If your dryer has leveling feet installed, remove them. Do not install the feet that came with the new dryer.
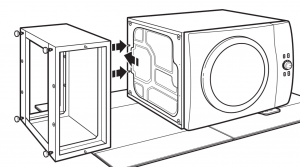 Move the pedestal against the dryer bottom. The front of the pedestal cabinet should align with the dryer cabinet as shown below.Slide the pedestal’s keyhole slots over the lower two partially installed screws.
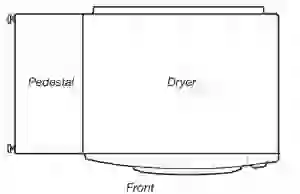 View from above
 Position the pedestal toward the front of the dryer and install the two remaining hex-head sheet metal screws. Do not tighten completely. Now proceed to “Complete the pedestal installation”.
COMPLETE THE INSTALLATION
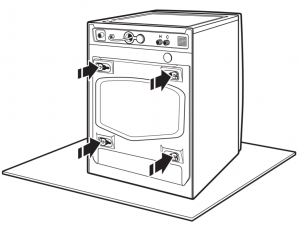
- Align sides of pedestalAlign the sides of the pedestal so that they are even with the sides of the washer/dryer. Reach inside the pedestal opening and securely tighten all four pedestal screws.
- Prepare pedestal feetUsing a 1/4″ hex head ratchet or open-end wrench, lower the feet approximately 1″ (25 mm) away from the bottom of the pedestal.
- Stand the washer/dryer uprightTip the washer/dryer back to its upright position. Remove any remaining packaging material. Set the pedestal box aside for use if installing another pedestal. Once both the washer and dryer have been installed, dispose of/recycle all packaging material.
 Align the sides of the pedestal so that they are even with the sides of the washer/dryer. Reach inside the pedestal opening and securely tighten all four pedestal screws.
 Using a 1/4″ hex head ratchet or open-end wrench, lower the feet approximately 1″ (25 mm) away from the bottom of the pedestal.
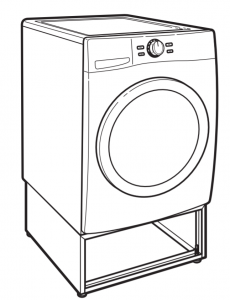 Tip the washer/dryer back to its upright position. Remove any remaining packaging material. Set the pedestal box aside for use if installing another pedestal. Once both the washer and dryer have been installed, dispose of/recycle all packaging material.
Level the washer/dryer
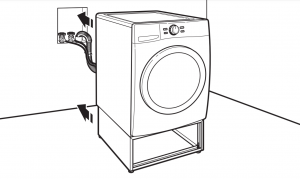
- Move close to final locationFollow the installation instructions that came with your model to finish installing or reinstalling your washer/dryer (i.e. hoses, vents, etc.).NOTE: Be sure to remove the transport bolts from the back of the washer.
- Check levelness of washer/dryerPlace a level on top edges of washer/dryer, checking each side and front. Rock washer/dryer back and forth to make sure all four feet make solid contact with floor.If not level, adjust pedestal feet up or down, repeating as necessary.
- Adjust pedestal feetLocate the 1/4″ hex-head screws on the top of each pedestal foot. Reach inside the pedestal and use a 1/4″ hex-head ratchet or open-end wrench to adjust the feet up or down as needed, to level the washer/dryer.NOTE: Make sure all four pedestal feet are in solid contact with the floor.
- Securely tighten jam nutsWhen the washer/dryer is level, use a 9/16″ open-end wrench to securely tighten all four jam nuts against the pedestal.IMPORTANT: The jam nuts must be tightened to avoid vibration.
 Follow the installation instructions that came with your model to finish installing or reinstalling your washer/dryer (i.e. hoses, vents, etc.).NOTE: Be sure to remove the transport bolts from the back of the washer.
 Place a level on top edges of washer/dryer, checking each side and front. Rock washer/dryer back and forth to make sure all four feet make solid contact with floor.
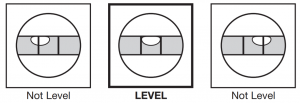 If not level, adjust pedestal feet up or down, repeating as necessary.
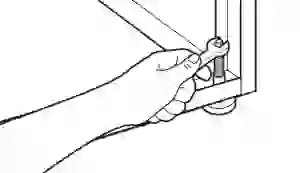 Locate the 1/4″ hex-head screws on the top of each pedestal foot. Reach inside the pedestal and use a 1/4″ hex-head ratchet or open-end wrench to adjust the feet up or down as needed, to level the washer/dryer.NOTE: Make sure all four pedestal feet are in solid contact with the floor.
 When the washer/dryer is level, use a 9/16″ open-end wrench to securely tighten all four jam nuts against the pedestal.IMPORTANT: The jam nuts must be tightened to avoid vibration.
Reinstall pedestal drawer
1. Reassemble pedestal drawer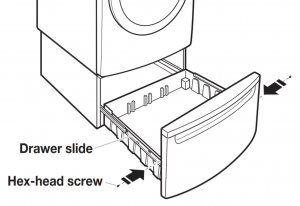 Pull both drawer slides out and reassemble the drawer to the drawer slides with the two hex-head screws.2. Place drawer divider in drawer
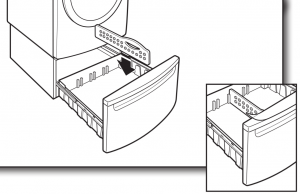 Remove the shipping film from the drawer.Place the divider in the drawer at the desired location. Close the drawer.NOTE: Use of the divider is optional.
References
[xyz-ips snippet=”download-snippet”]