
Dryer Quick Start Guide
OPERATING INSTRUCTIONS
![]() WARNING
WARNING

Fire Hazard
No washer can completely remove oil.Do not dry anything that has ever had any type of oil on it (including cooking oils).Items containing foam, rubber, or plastic must be dried on a clothesline or by using an Air Cycle.Failure to follow these instructions can result in death or fire.
![]() WARNING
WARNING

Explosion Hazard
Keep flammable materials and vapors, such as gasoline, away from dryer.Do not dry anything that has ever had anything flammable on it (even after washing).Failure to follow these instructions can result in death, explosion, or fire.
WARNING: To reduce the risk of fire, electric shock, or injury to persons, read the IMPORTANT SAFETY INSTRUCTIONS, located in your appliance’s Owner’s Manual, before operating this appliance.
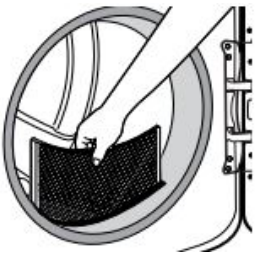
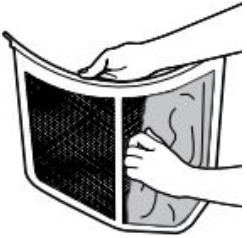
Step 1. Clean Lint Screen
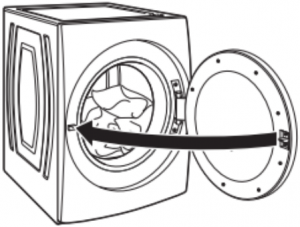
Step 2. Load Clothes
Step 3. Turn Power On
![]()
Step 4. Close Door; then Select Cycle and Settings

Step 5. Press START/PAUSE
![]()
Cycle Guide – Normal Cycle
This dryer has a unique user interface to help you select the best cycle you need for your load. The “What to Dry” “How to Dry” layout guides you to the optimal cycle in two easy steps: First determine what items are in the load that you are trying to dry. Use that to guide your “What to Dry” selection. Then determine how you want the dryer to dry them and select the appropriate “How to Dry” selection. Modifiers are preset for the items being dried, but can be changed if desired. To get the most energy savings and enhanced fabric care from your dryer, use the Automatic cycles. These cycles measure the drying air temperature and moisture levels to turn the dryer off once the load reaches the selected dryness level. Dryer performance and results may vary with service voltage less than 240 V.
| Items to Dry: | “What to Dry”: | “How to Dry”: | Description: |
| T-shirts, Lingerie, Blankets, White Napkins, Athletic, Dish cloths | Regular, Delicate, Bulky Items, Whites, Colors, Towels | Normal | Automatic Sensor Cycle stops when dryness level is reached. |
NOTE: Government energy certifications for this model were based on the Regular + Normal Cycle, Highest temperature setting, Normal Dryness Level, EcoBoost™ On. The as-shipped defaults were the same as the Government Energy Certification Settings except the default Temperature Setting of Medium was adjusted to the Highest temperature setting. Cycles that are available for post-sale download may use more energy than the Normal cycle, upon which the energy use rating of this dryer is based upon.
For detailed installation instruction and maintenance information, winter storage, and transportation tips, please see the Owner’s Manual included with your machine.
|
Online Ordering Information |
|||
| For information on any of the following items, a full cycle guide, warranty, detailed product dimensions, or for complete instructions for use and installation, please visit https://www.whirlpool.com/owners, or in Canada https://www.whirlpool.ca/owners. This may save you the cost of a service call. | |||
| Register Product | Schedule Service | How To’s & FAQ | Manuals & Downloads |
 |
 |
 |
 |
| Add Service Plan | Parts | Filters | Accessories |
 |
 |
 |
 |
| However, if you need to contact us, use the information listed below for the appropriate region. | |||
|
United States:1–866–698–2538Whirlpool Brand Home AppliancesCustomer eXperience Center553 Benson RoadBenton Harbor, MI 49022–2692 |
Canada:1–800–807–6777Whirlpool Brand Home AppliancesCustomer eXperience Centre200–6750 Century Ave.Mississauga, Ontario L5N 0B7 |
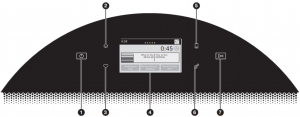
1. POWER/CANCELTouch to turn the dryer on and off. Touch to stop/cancel a cycle at any time.
2. HOMETouch this button and the LCD screen will show the home screen, where you can select your cycle, settings, and options.
3. FAVORITESStores and accesses your favorite cycles, and also accesses a history of recently run cycles.
4. LCD DISPLAYUse this screen to select cycle, settings, options, etc. Swiping the screen gives access to five frequently run cycles.
MODIFIERS
First select a cycle from the “What to Dry” (Automatic Cycles) and then select the “How to Dry” to get the best combination cycle available for the type of items you are going to dry. See the online “Cycle Guide” for more information.
Automatic CyclesYou can select a different dryness level, depending on your load. Touch Set Auto-Drying Level; then touch the screen to choose between More, Normal, or Less to adjust the dryness level at which the dryer will shut off. Dryness level can be changed in the first 5–8 minutes of the cycle.Automatic cycles give the best drying in the shortest time. Drying time varies based on fabric type, load size, and dryness setting.
NOTE: Automatic Cycles will give you up to 4 temperatures to adjust and it varies, depending on the “What to Dry” or “How to Dry” selections that have been made.
Timed DryWhen you select Timed Dry, the default time appears in the display. To change the drying times, touch Timed Dry or Quick Dry, then touch the screen to choose a new drying time. Touch Temperature then the screen to adjust the default temperature.
Wrinkle Shield™ OptionIf you will be unable to remove a load immediately, touch Wrinkle Shield™ to add up to 150 minutes of periodic tumbling to help reduce wrinkling. Touch Wrinkle Shield™ option, then touch “ON” to activate this option. Wrinkle Shield™ option may be ended at any time by touching the “X” on the touch screen to the right of the estimated time remaining.
OPTIONSFrom the home screen, touch the Options icon (at upper right of screen) and the Options screen will show Static Reduce, Damp Dry Signal, and/or EcoBoost™ (depending on the cycle).
NOTE: Not all options and settings are available with all cycles.
Damp Dry SignalTouch to select the Damp Dry Signal on or off. When selected, a series of beeps will sound when the load is damp, but not completely dry. This will allow you to take clothes out of the load that do not need to dry completely. The Damp Dry Signal is selected as a default for the Bulky Items cycles, as a reminder to manually reposition bulky loads midway through the cycle. This option is not available for all cycles. See the online “Cycle Guide” for details.
Static Reduce (on some models only)Touch to add this option to selected Automatic Cycles. The dryer will be automatically tumble, pause, and introduce a small amount of moisture into the load to help reduce static. This option adds approximately 3 minutes to the total cycle time.
EcoBoost™ OptionTouch to activate the EcoBoost™ option, which allows you to increase your energy savings by using a slightly lower heat level. This will increase dry times. The EcoBoost™ option is only available on the Regular/Normal cycle and defaults on.
5. REMOTE ENABLEPress the Remote Enable button any time you want to use the Wi-Fi app. Pressing the button locks out the LCD screen and you will be prompted with a message about the dryer waiting for input from the app. To exit this mode, press the Remote Enable button again.
6. TOOLSThe Tools button gives access to many other settings, utility cycles, preferences, and information. Touch the Tools button to access the Tools screen. Scroll down with your finger to access all of the selections.
Control LockPress this icon to lock the controls. Swipe up to unlock.
MutePress this icon to mute or unmute sounds.
UTILITY CYCLE
Steam RefreshSelect Steam Refresh to reduce odors and light wrinkles in dry loads consisting of wrinkle-free cotton, cotton-polyester blends, common knits, and synthetics. If you will be unable to remove a load immediately, touch Wrinkle Shield™ to add up to 150 minutes of periodic tumbling. You may select the “+ Steam” setting to add a short steam cycle after 60 minutes to help smooth out wrinkles.
NOTE: The Control Lock function may be enabled when recovering from a power failure. To unlock the control, touch and hold Control Lock for at least 3 seconds.
PreferencesPress to access Times and Dates, Sound Volume, Display Settings, and Regional. Follow the screen prompts.
Wi-FiTouch and hold Wi-Fi Connect for 3 seconds during the initial connection of the dryer to your home Wi-Fi network. If the dryer is in a Smart Delay, touch Wi-Fi Connect to override the delay and begin a dry cycle immediately.
InfoPress to access Service & Support, Store Demo Mode, Restore Factory, Wi-Fi Terms and Conditions, and Software Terms and Conditions. Follow the screen prompts.
7. START/PAUSETouch and hold to start, or touch to pause a cycle. When the dryer drum begins to move, release the Start/Pause button. Continuing to hold the Start/Pause button after the dryer has started will cause the dryer to stop.
Internet Connectivity Guide
Connectivity requires Wi-Fi and account creation. App features and functionality subject to change. Data rates may apply. Once installed, launch the app. You will be guided through the steps to set up a user account and to connect your appliance. If you have any problems or questions, call Whirlpool® Corporation Connected Appliances at 1–866–333–4591.
Not all features, cycles, and options are available on all models. Appearance may vary.
NOTE: The control panel features a sensitive surface that responds to a light touch of your finger. To ensure your selections are registered, touch the control panel with your finger tip, not your fingernail. When selecting a setting or option, simply touch its name.
W11550668A06/21 ®/™ ©2021 Whirlpool. All rights reserved. Used under license in Canada.
References
[xyz-ips snippet=”download-snippet”]