
Whynter 30″ Built-In French Door Dual Zone33 Bottle Wine Refrigerator 88 Can Beverage CenterModel # : BWB-3388FDSINSTRUCTION MANUAL

Congratulations on your new Whynter product. To ensure proper operation, please read this Instruction Manual carefully before using this product. Keep this manual in a safe place for future reference.
Safety Precautions
APPLIANCE SAFETY
Your safety and the safety of others are very important to us.To reduce the risk of fire, electrical shock, or injury when using your appliance, follow these basic precautions
 This is the Safety Alert Symbol. This symbol alerts you to potential hazards that may result in serious injury. All safety messages will follow the Safety Alert Symbol and either the words” DANGER” or “WARNING”.

Danger means that failure to heed this safety statement may result in severe injury or death.

Warning means that failure to heed this safety statement may result in extensive product damage, serious injury, or death.

Caution means that failure to heed this safety statement may result in minor or moderate injury, or property or equipment damage.
IMPORTANT SAFEGUIDES
Before the appliance is used, it must be properly positioned and installed as described in this manual, please read the manual carefully. To reduce the risk of fire, electrical shock, or injury when using the appliance, follow basic precaution, including the following:
- Plug into a grounded 3-prong outlet, do not remove grounding prong, do not use an adapter, and do not use an extension cord.
- Do not use it if the power supply cord is damaged. If damaged, it must be replaced by a qualified electrician.
- It is recommended that a separate circuit, serving only your appliance be provided. Use receptacles that cannot be turned off by a switch or pull chain.
- Never clean appliance parts with flammable fluids or harsh chemicals. These fumes can create a fire hazard or explosion.
Safety Precautions
- Do not store or use gasoline or other flammable vapors and liquids in the vicinity of the appliance or any other appliance.
- Before proceeding with cleaning and maintenance operations, make sure to unplug the appliance.
- Do not connect or disconnect the electric plug with wet hands.
- Do not attempt to repair or replace any part of your appliance unless it is specifically recommended in this manual. All other servicing should be referred to a qualified technician.
- This appliance is CFC- and HFC-free and contains small quantities of Isobutane (R600a) which is environmentally friendly, but flammable. It does not damage the ozone layer, nor does it increase the greenhouse effect. Care must be taken during transportation and setting up of the appliance that no parts of the cooling system are damaged. Leaking coolant can ignite and may damage the eyes.In the event of leakage:– Avoid open flames and anything which creates a spark– Disconnect from the mains– Air the room in which the appliance is located for several minutes and contact the Service Department for advice
FOLLOW WARNING CALL OUTS BELOW ONLY WHEN APPLICABLE TO YOUR MODEL
- Use two or more people to move and install the appliance. Failure to do so can result in injury.
- To ensure proper ventilation for your appliance, the front of the appliance must be completely unobstructed. Choose a well-ventilated area with temperatures above 60°F (16°C) and below 90°F (32°C). This appliance must be installed in an area protected from the element, such as wind, rain, water spray or drips.
- The appliance should not be located next to ovens, grills, or other sources of high heat.
- The appliance must be installed with all electrical connections in accordance with state and local codes.
- The fuse (or circuit breaker) size should be 15 amperes.
- It is important for the appliance to be leveled in order to work properly. For a stable installation, make sure the appliance is placed on a flat, level, and solid surface.
- Ensure that the surface on which the appliance is placed is strong enough to hold the appliance and the items stored inside.
- This appliance is not intended for use by young children or physically-challenged persons without supervision/assistance. Young children must be supervised to ensure safety around this or any appliance.
- Do not use solvent-based cleaning agents of abrasives on the interior. These cleaners may damage or discolor the interior.
- Keep fingers out of the “pinch point” areas. Clearance between the doors and between the doors and cabinet is necessarily small. Be careful closing doors when children are in the area.
- This refrigerator is designed to store beverage cans and wine bottles. If food is stored inside, ensure that there is sufficient airflow between items. Please note that the temperature range for this refrigerator is optimized for wine and beverage storage. Perishable food items may require a different storage environment.
- Do not place hot food or beverages into the appliance.
- Close the refrigerator doors immediately after putting in any items to keep the internal temperature relatively constant.
- Avoid placing any objects on top of the appliance.
- This is an electrical appliance, to avoid injury from electrical shock does not operate the unit with wet hands while standing on a wet surface or while standing in water. Do not use outdoors or in wet conditions.
- When positioning or moving the appliance, ensure that it is not turned upside down or unleveled greater than 45°
- Never pull the power cord to disconnect it from the outlet. Grasp the plug and pull it from the outlet.
- Never lift, carry or drag the appliance by the power cord.
- This appliance is designed for household, non-commercial use only. Any other use will void the warranty.
- Do not plug into the power outlet before setup is completed.
- Do not move this appliance without emptying it and securing the door in a closed position.
Parts


Product Features
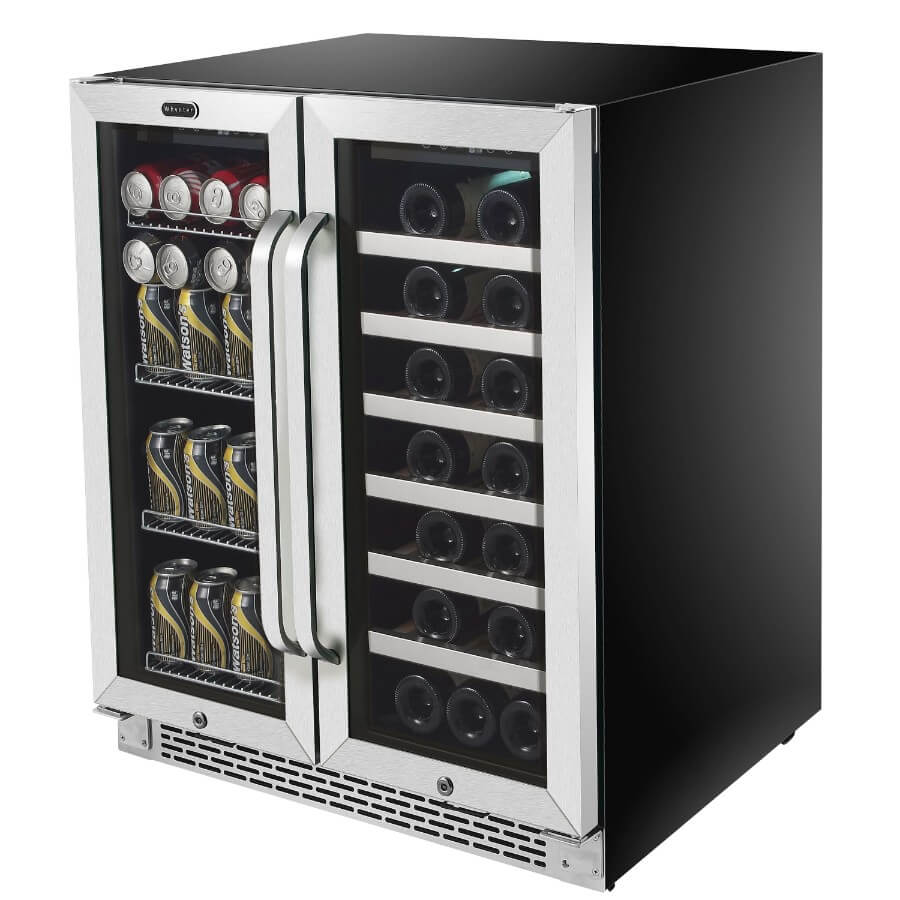
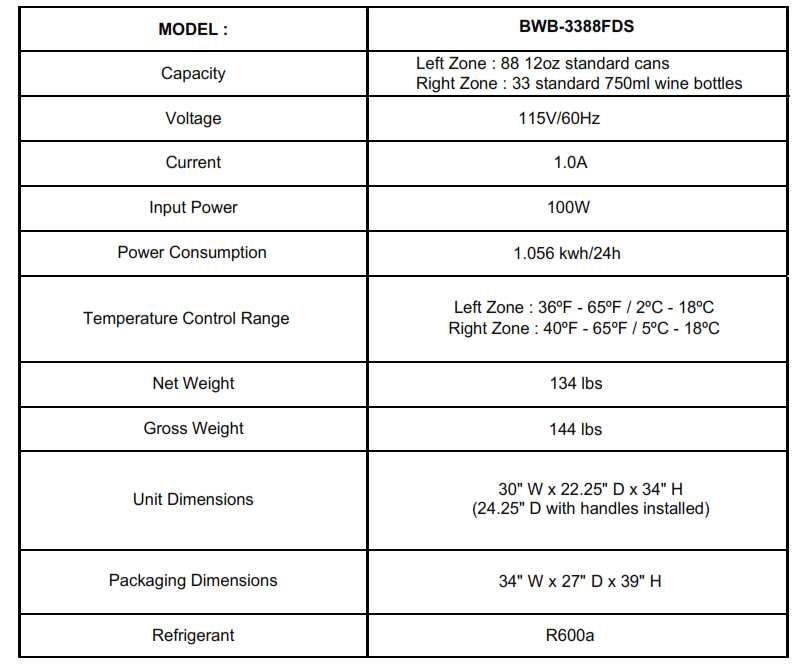
- Capacity:Beverage Refrigerator (Left Zone) Capacity: 88 standard 12oz cans Wine Refrigerator (Right Zone) Capacity: 33 standard 750ml wine bottles
- Dual zones for storing different beverage can and wine varietals
- Stainless steel glass doors with sleek black cabinet
- Luxurious curved handlebars
- Tempered double-pane gray-smoked glass for enhanced UV protection
- Adjustable thermostat for both zones
- Soft white LED Interior Lights
- Powerful fan-circulated compressor cooling
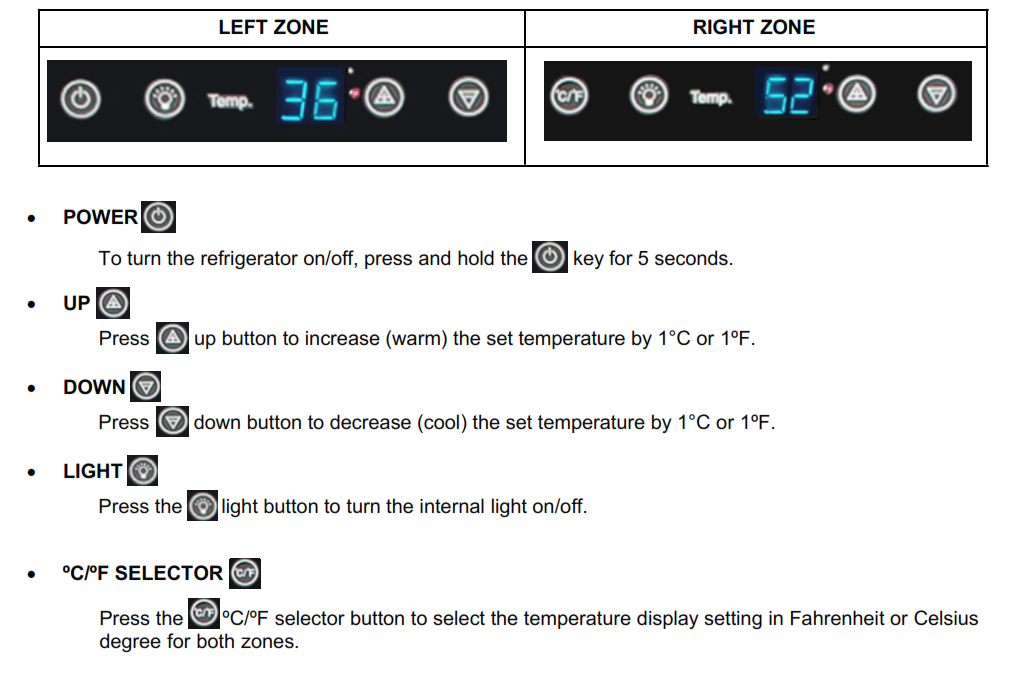
- Fahrenheit and Celsius degree optional temperature indicators
- 4 removable pull-out sliding wire shelves – Beverage Refrigerator (Left Zone)6 removable pull-out sliding wooden shelves – Wine Refrigerator (Right Zone)
- Environmentally friendly refrigerant
TECHNICAL DATA
Installation
IMPORTANT SAFETY INSTRUCTIONS
WARNINGTo reduce the risk of fire, electrical shock, or injury when using your appliance, follow these basic precautions:
- Read all instructions before using the appliance.
- DANGER or WARNING: An empty refrigerator can be hazardous for children or small pets. If disposing of the refrigerator, remove gasket seals, latches, lids, or the doors from your unused appliance, or take other action to ensure the refrigerator is harmless.
- Never allow children to operate, play with, or crawl inside the appliance.
- Never clean appliance parts with flammable fluids or harsh chemicals. The fumes can create a fire hazard or explosion.
- Do not store or use gasoline or any other flammable vapors and liquids in the vicinity of this or any other appliance. The fumes can create a fire hazard or explosion.
INSTALLATION INSTRUCTIONS
BEFORE USING YOUR APPLIANCE
- Remove the exterior and interior packing.
- Before connecting the appliance to the power source, let it stand upright for approximately 4 hours. This willreduce the possibility of a malfunction in the cooling system from handling during transportation.
- Clean the interior surface with lukewarm water using a soft cloth.
- Install the handles on the doors.
INSTALLATION OF YOUR APPLIANCE
- The appliance is designed for built-in, recessed, or freestanding installation.
- WARNING: Do not store or install the appliance outdoors.
- CAUTION: This appliance is designed for storing and cooling beverage cans and wines. Do not store perishable food, medicine, or other medical products.
- Place your appliance on a hard and level floor that is strong enough to support it when it is fully loaded.
- We do not recommend installing the appliance on the carpet.
- To level your appliance, adjust the leveling legs at the bottom of the appliance if needed.
- For freestanding installation, 5 inches (127mm) of space between the back and sides of the appliance are suggested, which allows the proper air circulation to cool the compressor and condenser. Even for built-in installation, it is a must to keep a ¼” (6.35mm) space on each side and at the top. The air vent at the front of the appliance must never be covered or blocked in any way.NOTE: DO NOT install the appliance near an oven or other heating source. Direct sunlight may affect the acrylic coating and heat sources may increase electrical consumption. For best performance, do not install the appliance behind a cabinet door or block the base grille.
- Avoid locating the appliance in an area that may be exposed to excessive moisture.
- Plugin the appliance into an exclusive, grounded wall power outlet. Do not under any circumstances cut or remove the third (ground) prong from the power cord. Any questions concerning power and/or grounding should be directed toward a qualified electrician or an authorized service center.
BUILT-IN CABINET INSTRUCTIONSThese appliances are designed for both built-in or free-standing installation. For built-in installation, ensure proper service access and ventilation, allow at least ¼” (6.35mm) space on each side and at the top.

ELECTRICAL CONNECTION
WARNING: Improper use of the grounded plug can result in the risk of electrical shock. If the power cord is damaged, have it replaced by a qualified electrician or contact Whynter Service Department
This appliance requires a standard 115/120 Volt AC ~/60Hz electrical ground outlet with three-prong. Have the wall outlet and circuit checked by a qualified electrician to make sure the outlet is properly grounded? The cord should be secured behind the appliance and not left exposed or dangling to prevent accidental injury.
The appliance should always be plugged into its own individual electrical outlet which has a voltage rating that matches the rating label on the appliance. This provides the best performance and also prevents overloading house wiring circuits that could cause a fire hazard from overheated. Never unplug the appliance by pulling the power cord. Always grip the plug firmly and pull straight out from the receptacle. Repair or replace immediately all power cords that have become frayed or otherwise damaged. Do not use a cord that shows cracks or abrasion damage along its length or at either end. When moving the appliance, be careful not to damage the power cord.
EXTENSION CORDBecause of potential safety hazards, it is strongly recommended that you do not use an extension cord with this appliance. However, if you must use an extension cord, it is absolutely necessary that it be a UL/CULListed, 3-wire grounding type appliance extension cord having a grounding type plug and outlet and that the electrical rating of the cord is 115 volts and at least 10 amperes.
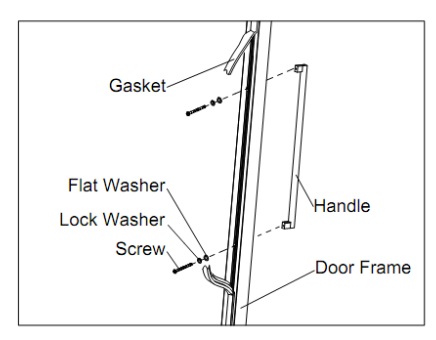
INSTALLING STAINLESS STEEL HANDLESThis appliance includes stainless steel handles that are not required to operate this appliance. To install the handles please follow the below instructions:
- The gaskets are easily displaced by hand, no tools are necessary.
- Use a flat-head screwdriver to unscrew and remove the pre-installed decorative plugs from the back of doors (Some models have no decorative plugs).
- Install the handles tightly as shown with two screws, lock washers, and flat washers provided. (DO NOT over tighten as this will cause damage to the handles and stainless steel door frames).
- Replace the door gaskets to their original position.
Operation and Controls
It is recommended you install the appliance in a place where the ambient temperature is between 72º- 78ºF /23º-26ºC. If the ambient temperature is above or below recommended temperatures, the performance of the wine refrigerator may be affected. For example, placing your appliance in extreme cold or hot conditions may cause interior temperatures to fluctuate.
NOTE:
- When using the wine refrigerator for the first time or restarting after being shut off for a long period of time, there may be a few degrees variance between the set temperature and the LED readout. This is normal due to the length of activation time. The unit should return to normal after running for a few hours.
- It is normal for there to be a temperature variance of 1º-5º of the set temperature. This unit will not raise its internal temperature if the ambient temperature where the unit is located is lower than the set temperature.
RECOMMENDED WINE TEMPERATURE SETTINGS

CONTROL PANEL GUIDE
NOTE: If the appliance is unplugged, encounter power interruption, or turned off, you must wait 3 -5 minutes before restarting the appliance. If attempted to restart before this time delay, the appliance may not start.
SETTING THE TEMPERATURE CONTROL
- During normal operation, the temperature display on the control panel shows the temperature inside the appliance.
- This refrigerator has two separate temperature zones.For the beverage refrigerator zone (left), the temperature range can be set between 36ºF – 65ºF / 2ºC 18ºC. For the wine refrigerator zone (right), the temperature range can be set between 40ºF – 65ºF /5ºC -18ºC
- When the unit is plugged in for the first time, the unit will power up automatically to the preset defaults. The preset temperature for the beverage refrigerator zone (left) is 38ºF (3ºC) and for the wine refrigerator zone is 54ºF (12ºC).
- You can press the left zone UP and DOWN buttons to control the internal temperature of the beverage refrigerator zone and press the right zone UP and DOWN buttons to control the internal temperature of the wine refrigerator zone.
- The temperature that you desire to set will increase 1ºC or 1ºF if you press the UP button once and will decrease 1ºC or 1ºF if you press the DOWN button once. The display flashes while you make the setting.
- After the temperature has been set, the display will flash four times before it shows the current internal temperature of the particular temperature zone.
- To view the set temperature at any time, press the UP or DOWN button, the set temperature will temporarily flash in the display for 5 seconds. Then the display shows the current internal temperature again.
TEMPERATURE MEMORY FUNCTION
In the event of a power interruption (power surge, breaker switch, etc.), the unit can remember the previous temperature settings. When the power has restored, the temperature display will show the current cabinet temperature.
INTERIOR LIGHTThe interior light makes it easy to view your refrigerator contents. The light can be turned on or off using the light button on the display.
CABINET SHELVESNOTE: Do not cover any part of the shelves with aluminum foil or any other material that will prevent adequate air circulation within the cabinet.
- This appliance is equipped with removable shelves. To prevent damage to the door gasket, make sure the doors are opened completely before pulling the shelves out.
- For easy content access, you must pull the shelves approximately ⅓ out of the railing.
- The shelves are designed with an emergency stop to prevent them from being removed too far when loaded.
- When removing the shelves out of the railing, make sure to remove all items first.
- To remove the shelves, pull the shelf forward until the notch aligns with the plastic post. Lift the shelf and continue to pull the shelf forward until it is completely removed from the internal compartment.
NORMAL SOUNDS
The unit is cooled by a compressor. The compressor pumps coolant through the cooling system, producing operating noise. Even when the compressor cuts out, noises caused by changes in temperature and pressure are unavoidable. Operating noise will be most audible immediately after the compressor comes on. It becomes quieter as the operating period continues. The following noises are normal and occur from time to time:
- Gurgling sound, caused by the refrigerant flowing through the appliance’s coils,
- Humming noise made by the compressor. This noise can get louder for brief periods when the motor is switching on.
- Cracking/popping sounds, resulting from the materials contraction and expansion due to temperature variations,
- Fan operating sound, to circulate the air within the wine cabinet for even temperature distribution and to save energy. The fan running saves energy by circulating the cool air to avoid the compressor from running too frequently.
- Unusual noise is normally the result of improper installation.
- Where the unit is installed in the open-plan kitchen or in partition walls, the level of operating noise will be heard more acutely. However, this is due to the surrounding architecture and not to the unit.
- Fan operating sound, to circulate the air within the wine cabinet.
- Unusual noise is normally the result of improper installation.
- Where the unit is installed in the open-plan kitchen or in partition walls, the level of operating noise will be heard more acutely. However, this is due to the surrounding architecture and not to the unit.
NOTE: An individual’s perception of noise is directly linked to the environment in which the unit is located, as well as the specific type of models. Our appliances are in line with international standards for such appliances and in line with the latest technical developments. Please remember that the noise of the compressor and the coolant circulating in the system is unavoidable.
DEFROSTING AND VENTILATIONYour refrigerator is designed with an automatic defrost system. During off-cycle, the evaporator behind the rear wall of the unit defrosts automatically. Condensation is collected in the drain at the back of the unit and flows through the drainage hole into the drip tray above the compressor. The heat is transferred from the compressor and evaporates any condensation that has collected in the drip tray. Part of the remaining water within the refrigerator is collected for humidity purposes.
NOTE: Frost may accumulate on the evaporator if the unit is repeatedly opened in high heat or high humidity location. If this frost pattern does not clear within 24 hours, your unit will require manual defrosting.
Storage
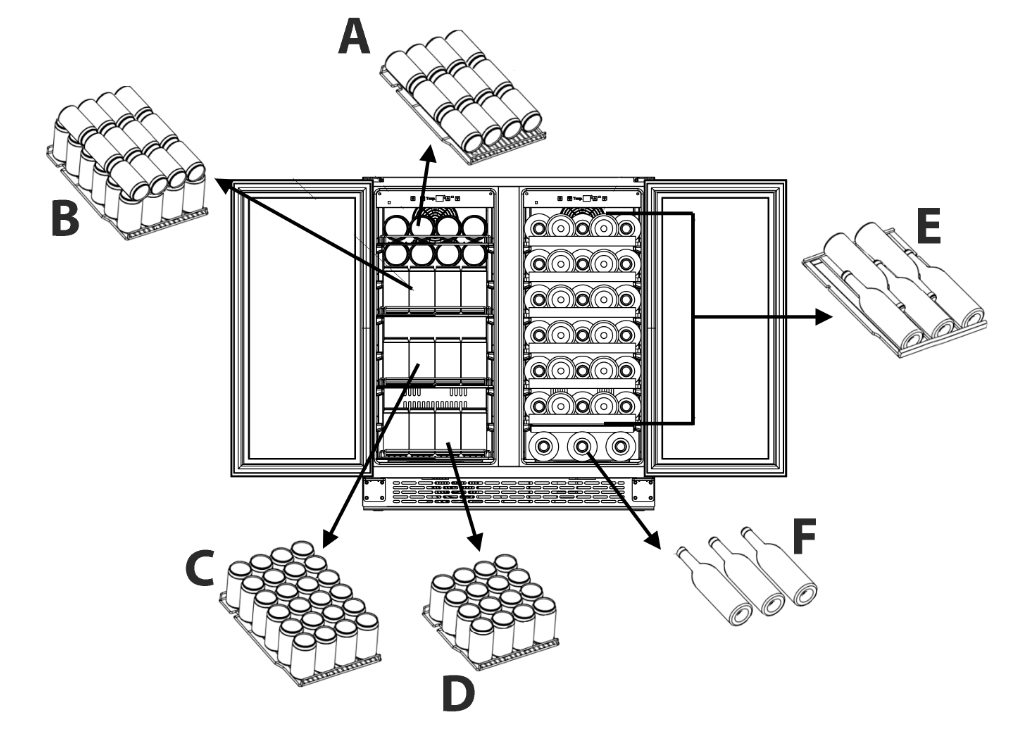
BEVERAGE REFRIGERATOR ZONE
A. Shelf One – 12 standard 12oz cans per shelfB. Shelf Two – 36 standard 12oz cans per shelfC. Shelf Three – 24 standard 12oz cans per shelfD. Bottom Section – 16 standard 12oz cans
WINE REFRIGERATOR ZONE
E. Shelf One to Six – 5 standard 750ml bottles per shelfF. Bottom Section – 3 standard 750ml bottles
STORAGEBeverage cans and wine bottles may differ in size and dimensions so the actual number of cans and bottles can be stored may vary. The 88 can or 33 bottle capacities are approximate maximums when storing 12 oz. cans or traditional Bordeaux 750 ML bottles and includes bulk storage.
You may load your beverage cans or wine bottles in a single row or by stacking while taking note of the following: if you do not have enough cans or bottles to fill your refrigerator, it is better to distribute the load throughout the refrigerator so as to avoid “all on top” or “all below” type loads.
- You can remove or relocate adjustable shelves to accommodate the larger types of bottles (see removing shelves).
- Keep small gaps between the walls and the bottles to allow air circulation.
- Do not overload your refrigerator.
- Avoid obstructing the internal fans (located inside on the back panel of the refrigerator).
- Do not try to slide the shelves outwards beyond the fixed position to prevent the bottles from falling.
- Do not pull out more than one loaded shelf at a time as this may cause the refrigerator to tilt forward if not properly installed.
REMOVING WIRE AND WOODEN SHELVES
- To remove any of the wire or wooden shelves from the rail compartment, move the shelf to the position where the notch of shelf is exactly under the plastic post and then lift it up and out.
- In order to replace the shelf, repeat steps described above in reverse.

Care and Maintenance
CAUTION: Failure to unplug the appliance during service could result in electrical shock or personal injury.
CLEANING YOUR APPLIANCE
- Turn off the power, unplug the appliance, and remove all items including shelves.
- Wipe the interior with warm water and baking soda solution. The solution should be about 2 tablespoons of baking soda to one quart of water.
- Wipe the shelves with a mild detergent solution.
- Wipe the outside cabinet with warm water and a mild liquid detergent.
- Do not use steel wool or steel brush on the stainless steel. These will erode the stainless steel and rusting may occur.
CAUTION: Failure to unplug the appliance could result in electric shock or personal injury
PREMISES POWER FAILURE
- In the event of a power interruption, all previous temperature settings are automatically memorized. If power is interrupted (power surge, breaker switch, etc.) and then powered up again, the unit will operate with the last temperature set-point.
- Most power failures are corrected within a few hours and should not affect the temperature of your appliance if you minimize the number of times the doors are opened. If the power is going to be off for a longer period of time, you need to take the proper steps to protect your contents.
VACATION TIME
- Short vacations: Leave the appliance operating during vacations of less than two days.
- Long vacations: If the appliance will not be used for an extended period, remove all items and turn off the appliance. Clean and dry the interior thoroughly.
MOVING YOUR APPLIANCE
- Remove all items inside the appliance.
- Securely tape down (painter’s tape recommended) all loose items (shelves) inside your appliance.
- Turn the adjustable leg up to the base to avoid damage.
- Tape (we recommend using painter’s tape) the doors shut.
- Be sure the appliance stays secure in the upright position during transportation and protect the exterior of appliance with a blanket, or similar item.
ENERGY SAVING TIPS
- The appliance should be located in the coolest area of the room (above 60°F (16°C) and below 90°F (32°C) away from heat producing appliances, and out of any direct sunlight.
- Ensure that the appliance is adequately ventilated. Never obstruct the air vents
- Close the door tightly and do not open the appliance too frequently or for a long period of time
- Store the content in an organized way
- Do not over-fill the appliance or allow its contents to block the internal cabinet fan(s) to allow air to circulate
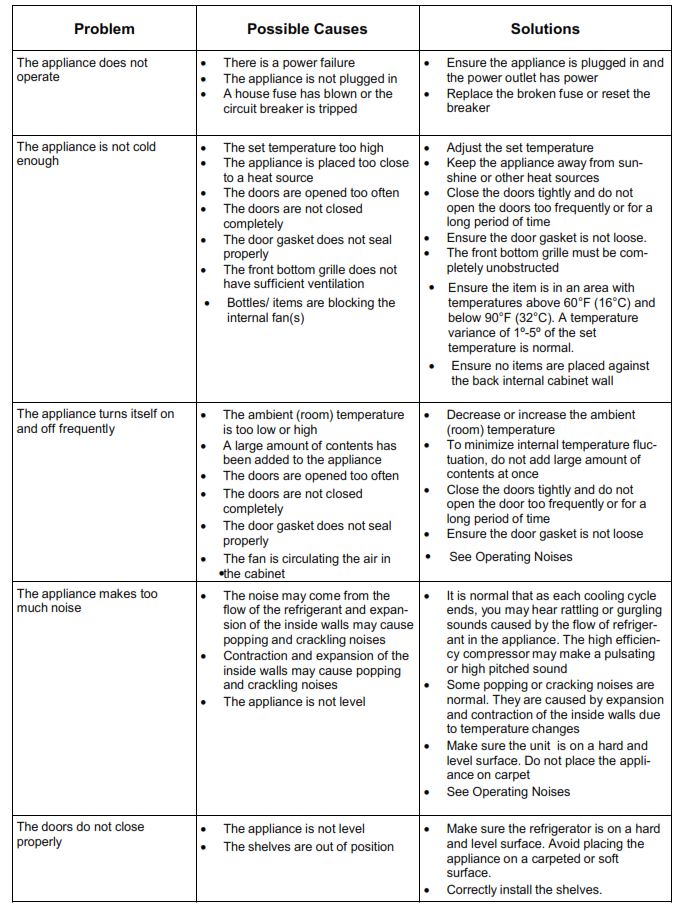
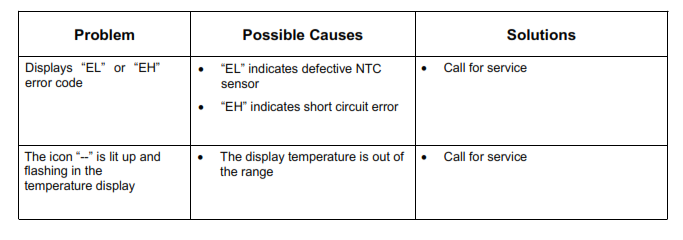
Troubleshooting
ONE YEAR LIMITED WARRANTY
This WHYNTER product is warranted to the original owner, purchased from an authorized Whynter dealer within the 48 U.S. continental states, for one year from the original purchase date against defects in material and workmanship under normal residential usage. Should your WHYNTER product prove defective within one year from the date of purchase, contact Whynter’s Customer Support Team with the serial number and proof of purchase to make a warranty claim. A Return Authorization Number must be issued before returning any parts or products. Parts or products received without a Whynter issued Return Authorization Number will be refused. Under this warranty, Whynter will repair or replace any parts found defective with new or remanufactured parts or exchange the defective product with a new, refurbished, or remanufactured product at our discretion. All defective products and parts covered by this warranty will be repaired or replaced on a mail-in basis to Whynter’s Service Center. This warranty is not transferable. After the expiration of the warranty, the cost of labor and parts will be the responsibility of the original owner.
Return freight is prepaid by Whynter within two months of purchase. After two months to one year, the customer will be responsible for the return freight cost to Whynter’s Service Center. Please package the product carefully in its original packaging to avoid damage in transit. Whynter is not responsible for damage resulting from shipper mishandling or improper packaging. Please retain the original box and packaging materials.
THIS WARRANTY DOES NOT COVER:
- Acts of God, such as fire, flood, hurricanes, earthquakes, and tornadoes.
- Improper power supply such as power surge, low voltage, defective household wiring or inadequate fuses.
- Use in commercial or industrial applications.
- Damage, accidental or otherwise, to the WHYNTER Beverage Refrigerator while in the possession of a consumer not caused by a defect in material or workmanship
- Damage caused by consumer misuse, tampering, or failure to follow the care and special handling provisions in the instructions.
- Damage to the finish of the case, or other appearance parts caused by wear.
- Damage caused by repairs or alterations to the product by anyone other than authorized by the manufacturer.
- Removal, Replacement Packaging, Freight, and Insurance cost for the warranty service.
DISCLAIMER OF IMPLIED WARRANTIES; LIMITATION OF REMEDIESCUSTOMER’S SOLE AND EXCLUSIVE REMEDY UNDER THIS LIMITED WARRANTY SHALL BE PRODUCT REPAIR OR REPLACEMENT AS PROVIDED HEREIN. CLAIMS BASED ON IMPLIED WARRANTIES, INCLUDING WARRANTIES OF MERCHANTABILITY OR FITNESS FOR A PARTICULAR PURPOSE, ARE LIMITED TO ONE YEAR OR THE SHORTEST PERIOD ALLOWED BY LAW, BUT NOT LESS THAN ONE YEAR. WHYNTER SHALL NOT BE LIABLE FOR CONSEQUENTIAL OR INCIDENTAL DAMAGES SUCH AS PROPERTY DAMAGE AND INCIDENTAL EXPENSES RESULTING FROM ANY BREACH OF THIS WRITTEN LIMITED WARRANTY OR ANY IMPLIED WARRANTY. SOME STATES AND PROVINCES DO NOT ALLOW THE EXCLUSION OR LIMITATION OF INCIDENTAL OR CONSEQUENTIAL DAMAGES, OR LIMITATIONS ON THE DURATION OF IMPLIED WARRANTIES, SO THESE LIMITATIONS OR EXCLUSIONS MAY NOT APPLY TO YOU. THIS WRITTEN WARRANTY GIVES YOU SPECIFIC LEGAL RIGHTS. YOU MAY ALSO HAVE OTHER RIGHTS THAT VARY FROM STATE TO STATE.The warranty, product contents, and specifications are subject to change at any time without notice; please refer to www.whynter.com for the most current information.
To register your warranty, please visit www.whynter.com and fill out the online Warranty Registrationform. Please be sure to include a copy of your purchase invoice.To obtain service or information, contact Whynter LLC via email at or call866-WHYNTER (866-949-6837).Copyright © 2019 Whynter LLCwww.whynter.com
Whynter 30″ Built-In French Door Dual Zone 33 Bottle Wine Refrigerator 88 Can Beverage Center BWB-3388FDS User Manual – Whynter 30″ Built-In French Door Dual Zone 33 Bottle Wine Refrigerator 88 Can Beverage Center BWB-3388FDS User Manual –
[xyz-ips snippet=”download-snippet”]