![]() Whynter 50 Pint Portable Dehumidifier with Built-in Pump in White, Energy StarINSTRUCTION MANUAL
Whynter 50 Pint Portable Dehumidifier with Built-in Pump in White, Energy StarINSTRUCTION MANUAL

Model # : RPD-506EWP
Congratulations on your new Whynter product. To ensure proper operation, please read this Instruction Manual carefully beforeusing this product. Keep this manual in a safe place for future reference.
DISPOSAL INFORMATION
Thank you for choosing the Whynter Portable Dehumidifier. Please follow the instructions provided in this user guide to obtain the very best performance from your dehumidifier. We trust that your Whynter dehumidifier will provide the performance and reliability that we stand for.Your Whynter dehumidifier is designed to remove moisture in the air by condensation removal and collecting the condensation water in the drain bucket or draining through a drain hose.Please keep this user manual in a safe place for future reference.
This symbol on the product or its packaging indicates that the appliance cannot be treated as normal domestic trash, but must be handed in at a collection point for recycling electric and electronic appliances. Your contribution to the correct disposal of his product protects the environment.Further information about the recycling of this product can be obtained from your local municipal authority.
SAFETY PRECAUTIONS
| WARNING | TO REDUCE THE RISK OF FIRE, ELECTRICAL SHOCK, OR INJURY WHEN USING YOUR PORTABLE DEHUMIDIFIER, FOLLOW THESE BASIC PRECAUTIONS: |
- Read all instructions before using the appliance.
- Never clean appliance parts with flammable fluids. The fumes can create a fire hazard. Do not use an excessively wet cloth, industrial solvents, and oil-based products to clean this appliance.
- Do not store or use gasoline or any other flammable vapors and liquids in the vicinity of this or any other appliance. The fumes can create a fire hazard.
- Do not abuse, sit on, or stand on the appliance.
- This appliance is not intended for use by persons (including children with reduced physical, sensory or mental capabilities, or lack of experience and knowledge, unless they have been given supervision or instruction concerning use of the appliance by a person responsible for their safety.
- Children should be supervised to ensure that they do not play with the appliance.
- If the power cord is damaged, it must be replaced by the manufacturer or its service agent or a similarly qualified person in order to avoid a hazard.
- Please dispose of packing materials properly.
- Use the portable dehumidifier only for its intended function. This appliance is designed for household, noncommercial use only. Any other use will void the warranty.
- To avoid the risk of shock, the product should never be used in bathrooms, shower rooms, or in any other steamy or wet areas.
- During installation, the power supply must not be excessively or dangerously bent or flattened.
- Do not tamper with controls.
- Make sure the power plug is placed fully and firm into the wall socket. If the wall receptacle you intend to use is not adequately grounded or protected by a time delay fuse or circuit breaker, have a qualified electrician install an outlet that is appropriate to local electrical codes and requirements.
- Do not use multiple socket or of an extension cord as it may overheat and become a risk of fire.
- Make sure the power plug is clean before usage.
- Do not turn this appliance on and off by plugging and unplugging. Always use the ON/OFF switch.
- After turning the appliance off, please take the power plug out of the socket.
- Make sure hands are dry when connecting the power plug. The appliance is equipped with a three-prong grounded plug on the power cord for your protection. Never modify, remove or attempt to repair the power plug yourself.
- Do not repair, disassemble and/or modify the appliance by yourself.
- Always turn off the appliance when cleaning the air filter, and transporting.
- At the end of each season, all water must be drained from the appliance and air filter must be cleaned before storage.
- Do not drink or use the water collected or drained from the appliance.
- Do not remove the drain bucket during operation.
- Transport the appliance in an upright position only, or leave it in an upright position for at least 2 hours before first use.
- When positioning or moving the appliance, ensure that it is not turned upside down or greater than 45° or more off level.
- This appliance must be installed in an area protected from the element, such as wind, rain, water spray or drips.
- Always place the appliance on even and hard and level surface that can support the unit when it is full of water.
- Ensure objects are not obstructing the exhaust and air intake.
- Never insert your fingers or other objects into the air intakes and air outlets.
- Do not operate the appliance without the air filter.
THE MANUFACTURER DISCLAIMS ANY RESPONSIBILITY IF THE ABOVE INSTRUCTIONS ARE NOT FOLLOWED
INTRODUCTION
How it WorksWhen the dehumidifier is started, the fan begins to pull moisture-laden air across the dehumidifying coils. The coils condense or draw moisture from the air, and air flows through the top louver into the room as dry, warm air. Moisture removed from the air is collected in a drain bucket on the front of the dehumidifier.
The appliance is designed to operate between 41° F (5 ° C), and 90 ° F (32º.C) The “Compressor” circuit has an automatic 3 minute time delayed start if the appliance is turned off and on quickly. This prevents over heating of the compressor and possible circuit breaker tripping. Make sure the drain bucket is fitted correctly otherwise the appliance will not turn on.
Energy Saving GuideThis Whynter dehumidifier is an Energy Star rated appliance. Follow the guide below can help to get the best performance and efficiency from your dehumidifier.
- Do not cover the air intake and outlet.
- Do not place the appliance in front of curtains or drapes- to ensure they do not obstruct the air intake.
- Keep curtains, blinds or drapes closed during the sunniest part of the day.
- Close all windows and doors.
- Indoor relative humidity should ideally be kept between 30%RH and 80%RH depending on the ambient temperature.
- Make sure the appliance is on a hard and level surface.
- To prolong the compressor’s life, please wait at least 3 minutes before turning the appliance back on after shutting it off.
- Inspect and keep the air filter clean by cleaning regularly.
- Perform routine maintenance.
| TECHNICAL DATA | |
| MODEL: | RPD-506EWP |
| Dehumidifying capacity | 50 pints |
| Drain Bucket capacity | 6L (13 Pints) |
| IEF (Liters per kW-Hour) | 1.9 L/kWh |
| Power supply | 115 V,1Ph,60 Hz |
| Maximum power input | 810 Watts |
| Current Consumption | 7.8 Amps |
| Refrigerant | R410A/6.88oz |
| Air flow M3/H / CFM | 370/320 m3/h,217/197 CFM |
| Fan speeds | Hi/Low |
| Unit Dimensions | 15.4″ W x 11.1″ D x 24.3″ H |
| Unit Net Weight | 42.8 lbs |
| Unit Gross Weight | 46.9 lbs |
| Noise Level (dBA) | < 51/49 dBA |
PARTS AND CONTROLS
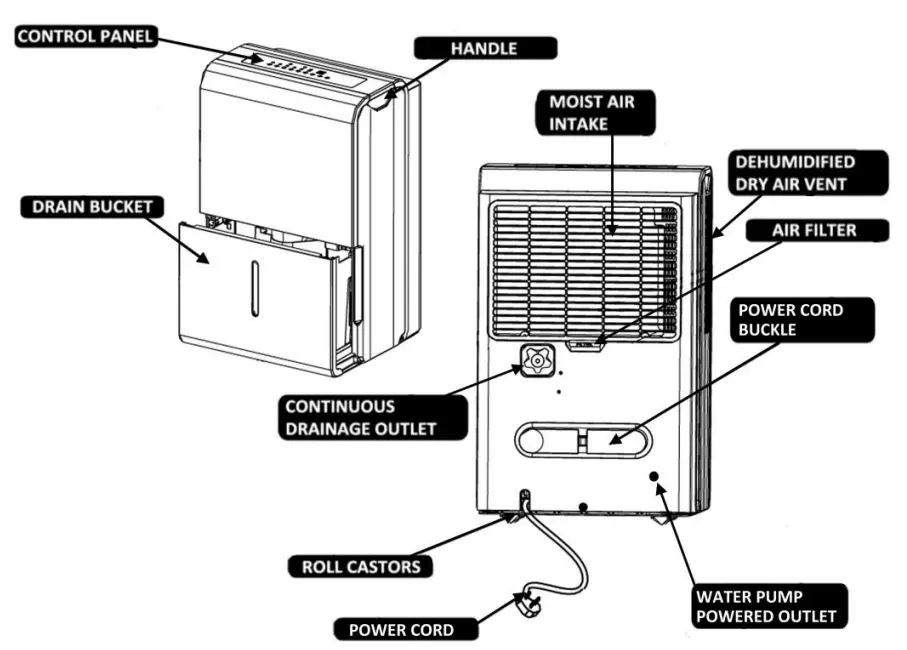
| OTHER ACCESSORIES: | |
| 1. 20“ Continuous/ Gravity Drain hose | |
| 2. 16.5 ft. pump drain hose | |
| 3. Power Cord Buckle |
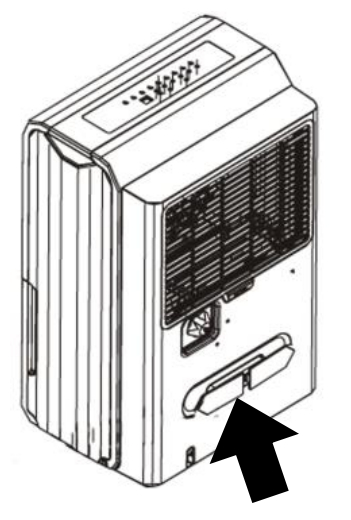
Power Cord Buckle InstallationFor easy storage, install the power cord buckle to the rear of the unit. Once installed, the power cord can be wrapped using the buckle for safe storage.
PART AND CONTROLS
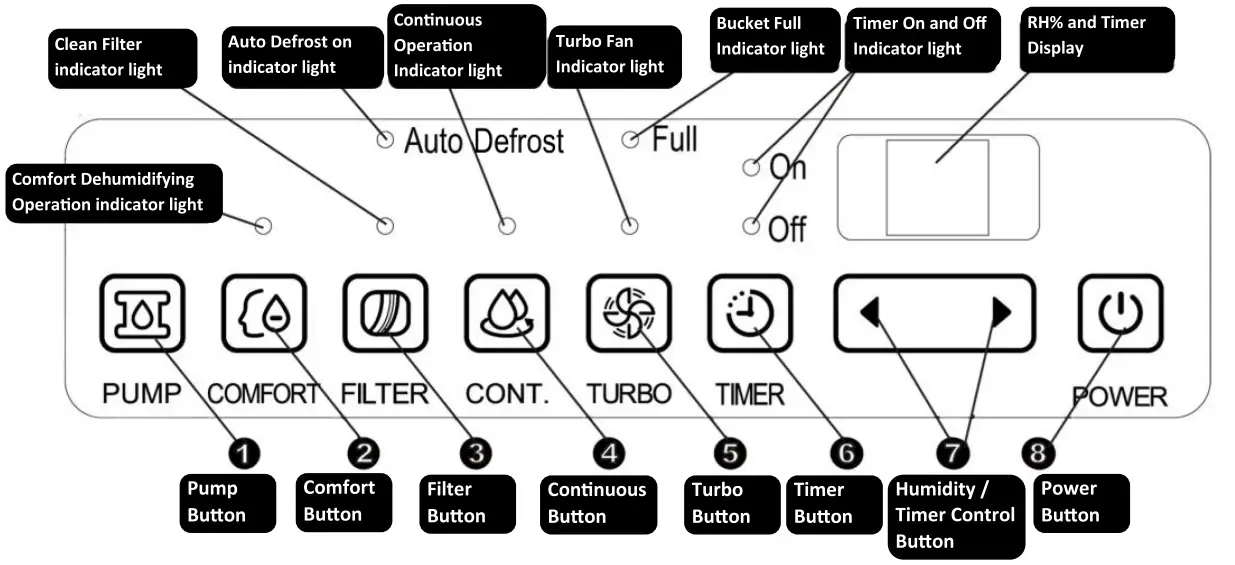
Pump ButtonPress to activate the pump operation. The Pump indicator light will illuminate when the water pump is in operation.Note: Make sure the pump drain hose is Installed Into the unit and the continuous/gravity drain assembly is removed from the unit before the pump operation is activated. The water pump function will start when the drain bucket is full.
Comfort ButtonPress to activate the Comfort Dehumidifying mode operation. The Comfort Dehumidifying indicator light will come on when this mode is selected. In this mode, the unit will automatically control the room humidity in a comfortable range of 45%-55% according to the room temperature. The humidity setting function is automatically disabled. To stop Comfort Dehumidifying operation, press the Comfort button and set the desired RH percentage value to resume normal operation.
Filter ButtonThe check filler indicator is a reminder to clean the air filter for more efficient operation. The filter light will illuminate after approximately 250 hours of operation. To reset after cleaning the filter. Press the Filter button and the light will turn off.
Continuous ButtonPress to activate the Continuous dehumidifying operation. The Continuous indicator light will come on when this mode is selected. To stop continuous operation, press the Continuous (CONT.) Button and set the desired RH percentage value to resume normal operation.Note: The Humidity Set Control Buttons will be disabled. The compressor will not stop unless the drain bucket is full, or is removed.
Turbo ButtonPress the Turbo button to engage Turbo Fan mode. The Turbo indicator light will come on when this speed is selected. Press the Turbo button again to set the unit to Normal Fan mode. The Turbo indicator light will turn off when Normal Fan mode is activated.
Timer ButtonPress to activate the Timer delay feature, in conjunction with the Timer Control Buttons.
- Timer Delay Switch OffWhen the appliance is ON, press the Timer button to activate the Auto-stop function, and the Timer OFF light will come on. Set the desired time delay OFF hours by pressing the
 and buttons. The time increments are 1 hour up to 24 hours. When the delay time set has elapsed, the appliance switches off. To cancel the delayed switch-off function, set the time to “00” or turn off the appliance.
 - Timer Delay Switch OnWhen the appliance is OFF, press the Timer button to activate the Auto-start function, and the Timer ON light will come on. Set the desired time delay ON hours by pressing the and buttons. The time increments are 1 hour up to 24 hours. When the delay time set has elapsed, the appliance turns on. To cancel the delayed switch-on function, set the time to “00” or turn off the appliance.
- Timer Delay Switch On and Off SequenceWhen the appliance is OFF, press the Timer button to activate the Auto-start function and the Timer light ON will come on. Set the desired time delay ON hours by pressing the and buttons. Once Timer Delay Switch On is placed, press the Timer button again to activate the Auto-stop function, and the Timer OFF light will come on. Set the desired time delay OFF hours by pressing the and buttons. When the delay time set has elapsed, the appliance switches off. To cancel the delayed switch-off function, set the time to “00” or turn off the appliance.
Humidity /Timer Control Buttons
- Humidity Set Control ButtonsThe humidity level can be set within a range of 35%RH(Relative Humidity) to 85%RH in 5% increments. For lower humidity levels, press the button and set to a lower RH percentage value. For higher humidity levels, press the button and set to a higher RH percentage value. Once the RH% is set, the set RH% will stay on the display for about 5 seconds then it will revert back to the current RH%.
- Timer Set Control ButtonsIf Timer Button is pressed, use the and buttons to set the Auto Start and Auto Stop time from 0.0 hours to 24 hours.
Power ButtonPress to turn the dehumidifier on and off
Energy SaverWhen the unit is running on normal operation, once the RH% is reached, the fan will still run continuously to avoid high start-up amperage which makes the unit energy-efficient. Please note that the fan may run continuously or shut off intermittently depending on the RH% and set humidity.
Bucket Full IndicatorThe appliance will run continuously until the set RH% is reached or when the drain bucket is full. When the drain bucket is full, the Full indicator light will illuminate and the dehumidifier will stop operating. Remove the water in the bucket with two hands, then place the drain bucket back to its proper position and the machine will start operating again.Auto Defrost IndicatorIn the event frost builds up on the evaporator coils, the compressor will cycle off and the fan will continue to run until the frost is evaporated. This happens when the appliance is operating in low temperatures (less than 53°F or 12°C), which affects the efficiency of the dehumidifier. When this happens, the Auto Defrost light will turn on and the machine will go into periodic defrost mode automatically. Defrost time may vary. If the dehumidifier freezes up, turn the appliance off for few hours and then restart. The appliance will not operate satisfactorily if the room temperature is below 41°F
DisplayThe display screen shows a number of different indications depending on the selection function.
- Shows the set % relative humidity level from 35%RH to 85%RH.
- Once the RH% is set, the set RH% will stay on the display for about 5 seconds then it will revert back to current RH%.
- Shows Auto Start and Auto Stop time from 0.0 hours to 24 hours.
- After the option settings are completed, the display shows the approximate room humidity level in a range of 30%RH (Relative Humidity) to 90%RH.
| Error Codes and Protection Code | |
| AS – Humidity Sensor Error | Unplug the unit and plug it back in. |
| ES – Temperature SensorError | Unplug the unit and plug it back in. |
| P2 – Drain Bucket Full | Empty the drain bucket.Please make sure float moves freely and is not stuck . |
| EC – Unit Malfunction | Please make sure whether the environment temperature isbetween 41°F (5°C), and 96°F (35°C). |
| E3 – Unit Malfunction | Unplug the unit and plug it back in. |
| Eb – Drain Bucket Error | Drain bucket is removed or not positioned correctly. Makesure that the drain bucket is properly installed and the inright position. |
Auto RestartIn the event of a power outage, appliance restarts at the previously set function mode and settings when power is restored (not applicable to Timer Function).
OPERATION INSTRUCTIONS
AIR FILTERS INSTALLATIONYour Whynter portable dehumidifier is equipped with washable pre-filter. This pre-filter removes large particles such as dust, pet hair and dander.
WARNING: NEVER OPERATE THE DEHUMIDIFIER WITHOUT THE FILTER START OPERATION
- Ensure that the appliance is connected to the power socket.
- Make sure the drain bucket is placed in the proper position.
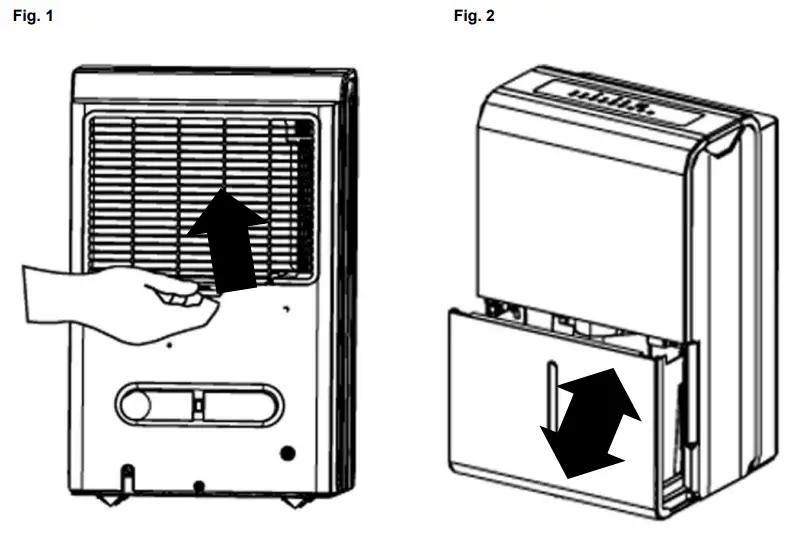
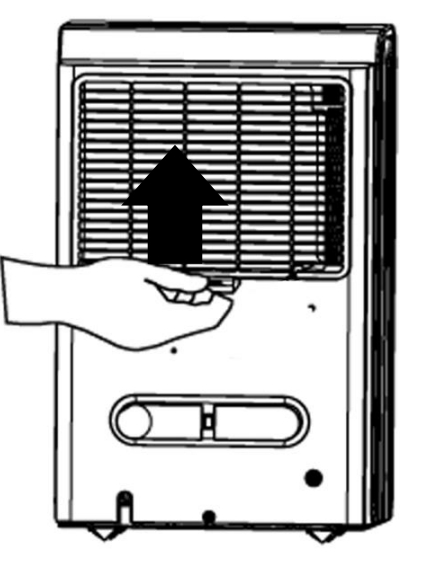
- Make sure the filter is installed. (Fig. 1)
- When the unit is turned on for the first time, if the bucket full lamp lights up, just pull out the drain bucket then push it back to the proper position. (Fig. 2)
- Set the relative humidity level RH% by pressing the and buttons. We recommend setting the RH% to at least 10% lower than the current RH%.
OPERATION INSTRUCTIONS
POSITIONING THE UNIT
- This dehumidifier is intended for indoor residential applications only and should not be used for commercial or industrial applications.
- Place the dehumidifier on a smooth, hard, and level floor strong enough to support the appliance with a full bucket of water.
- Do not attempt to roll the appliance over objects.
- Avoid placing the appliance in an area where the temperature will fall below 53°F. The coils may become covered with frost and may reduce performance.
- Do not place the appliance near the clothes dryer, heater or radiator.
- Shut all doors, windows, and openings to your target dehumidifying space for maximum performance.
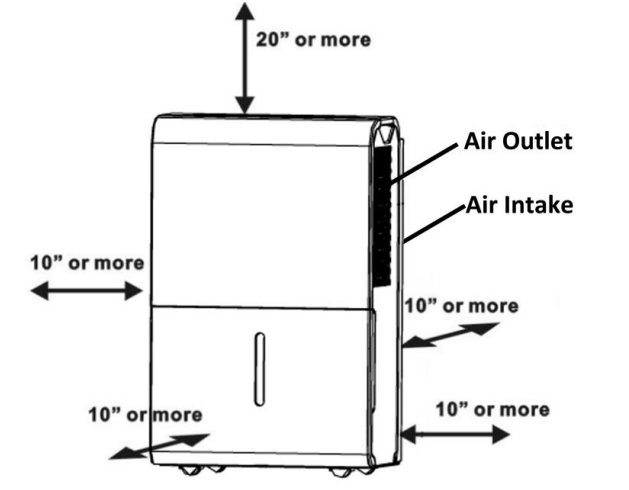
- Allow at least 10” of air space on all sides of the appliance for good air circulation and 20” or more above the appliance.
NOTE:
- Dehumidifiers working in a basement will have little or no effect on adjacent enclosed rooms such as closets, unless there is enough circulation of air in and out of the enclosed area.
- If the appliance has been switched off and needs to be switched on again, allow approximately three minutes for the correct operation to resume.
- Select a suitable location and make sure you have easy access to the electrical outlet.
- Ensure the air filter and drain bucket are correctly installed before switching the appliance on.
- Always be careful when moving the appliance with a full drain bucket.
- Ensure that the safety requirements and warnings detailed in this user manual are followed when operating this appliance.
WATER DRAINAGE INSTRUCTION
Using a portable dehumidifier requires that collected water be emptied frequently. Draining water from this unit can be done in 3 different methods:
DRAIN BUCKET METHOD
| 1. When the bucket is full, the Full indicator light will light. The compressor and fan will turn off, the Full indicator will light, and a P2 code will be displayed. | 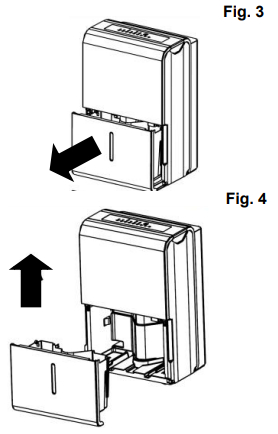 |
| 2. It is recommended to turn the unit off before removing the drainbucket. | |
| 3. Grip the left and right handles of the drain bucket securely andcarefully pull out the drain bucket. Do not put the drain bucket on thefloor because the bottom of the bucket is not even which may causethe water to spill. See Fig.3 and Fig. 4. | |
| 4. Remove the water from the drain bucket and replace it back to thedehumidifier. The drain bucket must be installed properly and securely seated for the dehumidifier to operate. | |
| 5. The machine will restart when the drain bucket is restored to its correct position. If the unit was turned off prior to the removal of the drain bucket, press the Power button to restore operation. |
NOTES:
| • When you remove the drain bucket, do not touch any inside parts ofthe unit. Doing so may damage the product and result to injury. | 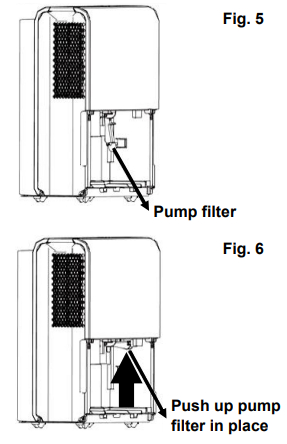 |
| • Be sure to push the drain bucket gently all the way into the unit.Banging the bucket against anything or failing to push it in securelymay cause the unit not to operate. | |
| • If the pump filter drops when you remove the bucket (see Fig.5), youmust reinstall the pump filter properly to the unit before replacing thedrain bucket into the unit (see Fig.6). | |
| • Upon replacing the bucket, firmly push the bucket in place until itlocks. There should be no gaps between the bucket and the dehumidifier. | |
| • When the drain bucket is removed, the unit will beep 8 times and thedigital display shows Eb. Eb is an error code that indicates thatthe drain bucket is removed or not positioned correctly. Make surethat the drain bucket is properly installed and the in right position. |
WATER DRAINAGE INSTRUCTIONS
CONTINUOUS / GRAVITY DRAIN METHODWater can be automatically emptied into a floor drain by attaching the 20” continuous/gravity drain hose to the continuous/gravity drain outlet. To use gravity to drain your portable dehumidifier, it must be installed on a level surface or at least 12 inches above the ground, on a sturdy table or shelf unit. When using the function of continuous/ gravity drainage, your drain hose must be placed horizontally below the drainage hole. Avoid uneven ground and folding the hose.
| 1. Remove the continuous drain cover and then attach the 20” continuous/gravity drain hose. Make sure the hose is securely fastened to prevent leakage. | 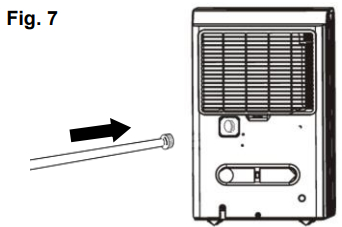 |
| 2. Direct the drain hose toward a drain or other suitable drainage outlet. Make sure that there are no distortions with the hose that may stop the water flow. (See Fig. 7) | |
| 3. Select the desired humidity setting and fan speed on the unit for continuous draining to start. |
NOTE: When using continuous/gravity drainage setup, there may be some water collected in the water in the drain bucket
WATER PUMP METHODOne of the key features of this dehumidifier is that it has a water pump that pushes water up or over a longer distance. Using this feature will enable your unit to run maintenance-free.NOTE: The water pump will ONLY engage when the drain bucket is full.
| 1. Make sure the continuous/gravity drain assembly is removed fromthe continuous/gravity drain outlet and the plastic cover is installed. | 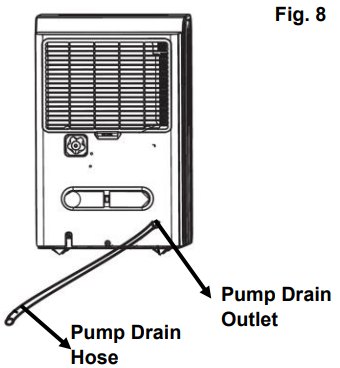 |
| 2. Insert the 16 ft. pump drain hose (included) into the bottom pump drain outlet (See Fig. 8), then lead the drain hose to a suitable drainage facility. Make sure that the hose is fully inserted to avoid water leakage and no kinks which will cause the water to stop flowing. | |
| 3. Press the Pump button to activate the pump operation.NOTE: The water pump will ONLY engage when the drain bucket is full. | |
| 4. The water pump may make some noise when it starts to work within the first 3 – 5 minutes. This is a part of the unit’s normal operation. | |
| 5. Select the desired humidity setting and fan speed on the unit. |
NOTE: The Pump Indicator Light will flash when there is a failure in the pump operation. Please turn off the unit and unplug the power cord and check the following points:
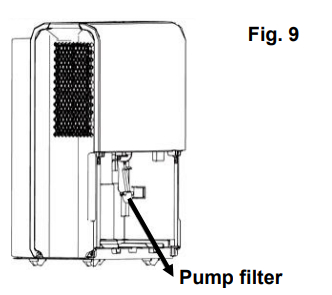
- Clean the pump filter – remove the drain bucket from the unit, pull down the pump filter, and clean (See Fig. 9)
- Check the pump drain hose for kinks or obstructions
- Reinstall the pump filter and drain bucket properly. Turn on the unit. If the error repeats, call for service
- Do not use this operation when the outdoor temperature is equal to or less than 32°F. Otherwise, water hose may be blocked as the water will turn to ice and cause the unit to fail. When the pump drain feature is not being used, remove the pump drain hose from the outlet.
 Clean the pump filter – remove the drain bucket from the unit, pull down the pump filter, and clean (See Fig. 9)
MAINTENANCE
CAUTION: Always turn off and unplug the dehumidifier before cleaning![]()
Cleaning the air grille and main unit
- Use a damp cloth to wrap the main unit or use water and a mild detergent. Do not use bleach, chemicals or abrasives.
- Do not splash water directly onto the unit. Doing so may cause an electrical shock, cause the insulation to deteriorate, or cause the unit to rust.
- Use a vacuum attachment or brush to clean the air intake and outlet grilles.
Cleaning the bucket
- Clean the bucket to prevent the growth of mold, mildew, and bacteria every two weeks.
- Fill the bucket with clean warm water and add a mild detergent to the water.
- Dry thoroughly before reinserting the bucket to the main unit.NOTE: Do not clean the bucket in a dishwasher.
Cleaning the air filterTo ensure the air intake is filtered properly and to assure that your dehumidifier runs efficiently, it is recommended to clean the air filter at least once every two weeks.
- Use a vacuum cleaner or tap the filter lightly to remove loose dust and dirt.
- Rinse the air filter under warm or cold running water (no hotter than 100F.)
- Dry thoroughly before reinserting the air filter.
- Reinstall the air filter and replace bucket securely.
End of Season Storage
- After turning off the unit, wait 24 hours before emptying the bucket to allow excess moisture to drain into the bucket.
- Attach the power cord buckle.
- Wrap the power cord using the power cord buckle.
- Clean the main unit, drain bucket, and air filter as detailed above.
- Cover the unit with the original plastic bag that came with the unit or any appropriate dust cover.
- Store the unit upright in a dry, well-ventilated place.
 After turning off the unit, wait 24 hours before emptying the bucket to allow excess moisture to drain into the bucket.
TIPS ON WHEN TO USE YOUR PORTABLE DEHUMIDIFIER
If you have respiratory problems, asthma, and allergies, your Whynter Portable Dehumidifier is a great option for controlling moist environments. Creating dry air can keep indoor air pollutants at a more manageable level, especially when used in conjunction with an air purifier. Using your portable dehumidifier can help you save money in the long run because it uses relatively little power and can help furnaces and air conditioners operate more efficiently.
- Excess moistureIndoor environments with excessive moisture can cause mold and fungus to thrive inside the walls and be neath the carpet. Many types of mold are potentially dangerous and can lead to health problems. This Whynter Portable Dehumidifier reduces the amount of moisture in the air inside a home, which makes it far more difficult for harmful mold to grow. This portable dehumidifier is also effective for a small area, such as a hallway or bedroom.
- Respiratory problems or allergiesThis Whynter Portable Dehumidifier is perfect for larger rooms or areas in your home, including a living room or family room. If your home is musty, you will want to use your portable dehumidifier, especially if you have respiratory trouble or allergies. This unit can also help relieve symptoms by controlling the relative humidity inside your home and is a good idea in general if your home has such underlying problems as leaky foundation walls or inadequate ventilation or if you live in a humid area. By keeping the relative humidity indoors below 50 percent, you can keep allergy-inducing dust mites and mold from thriving.
- BasementsIf you have a basement that is below grade, you should use your Whynter Portable Dehumidifier. This de-humidifier will help you keep the moisture levels in your basement down to manageable levels. By doing this, you can help keep your indoor furnace operating efficiently and even help eliminate minor standing-water problems. Your portable dehumidifier also can help keep furniture and valuables dry, and it will help keep electronics in proper working order.
- Humid climatesIn humid climates, such as areas near a beach or a large body of water, this Whynter Portable Dehumidifier can help keep the environment in your home at a more comfortable level. While the actual temperature won’t be affected, you’ll sleep more comfortably and may actually save money, since your unit can keep the indoor humidity and, thus, your thermostat under control.
TROUBLESHOOTING
Many common portable dehumidifiers problems are easily resolved. Try the troubleshooting suggestions below to see if the problems can be resolved before having to contact the service department.
| Problem | Possible Causes | Solutions |
| The dehumidifier does not operate. | · Power failure/outage.· The automatic switch, line fuse, or breaker has been tripped.· The power supply voltage is too low.· The power cord is damaged.·The dryness level you selected has been reached.· Drain bucket is full or not positioned properly. | ·Restore the power supply.· Flip the switch / change the fuse / turn the breaker back on. Also, note that you may have too many appliances drawing power on one circuit, you may need to move the other appliances to another circuit.· Move the appliance onto another circuit with the correct voltage.· Call for service. Only authorized personnel should replace the damaged power cord or power plug.· If you want to remove more moisture, set the unit on Continuous operation.· Empty drain bucket and insert the bucket to the appliance properly. |
| The dehumidifier runs too much. | ·Windows or doors near dehumidifier are open.·Area to be dehumidified is too large.· Air movement through dehumidifier is blocked. The Air grille may be dirty.· Continuous mode is on. | · Close all windows or doors.· You may need an additional dehumidifier for the area.· Clean the air filter.·The appliance must be placed in a space that does not restrict airflow into the rear coil or out of the front grille.· Set the RH% level and the appliance will stop when the set RH% is reached. |
| The dehumidifier runs but the room is not dry enough. | · Humidity setting (RH%) is too high.·The dehumidifier does not have sufficient clearance to operate.· Room temperature is too low.· Windows or doors are opened. | · Set the humidity level to a lower RH%. We recommend setting the RH% to at least 10% lower than the current RH%.· Ensure there is at least 10” of clearance for proper ventilation.· The appliance will not operate satisfactorily if the room temperature is below 41°F·Close windows or doors. |
| Frost appears on the coils above the bucket. | · The dehumidifier has been turned on recently.· Room temperature is too low. | · This is normal due to refrigerant rushing through the coil. Frost will usually disappear within 60 minutes. This happens when the appliance is operating in low temperatures less than 53°F .· The appliance will not operate satisfactorily if the room temperature is below 41°F. |
| The dehumidifier makes a loud noise. | · Appliance is not leveled. | · Shut off the appliance and let it sit on the lev- el surface for at least 6 hours. |
| The dehumidifier leaks. | · Continuous/gravity drainhose is loose.· Cracked drain bucket. | · Secure the drain hose.· Contact Whynter Service Department. |
| The dehumidifier does not operate. | · Power failure or outage.· The automatic switch, line fuse, or breaker has been tripped.· The power supply voltage is too low.·The power cord is damaged.· The dryness level you select- ed has been reached.· Drain bucket is full or not positioned properly. | · Restore the power supply.· Flip the switch / change the fuse / turn the breaker back on. Also, note that you may have too many appliances drawing power on one circuit, you may need to move the other appliances to another circuit.· Move the appliance onto another circuit with the correct voltage.· Call for service. Only authorized personnel should replace the damaged power cord or power plug.· If you want to remove more moisture, set the unit on Continuous operation.· Empty drain bucket and insert the bucket into the appliance properly. |
| The pump indicator light blinks. | · Water pump filter is dirty· Water pump drain hose is ob- structed or kinked. | · Clean the filter of the pump.· Make sure that the water pump drain hose is not obstructed. |
| Water on the floor. | ·Drain bucket is not installed properly.· Drain hose connection may be loose or not installed properly. | · Install the drain bucket securely.· Make sure that the drain hose is securely installed in the drain outlet.· For the Drain Bucket method, make sure that the continuous drain assembly is not installed and the rubber drain cover is in place.· For the Continuous/Gravity Drain method and water Pump method, make sure the hose is securely fastened to prevent leakage. Direct the drain hose toward a drain or other suitable drainage outlet. |
ONE YEAR LIMITED WARRANTY
This WHYNTER product is warranted to the original owner, purchased from an authorized Whynter dealer within the 48 U.S. continental states, for one year from the original purchase date against defects in material and workmanship under normal residential usage. Should your WHYNTER product prove defective within one year from the date of purchase, contact Whynter’s Customer Support Team with the serial number and proof of purchase to make a warranty claim. A Return Authorization Number must be issued before returning any parts or products. Parts or products received without a Whynter issued Return Authorization Number will be refused. Under this warranty, Whynter will repair or replace any parts found defective with new or remanufactured parts or exchange the defective product with a new, refurbished, or remanufactured product at our discretion. All defective products and parts covered by this warranty will be repaired or replaced on a mail-in basis to Whynter’s Service Center. This warranty is not transferable. After the expiration of the warranty, the cost of labor and parts will be the responsibility of the original owner.
Return freight is prepaid by Whynter within two months of purchase. After two months to one year, the customer will be responsible for the return freight cost to Whynter’s Service Center. Please package the product carefully in its original packaging to avoid damage in transit. Whynter is not responsible for damage resulting from shipper mishandling or improper packaging. Please retain the original box and packaging materials.
THIS WARRANTY DOES NOT COVER:
- Acts of God, such as fire, flood, hurricanes, earthquakes and tornadoes.
- Improper power supply such as power surge, low voltage, defective household wiring or inadequate fuses.
- Use in commercial or industrial applications.
- Damage, accidental or otherwise, to the WHYNTER Beverage Refrigerator while in the possession of a consumer not caused by a defect in material or workmanship
- Damage caused by consumer misuse, tampering, or failure to follow the care and special handling provisions in the instructions.
- Damage to the finish of the case, or other appearance parts caused by wear.
- Damage caused by repairs or alterations to the product by anyone other than authorized by the manufacturer.
- Removal, Replacement Packaging, Freight and Insurance cost for the warranty service
DISCLAIMER OF IMPLIED WARRANTIES; LIMITATION OF REMEDIESCUSTOMER’S SOLE AND EXCLUSIVE REMEDY UNDER THIS LIMITED WARRANTY SHALL BE PRODUCT REPAIR OR REPLACEMENT AS PROVIDED HEREIN. CLAIMS BASED ON IMPLIED WARRANTIES, INCLUDING WARRANTIES OF MERCHANTABILITY OR FITNESS FOR A PARTICULAR PURPOSE, ARE LIMITED TO ONE YEAR OR THE SHORTEST PERIOD ALLOWED BY LAW, BUT NOT LESS THAN ONE YEAR. WHYNTER SHALL NOT BE LIABLE FOR CONSEQUENTIAL OR INCIDENTAL DAMAGES SUCH AS PROPERTY DAMAGE AND INCIDENTAL EXPENSES RESULTING FROM ANY BREACH OF THIS WRITTEN LIMITED WARRANTY OR ANY IMPLIED WARRANTY. SOME STATES AND PROVINCES DO NOT ALLOW THE EXCLUSION OR LIMITATION OF INCIDENTAL OR CONSEQUENTIAL DAMAGES, OR LIMITATIONS ON THE DURATION OF IMPLIED WARRANTIES, SO THESE LIMITATIONS OR EXCLUSIONS MAY NOT APPLY TO YOU. THIS WRITTEN WARRANTY GIVES YOU SPECIFIC LEGAL RIGHTS. YOU MAY ALSO HAVE OTHER RIGHTS THAT VARY FROM STATE TO STATE.The warranty, product contents and specifications are subject to change at any time without notice; please refer to www.whynter.com for the most current information.
To register your warranty, please visit www.whynter.com and fill out the online Warranty Registrationform. Please be sure to include a copy of your purchase invoice.To obtain service or information, contact Whynter LLC via email at [email protected] or call866-WHYNTER (866-949-6837).Copyright © 2020 Whynter LLCwww.whynter.com
References
[xyz-ips snippet=”download-snippet”]