Whynter Countertop Direct Connection Ice Maker and Water Dispenser – Silver
DISPOSAL INFORMATION
Thank you for choosing the Whynter Countertop Direct Connection Ice Maker and Water Dispenser. Please follow the instructions provided in this user guide to obtain the very best performance from your Ice Maker and Water Dispenser. We trust that your Whynter Ice Maker and Water Dispenser will provide the performance and reliability that we stand for.Please keep this user manual in a safe place for future reference.
This symbol on the product or its packaging indicates that the unit cannot be treated as normal domestic trash, but must be handed in at a collection point for recycling electric and electronic appliances. Your contribution to the correct disposal of this product protects the environment.Further information about the recycling of this product can be obtained from your local municipal authority.
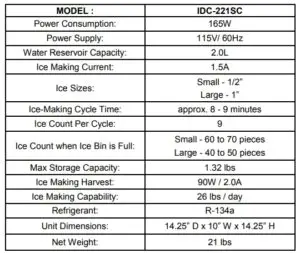
TECHNICAL SPECIFICATIONS
SAFETY PRECAUTIONS
WARNING: TO REDUCE THE RISK OF FIRE, ELECTRICAL SHOCK, OR INJURY WHEN USING YOUR ICE AND WATER DISPENSER, FOLLOW THESE BASIC PRECAUTIONS:
- Read all instructions before using the appliance
- Never clean appliance parts with flammable fluids. The fumes can create a fire hazard. Do not use an excessively wet cloth, industrial solvents, and oil-based products to clean this appliance
- Do not store or use gasoline or any other flammable vapors and liquids in the vicinity of this or any other appliance. The fumes can create a fire hazard
- Do not abuse, sit on, or stand on the appliance
- This appliance is not intended for use by persons (including children with reduced physical, sensory or mental capabilities, or lack of experience and knowledge, unless they have been given supervision or instruction concerning use of the appliance by a person responsible for their safety
- Children should be supervised to ensure that they do not play with the appliance
- If the power cord is damaged, it must be replaced by the manufacturer or its service agent or a similarly qualified person in order to avoid a hazard
- Use the unit only for its intended function. This appliance is designed for household, non-commercial use only. Any other use will void the warranty
- To avoid the risk of shock, the product should never be used in steamy or wet areas
- During installation, the power supply must not be excessively or dangerously bent or flattened
- Do not tamper with controls
- Make sure the power plug is placed fully and firm into the wall socket. If the wall receptacle you intend to use is not adequately grounded or protected by a time delay fuse or circuit breaker, have a qualified electrician install an outlet that is appropriate to local electrical codes and requirements
- Do not use multiple socket or of an extension cord as it may overheat and become a risk of fire
- Make sure the power plug is clean before usage
- Do not turn this appliance on and off by plugging and unplugging. Always use the ON/OFF switch
- After turning the appliance off, please take the power plug out of the socket
- Make sure hands are dry when connecting the power plug. The appliance is equipped with a three-prong grounded power plug on the power cord for your protection. Never modify, remove or attempt to repair the power plug yourself
- Do not repair, disassemble and/or modify the appliance by yourself
- Transport the appliance in an upright position only, or leave it in an upright position for at least 4 hours before first use
- When positioning or moving the appliance ensure that it is not turned upside down or greater than 45° or more off level
- Extreme caution must be used when moving or lifting the appliance, utilize handles and do not lift from the base of the unit to avoid injury
- This appliance must be installed in an area protected from the elements, such as wind, rain, water spray or drips
- When using this appliance in any confined space, be sure to allow proper ventilation to prevent overheatingand fire. Allow at least 5” of air space on all sides of the appliance
- Always place the appliance on even and hard and level surface that can support the unit when it is full
- Ensure objects do not obstruct the air vents
- Never insert your fingers or other objects into the air outlets
- This appliance must be earthed
- The wires in this mains lead are colored in accordance with the following code:
- Green or Green with a strip yellow: Grounding
- White: Neutral
- Black: Live
PARTS AND CONTROL PANEL
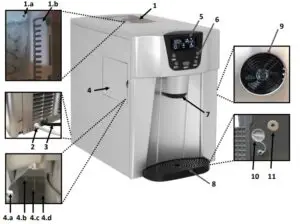

1 Ice Bin Access Lid1.a Ice Full Sensor1.b Ice Shovel2 Water Inlet Port3 Power Cord4 Water Reservoir Access Door4.a Ice Reservoir Drain Outlet4.b Water Inlet Supply4.c Water Level Sensor4.d Water Reservoir5 LCD Display6 Control Panel7 Water and Ice Dispenser Outlet8 Water Drip Tray9 Air Vent10 Drain cap and Rubber Drain Plug11 Rubber Grip Legs (4)12 12 ft. Inlet Hose
LCD DISPLAY OVERVIEW
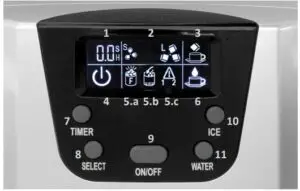
- TIMER INDICATOR Displays remaining time when unit to turn ON or OFF. (see Timer Setting Instructions on page 8)
- ICE SIZE INDICATORThis unit produces bullet-shaped ice. Each time you press the ice size selector button, the size selection window will change between Small and Large. The chosen size shall stay as selected unless changed or there is a power failure. When ambient temperature is below 59ºF, the most efficient operation is to use the small cube size setting. In an event of a power interruption, operation does not restart automatically. Upon restart, Large ice size will be selected at default.
- ICE DISPENSING INDICATOR This indicator is displayed when the unit is dispensing ice.
- ON/OFF INDICATOR This indicator is displayed all the time to show that the unit is plugged in and receiving power.
- OPERATION INDICATORS5.a ICE FULL INDICATOR When the ice bin is full, this indicator will be displayed. The indicator will remain until the ice in the bin either melts away slowly or has been removed. The unit will stay in a “Standby” mode until the ice has been removed / melted at which time the unit will automatically start operation as normal.5.b WATER INDICATOR When the water indicator is solid, the unit is pumping water to make ice. If the water level is too low, the indicator will flash and the unit will stop working automatically. Once you add water to the unit, the indicator will turn off and the unit will resume normal operation.5.c WARNING INDICATOR This indicates that there is an error with the unit. (see Troubleshooting on page 11)
- WATER DISPENSING INDICATOR This indicator is displayed when the unit is dispensing water.
- TIMER BUTTON Press to program timer delayed switch ON or OFF function
- SELECT BUTTON Press to program ice size selection and timer.
- ON/OFF BUTTON Press to turn the unit on and off
- ICE DISPENSER BUTTON Press button to dispense ice. Press again to stop ice from dispensing.
- WATER BUTTON Press button to dispense water. Press again to stop water from dispensing.
INSTALLATION AND OPERATING INSTRUCTIONS
INSTALLATION OF YOUR ICE MAKER AND WATER DISPENSER
- This unit should be installed by a licensed plumber only (DIRECT WATER CONNECTION METHOD only)
- Before connecting the unit to the power source, let it stand upright for approximately 4 hours. This will reduce the possibility of a malfunction in the cooling system from handling during transportation.
- Place the unit away from direct sunlight and sources of heat (stove, heater, radiator, etc.). Direct sunlight may affect the acrylic coating and heat sources may increase electrical consumption. Extreme cold ambient temperatures may also cause the unit not to perform properly. For best performance, water temperature should be between 55ºF and 85ºF and ambient temperature between 65ºF and 77ºF.
- Plug the unit into an exclusive properly installed-grounded wall outlet. Do not under any circumstances cut or remove the third (ground) prong from the power cord.
- The unit must be installed with all electrical and water connections in accordance with state and local codes.
- In general, it is always a good idea to filter the water. A water filter can remove taste and odors as well as particles. Where water is very hard, softened water may result in white, mushy cubes that stick together. Deionized water is not recommended.
- IMPORTANT: Do not install the unit near an oven, radiator, or other heat source.
SPACE REQUIREMENTS
- During transportation, the incline angle of the unit should not be over 45°
- Do not turn the unit upside down. Problems could occur in the compressor and sealed system.
- The unit should be located on a hard and level surface that can support the unit when it is full. It is important for the ice maker to be level in order to work properly.
- Before using the unit for the first time, please wait 4 hours after positioning it.
- Clean the ice shovel, water reservoir, and ice scoop frequently.
- IMPORTANT: Do not kink or pinch the power supply cord between the ice maker and wall or cabinet.
OPERATING INSTRUCTIONS
Using this unit requires water. Adding water to this unit can be done in 2 different methods:
MANUAL FILL METHOD:
- Make sure that the unit is turned off.
- Open the water reservoir access door.
- Remove any dust or objects that may be in the water reservoir.
- Fill the water reservoir up to the line marked “MAX”. Fill with potable or drinking water only.
DIRECT WATER CONNECTION METHOD
The direct water line can be installed into the unit for a continuous flow of water, preventing you from refilling the water reservoir every time you need more ice or water.NOTE: When using the direct water connection method, this appliance should be installed by a licensed plumber only.
- Make sure that the unit is turned off.
- Insert the inlet hose into the water inlet port. Make sure that the inlet hose if fully inserted to avoid water leakage.
- Connect the other end of the hose to your water source.
- Hand screw the hose into the water source and be sure to tighten the connection to avoid leaking.
- The recommended water pressure is 58 PSI.
- Turn on main water supply and tap. Check for water supply connection leaks. Tighten any connections.
ICE MAKING INSTRUCTIONS
- Turn the unit on by pressing the Power button.
- Select desired ice size by pressing the ice size selector button (Small or Large).
- Water will be pumped from the water reservoir to the water tray under the freezing bars. The freezing bars will start freezing. Once the freezing process is complete, the freezing bars will heat up to drop the ice and the ice shovel will push the ice down to the ice storage bin.
- When the unit is used for the first time, discard the first couple batches of ice.
- The unit will automatically check the water level in the reservoir periodically and will stop the ice-making cycle when the unit detects any shortage of water.MANUAL FILL METHOD: When the water level is low, the water indicator will then start flashing. Press the ON/OFF button to turn off the unit and fill the reservoir with water. Press the ON/OFF button again to restart the ice-making cycle or wait 3 minutes after the water indicator stops flashing as the unit will begin it’s normal operation cycle automatically.DIRECT WATER CONNECTION METHOD: Once the water reservoir is out of water, the unit will refill automatically up to the MAX line.
- When the ice reaches the ice full sensor, the unit will stop operating and the ice full indicator will be displayed.
- Change water in the water reservoir every 24 hours to ensure a reasonable hygiene level. If unit is not in use, drain all water left in the water reservoir.
- When the ambient temperature is lower than 59ºF, the small ice size is recommended to avoid ice clumping together. For best performance, water temperature should be between 55ºF and 85ºF and ambient temperature between 65ºF and 77ºF.
- The ice storage bin does not keep the ice frozen. The ice in the bin will slowly melt and the water will drip to the water reservoir and reused.
DISPENSING ICE AND WATER
- Place a glass or cup directly below the water and ice dispenser outlet.
- To dispense ice, press the ICE button. Once the desired amount of ice has been dispensed, press the icedispenser button to stop
To dispense water, press the WATER button. Once the desired amount of water has been dispensed, press the WATER button to stop. This unit only dispenses room temperature water and/or water from the melted ice. Water in the water reservoir is not refrigerated when unit is in operation.NOTE: As a default, the unit will dispense water for 10 seconds when the WATER button is pressed. The water dispensing default time can be adjusted by holding the WATER button for 3 seconds. Then press the Select button to choose the desired dispensing time from 7 seconds to 25 seconds. Press the WATER button to confirm the selection.
WARNING:
- Do not remove the glass or cup from below the dispensing outlet before the ice or water are finished dispensing
TIMER SETTING INSTRUCTIONS
TIMER DELAY SWITCH ONWhen the unit is OFF, press the Timer button on the control panel and the time indicator will flash. Set the desired time delay ON hours by pressing the Select button. The time increments are 0.5 hour up to 18 hours. The time displayed will change invariably and will decrease by 0.1 Hr. When the delay time set has elapsed, the unit will turn on. To cancel the delayed switch on function, press the Timer button and icon will disappear confirming the function has been cancelled.TIMER DELAY SWITCH OFFWhen the unit is ON, press the Timer button on the control panel and the time indicator will flash. Set the desired time delay OFF hours by pressing the Select button. The time increments are 0.5 hour up to 18 hours. The time displayed will change invariably and will decrease by 0.1 Hr. When the delay time set has elapsed, the unit will turn off. To cancel the delayed switch off function, press the Timer button and icon will disappear confirming the function has been cancelled.
NORMAL SOUNDS
Your unit may make sounds that are not familiar to you. Hard surfaces like the floor and walls can make the sounds seem louder than they actually are. The following describes the kinds of sounds that might be new to you and what may be making them.
- Ratting noises may come from the flow of the refrigerant or the water line, items stored on top of the unit can also make noises.
- The high efficiency compressor may make a pulsating or high pitched sound.
- Water running from the evaporator to the water reservoir may make a splashing sound.
- As each cycle ends, you may hear a gurgling sound due to the refrigerant flowing in your unit.
- You may hear air being forced over the condenser by the condenser fan.
- During the harvest cycle, you may hear the sound of ice cubes falling into the ice bin
POWER FAILURE
Most power failures are corrected within a few hours and should not affect the temperature of your unit if you minimize the number of times the unit cover is opened. If the power is going to be OFF for a longer period of time, you need to take the proper steps to disconnect your appliance. Failure to unplug the unit could result in electrical shock or personal injury.
CARE AND MAINTENANCE
Periodic cleaning and proper maintenance will ensure efficiency, top performance, and long life. The maintenance intervals listed are based on normal conditions.
- Regularly inspect plumbing connections to insure that no leaks are present.
- Disconnect the water inlet hose if the unit will not be used for a long period of time.
- Never keep anything in the ice storage bin that is not ice.
IMPORTANT:
- Do not touch the power plug when your hands are wet.
- Never unplug the unit by pulling on the cord. Grasp the plug and pull out firmly.
DRAINING YOUR ICE MAKER AND WATER DISPENSER
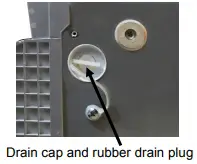
Follow the steps below to drain the unit.
- Carefully move the unit towards a sink or other suitable location for draining
- Remove the drain cap and rubber drain plug located at the bottom side of the unit to access the drain.
- Let the water drain from the drain plug.
- Firmly install the rubber drain plug into the drain port.WARNING: Do not tip the unit over while there is water in the reservoir.
REMOVING THE INLET HOSE

To disconnect the inlet hose from the portable unit, push the water inlet button while pulling the inlet hose at the same time.
CLEANING YOUR ICE MAKER AND WATER DISPENSER
To ensure the cleanliness of the ice, water in the reservoir should be replaced every 24 hours.
- Remove the drain plug to drain remaining water from the water reservoir when the unit will not be used for long period of time. Place the drain plug back in after the water has been drained.
- Always use potable or drinkable water.
- Please clean your unit regularly. When cleaning, unplug the unit and remove ice. Do not spray unit with chemicals or diluted agents such as acids, gasoline or oil. Rinse thoroughly before starting.
EXTERIOR CLEANINGThe unit may be cleaned with a mild detergent and warm water solution such as 1 oz.(28g) of dish-washing liquid mixed with 2 gallons of warm water. Do not use solvent-based or abrasive cleaners. Use a soft sponge and rinse with clean water. Wipe with a soft clean towel to prevent water spotting.INTERIOR CLEANINGWhen necessary, defrost and thoroughly clean the inside of the unit with mild soap and water. Do not use electrical heating devices, sharp or pointed tools when defrosting.When defrosting or leaving open the unit turned off, leave the ice bin access lid and water reservoir door open.This allows air to dry the inside of the unit, reducing the chance for mildew and damage to the mold mechanism’s components.
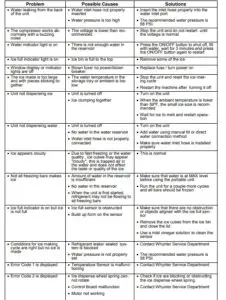
TROUBLESHOOTING
ONE YEAR LIMITED WARRANTY
This Whynter Ice Maker and Water Dispenser is warranted, to the original owner within the 48 continental states, for one year from the date of purchase against defects in material and workmanship under normal use and service. When making a warranty claim, please have the original bill or invoice of purchase with purchase date available. Should your Whynter Ice Maker and Water Dispenser prove defective within one year from the date of purchase, return the defective part or unit, freight prepaid (within two months of purchase; after two months to one year, customer will be responsible for freight cost to Whynter’s service department), along with an explanation of the claim to Whynter LLC. A return authorization number issued by Whynter is required for all warranty claims and returns. Please package the Whynter Ice Maker and Water Dispenser carefully in its original packaging material to avoid damage in transit. The original box and packaging material should be retained, as Whynter is not responsible for the cost of replacement packaging. Under this warranty, Whynter will repair or replace any parts found defective at our discretion. This warranty is not transferable. After the expiration of the warranty, the cost of labor and parts will be the responsibility of the original owner of the unit.
THIS WARRANTY DOES NOT COVER:
- Acts of God, such as fire, flood, hurricanes, earthquakes and tornadoes.
- Improper power supply such as power surge, low voltage, defective household wiring or inadequate fuses.
- Use in commercial or industrial applications
- Damage, accidental or otherwise, to the Whynter Ice Maker and Water Dispenser while in the possession of a consumer not caused by a defect in material or workmanship;
- Damage caused by consumer misuse, tampering, or failure to follow the care and special handling provisions in the instructions.
- Damage to the finish of the case, or other appearance parts caused by wear.
- Damage caused by repairs or alterations to the product by anyone other than authorized by the manufacturer.
- Removal, Replacement Packaging, Freight and Insurance cost for the warranty service.
DISCLAIMER OF IMPLIED WARRANTIES; LIMITATION OF REMEDIES CUSTOMER’S SOLE AND EXCLUSIVEREMEDY UNDER THIS LIMITED WARRANTY SHALL BE PRODUCT REPAIR OR REPLACEMENT AS PROVIDED HEREIN. CLAIMS BASED ON IMPLIED WARRANTIES, INCLUDING WARRANTIES OF MERCHANTABILITY OR FITNESS FOR A PARTICULAR PURPOSE, ARE LIMITED TO ONE YEAR OR THE SHORTEST PERIOD ALLOWED BY LAW, BUT NOT LESS THAN ONE YEAR. WHYNTER SHALL NOT BE LIABLE FOR CONSEQUENTIAL OR INCIDENTAL DAMAGES SUCH AS PROPERTY DAMAGE AND INCIDENTAL EXPENSES RESULTING FROM ANY BREACH OF THIS WRITTEN LIMITED WARRANTY OR ANY IMPLIED WARRANTY. SOME STATES AND PROVINCES DO NOT AL-LOW THE EXCLUSION OR LIMITATION OF INCIDENTAL OR CONSEQUENTIAL DAMAGES, OR LIMITATIONS ON THE DURATION OF IMPLIED WARRANTIES, SO THESE LIMITATIONS OR EXCLUSIONS MAY NOT APPLY TO YOU. THIS WRIT-TEN WARRANTY GIVES YOU SPECIFIC LEGAL RIGHTS. YOU MAY ALSO HAVE OTHER RIGHTS THAT VARY FROM STATE TO STATE.
Please retain the original proof of purchase in order to obtain warranty services. Warranty begins from the original date of purchase.To obtain service or information, contact Whynter LLC via email at [email protected] or call 866-WHYNTER.
Whynter Countertop Direct Connection Ice Maker and Water Dispenser [IDC-221SC] Instruction Manual – Whynter Countertop Direct Connection Ice Maker and Water Dispenser [IDC-221SC] Instruction Manual –
[xyz-ips snippet=”download-snippet”]
