![]()
Whynter Portable Fridge/Freezer Instruction Manual

Congratulations on your new Whynter product. To ensure proper operation, please read this Instruction Manual carefully before using this product. Keep this manual in a safe place for future reference.
Safety Precautions
WARNING
TO REDUCE THE RISK OF FIRE, ELECTRICAL SHOCK, OR INJURY WHEN USING YOUR PORTABLE FREEZER, FOLLOW THESE BASIC PRECAUTIONS:
- Read all instructions before using the appliance.
- Never clean appliance parts with flammable fluids. The fumes can create a fire hazard. Do not use an excessively wet cloth, industrial solvents, and oil-based products to clean this appliance.
- To clean the freezer, use only mild detergents. Never use harsh chemicals or solvents.
- Do not store or use gasoline or any other flammable vapors and liquids in the vicinity of this or any other appliance. The fumes can create a fire hazard.
- Do not abuse, sit on, or stand on the appliance.
- This appliance is not intended for use by persons (including children with reduced physical, sensory or mental capabilities, or lack of experience and knowledge, unless they have been given supervision or instruction concerning use of the appliance by a person responsible for their safety
- Children should be supervised to ensure that they do not play with the appliance.
- Ensure the freezer is unplugged before cleaning or if not in use
- If the power cord is damaged, it must be replaced by the manufacturer or its service agent or a similarly qualified person in order to avoid a hazard.
- Use the portable freezer only for its intended function. This appliance is designed for household, noncommercial use only. Any other use will void the warranty.
- Do not plug this portable freezer into the power source before setup is completed.
- An empty portable freezer can be dangerous for children and small animals. If disposing of the portable freeze, remove gaskets, latches, lids, and the entire freezer door from your unused appliance so that children or small animals cannot be trapped inside.
- The portable freezer is an electrical appliance. To avoid serious injury from electrical shock, do not operate the freezer with wet hands, while standing on a wet surface, or while standing in water.
- To avoid the risk of shock, the product should never be used in bathrooms, shower rooms, or in any other steamy or wet areas.
- During installation, the power supply must not be excessively or dangerously bent or flattened.
- Do not tamper with controls.
- For AC power connection, make sure the power cord is placed firmly into a grounded power outlet that can support the maximum power consumption. If the wall receptacle you intend to use is not adequately grounded or protected by a time delay fuse or circuit breaker, have a qualified electrician install an outlet that is appropriate to local electrical codes and requirements.
- Do not use multiple socket or an extension cord as it may overheat and become a risk of fire. Please ensure that the freezer is plugged directly into the electrical outlet.
- The cord should be secured behind the unit and should not be left exposed or dangling
- Make sure the power cord is clean before usage.
- Make sure hands are dry when connecting the power cord. The appliance is equipped with a three-prong grounded plug on the power cord for your protection. Never modify, remove or attempt to repair the power cord yourself.
- Never pull the power cord to disconnect the unit from an outlet. Grasp the plug directly and pull it from the outlet.
- Never lift or carry the freezer by the power cord.
- Keep the power cord away from heated surfaces.
- Do not repair, disassemble and/or modify the appliance by yourself.
- Always turn off the appliance when cleaning or transporting.
- Transport the appliance in an upright position only.
- Always place the appliance on even and hard and level surface.
- When positioning the portable freezer, ensure that there is at least a 6” clearance at the sides of the portable freezer. This will allow for adequate ventilation of heat from the back of the freezer
- Close the freezer lid immediately after putting in any items to maintain the internal temperature of the unit
- Avoid placing the freezer near external heat sources or direct sunlight
- Do not expose this appliance to rain or excessive moisture
- Make sure the freezer is placed on a flat, level, and solid surface.
- Place your appliance on a hard and level floor that is strong enough to support it when it is fully loaded.
- Do not turn the portable freezer upside down, on its side, or 45° or more off level.
- Do not move this portable freezer without securing the lid in a closed and latched position
- Performance may vary based on operational and ambient conditions
ELECTRICAL CONNECTIONThe appliance should always be plugged into its own individual electrical outlet which has a voltage rating that matches the rating label on the appliance. The cord should be secured behind the appliance and not left exposed or dangling to prevent accidental injury. This provides the best performance and also prevent overloading house wiring circuits that could cause a fire hazard from overheated. Never unplug the appliance by pulling the power cord. Always grip the plug firmly and pull straight out from the receptacle. Repair or replace immediately all powercords that have become frayed or otherwise damaged. Do not use a cord that shows cracks or abrasion damage along its length or at either end. When moving the appliance, be careful not to damage the power cord.
EXTENSION CORDBecause of potential safety hazards, it is strongly recommended that you do not use an extension cord with this appliance. However, if you must use an extension cord, it is absolutely necessary that it be a UL/CUL-Listed, 3- wire grounding type appliance extension cord having a grounding type plug and outlet and that the electrical rating of the cord be 15 amperes and 115 volts. Failure to follow these instructions can result in fire, electric shock, or death.
THE MANUFACTURER DISCLAIMS ANY RESPONSIBILITY IF THE ABOVE INSTRUCTIONS ARE NOT FOLLOWED.
Parts and Accessories
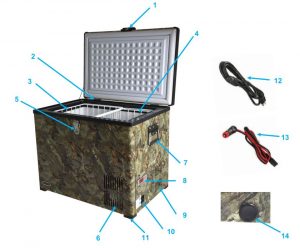
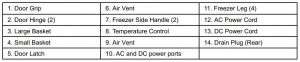
Your Whynter portable freezer is supplied with all the accessories you need to enjoy refrigeration almost anywhere.
Below is an image of the freezer features and standard accessories.Additional protection and insulation can be provided for your Whynter portable freezer with a Whynter insulated flexible transit bag. The transit bag comes custom tailored with openings for your freezer’s handle grips, air vents, and power cords to allow operation with the bag in place.
The transit bag also comes with a fast open top flap for quick and easy access to the freezer compartment. A convenient side pocket also allows you to tote any cords and accessories withthe bag.
If you are interested in purchasing optional accessories, please contact for retail sales information.
Product Features / Technical Data
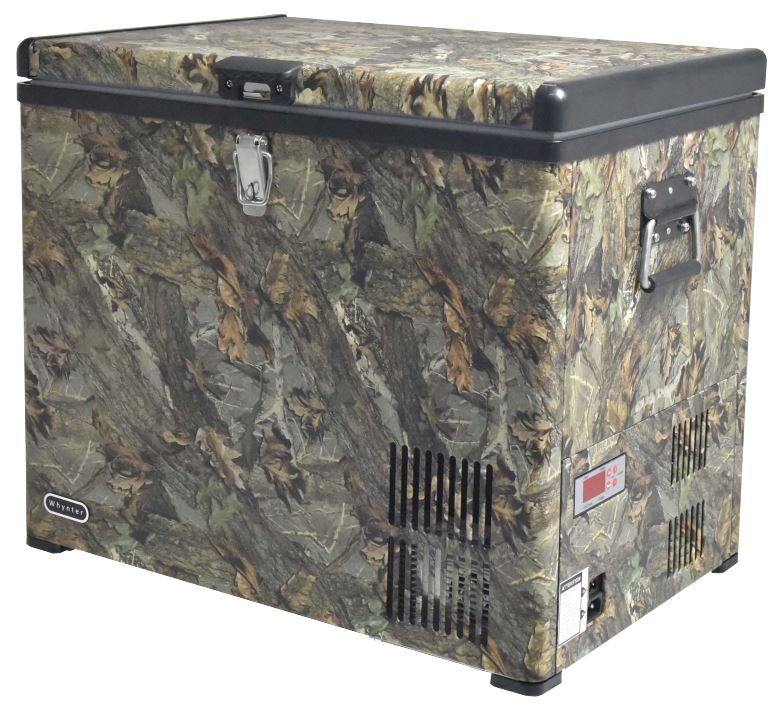
Wrapped with the industry’s leading camouflage pattern, Woodland Camo, this Whynter Portable Fridge / Freezer offers premium quality and innovative design to your frozen/ refrigerated needs. Making this perfect for any passionate outdoor enthusiast, this freezer is great for RVs, boats, campsites, fishing trips and truly portable so you can take your fridge/freezer anywhere! All you need is either a standard household 110 Volt outlet or a 12 Volt power source, like an automotive battery.
Whether on a day trip or major expedition, you can easily keep your food and beverages chilled, or frozen with this benchtop freezer. The Whynter portable freezers should not to be confused with less effective 12 volt novelty and beverage type “coolers”, the Whynter portable freezer fridge is a true freezer/refrigerator which cools between –8°F to 50°F. A cost effective and mobile solution for your recreational and critical freezing requirements.
- Operates as a refrigerator or freezer
- Compressor Cooling System
- 8′ AC power cord and 10′ DC power cord are included
- “Fast Freeze” mode rapidly cools to -8°F
- LED temperature display
- Open-door warning system
- Power low indicator
- Insulated lid and walls
- 2 removable wire basket (1 Large, 1 Small)
- Side handles for easy mobility
- Functions even when tilted 30°
- Tough and solid outer casing
- ETL approved
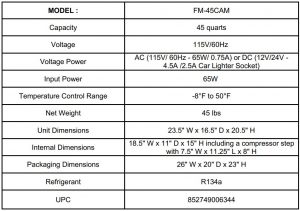
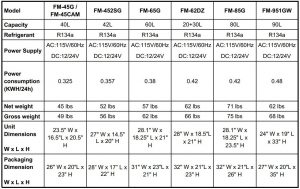
TECHNICAL DATA
Installation
BEFORE USING YOUR APPLIANCE
- Remove the exterior and interior packing.IMPORTANT: Do not remove any permanent instruction labels or the data label on your freezer
- To remove any remaining tape or glue, rub the area briskly with your thumb. Tape or glue residue can also be easily removed by rubbing a small amount of liquid dish soap over the adhesive with your fingers. Wipe with warm water and dry.
- Do not use sharp instruments, rubbing alcohol, flammable fluids, or abrasive cleaners to remove tape or glue. These products can damage the surface of your freezer.
- Before connecting the appliance to the power source, let it stand upright for approximately 4 hours. This will reduce the possibility of a malfunction in the cooling system from handling during transportation.
PROPER LOCATION
- The appliance is designed for free standing installation.
- The normal operation of the freezer depends on heat radiation from the condenser. Allow at least 6 inches of space between the back and sides of the appliance, which allows the proper air circulation to cool the compressor and condenser. The air vent at the front of the appliance must never be covered or blocked in any way.
- Do not install the appliance near an oven or other heating source. Direct sunlight may affect the acrylic coating and heat sources may increase electrical consumption. For best performance, do not install the appliance behind a cabinet, door or block the air vents.
- This portable freezer is suitable for vehicle use and outdoor use such as camping.
- Avoid locating the appliance in area that may be exposed to excessive moisture or rain.
MOVEMENT AND INSTALLATION OF YOUR APPLIANCE
- Position the freezer in a dry and well-ventilated place. Keep the freezer away from direct sunlight, heaters, and corrosive gases or chemicals.
- Clean the interior surface with lukewarm water using a soft cloth.
- Place your appliance on a hard and level floor that is strong enough to support it when it is fully loaded.
- We do not recommend installing the appliance on carpet.
- To level your appliance, install fixed legs at the bottom of the appliance if needed.
- When inserting the AC power-cord into the power socket, make sure the power socket is a grounded 115V~AC / 60Hz socket. Also, make sure that the unit’s grounding prong has not being tampered with.NOTE: When inserting the DC power-cord, make sure the input is a 12V~DC / 24V power source.
TEST RUNDC INPUT POWER
- When powering your portable freezer with a standard 12 V socket, the unit will not work if socket has a voltage of less than 10.4 V. The unit will restart when the voltage is 11.8V or greater.
- When powering your portable freezer into a standard 24 V socket, the unit will not work if the socket has a voltage of less than 22.5 V. The unit will restart when the voltage is 24.2 V or greater.
Operation and Controls
CONTROL PANEL GUIDETo obtain the best possible results for your freezer, it is important that you operate it properly. Your portable freezer uses a digital control system for adjusting the thermostat.

1. Set ButtonPress the Set Button to select desired temperature.Battery cut-out voltage setting:This function sets the minimum voltage that the unit will run if 12 volt connection is active and DC Cord is plugged in. Press the SET button 3 times to set the Battery cut-out voltage. To select different cut-out voltage (10V/ 10.7V/ 11.8V), press the +/- buttons.
2 – 3. Temperature Control ButtonsThe temperature setting can be set within a range of –8°F to 50°F in 1°F increments. Press the Set button and choose your desired temperature setting. For lower temperature setting, press the Down button and set to a lower temperature value. For higher temperature setting, press the Up button and set to a higher temperature value.Once the desired temperature is set, the temperature display will flash 4 times confirming the chosen temperature and then it will revert back to current temperature setting. The set temperature can be check by pressing the Set Button again.
4. Mode / Power ButtonPress the “Mode” button to turn on the portable freezer. To turn off, press the “Mode” button for 5 seconds. When the portable freezer is in operation, press the “Mode” button to select Auto, Low Speed, or Fast Freeze Operation.
5. Auto Mode Indicator LightThe Auto indicator light will illuminate a yellow light when the freezer is running on Auto Mode. In this mode, the unit operates in a fully automatic operation that ensures hassle-free operation while automatically maintaining the set temperature. The temperature can be set between –8°F to 50°F. The portable freezer measures the temperature inside the freezer cabinet and automatically adjusts the appropriate temperature setting for optimal operation.
6. Low Speed Mode Indicator LightThe Low indicator light will illuminate a green light the freezer is running on Low Speed Mode. In this mode, the portable freezer operates at the lowest fan speed while automatically maintaining the set temperature. The temperature can be set between –8°F to 50°F. The unit switches to lower activity level, fan speed and compressor operation are reduced and the energy consumption is minimized.
7. Temperature DisplayThe LED display shows the actual temperature inside the portable freezer. When setting the desired temperature, the LED display shows the set temperature level from –8°F to 50°F.Fast Freeze Mode When you set the freezer in Fast Freeze mode, the freezer will rapidly cool the unit to -8°F. The freezer will then maintain this temperature. To operate the unit in Fast Freeze mode when the unit is on, press the MODE button until the FF indicator comes on. Note: Do not run the unit on “FF” (fast freeze) for more than four hours, as this might adversely affect the refrigeration system.
8. Voltage DisplayIf 120 volt connection is active and the AC Cord is plugged in, the LED Display will display “AC” indicator. If 12 volt connection is active and DC Cord is plugged in, the LED Display will display “DC” indicator.Note: This portable freezer can be plugged in with both AC power and the DC power at the same time. If both AC and DC are plugged in at the same time, then the unit will primarily operate on AC. If the AC power source fails, DC will become primary source of power supply.
9. Battery DisplayThe battery icon will be displayed only when connected to a DC power source. The battery icon symbolizes the remaining battery source voltage.
NORMAL SOUNDSYour new freezer may make sounds that are not familiar to you. Hard surfaces like the floor, walls can make the sounds seem louder than they actually are. The following describes the kinds of sounds that might be new to you and what may be making them.
- Ratting noises may come from the flow of the refrigerant or the water line, items stored on top of the freezer can also make noises.
- The surface temperature of the compressor can reach 158 – 194°F when running.
- The high efficiency compressor may make a pulsating or high-pitched sound.
- The noise emitted by the cooling fan on the condenser is a normal function.
- It is normal for the fan in the power supply to run all the time.
- As each cycle ends, you may hear a gurgling sound due to the refrigerant flowing in your freezer.
OPEN-DOOR WARNING SYSTEMThis portable freezer has an open-door warning system feature which alarms if the freezer door is left unopened for more than 1 minute. Close the freezer door to turn the alarm off.
STORING FROZEN FOODWhen using the freezer for the first time or after defrosting, turn the temperature setting to set “-8°F ” for at least two hours before introducing the food to be stored.
- All frozen food products purchased should be placed in the freezer as soon as possible to avoid the frozen food from defrosting.
- Storage recommendation printed on the packaging of frozen food by the manufacturers should be always be followed.
FREEZING FRESH FOODEnsure that your freezing operations are carried out under the most hygienic conditions as freezing alone does not sterilize the food.
- It is advisable to freeze the food by packing it into separate meal portions and not in bulk form. Never put hot or warm food stuffs into the freezer.
- Prior to storing the frozen food, pack it in plastic bags, aluminum sheets or freezing containers and place into the freezer.
- Fresh foods should not be stored together with frozen foods.
- When the temperature is set below 32°F, do not keep glass-bottled drinks such as beer and lemonade or soda cans, as the glass and cans might shatter.
- Do not use this portable freezer as a refrigerator when the ambient temperature is 41°F as food can become frozen.Note: For best performance, leave enough space inside the freezer compartment for air to circulate around the packages.
Cleaning and Maintenance
DEFROSTING AND DRAININGWARNING: Before proceeding with cleaning and maintenance operations, make sure the power line of the unit is disconnected. Do not touch the power cord when your hands are wet. Never unplug the unit by pulling on the plug.
To avoid damaging the freezing compartment wall, never use a sharp or metallic instrument to scrape off frost or separate the frozen food.
Moisture contained in food and air may form a layer of frost inside the unit after a period of use. We highly recommend that the unit gets defrosted when frost becomes ¼” thick. The defrosting process for this unit is operated manually.
For complete defrosting:
- Unplug the unit from its power source
- Remove all food and place it in corrugated boxes, insulated bags, picnic cooler, etc. Use towels and newspaper for insulation as needed
- With the door open, use pans of hot water to speed the loosening of the frost. Remove large pieces of before they melt
- Remove the clear drain plug from the inside base cabinet of the freezer. Also, remove the black drain plug from the side of the freezer to drain water.
- Sponge excess water from the bottom of the freezer.
- After defrosting, clean the inside and dry with a soft cloth to wipe away the remaining ice and water.
Once the compartment is wiped and dry, replace the drain plugs and plug in the freezer. Return the temperature value to its previous setting and return food to the freezer.
NOTE: Do not use mechanical devices or other means to accelerate the defrosting process. DO NOT pour hot water directly into compartment or heat with hair dryer while defrosting.
CLEANINGOutside/ExteriorWipe with a clean cloth lightly dampened with appliance polish wax or mild liquid dishwashing detergent. Dry and polish with a clean, soft cloth. Do not wipe the freezer with a soiled dishwashing cloth or wet towel. Do not use scouring pads, powdered cleaners, bleach, or cleaners containing bleach.
InsideUse warm water and baking soda solution–about a tablespoon of baking soda to a quart of water. Rinse thoroughly with water and wipe dry. Do not use cleaning powders or other abrasive cleaners. An open box of baking soda in the freezer will absorb stale freezer odors. Change the box every three months.
PROLONGED OFF PERIODSIf the freezer is not to be used for a long period of time, disconnect freezer from main power supply. Clean and dry the inside as instructed. Leave the freezer door open to prevent any mold and mildew growth.
Usage Tips:
- Keep the freezer’s door closed as much as possible. Try not to open the door too frequently, especially when weather is hot and humid
- Ensure that the unit has sufficient clearance for ventilation
- For normal household use, it is recommended to set the thermostat in the middle setting.
- Before loading the freezer with an item, make sure they are cooled to ambient temperature.
- Ice and frost layer increase energy consumption, defrost when frost is 3-5 mm thick.
PREPARING FOR VACATIONTo maintain freezer in operation during vacations, be sure your house power is not turned off. For extended vacations or absences, you may prefer to move your frozen foods to a storage locker temporarily. If your freezer is to be left empty, disconnect power cord plug from power source. To prevent formation of odors, place open box of baking soda in freezer and leave freezer door open.
IN CASE OF EXTENDED POWER FAILUREKeep freezer door/lid closed. Your freezer will keep food frozen for 24 hours provided warm air is not admitted. If freezer is out of operation for 24 hours or more, add dry ice. Leave ice in large pieces. Add more ice as required
NOTE: Handling of dry ice can cause freezing of the hands, gloves or other protection is recommended. If dry ice is not available, move food to a frozen food locker temporarily until power is restored.
ENERGY SAVING TIPSThe freezer should be located in the coolest area of the room, away from heat-producing appliances or heating ducts, and out of direct sunlight. Let hot foods cool to room temperature before placing in the freezer. Overloading the freezer forces the compressor to run longer. Foods that freeze too slowly may lose quality or spoil. Be sure to wrap foods properly, and wipe containers dry before placing them in the freezer. This cuts down on frost buildup inside the freezer
Freezer shelves should not be lined with aluminum foil, wax paper or paper toweling. Liners interfere with cold air circulation, making the freezer less efficient. Organize and label food to reduce door openings and extended searches. Remove as many items as needed at one time, and close the door as soon as possible.
Whynter Portable Freezer Consumption Chart
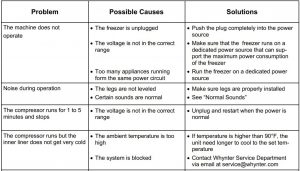
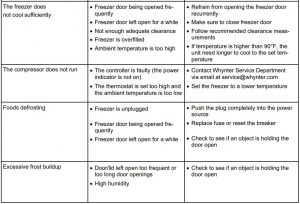
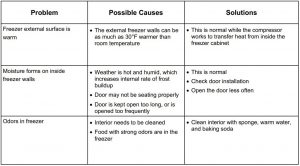
Troubleshooting
Many common portable freezer problems are easily resolved. Try the troubleshooting suggestions below to see if the problems can be resolved before having to contact the service department.
ONE YEAR LIMITED WARRANTY
This Whynter Portable Freezer is warranted, to the original owner within the 48 continental states, for one year from the date of purchase against defects in material and workmanship under normal use and service. When making a warranty claim, please have the original bill or invoice of purchase with purchase date available. Should your Whynter Portable Freezer prove defective within one year from the date of purchase, return the defective part or unit, freight prepaid (within two months of purchase; after two months to one year, customer will be responsiblefor freight cost to Whynter’s service department), along with an explanation of the claim to Whynter LLC. A return authorization number issued by Whynter is required for all warranty claims and returns. Please package your Whynter Portable Freezer carefully in its original packaging material to avoid damage in transit. The original box and packaging material should be retained, as Whynter is not responsible for the cost of replacement packaging. Under this warranty, Whynter will repair or replace any parts found defective at our discretion. Thiswarranty is not transferable. After the expiration of the warranty, the cost of labor and parts will be the responsibility of the original owner of the unit.
THIS WARRANTY DOES NOT COVER:
- Acts of God, such as fire, flood, hurricanes, earthquakes and tornadoes.
- Improper power supply such as power surge, low voltage, defective household wiring or inadequate fuses.
- Use in commercial or industrial applications
- Damage, accidental or otherwise, to the Whynter Portable Freezer while in the possession of a consumer not caused by a defect in material or workmanship;
- Damage caused by consumer misuse, tampering, or failure to follow the care and special handling provisions in the instructions.
- Damage to the finish of the case, or other appearance parts caused by wear.
- Damage caused by repairs or alterations to the product by anyone other than authorized by the manufacturer.
- Removal, Replacement Packaging, Freight and Insurance cost for the warranty service.
DISCLAIMER OF IMPLIED WARRANTIES; LIMITATION OF REMEDIES CUSTOMER’S SOLE AND EXCLUSIVE REMEDY UNDER THIS LIMITED WARRANTY SHALL BE PRODUCT REPAIR OR REPLACEMENT AS PROVIDED HEREIN. CLAIMS BASED ON IMPLIED WARRANTIES, INCLUDING WARRANTIES OF MERCHANTABILITY OR FITNESS FOR A PARTICULAR PURPOSE, ARE LIMITED TO ONE YEAR OR THE SHORTEST PERIOD ALLOWED BY LAW, BUT NOT LESS THAN ONE YEAR. WHYNTER SHALL NOT BE LIABLE FOR CONSEQUENTIAL OR INCIDENTAL DAMAGES SUCH AS PROPERTY DAMAGE AND INCIDENTAL EXPENSES RESULTING FROM ANY BREACH OF THIS WRITTEN LIMITED WARRANTY OR ANY IMPLIED WARRANTY. SOME STATES AND PROVINCES DO NOT AL-LOW THE EXCLUSION OR LIMITATION OF INCIDENTAL OR CONSEQUENTIAL DAMAGES, OR LIMITATIONS ON THE DURATION OF IMPLIED WARRANTIES, SO THESE LIMITATIONS OR EXCLUSIONS MAY NOT APPLY TO YOU. THIS WRIT-TEN WARRANTY GIVES YOU SPECIFIC LEGAL RIGHTS. YOU MAY ALSO HAVE OTHER RIGHTS THAT VARY FROM STATE TO STATE.
Please retain the original proof of purchase in order to obtain warranty services. Warranty begins from the original date of purchase.
To obtain service or information, contactWhynter LLC via email at or call 866-WHYNTER.
Product contents and specifications may change without notice.Copyright © 2019 Whynter LLCWWW.WHYNTER.COM
References
[xyz-ips snippet=”download-snippet”]