
Wickes Engineered Wood Worktops
Special note: Belfast sink and under-mount sink installation is not possible with engineered wood worktops
Thank you for purchasing the engineered wood worktops. The worktops are pre oiled in the factory with Woca White Worktop Oil ensuring maximum protection against moisture. It is important that on installation all the worktop’s wooden elements (including any raw cut edges of the overlay) are treated with the Woca Worktop Oil, to ensure it is protected from moisture. It is recommended that ongoing simple maintenance is carried out as per section „Care & Maintenance” of these instructions. Ensure that you read, understand and follow the instructions carefully.
BEFORE YOU START
- Check the worktop and make sure you are completely happy with its finish and quality prior to fitting – Once cut and fitted its assumed the product was perfect.
- Make sure you have the correct tools to hand for the job before starting.
- Please remember worktops are very heavy and lifting them should not be attempted alone, worktops should always be handled by at least two people.
- Check that all pieces to be installed are correct.
- Inspect all edges for any imperfections and other obvious defects prior to cutting.
- Any alteration work is best done outside, as cutting and sanding creates dust. One of the main onsite considerations is to reduce the amount of dust.
- Use polythene sheeting and dust covers to protect all areas where appropriate.
- Clearance should always be allowed between all worktop edges and walls (see cutting your worktop to length).
- Always ensure a sturdy work bench is available before commencing cutting.
- Please ensure the worktops are acclimatised 24 hours prior installation in the room that it is to be installed in. Please leave the worktops in the packaging while acclimatisation is happening.
- Do not open the worktops until you are ready to start installation.
- Apply 1 light coat of Woca White Worktop Oil during installation on the surface, underside and all edges.
ENGINEERED Wood Worktop Installation
We hope that your wood worktop provides you with many years of trouble free service. Being a natural material, wood is subject to variation in colour, texture, graining, pattern and knots. Wood also has characteristics which are not found in man-made worktops, such as shakes in the surface, these are accepted as being normal features and are generally not detrimental to the performance of the worktop.
Changes in humidity will cause natural expansion and contraction of the worktop, so a wood worktop must never be “trapped” between two walls without a gap to allow for the natural movement of the worktop.
Solid wood surface wear layer is produced using staves of kiln dried timber that are butt jointed and glued together along their width. Wood is a natural, living product and just as no two sets of fingerprints are alike, the same can be said of variations in wood graining and colouring, no two lengths of wood worktop will ever look exactly alike.
It should be noted that the following can occur:
- VARIATIONS IN COLOUR & GRAINING
- POSSIBILITY OF KNOTS
- WOOD WILL DARKEN WITH AGE
- WOOD IS WATER RESISTANT – IT IS NOT WATER PROOF!
- WOOD GRAIN CAN LIFT IF SUBJECTED TO STANDING WATER FOR ANY LENGTH OF TIME
- REMOVE ALL SPILLAGES IMMEDIATELY
Once wood surfaces have been treated with Woca White Worktop Oil a beautiful water repellent surface which will mellow with age is created.
Cutting & Installation
INSTALATION
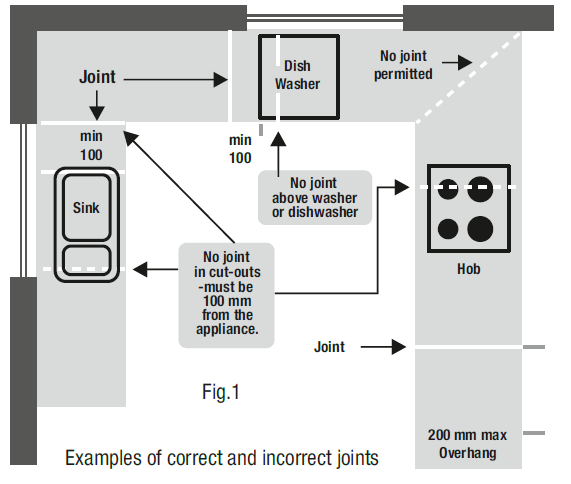
Engineered wood worktops are easy to fit – similar to laminated worktops. Joints can either be square edged, mitred or butt and scribed (using a worktop Jig/ template) with worktop bolts and D4 glue to achieve a virtually invisible joint. Begin planning with a pre-site survey, always ensure that planning starts at the sink. Plan worktops layout to ensure joints don’t fall on or within 100mm of appliances. Worktop overhang must not exceed 200mm. Mitre joints and square edge joints can be used with worktop using worktop jig / template as per the instructions supplied to join engineered wood worktops. Wherever possible joints in worktops should fall on a carcass end and not in the middle to give added support to the joint. (Fig.1)
Each worktop requires an expansion clearance of 3mm around the perimeter of the worktop in-between walls and any tall units.Plan the layout and orientation of the worktops suited to the location of the sink and appliances – always cut the worktops to ensure that a factory finished short edge is always shown.For a square edge joint cut the worktop blank to size plus a 20mm allowance for the overhang of the carcass with the exposed factory finished edge. For routed “J” joints always ensure the factory finished edges are always shown on the end and a router allowance of 120mm for the male j joint and 35mm for the female joint plus if required a 20mm overhang allowance for the exposed short end.
Standard cut method for square edge and the worktop bolt recessesAs per the instructions supplied with the worktop router template / jig please use the template / jig supplied for the correct location and position the worktop bolt recesses. The square edge joint means that both joined edges are factory finished which do not need any further oiling at the worktop joints and are securely joined together with 3 worktop bolts and 4 bolts for wider breakfast bars.
Butt and scribing the joint with routerWhen you are Butt and scribing the joint with router please use 3 worktop bolts for worktops and 4 worktop bolts for wider breakfast bars as per the instructions supplied with the worktop template / jig. As the factory long edges are broken when routed when you create the male and female “J “ joint – always take extra care to ensure full protection of the exposed raw cut 3mm edge of the overlay by oiling the exposed 3mm raw cut edge applying the white worktop oil. To help you further to understand what is required for a successful routed butt and scribe “J” joint please see a video on how it is done on the link below. With either type of joint it is necessary to apply a bead of elasticised silicone / wood adhesive inbetween the 2 worktops that are being fixed together and held in place with the worktop bolts. This provides an additional layer of protection at the joint.
FIXING
It is necessary to leave a 3mm gap between the edge of the work surface and the wall, which will allow it to expand and contract within the humidity of the kitchen.
OILING DURING INSTALLATION.The wood surfaces and edges are pre oiled in the factory but also need a final light coat of Woca White Worktop Oil on installationfor full protection. All cut outs for hobs and inset sinks – apply the worktop oil to the exposed raw 3mm wood overlay around the cut out and also approx. 12mm wide around the top surface around sink cut out for extra protection.
Installation oiling of the top surface – once the worktop is installed and secured on the carcass – apply a light coat of Woca White Worktop Oil across the top surface and buff in evenly with a white Scotch Brite type pad to ensure all the surface is protected. Take extra care to oil the long front edge and the two short edges including the overlay joints and complete the procedure with further buffing in with a cotton cloth to remove all excess oil and to avoid an uneven appearance.
SINK CUT-OUTS
Cut outs for sinks etc should be no closer than 100mm from the end of the worktop as this would seriously weaken the worktop. A minimum 100mm between cut-outs should be supported underneath with a rail. When a sink cut-out is complete, exposed top layer wood needs re-sealing, apply worktop Oil by cotton cloth and work into grain. Always protect raw cut edges of the overlay and exposed chipboard with silicone.
TAP INSTALLATION
Holes should be drilled through the centre of the wood stave. Ensure that the hole is a min 3mm larger than the pipe diameter. Always oil the exposed top layer wood of the internal hole. Finally seal the tap and hole with an elasticised sealant.
HOB CUT-OUTSWhen a worktop is fitted near to a constant heat source i.e. an AGA or freestanding cooker, allow a minimum gap of 10mm protect with laminate matching edging contact glued to exposed ends.
INSULATION
If a dishwasher, boiler, washing machine, under counter fridge / freezer or cooker is to be installed under the worktop, adhere a piece of foil to the underside of the worktop (Fig. 2), with the foil face outward. This will protectthe worktop from any intense heat or moisture. Use the same procedure when you are fixing onto exposed brickwork, pipework or fitting over a radiator or other heat sources. A grill will be needed when a radiator is fully concealed within a unit to allow air flow. 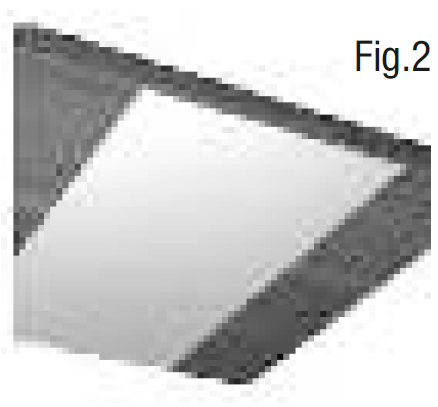
FIXING BRACKETS
Fixing of Worktop to the carcass Engineered worktops are stable and can be fixed to the carcass by either screwing with chipboard screws approx. 10mm into the worktop through solid top carcass or with traditional plastic Fixing blocks as per images. ( Fig.3, Fig.4 )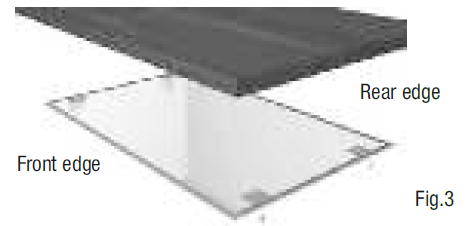
Method 1 – Screwing through a solid top carcass – drill two pilot holes 1 mm larger than the chipboard screws through both the front and back of all the carcasses.Method 2 – When attaching to an open top carcass position two “fix it blocks” as per image on the back of the carcass and two on the front /side using chipboard screws that penetrate the chipboard underside by approx. 10mm
APPLIANCESWhere 2 appliances are situated side by side, the span must be supported either by a mid panel or a solid timber front rail that is at least 40mm thick.
EXPOSED RAW CUT CHIPBOARD EDGES PROTECTIONExposed raw cut edges can be covered with the matching pre glued hot ironed on edging tape supplied with the worktop and than treated with Woca White Worktop Oil.
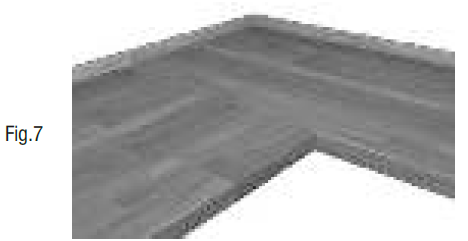
JOINTSEngineered worktops can be joined together either with a square edge or a butt and scribed “J” joint using the worktop template / jig see image Fig.5 – for routing out the bolt holes and the “J” joint.

- Square edge joint – using 3 worktop bolts for worktops and 4 for the wider breakfast bars with the bolt holes routed out using the worktop template/jig and at the face to face joint for extra strength and protection against moisture ingress also use a D4 water resistant wood glue.
- Butt and scribed “J” joint routed created with the worktop template / jig and the router. After routing the “J” section which will expose the raw cut “male” and “female” joints which needs protection before joining together with the worktop bolts – it is essential to apply the white worktop oil to the raw cut 3mm edges of the overlay at the joint and also apply the silicone to the exposed raw chipboard before tightening.
Remember that the operation of tightening the and securing the joints must be done within a 20 minute time window because the wood glue will start to go off.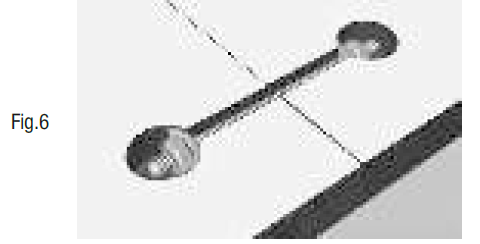

TOOLS
- “Woca White Worktop Oil”.
- “Worktop Mitre / jig for worktop bolt routing or “J” joint + Bolt routing.”
- “1850w router fitted with guide bush.”
- “Electric saw”
- “Accurate straight edges”
- “Set of quick action clamps”
- “Power drill with bits and screws”
- “Cordless screwdriver”
- “Hammer”
- “Hand saw”
- “Silicone gun”
- “1200mm level”
- “ 3 worktop jointing bolts per joint”
- “D4 wood glue for joints”
- “Sandpaper 120 grit and 400 grit”
- 2 x 600mm self-adhesive foil sheets (Moisture & heat protection)
SAFETY EQUIPMENT
- Ear defenders
- Safety glasses
- Dust masks
- Protective gloves
AFTER INSTALLATION IS COMPLETE:
The pre-oiled work surface is sealed at the factory. Woca White Worktop Oil is applied on top, underside, long and short edges. During installation all raw cut overlay edges are oiled a minimum of 3 times. On completion of the installation a final light coat of oil needs to be applied.
POLISHING & OILING
After installation apply the Woca White Worktop Oil to the top, underside, long and short edges. Woca White Worktop oil is a strong and water resistant oil suitable for the final coat after installation and the ongoing maintenance of previously treated oiled surfaces. Protect all raw cut edges with silicone.
HOW TO DO – WORKTOP OIL
- Apply the oil evenly with a brush or cotton cloth across all the surfaces – paying particular attention to the Overlay joints on the long and short edges and buff in evenly with a white buffing pad using circular movements on the top surface, the long and short edges – continue polishing until the wood appears saturated and the surface looks uniform.
- Wipe off the excess oil with a lint-free cloth – there should not be any excess oil on the surface after final polishing.
- Leave the surface to dry for 4-6 hours hereafter it may be cautiously be taken into service – If possible do not expose the treated surface to water during the first 2-3 days.
HOT PANS ETC.All hot pots and pans should be placed on a heat resistant trivet /surface. Contact with the wooden work surface may result in permanent damage.
CAST IRON PANSWet cast iron pans can react with some timber and affect the tannings, leaving black marks. Avoid contact at all times.
HANDLING HEALTH AND SAFETY
HANDLING DO’s & DON’Ts
- DO take note of the weight marked on each product before lifting.
- DO use two people to carry out an installation.
- DO ALWAYS CARRY ON EDGE, ALL WORKTOPS SHOULD BE LIFTED & HANDLED BY AT LEAST 2 PEOPLE.
- DO inspect the route you will carry worktops along and ensure the route you are taking is free from obstacles.
- DO ensure that the surface where the worktop is to be placed is flat and free of any dirt or debris.
- DO NOT CARRY THE MATERIAL FLAT, CARRY IT ON ITS EDGE! Wear heavyduty gloves, and if appropriate, use lifting straps.
SITE DO’s & DON’Ts
- DO ensure that wood worktops are clean and free of dust, dirt etc.
- DO keep work area clean and tidy.
- DO work outside on worktops wherever possible, to limit amount of dust inside building.
- DO seal doorways of adjoining rooms when working indoors.
- DO screen off the cutting area with plastic sheeting.
- DO NOT breathe sawdust. Use dust extraction equipment and wear a dust respirator.
Handling, Health & Safety CARE & MAINTENANCE
For the first year you should lightly treat the top and accessible edges of the worktop with Woca White Worktop Oil every two/three months or when the surface starts to look dry. When placing hot pots or pans on the worktop a heat protective mat or coaster should be used. In general use the worktop should be kept clean by wiping over with a water dampened cloth. Don’t use abrasive cleaners.
USING WORK SURFACE FOR THE FIRST TIMEFor daily cleaning we recommend a solution of warm water and a drop of washing up liquid, soak a cloth in the solution, wring out and wipe the work surface down.
- Don’t use concentrated soap/detergent.
- Don’t allow surplus water from wet cloths, cups, plates, vases etc. to remain on the worksurface.
- If polishing is necessary,
HEATRather than cause accidental heat damage, it is much better to prevent such damage in the first place:
- Always use a heat protection pad or trivet (with rubber feet) for hot cookware, or leave cookware to cool on the hob first.
- Don’t put hot pans, particularly CAST IRON, directly onto your timber worksurface. Such heat can damage any surface!
HOB AND GRILL COOKING METHODS
Modern appliances reach higher temperatures more quickly, often holding heat for longer. To avoid worksurface damage, follow both the appliance manufacturers instructions and these rules:
- Always use the correct size of pan for the burner, placed centrally. An overhanging pan can scorch surrounding surfaces. Don’t use two burners as one (e.g. for a large griddle), it has the same effect.
- To reduce heat, turn the burner down instead of pulling the utensil partially off the heat source.
SCRATCHES
Don’t cut or chop on a timber worksurface – it will score the surface! Always use a chopping board. Minor scratches and marks can be treated by applying a fresh coat of oil and lightly polishing the surface while wet with a white pad or fine grit sandpaper (180 grit +). Deeper scratches can be repaired by sanding out using a 100 grit sandpaper, then apply 2 coats of oil as per oil instructions. On the 3rd coat of oil use either a white polishing pad or 180 grit sandpaper while the surface is wet and lightly polish along the grain paying attention not to apply excess pressure that will remove the white colour. Leave 30 minutes and buff excess with a cotton cloth.
HEALTH & SAFETY DO’s & DON’Ts
- DO ensure adequate ventilation to enable dust to escape when working indoors.
- DO wear a dust mask when sanding or cutting.
- DO wear ear defenders when working with tools and machinery.
- DO always work to the highest standards of safety.
- DO use the correct tool for the job.
- DO check tools are in good condition before use.
- DO secure work. Use clamps to hold down work piece when practical.
- DO wear safety spectacles when cutting or grinding.
- DO use recommended accessories.
- DO keep children and visitors away from the work area.
- DO NOT use standard tools, use specialist tools as described in the Tools Required section.
- DO NOT force tools.
Disposal of Oiling cloths
- There is a risk that oiling cloths can self ignite (when oxidising)! After use, immerse the cloths in water and then place the soaking wet cloths in a sealed plastic bag in the outside refuse bin. This will avoid the risk of possible self ignition.

[xyz-ips snippet=”download-snippet”]