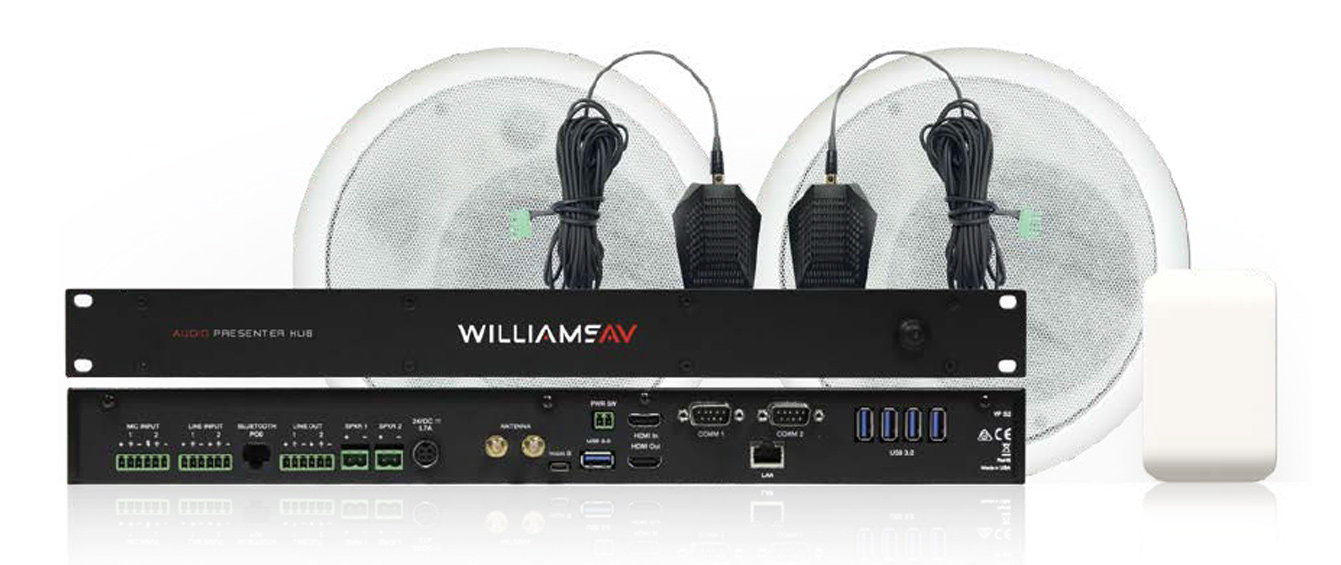
Presenter Hub
VP S1
![]()
QUICK START GUIDE
General Installation
Connecting the Video Source and Outputs
A video source provides the Presenter HUB a video image. The Presenter HUB incorporates any annotations, then outputs the combined annotations and video image to a display. Examples of video sources include DVD players, computers, cameras, and television sets. Outputs can be to projectors, monitors or other display devices. In the Presenter HUB, the source can be from HDMI or USB.
HDMI Connectors
To connect HDMI video:
1. HDMI Input into Presenter HUB: Using HDMI video cable, connect the Presenter HUB’s HDMI In on the back panel to HDMI out on a HDMI video source.
2. HDMI Output from Presenter HUB: Using HDMI video cable, connect the Presenter HUB’s HDMI Out to HDMI In on a HDMI video source.
USB Connectors
Connect the device to one of the USB ports on the back of the Presenter HUB. The system supports up to 5 USB 3.0 devices, and can support more with a hub.
Connecting Physical Controllers
IMPORTANT: Be sure to power down the Presenter HUB before connecting or disconnecting any controllers. The Presenter HUB will automatically detect installed controllers once powered on. If you change controllers or add a new controller, you need to power down, install the new controller(s), then power the device on.
Connecting a Keyboard, Tablet or other USB Devices
Connect the device(s) to any USB port on the Presenter HUB. The system supports up to 5 USB 3.0 devices.
Connecting the Phoenix-style Connector for Power
Connect the wires from your remote power controller (or other device) to the Presenter HUB’s Phoenix-style connector (green connector labeled PWR SW). When the power control relay is enabled, the Presenter HUB will power on or off, as a toggle.
Connecting a Mouse Device via USB
Connect the mouse device to a USB port on the back of the Presenter HUB.
Connecting Touch Screens and Whiteboards
The Presenter HUB is compatible with many types of touch screens. Install the HID touch screen to the monitor as directed by your touch screen manufacturer.
Remote Control from Browser
To connect to the Presenter HUB from a browser, enter the IP Address of the Presenter HUB into the browser.
The IP address of the Presenter HUB can be found in the System Information. The Presenter HUB must be connected to a network for this to work.
See For Additional Information for more instructions, and for information on how to download the control app for phones and tablets.
Power On
NOTE: In order for the Presenter HUB to properly sync with the video signals, the sources should be turned on first.
To power on the Presenter HUB:
- Plug the power cord into the back of the Presenter HUB and then into any grounded outlet.
- Plug the power cords from any video source(s), controller(s), and display(s) into any grounded outlet.
- Turn on each of the connected units, and then press the power button on the front panel of the Presenter HUB.
After a moment, the Presenter HUB splash screen will appear, followed by the initializing of the ports, and ending with a copyright message.
Basic Configuration
The main menu is a large, hidden main menu system mostly used for setup and configuration.
Use a keyboard to access this menu for initial configuration. This menu will need to be accessed to get your device connected to the network.
Keyboard:Press Setup Menu (Print Screen) key.
Touch Screen (or Whiteboard): Tap the upper center function area.
Keyboard: Use arrow to move to your selection and press the Enter key.
Touch Screen (or Whiteboard): Tap the screen over the option you want to select.
Network Setup
- Activate the menu system. The Main Menu appears.
- Select the Network option. The Network Menu appears.
- Select Network Setup. The Network Setup menu appears. This dialog prepares the Presenter for communicating on your network.
- Select DHCP or STATIC. Consult with your IT administrator if you need help with these entries.
- If DHCP is selected, IP Address, Netmask, Gateway and Nameserver are assigned automatically.
- If STATIC is selected, you must make entries for IP Address, Netmask, Gateway and Nameserver.
5. Enter the hostname, if desired. The hostname must be one word with no spaces.
6. Select Apply Settings to finish the network configuration.
7. Exit the menu system.
Selecting Video and Audio Sources
Video Source Selection:
- Activate the main menu.
- Select Display. The Display menu appears.
- Select Video Source. The video source menu appears.
- Select from HDMI, USB, Streaming, or chalkboard.
- If streaming, enter any additional stream information.
- Select the video source you wish to use, and exit the menu system.
Audio Source Selection:
- Activate the menu system. The main menu appears.
- Select Audio. The Audio menu appears.
- Select Audio Input.
- Choose the source of audio input. You may choose from a video source, or a specific secondary input
- Exit the menu system.
Audio Output Selection:
- Activate the menu system. The main menu appears.
- Select Audio. The Audio menu appears.
- Select Audio Output.
- Choose the location for audio output. You may chose from HDMI or USB source.
- If needed, select Volume to adjust the output volume.
- Exit the menu system.
Calibrating Touch Screen Controllers
Calibration ensures an intuitive and precise feel to drawing and marking over the particular monitor you are using.
Calibrations are automatically saved for each video port. If you move a touch screen to a different port, run the calibration again. If you have a touch screen display with multiple video inputs, you should calibrate the touch screen for each input.
All calibrations are stored in battery backed-up memory. The most recent calibration will be recalled any time power is cycled off and on.
- Activate the menu system. The Main Menu appears.
- Select Devices. The Devices menu appears
- Select Calibration. The Calibration Menu appears.
- In the Calibration Menu, select the controller you want to calibrate. The calibration screen for the selected controller appears.
- Follow the calibration instructions displayed on-screen. As you touch the target, it will disappear and the next target will appear. Repeat until all 12 targets have been calibrated. After you perform final calibration procedures, the Calibration dialog automatically disappears, and you return to the menu system.
- Exit the menu system. Repeat this process for each video input on your touch screen display.
For Additional Information
This manual is a quick start guide for getting your Presenter HUB up-and-running. It covers basic cable connection and setup. Most features and customization options are not documented in this manual.
For additional information, feature instructions, commands, app access, warranty information and more, please download the full user manual from the Presenter HUB product page on Williams AV’s website.
Williams AV VP S1 Presenter Hub User Manual – Williams AV VP S1 Presenter Hub User Manual –
[xyz-ips snippet=”download-snippet”]