
FM + FM T55 Assistive Listening System
FM +  FM T55
Wi-Fi Network May Be Required
If Wi-Fi audio is desired, the FM + connects to the installation location’s Wi-Fi Network. It does not provide a network on its own. The Wi-Fi network will need to be installed and established before the FM + can be used.
You may connect the device to a computer via a hardwired connection to help troubleshoot any networking problems. A Wi-Fi network is not required for broadcasting audio over FM.
Installation Procedures
- Position the FM + transmitter near the sound system or mixer from which it will receive audio. We do not recommend wall or ceiling mounting, or putting the device on a cart.
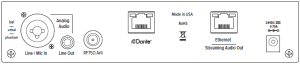
- Connect the power supply to the Power Supply connector located on the back of the FM +. Press in the power button on the front of the FM +. The power button should light up. If not, go back and check the power connections.
- Choose and configure the audio source. The audio source must be configured in the menu before plugging the source into the jack (except Dante Audio – skip to step 9). Push the Menu button and push the > button once to display AUDIO SOURCE on the screen. Push the > button to access the audio sources. Using the ^ or v menu buttons, choose between ANALOG LINE IN, MIC, PHANTOM MIC +12V, 400 Hz Test Tone, or DANTE. When the desired audio source is displayed, press the right arrow (>) to apply the setting. Press the Menu button to exit the menu.
- Push the power button to turn the unit off.
- Connect the audio source to the audio input jack on the rear of the FM +.
- Push the power button to turn the unit on.
- With the audio source playing, adjust the Audio Level on the FM + so that the green 0 dB LED generally lights and the red +9 dB LED lights occasionally. To do this, use the Hot Buttons while on the main info screen. Press the ^ button to increase the audio level in 1.0 dB steps, or press the v button to decrease the audio level in 1.0 dB steps.
- Select an Audio Preset. The FM + has three pre-configured Audio Presets to choose from: Hearing Assist, Music, and Voice. A Custom preset is also available. The performance of the FM + is optimized for each of the pre-configured Audio Presets. Using the menu and control buttons on the front of the FM +, push the Menu button, the display will change to show Audio Settings. Use the forward > button to display Audio Source in the selection box. Push the down v button to show Audio Presets. Now press the right arrow > button to display the list of Presets. Use the ^ and v buttons to alternate between Hearing Assist, Music, Voice and Custom selections. When the desired Audio Preset is displayed, press the right arrow (>) to apply the setting. If Custom is desired, push the right arrow > button to enter the custom settings. Press the Menu button to exit the menu.
- (FM + D only) Connect a CAT 5e Ethernet cable from the Dante network to the connector labelled Dante on the transmitter. (Note: Dante IP Address and other settings are configured externally through Dante Controller; there are no settings in the transmitter for Dante, other than choosing Dante as the input source).
- If Dante audio is being used, the Dante source must be connected, must be playing audio, and the Dante Controller must be used to route audio from the Dante source to the FM +.
- Install an appropriate antenna for your system configuration. For a full list of antenna options, please go to our website www.williamsav.com. See the 72 MHz Antenna Selection Guide on the Williams AV website for further installation advice.
12. Set the Transmitter Channel. The FM + is shipped from the factory with the channel/frequency set to Ch.1 (72.1 MHz). To change the channel/frequency, while on the main info screen, use the buttons < and > to change channels.13. To test Wi-Fi Audio, use a personal device with the WaveCAST App installed to listen to the audio and test that device is working and sounds correct over Wi-Fi.14. To test FM Audio, listen with an FMreceiver. Walk around the listening area. The signal should be clear and quite loud when the volume is turned up.
To adjust any settings via a web browser:
- Connect a CAT 5e Ethernet cable from your local area network, or Wi-Fi router to the connector on the transmitter labelled Ethernet. This network will be used to broadcast the audio.
- Open a web browser on a computer or mobile device that is also connected to the same local network as the FM +.
- In the address bar of the browser, type in the IP address that is shown on the front of the transmitter’s main info screen, and push the enter key on the keyboard. (Note: it is not necessary to type “http://” or “www.” preceding the IP address.)
- The browser will open the transmitter’s web page, displaying a Login button. Click the log-in button and enter the user name “admin” and the default password “admin”.
- The web browser will now show the transmitter’s Home Page, which shows the current FM + status info. The tabs at the top navigate to different pages that allow adjustment of the transmitter’s settings.
WaveCAST App with FM +
The WaveCAST app, which is used for both FM + and WaveCAST systems, allows listeners to hear the audio on their personal, Wi-Fi connected devices, such as a mobile phone. The WaveCAST App can be downloaded from Google Play for Android devices or the Apple App Store for IOS devices.
The app will only detect audio sent over Wi-Fi, not any FM broadcasts.
Connecting the App to the ChannelWhen the app is opened for the first time, a list of channels will be available. Tap on the channel to hear it’s audio.
If a list of channels does not appear, check that the personal device has Wi-Fi enabled and is connected to the same WiFi network as the FM +. If the phone settings seem correct, troubleshoot the network connection of the FM + itself.
Listening via the App
Once connected to the channel, the audio should start playing automatically. The volume of the audio can be adjusted using the slider in the middle of the screen, or the physical buttons on your device.To mute the audio, tap the speaker icon. Tap it again to unmute the audio.To switch channels, tap the menu icon on the bottom of the screen to display the list of channels again.
For Additional Information
This manual is a quick start guide for getting your FM + system up-and-running. Most features and customization options are not documented in this manual.For additional information, feature instructions, commands, warranty information and more, please download the full user manual from the FM + system’s product page on Williams AV’s website.
/ www.williamsav.com800-843-3544 / INTL: +1-952-943-2252© 2019, Williams AV, LLC MAN 246B
References
[xyz-ips snippet=”download-snippet”]