
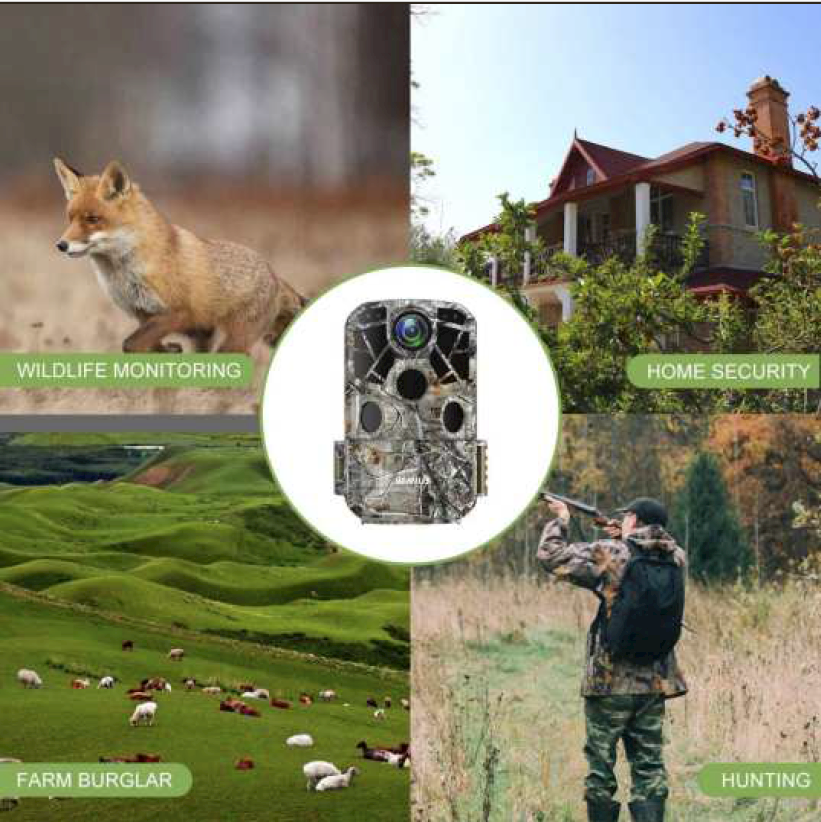
Wimius H8 Trail Camera
Your package should include:
- Trail Camera*1
- Metal bracket *1
- Mounting belt*1
- USB cable*1
- AV cable*1
- Long screw of metal bracket *3
- Plastic expansion tube *3
- instruction manual*1
Any problem, please feel free to contact us Email: [email protected] We look forward to serving for you
NOTE:
- Battery: Please install 8pcs 1.5V AA batteries before use, or use an external power supply (6V/2A, 3.5MM)
- SD card: 32GB SD/SDHC Card is recommended
- APP: Please install APP (Hunting Cam Pro) on your phone, not “Hunting Camera Pro”,
For Android smart phones, please search for “Hunting Cam Pro” on Google Play to download and install.For IOS smart phones, please search for “Hunting Cam Pro” in the Apple Store and install to use.
If you don’t want to use the wifi function, you don’t need to download the APP, then it will be a regular trail camera4. The battery box is specially designed to prevent the battery box from being bounced to the ground after pressing the “Battery box button” button. You can pull it out with a little force
How to use
- Install the battery and SD/SDHC card
- Set the switch to the “SETUP” button, and then press “MODE” continuously to the setting interface to adjust the settings you need
- After adjustment, turn the switch to the “ON” button, the camera will turn off the screen after 5 seconds, and start to work to capture the animals passing by in front of the lens. The screen will always go off during normal work(ON), If you want to exit, you can turn the switch to “OFF” or “SETUP” ,and other key is invalid
How to view the file
- View on the camera: turn on the switch to “SETUP”, press “MODE” continuously to find the file playback page, use “UP” or “Down” to switch to view pictures or videos
- Use the attached video cable/AV cable to view:① Connect the camera to the TV through the 3.5mm AV cable② Turn on the camera, and slide the operating mode selector to “SETUP”.③ After connecting, the camera enters the mode of playback and the LCD turns off.The camera recordings would be shown on the TV
- Use USB cable to view:Connect the camera to the computer through a USB cable. Once you have a successful connection, a new driver named mass storage would appear on the computer. Photos and videos can be found in “DCIM/100-MEDIA” in the mass storage and can be copied to the computer.Note: please don’t disconnect the cable or take out the memory card when copying photos/videos.
- View on APP (Hunting Cam Pro)
- Use SD card reader to view (not included)
How to enter the settings page?
After installing the power supply and SD card, please turn the switch to “SETUP”, You will enter the Video Interface, you can press the “OK” button to test the resolution, or press the “MODE” key continuously, You will see in turn
- “Photo interface”-you can press the “OK” button to test the resolution, or press the “MODE” button to agin into “File View” to view your pic/video
- “File View”-used to browse the recorded files by “up” or “down” on the camera
- “Settings page” Here you can use the “up”, “down”, and “OK” buttons to adjust the camera settings, press “MODE” to exit(Then turn the switch to “ON”, the screen will go off after 5 seconds, and you will enter the working mode, the camera will capture the animal pictures or videos passing by the lens, if you want to exit the normal working mode, please switch to “SETUP” or “OFF”)
Setting page details
- [Mode] –-select “photo” or “Video” or “Photo+Video”, which means the camera is in the “ON” state of recording mode
- [Image size]– select the photo resolution
- [Picture No]– can select the number of pictures taken at a time, press “OK” to confirm (camera zai)
- [Resolution] —select the resolution of the video and press “OK” to confirm
- [Video Length] — select the video recording time
- [PIR Interval]– selects the interval activation time of the sensor. The interval time you set means the time required for the sensor to start the detection function for the second time. During this interval, the sensor will not work, so your camera will not Record videos or pictures during this process (Note: reasonable settings can avoid recording many pictures or videos in the same event, reducing the memory from being filled up too quickly), “OK”button to enter, “UP” or “Down” to adjust the value, “OK” button to switch min or sec, “MODE” button to exit to the setting page
- [PIR Sensitivity]– Under normal circumstances, select “Medium”, for indoor environments and areas with less interference, please select “High”, for environments where more interference may cause a lot of memory, please select “Low”
- [IR LED]–under normal circumstances, please select “Auto”; if you want to get a clearer picture at night, please select “Super Fine”, but this means faster power consumption
- [Monitoring Period]– turn on “ON”, you can set the start time and end time of timing recording, so that the camera can only work within the set time each day. If you want to capture videos or pictures of wild animals only at night, you can only Need to set the time to night time, press “MODE” key to exit
- [Record Audio]– select whether to record audio
- [Date/Time]– sets the date and time, and sets the time and date according to the current time zone. Press the up/down keys to select the number. Press “OK” to change the value, press “MODE” to exit after finishing the setting
- [Time Format]– select 12H or 24H time format
- [Date Stamp]– selection switch to determine whether to display the date, time, temperature, etc. on the captured video or picture
- [Temper ature]– can select the temperature unit (℃/℉ ) only after selecting “ON” in the upper level “Date Stamp”
- [Camera Name]– To edit the name of the camera, press OK to enter, press “MODE” to switch positions, press “UP” or “DOWN” to adjust letters, press “OK” to confirm
- [Beep Sound]– Set whether you need key sound, Select on and off to turn on off the beep sound of the machine.
- [Language]– select system language
- [Password Setting]–Select “ON” in “Password Setting” to set a password for your camera, press “MODE” to switch positions, “UP” or “Down” to select a letter or number, press “OK “to exit after setting the 4-digit password; (note: if you forget the password, please enter the super password: 1111)
- [Auto WIFI OFF]– Set the time for the camera to automatically turn off the WIFI Select 1 minute / 2 minutes / 3 minutes. When you finish using app and the phone is disconnected from the camera, the camera automatically exits WIFI mode and returns to ON (monitoring) or SETUP mode
- [Format]– is used to format your memory card
- [Default Setting]– can be used to return to the camera’s initial settings
- [Version]– system version
- [Mcu FW Update]– firmware upgrade, you can contact us to update your system
How to connect using WIFI?
- Download the APP (Hunting Cam Pro) on the mobile phone, not “Hunting Cam Pro”, please do not scan the QR code in the paper manual to download, it is wrong
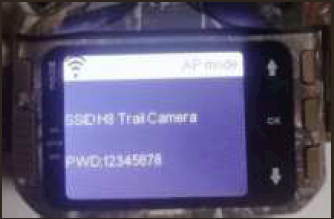
- Turn on the camera’s WIFI in the “SETUP” state (through the strap or long press the “UP” button for 3 seconds)

- Turn on the mobile phone WIFI, connect to the camera’s WIFI (H8 Trail Camera), the initial password is: 12345678When the phone is successfully connected, the camera screen is shown on the left, the indicator light on the top is always on, and it is in the connected state
- Open the mobile APP (Hunting Cam Pro), click “Connect Camera”, you can view the camera’s records in real time, take photos or videos, view files, and adjust camera settings (Note: If you cannot open “Connect Camera”, Please try to turn off the cellular data of your mobile phone and click “Connect Camera” again)
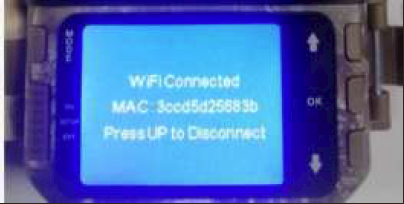 When the phone is successfully connected, the camera screen is shown on the left, the indicator light on the top is always on, and it is in the connected state
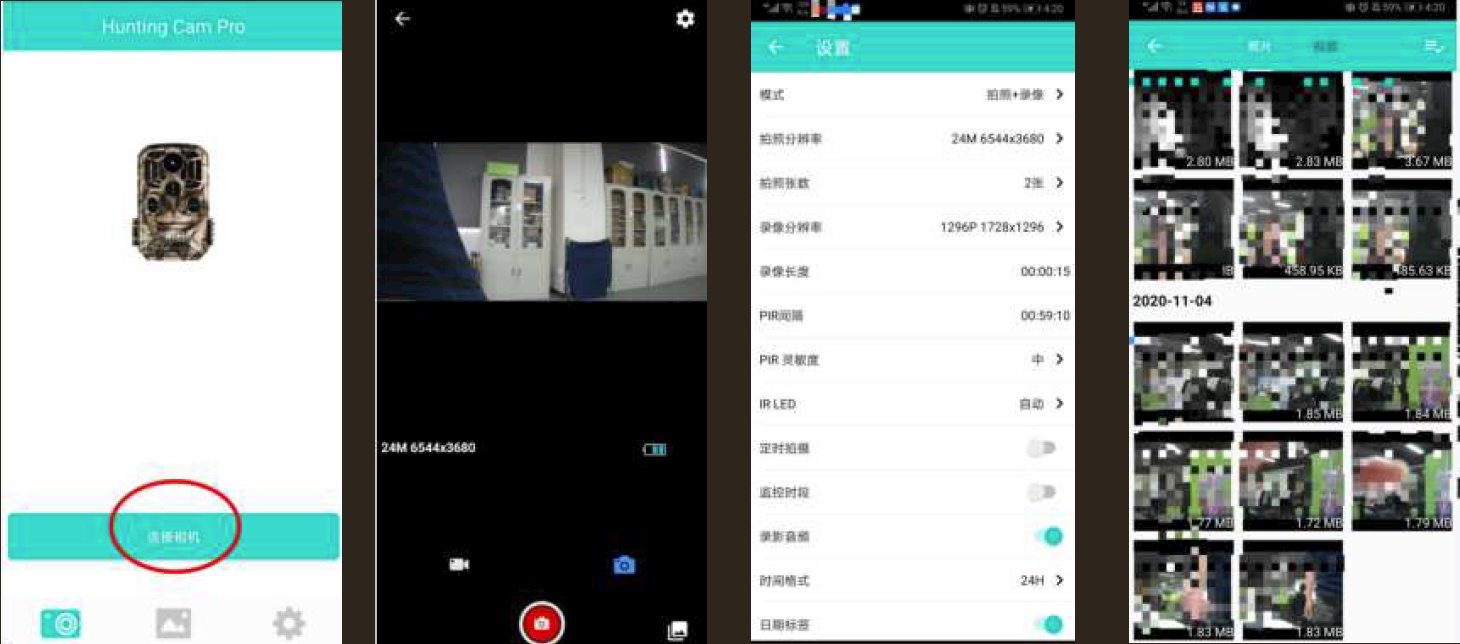
- Click “Connect Camera”
- After the connection is successful
- 1. Click the upper right corner to enter the settings page
- 2. Click the lower right corner to view the files in the memory card
[xyz-ips snippet=”download-snippet”]