WINEGARD® Extreme™ Outdoor Wifi Extender Installation / Operation Manual
RW-2035
For help, email [email protected]or call 1-800-320-9992
Please register your product at http://www.winegard.com/myantenna. We will be able to pass along relevant information, as well as inform you when software updates are available.
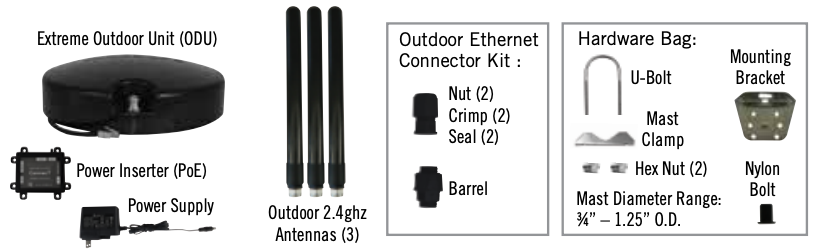
PARTS LIST
Ethernet Cable required, not included (85 ft. maximum)
WARNINGS:
- Read this manual carefully and completely before attempting to assemble, install or operate this product. Winegard® recommends the installation of this equipment be done by a professional technician.
- Save these instructions.
- Do not paint any portion of the Winegard® Extreme™. Painting the system could damage the system and will void the warranty.
- When first setting up the Winegard Extreme it is recommended to check for software updates the first time the system is connected to an internet signal. It is also recommended to check for updates every couple months for fixes and added features.
SPECS
- Dimensions: 10.3” diameter, 12.4” tall, 3.75 lbs.
- Wireless Standard: 802.11a/b/g/n
- Frequency Band: 2.4GHz
- Amplifiers: (3) 2.4GHZ Amplifiers
- Antennas: (3) detachable high gain 5dBi antennas
- Wireless Security: WEP, WPA, WPA2, WPA mixed
- Ports: (1) RJ45 10/100
- Power Rating: Switching, AC Input 100-240v, 1.5A
OUTDOOR INSTALLATION
(Mast Sold Separately)
The RW-2035 antenna may be installed inside or outside on any mast or pole.
DO NOT MOUNT OVER CHIMNEY OPENING.
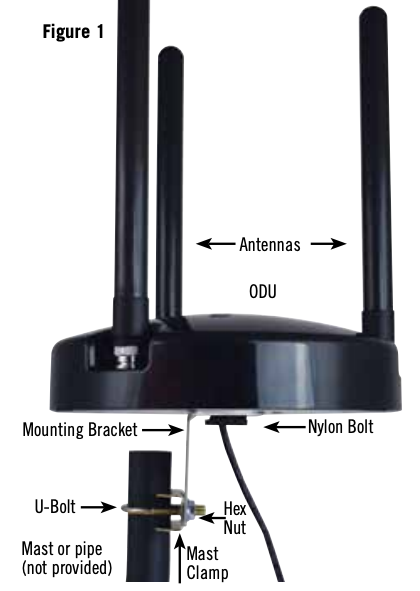
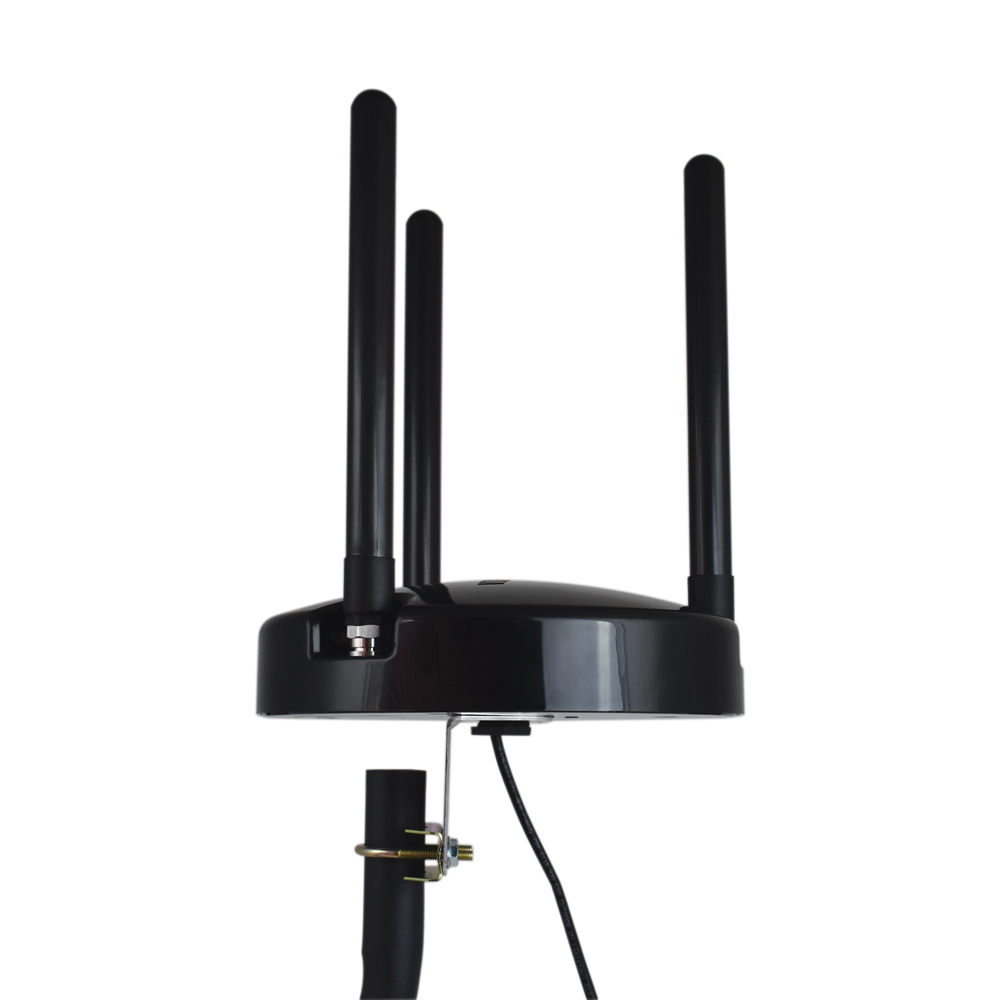
- Remove each antenna from the protective bag and screw it into the correct open port on the outdoor unit (ODU). Figure 1.
- Firmly tighten each antenna by hand. If using a wrench, do not overtighten as the antennas or housing may become damaged. The antennas should be tightened to 20–25 inch pounds of torque.
- Slide the cable from the antenna through the mounting bracket and nylon bolt. Screw the nylon bolt into the hole on the bottom of the antenna until the mounting bracket is firm against the bottom of the antenna. Figure 1.
- Insert “U” bolt through mast clamp and mounting bracket and start hex nuts onto “U” bolt. See Figure 1. Slide mast thru “U” bolt and tighten hex nuts with 7/16” wrench.

- Take each outdoor ethernet connector apart.
- Using a screw driver or similar tool, push through the crimp to force out the rubber seal, set the seal aside for later.
- Slide the end of the ethernet cable from the Extreme unit (ODU) through the nut before sliding the cable through the crimp portion of the nut. Use the slit on the side of the rubber seal to slip the seal onto the cable coming from the Extreme unit. Figure 2. Push the rubber seal back into the crimp.
- Plug the connector into the barrel and make sure that you hear it click. Slide the crimp until you can thread it snugly onto the barrel and screw the nut back onto the crimp and tighten until snug.
- Repeat this process with the ethernet cable (not provided) that runs into the building. This cable should not exceed 85 feet. Figure 2.
INTERIOR INSTALLATION
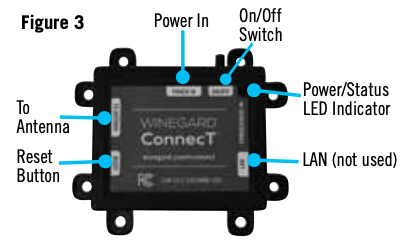
- Determine the location for the PoE and connect the ethernet cable (not provided) from the outdoor antenna to the “To Antenna” connection on the PoE. Ensure the cable is adequately secured to this port. Figure 3.
- Connect the power supply into the “Power IN” port on the PoE. Again, ensure the cable is tightly secured to this port.
- Lastly, there are 8 mounting eyelets on the PoE. We recommend using the remaining mounting screws (4), from the hardware pack, to mount the PoE to the desired location. To ensure eyelets don’t break, do not overtighten screw.
- Turn the power switch to the on position. The LED should light up.
OPERATION
IMPORTANT: DO NOT LOSE THIS MANUAL.It contains your unique factory default SSID and password.
NOTE: Winegard recommends web browsers Microsoft® Edge, Firefox®, and Google Chrome™ Browser.
WiFi Extender
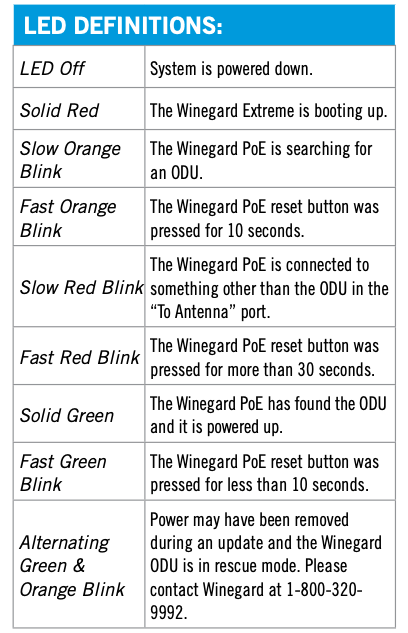
- Confirm the ON button is pressed in on the PoE power supply. The LED should be on and green. Turn on the WiFi enabled device(s) that you want to connect and scan for wireless networks. It may take a few minutes for the network to appear.
- The label located on the front of this manual lists the unique default SSID and password. Select this WiFi signal from the list of wireless networks and connect. Once the correct SSID has been selected, enter the password.It is recommended to set your device(s) to automatically connect with the Winegard® Extreme™.
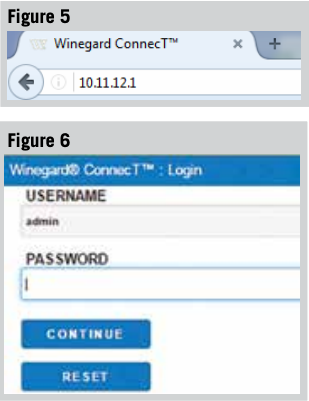
- Once connected, open an internet browser and type 10.11.12.1 into the address bar and press Enter. Figure 5. This will take you to the Admin Login screen. Figure 6. Login using: Username: admin Password: admin. To connect to a WiFi network, go to Step 4.NOTE: The steps below can also be done on the WINEGARD CONNECTED App.
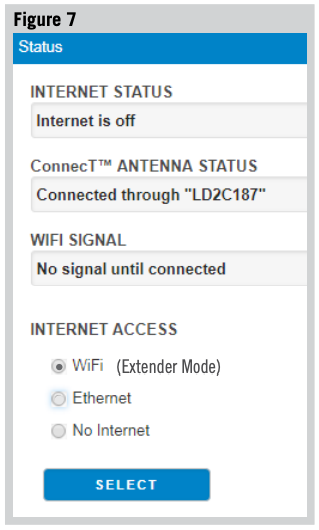
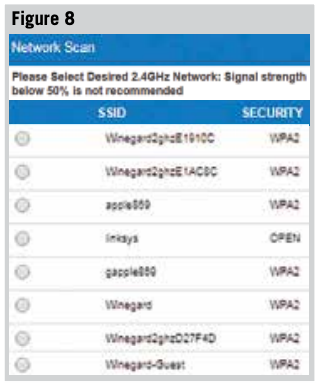
- To connect to a WiFi network, select WiFi and then click on SCAN FOR WiFi. Figure 7. This will bring up a list of all WiFi signals in range (this should take about one minute). The Winegard Extreme will display available networks by signal strength. Select the desired network and click CONTINUE.
- Enter the network password, if prompted. Once the Winegard Extreme connects to the internet, the INTERNET STATUS will show connected (this could take as long as two minutes). You are now ready to use the WiFi.

OPERATING FEATURES
Change (SSID) Network Name
It is recommended that you change the name of your Extreme. This will improve the security of your network and make it easier to find with your WiFi enabled devices.
Change Network Password
To secure your network, it is suggested that you change the network password to something you can remember. The new password must be at least eight characters long. You will need to log in using the new user name and password.
Forget and Saved Networks
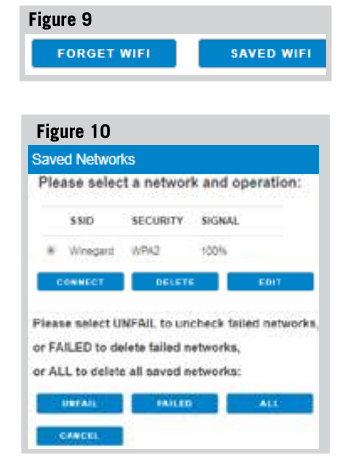
If you want to forget the WiFi network that you are currently on click the FORGET WIFI button. Figure 9.
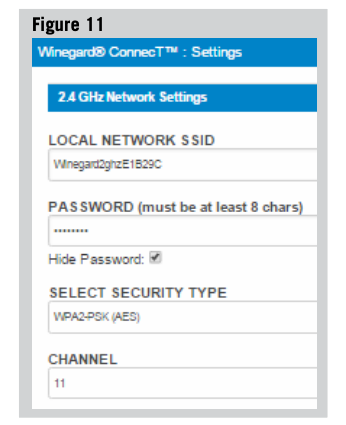
To view the list of saved networks. Click the SAVED WIFI button. On this page you will be able to prioritize your list of saved networks, delete any or all saved networks, and edit any saved network. Figure 10.
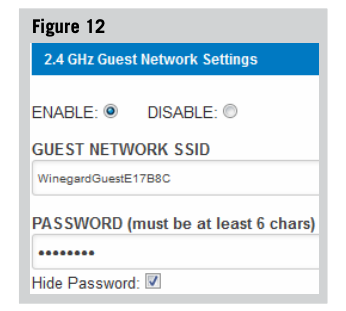
Most functions on the Winegard Extreme are controlled from the Local Network Settings screen. From the Status Screen, select LOCAL NETWORK SETTINGS from the drop down menu and click SELECT. From here (Figure 11), it is possible to do any of the following:
Security Type
The Winegard Extreme Security Type has been defaulted to WPA2-PSK (AES). Other options are available on this screen.
NOTE: Any changes made to your network settings may result in a temporary loss of all network connections . You will need to reconnect all devices to the Winegard Extreme with the changed network name and/ or password.
Guest Network
 The Winegard Extreme provides a simple way to set up an extra network that doesn’t have access to the Status Screen. This allows you to provide guests with an easier password to use when accessing your network while still maintaining a secure system.
To set up a Guest Network (Figure 12):
- Click on ENABLE.
- Give guest network an easily recognizable name.
- Enter a password. If you use a simple password, it is recommended that the guest network be disabled when not in use.
ADVANCED SETTINGS
Connected Devices
This displays the name of each device currently connected wirelessly to the Winegard® Extreme™.
Change Network Address
WARNING: Do not change the Network Address unless instructed by Winegard Tech Support. Doing so may cause your system to not function properly.
Change Admin Password
It is not necessary to change the administration password, however, to change the password click on CHANGE PASSWORD to bring up the new password screen. See Figure 13. Enter the new password into the area for both PASSWORD and RE-ENTER PASSWORD. The password in each of these boxes must match.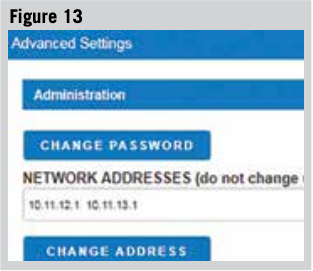 NOTE: Do not use the existing WiFi password for the ADMIN PASSWORD.
UPDATING THE SOFTWARE
When first setting up the Winegard Extreme it is recommended to check for software updates the first time the system is connected to an Internet signal. It is also recommended to check for updates every couple months for fixes and added features.
NOTE: To retain all passwords and name changes during updates, click “Keep Settings”. See Figure 14. Updating the system software from the network will require the Winegard Extreme to be connected to an internet source.
- From the Status Screen, choose UPDATE SOFTWARE from the drop down menu and click SELECT.
- Once on the update software screen, click CHECK FOR LATEST VERSION. See Figure 14.

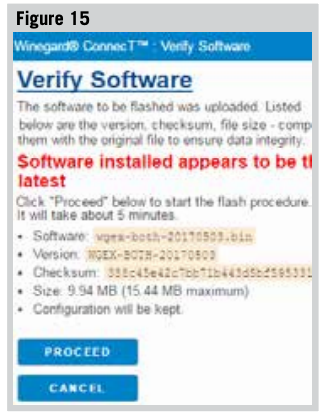
- There will be a slight delay while the Winegard Extreme compares the current software version to the latest available version. If you have the latest version there is no need to update the software, click CANCEL. If the check finds that you have older software, click PROCEED to update to the latest version. See Figure 15.
- If you clicked PROCEED, the system will unavailable for several minutes while the outdoor antenna resets. As it powers back on, the system will function normally.NOTE: During this reset, your device may switch to a local remembered WiFi network. This will not allow you to return to the Extreme setup screens. If this happens, simply reconnect manually to the Extreme’s SSID again from your device.

FCC STATEMENT
This device complies with Part 15 of the FCC Rules. Operation is subject to the following two conditions: (1) This device may not cause harmful interference, and (2) this device must accept any interference received, including interference that may cause undesired operation.
This equipment has been tested and found to comply with the limits for a Class B digital device, pursuant to Part 15 of the FCC Rules. These limits are designed to provide reasonable protection against harmful interference in a residential installation. This equipment uses and can radiate radio frequency energy and, if not installed and used in accordance with the instructions, may cause harmful interference to radio communications. However, there is no guarantee that interference will not occur in a particular installation. If this equipment does cause harmful interference to radio or television reception, which can be determined by turning the equipment off and on, the user is encouraged to try to correct the interference by one or more of the following methods:
- Reorient or relocate the receiving antenna.
- Increase the separation between the equipment and devices.
- Connect the equipment into an electrical outlet on a circuit different from that which the radio receiver is connected.
- Consult the dealer or an experienced radio/TV technician for help.
FCC Caution
Any changes or modifications not expressly approved by the party responsible for compliance could void the user’s authority to operate this equipment.
Only channels 1–11 can be operated. Selection of other channels is not possible.
This device and its antenna(s) must not be co-located or operating in conjunction with any other antenna or transmitter.
FCC Radiation Exposure Statement
This equipment complies with FCC radiation exposure limits set forth for an uncontrolled environment. This equipment should be installed and operated with a minimum distance of 25 cm between the radiator and your body. This device and its antenna(s) must not be co-located or operating in conjunction with any other antenna or transmitter except in accordance with FCC multi-transmitter product procedures.
This device complies with FCC and Industry Canada license-exempt RSS standard(s). Operation is subject to the following two conditions: (1) this device may not cause interference, and (2) this device must accept any interference, including interference that may cause undesired operation of the device.
Disclaimer: Although every effort has been made to ensure that the information in this manual is correct and complete, no company shall be held liable for any errors or omissions in this manual. Information provided in this manual was accurate at time of printing. If the antenna does not function as expected, please contact Winegard Co. Winegard Company Winegard is a registered trademark of Winegard Company. LLC. Apple & the Apple logo are trademarks of Apple Inc., registered in the U.S. and other countries. App Store is a service mark of Apple Inc., registered in the U.S. and other countries. Google Play & the Google Play logo are trademarks of Google LLC. All trademarks, registered trademarks and logos are the property of their respective owners and are not affiliated with Winegard Company.
Winegard Company • 2736 Mt. Pleasant Street • Burlington, IA 52601 • 1-800-288-8094 • Fax 319-754-0787 • www.winegard.com • Printed in U.S.A.©2018 Winegard CompanyRev2 8/19 2452414
References
[xyz-ips snippet=”download-snippet”]