

2 LB. ELECTRONIC BREAD MAKER WITH AUTOMATIC FRUIT & NUT DISPENSER
IMPORTANT NOTICEPlease read operating instructions before using thisproduct. Please keep original box and packing materialsin the event that service is required.
For questions or concerns please contact customer service at:Synergy Housewares, LLC.Toll-free: 866-444-4033Hours: M-F 8:30am-5:00pm ESTWebsite: warranty.synergyhousewares.comPrinted in ChinaModel SWPABMD001
Actual product may differ slightly from images in this manualWolfgang Puck is a trademark of Wolfgang Puck Worldwide
IMPORTANT SAFEGUARDS
Before using the electrical appliance, the following basic precautions should always be followed:
- READ ALL INSTRUCTIONS.
- Do not touch hot surfaces. Use handles or knobs. Always use oven mitts when handling the bread pan
- To protect against electrical shock do not immerse the cord, plug, or bread maker in water or other liquid.
- This appliance is not intended for use by persons (including children) with reduced physical, sensory or mental capabilities, or lack of experience and knowledge unless they have been given supervision or instruction concerning the use of the appliance by a person responsible for their safety.
- Unplug from outlet when not in use and before cleaning. Allow cooling before putting on or taking off parts.
- Do not operate any appliance with a damaged cord or plug or after the appliance malfunctions or has been damaged in any manner. Return appliance to the nearest authorized service facility for examination, repair, or adjustment.
- The use of accessory attachments not recommended by the appliance manufacturer may cause injuries.
- Do not use outdoors or for commercial purposes
- Do not let the cord hang over the edge of the table or counter or touch hot surfaces.
- Do not place on or near a hot gas or electric burner, or in a heated oven.
- Always attach the plug to the appliance first, then plug the cord into the wall outlet. To disconnect, press the start/stop button then remove the plug from the wall outlet.
- Do not clean with metal scouring pads. Pieces can break off the pad and touch electrical parts, creating a risk of electric shock or fire.
- A fire may occur if the Bread Maker is covered or touching flammable material, including curtains, draperies, walls, and the when in operation. Do not store any item on top of the appliance when in operation.
- Do not store any materials, other than manufacturers’ recommended accessories, in this oven when not in use.
- Avoid contact with moving parts.
- Place this bread maker a minimum of 2 inches away from any wall or other object.
- When plugging or unplugging this bread maker, be sure not to touch the plug blades with your fingers.
- Do use your Bread Maker with an external timer or separate remote control system.
- Do not use appliances other than intended use.
SAVE THESE INSTRUCTIONS HOUSEHOLD USE ONLY
Additional Safety Information
GROUNDING INSTRUCTIONS: This appliance must be grounded. It is equipped with a 3-prong cord having a grounded plug. The plug must be plugged into an outlet that is properly installed and grounded.
WARNING: Improper use of the grounded cord can result in the risk of electric shock. Consult a qualified electrician if necessary. Do not attempt to defeat this safety feature by modifying the plug.A short power-supply cord is provided to reduce the hazards resulting from entanglement or tripping over a long cord. If it is necessary to use an extension cord, it should be positioned such that it does not drape over the counter or tabletop where it can be pulled on by children or tripped over and:1. Use only a 3-prong extension cord with a 3-blade grounding plug.2. The marked rating of the extension cord must be equal to or greater than the rating of this appliance. The electrical rating of this appliance is 550 watts.
Before Your First Use
The appliance may emit a little smoke and slight odor when turning it on for the first time. This is normal and will soon stop. Make sure the appliance has sufficient ventilation.Please check if all parts and accessories are complete and free of damage.Clean all the parts according to the section Care & Cleaning section of this manual.We recommend a trial run to remove any protective coatings used for shipment. Set the Bread Maker mode to BAKE and the TIME Button to 10 minutes.
In the beginning, there was Wolfgang Puck. There were cooks and there were kitchens and there were people eating food, but the world had never seen anything like Spago— with its California cuisine, its casual elegance, and its chef whose genuine warmth and love of craft redefined the dining experience. And they came—from LA and from everywhere—to experience the future. Wolfgang Puck shaped the modern culinary landscape: he was the first celebrity chef, the inventor of fusion cuisine, the first in farm-to-table. His work is inspired by California living, and an insistence on only the freshest ingredients. From his legendary fine-dining icons, his entrepreneurial spirit has built an empire—from dining to catering, to products for the home— touching the lives of millions around the globe. Today, as always, Chef Puck is earnestly, restlessly, tirelessly at work behind the scenes inventing what’s next. He is driven by a genuine love of his craft, a passion for what’s possible, and its potential to change the world.
Know Your Bread Maker


The actual product may differ slightly from the illustrations on this page
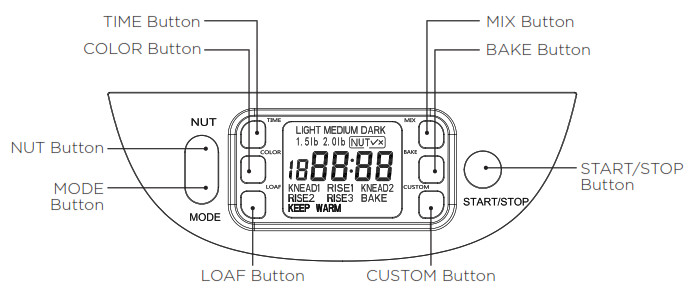
Know Your Control Panel
START/STOP ButtonFor starting and stopping the selected baking mode.To start a selected mode, press the START/STOP Button for approx. 1 second. A short beep will sound, two dots in the time display will begin to flash and the mode will start. To stop the selected mode, press the START/STOP Button for approx. 2 seconds until a beep confirms that the mode has been switched off.You can pause any active baking cycle any time by pressing the START/STOP Button once. The operation will be paused but all settings will be memorized. The remaining time will flash on the LCD while paused. Press the START/ STOP Button again to resume operation. The baking cycle will automatically continue after 10 minutes if no button is pressed.
TIME Button: Use to adjust the timer in DELAY, CUSTOM, JAM, BAKE, YOGURT and KNEAD modes only.COLOR Button: Use to select desired crust color LIGHT, MEDIUM, or DARK. This setting is inactive for the DOUGH, JAM, MIX/STIR and YOGURT modes.LOAF Button: Use to choose between 1.5lb and 2lb. This setting is inactive for the QUICK, ULTRA-FAST, CAKE, DOUGH, BAKE, JAM, MIX/STIR, YOGURT and CUSTOM modes.MIX Button: Shortcut to Mode 11: MIX/STIR (see page 12).BAKE Button: Shortcut to Mode 8: BAKE (see page 12).CUSTOM Button: Shortcut to Mode 13: CUSTOM (see page 13).NUT Button: Use to enable the Fruit & Nut Dispenser which defaults to OFF. See page 10.MODE Button: Use to set different modes. The 14 available modes are explained on page 12.
Know Your Control Panel (cont.)
As soon as the Bread Maker is plugged into the power outlet, the LCD will illuminate and a beep will sound. If no selection is made within 20 seconds, the LCD will turn off. The default settings shown are: BASIC, MEDIUM, 2.0lb. and “3:00” displayed on LCD.
WARNING DISPLAYIf the display shows “HHH” after the mode has been started, the temperature inside is still too high (accompanied by 5 beeps) and the model has to be stopped. Open the Lid and let the machine cool down for 10 to 20 minutes. If the display shows “LLL” after pressing the START/STOP Button, it means the temperature inside is too low (accompanied by continuous beeping). Press the START/STOP Button to return to the default setting and stop the beeping. Select the BAKE Mode to rapidly increase the temperature inside the chamber.NOTE: The temperature in the Bread Maker can become too low if the Bread Maker is placed near an air conditioner or vent, or in a cold room during wintertime. We suggest using the BAKE mode to heat the Bread Maker for 10 minutes with the Lid closed.
Quick Reference
Using your Bread Maker is a simple process of preparing your ingredients, choosing your desired settings then starting the baking cycle. See below for a quick reference diagram. Follow detailed instructions on the next page.
PREPARE1. Set up Bread Maker2. Measure, prepare and add ingredients to the Bread Maker3. Add additional ingredients to Fruit & Nut Dispenser if using (optional)CHOOSE SETTINGS1. Select desired mode (MODE Button)2. Select desired crust color (COLOR Button)3. Select desired size (LOAF Button)BEGIN OR DELAY BAKING CYCLE
Start baking cycle (START/STOP Button)ORDelay start if desired using the Delay Function (TIME Button)
Using Your Bread Maker
PREPARE1. Place Bread Maker on a level surface.2. Attach Kneading Blade onto the drive shaft inside the Bread Pan.3. Measure all ingredients accurately then add to the Bread Pan in the order listed in the recipe. As a general rule, liquid ingredients go in first, dry ingredients second and yeast, baking powder or baking soda last (see Figure 1).4. Lower Bread Pan by the Handle into the chamber, turn to the right to lock in place then close the Lid.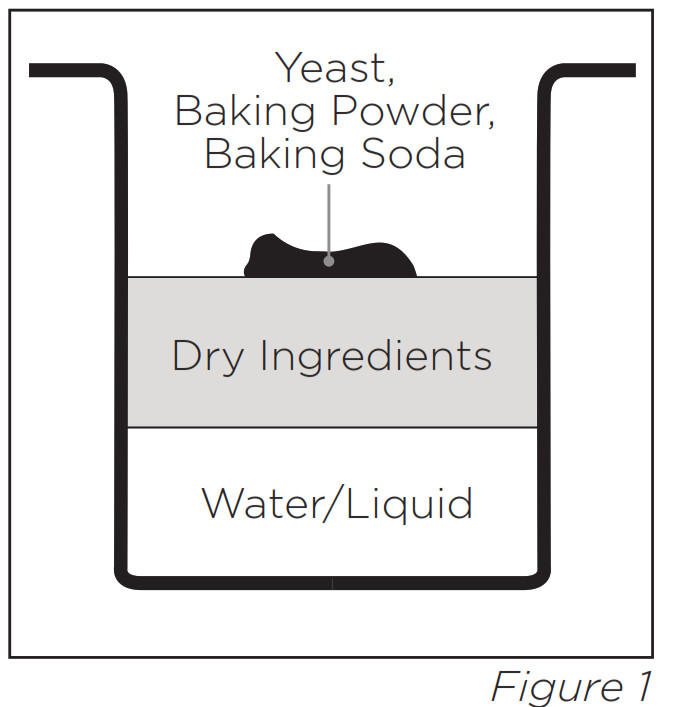 5. If using, add ingredients to the Fruit & NutDispenser (see Fruit & Nut Dispenser on page 10). During operation, these ingredients will be automatically dispensed into the bread pan at the optimal time. This feature defaults to OFF, to enable press the NUT Button.This feature is only available for the following modes: BASIC, QUICK, FRENCH, ULTRA-FAST, WHOLE WHEAT, CAKE, SWEET BREAD, GLUTEN FREE, YOGURT, and CUSTOM6. Plug the power cord into a wall outlet.
CHOOSE SETTINGS7. Select the desired mode by pressing the MODE Button (see a description of all available Modes on page 12).8. Select desired crust color by pressing the COLOR Button: LIGHT, MEDIUM, or DARK (this setting is inactive for the DOUGH, JAM, MIX/STIR and YOGURT modes).9. Select desired loaf size by pressing the LOAF Button (1.5lb or 2.0lb). This setting is inactive for the QUICK, ULTRA-FAST, CAKE, DOUGH, BAKE, JAM, MIX/STIR, YOGURT, and CUSTOM modes.
BEGIN OR DELAY BAKING CYCLE10. Start the baking cycle by pressing the START/STOP Button.11. Alternatively, you can delay the start of the baking cycle by pressing the TIME Button (see Delay Function on page 11).
Using Your Bread Maker (cont.)
AFTER BAKING IS COMPLETE12. You will hear 10 beeps upon completion of the baking cycle. Press the START/STOP Button for approx. 2 seconds to stop the process otherwise the Bread Maker will switch to Keep Warm for one hour (see Keep Warm on page 11). If your recipe needs more baking time, add minutes by using the BAKE mode (see page 12).13. To remove the Bread Pan, open the Lid, grasp the handle using oven mitts, turn counter-clockwise to unlock then gently lift it straight up to remove. CAUTION: Bread Pan and bread will be hot. Always use a potholder or oven mitt to handle. Always allow Bread Pan to cool down completely before reusing.14. Lay Bread Pan on its side, grasp the large wing nut on the bottom of the Bread Pan using the oven mitt then gently twist it back and forth 1/4-turn to release the Kneading Blade from the shaft. Tip Bread Pan on its side until bread slides out. If necessary, use a nonstick spatula to help release the bread.15. Let cool for 15 minutes then use the Hook to remove the Kneading Blade on the bottom of the loaf before slicing.CAUTION: Do not use your hands to remove the Kneading Blade as the bread will be hot.16. Unplug from the wall outlet.
Fruit & Nut Dispenser
This Bread Maker is equipped with an automatic dispenser to add fruits and nuts to the bread at the optimal time during the baking cycle. This ensures that these ingredients are distributed evenly throughout the finished bread. Before starting your bread-making cycle placing your desired ingredients into the Fruit & Nut Dispenser then insert it into the Lid until it clicks in place. This feature defaults to OFF, to enable press the NUT Button. This feature is only available for the following modes: BASIC, QUICK, FRENCH, ULTRA-FAST, WHOLE WHEAT, CAKE, SWEET BREAD, GLUTEN FREE, and CUSTOM
Delay Function (Time)
If you would like to delay the baking cycle to a later time, set your time based on when you would like your bread to be finished. For example, if the current time is 1pm and you would like the bread to be finished at 7 pm, set the delay for 6 hours.To use the Delay Function:1. Follow steps 1-10 of the “Using Your Bread Maker” section2. Press the TIME Button3. Adjust the delay time using the TIME Button4. Press the START/STOP button to activate the delay functionWhen using the Delay Function, it is important to prevent the yeast or soda from touching any of the liquid ingredients in the Bread Pan. Ensure that you add the ingredients according to Figure 1. If the yeast or soda comes into contact with the liquid ingredients before the baking cycle begins, they will activate early and prevent the bread from rising correctly.CAUTION: Do not use the Delay Function if your recipe includes perishable ingredients such as dairy products, eggs, etc.
Keep Warm
Upon completion of the baking cycle, your bread can be kept warm for 60 minutes if you do not switch off the Bread Maker by pressing the START/ STOP Button for approx. 2 seconds. When bread remains in the Bread Maker on Keep Warm, the crust will be noticeably thicker. If you wish to have a softer and thinner crust, do not use the Keep Warm function.
Memory
In case of any power supply disruption to the Bread Maker for less than 10 minutes, the Bread Maker will automatically resume at the interrupted stage of the baking cycle once power is restored. The Bread Maker will not maintain memory after 10 minutes.
Modes
Mode 1: BASICThis mode is used to make soft, white bread. It is the most popular setting.Mode 2: QUICKThis mode is used to make baked goods such as banana bread, brownies, coffee cake etc. This setting should not be used if your recipe contains yeast as the is no rise time. Typically the recipes will call for baking powder or baking soda or both.Mode 3: FRENCHThis mode is used to make crusty loaves of French or Italian-style bread with a pale crust. Recipes using this setting typically contain only four ingredients: flour, water, salt, and yeast.Mode 4: ULTRA-FASTThis mode is used to make yeast bread such as focaccia or quick dinner rolls. In order for it to be faster than other modes, the rise times are much shorter. For this mode, it is recommended to use rapid-rise yeast.Mode 5: WHOLE WHEATThis mode is used for recipes with significant amounts of whole wheat, rye flour, or bran. It begins with a rest period during which the flours or grains absorb the liquid ingredients. Soaking causes the flour or grain to soften and helps ingredients to combine well. The settings have an extra rinse cycle to allow heavy wheat and grains to expand.Mode 6: CAKEThis mode is used for recipes such as carrot or chocolate cakes containing baking powder or baking soda rather than yeast to make the cake rise.Mode 7: DOUGHUse this mode to mix, knead and rise a variety of doughs to make pizza, rolls, pretzels, doughnuts, and round or braided bread. This mode does not bake.Mode 8: BAKEThis mode is for baking only without mixing. Use to add additional bake time to any recipe that is not done or dark enough to your liking. It can also be used to bake meatloaves or to reheat bread.Mode 9: SWEET BREADThis mode is used to make soft, sandwich-style bread.Mode 10: JAMThis mode is ideal for making homemade jams and jellies from fruit, sugar, pectin, and lemon juice. A great compliment to freshly baked bread.Mode 11: MIX/STIRThis mode is used to mix ingredients together into a dough or batter without warming or proofing.
Mode 12: GLUTEN FREEThis mode is ideal for those looking to avoid gluten. This type of baking is unique due to the unusual ingredients used compared to other breeds. The dough will look like a batter. It only needs a quick mix and one rise cycle but a longer bake time due to the moisture content.Mode 13: CUSTOMThis mode allows you to create custom settings for your own recipes. You can reset kneading, rising, and baking time in each cycle for a total of 2 hours 56 minutes, plus a maximum Keep Warm time of up to 60 minutes.Mode 14: YOGURTTo make yogurt add up to 4 cups of milk to the Bread Pan. Select the YOGURT mode, use the TIME Button to set the time then press the START/STOP Button to start heating (setting a longer time will result in a thicker and more tart yogurt). The Bread Maker will begin to heat the milk to 180°F and will then settle down to 110°F. Once it reaches 110°F the Bread Maker will begin to beep, signaling it is time to add the starter yogurt to the Bread Pan (see recipe on page 30 of this manual). Add the starter yogurt then press the START/STOP button to begin the countdown timer.
Bread-Making Ingredients
Bread FlourBread flour is the most important ingredient for making yeast bread. Bread flour contains more gluten than all-purpose flour and will make a loaf of yeast bread that has a better shape and structure.All-Purpose FlourAll-purpose flour is the most widely used flour. It is used for more tender baked goods such as brownies or cakes. It contains less gluten than bread flour. It is not ideal for making bread that contains yeast.Whole Wheat FlourWhole wheat flour is made from wheat using the entire kernel. It is more nutritious than white flour. Loaves made with this flour will generally not rise as tall and have a more dense texture.Self Rising FlourThis type of flour contains salt and baking powder and is used to make baked goods such as biscuits. It is generally not used to make bread containing yeast.
SugarSugar promotes browning and adds sweetness to some bread. White sugar is most commonly used but brown sugar, molasses, honey, or maple syrup also work well. Results may vary if using sugar substitutes.YeastYeast is a leavening agent which causes bread to rise. It is also responsible for the wonderful aroma and flavor we all know and cherish. It is activated when it makes contact with a liquid in the recipe. It will begin to bubble as it mixes with the flour and provides the sponge-like texture we associate with great bread. There are many myths surrounding the temperature of the water needed for yeast as well as whether it needs to be proofed first. Modern yeasts have made things much easier and do not require any sort of special treatment other than keeping the yeast away from extreme temperatures and refrigerating/ freezing after opening. Please follow packaging instructions. Yeast must be measured accurately, do not be tempted to add extra yeast. There are many yeast varieties available for purchase. Although the differences may appear to be small, bread machine yeast and active dry yeast are best suited for use with a Bread Maker. Follow recipe instructions for best results. When adding yeast to the Bread Maker it should be the last ingredients added without any contact with liquid ingredients or salt.SaltSalt is necessary to improve bread flavor and crust color. However, using too much salt could prevent the bread from rising properly.Baking Powder and Baking SodaBaking powder and baking soda are used to increase volume and lighten the texture of baked goods such as cakes. These ingredients will only be mixed and baked without any rise time.
Bread-Making Ingredients (cont.)
Water and other liquidsThere are many myths surrounding the temperature of water or liquids used for making yeast bread. This Bread Maker only requires water or liquids to be at room temperature. Warming liquids is not recommended. Follow recipe instructions.Boxed Bread MixesYou can use store-bought boxed bread mixes with this Bread Maker. Follow instructions on the box which typically include settings instructions as well.
Measuring Ingredients
Accurate measuring of ingredients is essential for achieving bread-making success. Many recipes, including those in this manual, provide measurements using different measures such as cups, tablespoons, ounces, and grams. You can use the included Measuring Cup and Measuring Spoon to carefully measure each ingredient.Liquid IngredientsWater or other liquids should be measured using measuring cups. Check measurement markings on your measuring cups at eye level for best accuracy.Dry IngredientsDry ingredients should be measured by spooning ingredients into a measuring cup or measuring spoon without packing the ingredients. Level off the topusing a knife.Weighing IngredientsThe most accurate method of measuring ingredients is to do so by weight using a scale.
Care & Cleaning
CAUTION: To prevent electrical shock unplug the bread maker and allow it to cool completely before cleaning. Do not immerse the Housing, Lid, Plug, or Baking Chamber is water or any other liquid.For best performance and maintenance, clean the Bread Maker after each use as follows:Housing, Lid, and Baking ChamberThe Housing, Lid, Power Cord, and Baking Chamber can be washed with a warm damp cloth and dried thoroughly. Do not clean with metal scouring pads as pieces can break off the pad and touch electrical parts, creating a risk of electric shock. Do not use abrasive cleaners.Baking Pan and Kneading BladeBoth the Baking Pan and Kneading Blade have nonstick surfaces. Do not use any harsh or abrasive cleaners or utensils that may scratch the nonstick surfaces. Discoloration of nonstick surfaces may occur over time from moisture and steam. This is normal and will not affect the performance of the Bread Maker. Remove the Baking Pan and Kneading Blade from the Baking Chamber before cleaning. Wipe the outside of the Baking Pan with a damp cloth. Wash the inside of the Baking Pan with warm, soapy water. If the Kneading Blade gets stuck, fill the Baking Pan with hot water then soak for 30 minutes or until Kneading Blade loosens and can be removed easily. If the hole in the Kneading Blade becomes clogged, carefully clean it out with a wooden or plastic pick.Fruit & Nut DispenserRemove from Lid then wash the Fruit & Nut Dispenser with warm soapy water using a sponge or cleaning cloth. Rinse and dry thoroughly. Replace in Lid and close. Do not use any rough scouring pads or harsh cleaners.Hook, Measuring Cup, Measuring SpoonWash in warm, soapy water using a sponge or cleaning cloth. Alternatively, wash in the top rack of the dishwasher.Housing, Cord, and PlugThese parts should never be immersed in water or any other liquid. Only wipe these parts using a damp cloth then dry thoroughly.CAUTION: Never use any of the following to clean your Bread Maker: paint thinner, benzine, steel wool pads, or polishing powder. The Bread Maker is not dishwasher safe.StoringEnsure that Bread Maker is completely cool, clean and dry before storing. Place the Kneading Blade back in the Baking Pan then close the Lid. Do not store items on top of Bread Maker.
Troubleshooting
| Problem | cause |
solution |
| Bread bottom crust is too thick | Bread kept in the machine too long under Keep Warm setting. | It is recommended to remove bread once the baking cycle is completed. |
| Kneading Blade is stuck to shaft in Bread Pan | Kneading Blade is stuck to shaft from ingredients hardening on the shaft. | After taking bread out. put hot water into Bread Pan and immerge Kneading Blade for 10 minutes. then take it out and clean. |
| Smoke from venting while baking | Food residue may have spilled on the heating element, or food particles are underneath the heating element | Unplug the bread maker and allow it to cool completely. Wipe the heating element with a slightly damp cloth or remove food particles under the heating element. |
| Bread did not properly mix and/or rise | The incorrect Mode was selected for the recipe | Select the correct Mode |
| The Lid was opened too many times during baking and rising allowing heat to escape. | Resist opening Lid during rising and baking and instead use the Viewing Window. | |
| Control Panel shows HHH once Start Button is pressed | The Bread Maker temperature is too high | This can occur if successive loaves are made one after the other. Press the Stop Button, remove the Bread Pan and allow the Breadmaker to cool 15 minutes between batches. |
| You can hear the Bread Maker motor working but the dough is not being kneaded | The Bread Pan is improperly placed in housing, or the Kneading Blade is not attached to the shaft. | Follow instructions for proper placement of the Bread Pan in the cooking chamber and ensure the Kneading Blade is attached to the shaft. |
| The bread has risen too tall and has contacted the Lid | Improper amount of flour, yeast. and water was used. | Ensure accurate measurements of all ingredients. We recommend weighing your ingredients vs. volume measurements. |
| Problem | Cause | Solution |
| Bread size is too small, or the dough did not rise | You may not have added yeast to the recipe, the yeast may have expired, or you added yeast to the bread Pan before adding all other ingredients. | Check the expiration date of the yeast, ensure it is the last thing added to the ingredients, and double-check that you did add the proper amount of yeast to the Bread Pan. |
| The bread collapsed in the Bread Pan | Incorrect flour for recipe or wrong mode was used. | Ensure the correct flour type and Mode was selected |
| Too much yeast or too high a temperature of yeast/water. | Ensure a proper amount of yeast was used. We recommend measuring by weight, not by volume. | |
| Too much water was added to the recipe. | Adjust the water in the recipe |
Classic White Bread
| INGREDIENT | MEASURE |
| Water | 1 1/3 cups (12 oz) (340g) |
| Vegetable oil | 1/4 cup (2 oz) (57g) |
| Sugar | 3 tablespoons (1.5 oz) (38g) |
| Kosher salt | 2 1/2 teaspoons (15g) |
| Unbleached bread flour | 3 1/2 cups (17.5 oz) (496g) |
| Bread machine yeast or active dry yeast | 1 1/2 teaspoons (5g) |
METHOD1. Place all ingredients in order listed into the Bread Maker; close Lid.2. Press the MODE Button to select BASIC.3. Select the COLOR Button for desired crust color.4. Select 2.0 lbs size.5. Press the START/STOP to begin the baking cycle.6. After 3 minutes of mixing, open the Lid and check if a dough ball has formed. If a dough ball hasn’t formed (if you can’t see the bottom of the pan) add flour slowly, 1 tablespoon at a time, until a dough ball forms. If the dough appears too dry and the machine sounds like it’s laboring, add water slowly, 1 teaspoon at a time, until the dough ball forms. Close Lid.7. Baking is complete when Bread Maker finishes the baking cycle.
Wheat Bread
| INGREDIENT | MEASURE |
| Water | 3/4 cup + 1 tablespoon (7 oz) (195g) |
| Unsalted butter, softened | 2 tablespoons (1 oz) (28g) |
| Sugar | 1 tablespoon (0.5 oz) (13g) |
| Egg (large) | 1 |
| Kosher salt | 1 1/2 teaspoons (9g) |
| Whole wheat flour | 1 cup (5 oz) (142g) |
| Unbleached bread flour | 2 cups (10 oz) (284g) |
| Bread machine yeast or active dry yeast | 1 1/4 teaspoons (4g) |
METHOD1. Place all ingredients in order listed into the Bread Maker; close Lid.2. Press the MODE Button to select WHOLE WHEAT.3. Select the COLOR Button for desired crust color.4. Select 2.0 lbs size.5. Press the START/STOP to begin the baking cycle.6. After 3 minutes of mixing, open the Lid and check if a dough ball has formed. If a dough ball hasn’t formed (if you can’t see the bottom of the pan) add flour slowly, 1 tablespoon at a time, until a dough ball forms. If the dough appears too dry and the machine sounds like it’s laboring, add water slowly, 1 teaspoon at a time, until dough ball forms. Close Lid.7. Baking is complete when Bread Maker finishes the baking cycle.
Pineapple Bread
| INGREDIENT | MEASURE |
| Pineapple, mashed and drained | 1 cup (8 oz) (227g) |
| Eggs, large | 2 |
| Sugar | 1 cup (7 oz) (200g) |
| Unsalted butter, softened | 1/2 cup (4 oz) (113g) |
| Vanilla extract | 1 teaspoon (5g) |
| Sour cream | 2 tablespoons (1 oz) (28g) |
| Bleached bread flour | 2 cups (10 oz) (284g) |
| Baking soda | 1 teaspoon (5g) |
| Baking powder | 1/2 teaspoon (2.5g) |
| Kosher Salt | 1/2 teaspoon (2.8g) |
METHOD1. Place all ingredients in order listed into the Bread Maker; close Lid.2. Press the MODE Button to select QUICK.3. Select the COLOR Button for desired crust color.4. Press the START/STOP to begin the baking cycle.5. When baking is complete, keep bread inside the Bread Maker for the full Keep Warm cycle (1 hour) to allow the center to finish baking.
Mocha Pound Cake
| INGREDIENT | MEASURE |
| Whole milk | 1/4 cup (2 oz) (60g) |
| Eggs, large | 4 |
| Kosher salt | 1 teaspoon (6g) |
| Sugar | 1 1/4 cups (9 oz) (250g) |
| Unsalted butter, softened | 1 cup (8 ounces) (228g) |
| Vanilla extract | 1 tablespoon (15g) |
| Sour cream | 2 tablespoons (1 oz) (28g) |
| All purpose flour | 1 3/4 cups (9 oz) (255g) |
| Baking powder | 1 1/4 teaspoons (5.2g) |
| Espresso powder | 1 tablespoon (8g) |
METHOD1. Place all ingredients in order listed into the Bread Maker; close Lid.2. Press the MODE Button to select CAKE.3. Select the COLOR Button for desired crust color.4. Press the START/STOP to begin the baking cycle.5. When baking is complete, keep bread inside the Bread Maker for the full Keep Warm cycle (1 hour) to allow the center to finish baking.
Pecan Raisin Bread
| INGREDIENT | MEASURE |
| Water | 1 cup (8 oz) (240g) |
| Vanilla extract | 1 teaspoon (5g) |
| Eggs, large | 1 |
| Kosher salt | 1 teaspoon (6g) |
| Sugar | 1/4 cup (2 oz) (50g) |
| Unsalted butter, softened | 3 tablespoons (1.5 oz) (42g) |
| Ground cinnamon | 1 tablespoon (0.5 oz) (8g) |
| Powdered milk | 3 tablespoons (0.5 oz) (24g) |
| Vital wheat gluten | 2 teaspoons (10g) |
| Unbleached bread flour | 3 1/8 cups (12 oz) (444g) |
| Bread machine yeast or active dry yeast | 2 1/4 teaspoons (7g) |
| Raisins | 1/3 cup (2 oz) (57g) |
| Pecans | 1/3 cup (1.5 oz) (43g) |
METHOD1. Place all ingredients, except raisins and pecans, in order listed into the Bread Maker; close Lid.2. Add raisins and pecans to the Fruit & Nut Dispenser then press the NUT Button to enable.3. Press the MODE Button to select BASIC.4. Select the COLOR Button for desired crust color.5. Select 2.0 lbs size.6. Press the START/STOP to begin the baking cycle.7. After 3 minutes of mixing, open the Lid and check if a dough ball has formed. If a dough ball hasn’t formed (if you can’t see the bottom of the pan) add flour slowly, 1 tablespoon at a time, until a dough ball forms. If dough appears too dry and the machine sounds like it’s laboring, add water slowly, 1 teaspoon at a time, until a dough ball forms. Close Lid.8. Baking is complete when Bread Maker finishes baking cycle.
Quick Focaccia
| INGREDIENT | MEASURE |
| Water | 1 1/4 cups (10 oz) (282g) |
| Olive oil | 4 tablespoons (2 oz) (28g) |
| Honey | 1 tablespoon (0.5 oz) (21g) |
| Kosher salt | 1 1/2 tablespoons (9g) |
| Unbleached bread flour | 3 cups (15 oz) (426g) |
| Bread machine yeast or active dry yeast | 1 tablespoon (9g) |
| Sage leaves, chopped | 12 leaves |
METHOD1. Place all ingredients in order listed into the Bread Maker; close Lid.2. Press the MODE Button to select ULTRA-FAST.3. Select the COLOR Button for desired crust color.4. Press the START/STOP to begin the baking cycle.5. This dough will stay softer than other doughs and will not form a dough ball.6. Baking is complete when Bread Maker finishes the baking cycle.
French Bread
| INGREDIENT | MEASURE |
| Water | 1 1/2 cups (12 oz) (340g) |
| Kosher salt | 2 1/2 teaspoons (15g) |
| Unbleached bread flour | 3 1/2 cups (17.5 oz) (496g) |
| Sugar | 3 tablespoons (1 oz) (39g) |
| Bread machine yeast or active dry yeast | 2 teaspoons (6g) |
METHOD1. Place all ingredients in order listed into the Bread Maker; close Lid.2. Press the MODE Button to select FRENCH.3. Select the COLOR Button for desired crust color.4. Select 2.0 lbs size.5. Press the START/STOP to begin the baking cycle.6. After 3 minutes of mixing, open the Lid and check if a dough ball has formed. If a dough ball hasn’t formed (if you can’t see the bottom of the pan) add flour slowly, 1 tablespoon at a time, until a dough ball forms. If dough appears too dry and the machine sounds like it’s laboring, add water slowly, 1 teaspoon at a time, until dough ball forms. Close Lid.7. Baking is complete when Bread Maker finishes baking cycle.
Gluten-Free Bread
| INGREDIENT | MEASURE |
| Gluten-free flour mix (1:1 ratio) | 2 1/2 cups (12.5 oz) (354g) |
| Sugar | 3 tablespoons (1 oz) (39g) |
| Milk powder | 2 tablespoons (0.5 oz) (16g) |
| Almond flour | 1 cup (6 oz) (170g) |
| Psyllium husk | 1 tablespoon (9g) |
| Kosher salt | 2 teaspoons (12g) |
| Eggs, large | 3 |
| Apple cider vinegar | 1/2 teaspoon (2.5g) |
| Tamari | 1 tablespoon (15g) |
| Unsalted butter, melted | 2 tablespoons (28g) |
| Bread machine yeast or active dry yeast | 1 1/2 teaspoons (5g) |
METHOD1. Place all ingredients in order listed into the Bread Maker; close Lid.2. Press the MODE Button to select GLUTEN-FREE.3. Select the COLOR Button for desired crust color.4. Select 1.5 lbs size.5. Press the START/STOP to begin the baking cycle.6. After 5 minutes of mixing, use a rubber spatula to scrape down the sidesof the Bread Pan to incorporate any dry flour.7. Baking is complete when Bread Maker finishes baking cycle.
Classic Pound Cake
| INGREDIENT | MEASURE |
| Eggs, large | 2 |
| Kosher salt | 1 teaspoon (6g) |
| Sugar | 1 1/2 cups (10.5 oz) (300g) |
| Unsalted butter, softened | 1/2 cup (4 oz) (113g) |
| Vanilla extract | 2 teaspoons (10g) |
| Sour cream | 1/2 cup (4 oz) (113g) |
| Bleached all purpose flour | 1 1/2 cups (7.5 oz) (213g) |
| Baking powder | 1 teaspoon (5g) |
METHOD1. Place all ingredients in order listed into the Bread Maker; close Lid.2. Press the MODE Button to select CAKE.3. Select the COLOR Button for desired crust color.4. Press the START/STOP to begin the baking cycle.5. When baking is complete, keep bread inside the Bread Maker for the full Keep Warm cycle (1 hour) to allow the center to finish baking.
Cherry Jam
| INGREDIENT | MEASURE |
| Sour cherries, mashed | 5 cups (3 lbs) (1361g) |
| Sugar | 3 1/2 cups (24.5 oz) (695g) |
| Pectin, dry (for lower sugar jam) | 1 box (1.75 oz) |
| Lemon juice | 2 tablespoons (1 oz) (28g) |
METHOD1. In a large mixing bowl, stir together all ingredients until combined.2. Pour mixture into the Bread Maker; close Lid.3. Press the MODE Button to select JAM.4. Press the START/STOP to begin the baking cycle.5. When baking is complete, transfer jam to an airtight storage container.6. Jam will keep for 2 weeks in the refrigerator or up to 3 months in the freezer.
Pizza Dough
| INGREDIENT | MEASURE |
| Water | 1 cup (8 oz) (240g) |
| Olive oil | 2 tablespoons (1 oz) (28g) |
| Honey | 1 tablespoon (0.5 oz) (21g) |
| Kosher salt | 1 teaspoon (6g) |
| All-purpose flour | 3 cups (15 oz) (426g) |
| Bread machine yeast or active dry yeast | 2 1/2 teaspoons (8g) |
METHOD1. Place all ingredients in order listed into the Bread Maker; close Lid.2. Press the MODE Button to select DOUGH.3. Press the START/STOP to begin the mixing cycle.4. When cycle is complete, remove dough and use as desired.
Natural Homemade Yogurt
| INGREDIENT | MEASURE |
| Whole pasteurized milk | 1 quart (34 oz) (963g) |
| Yogurt, with live cultures | 3 tablespoons (1.5 oz) (45g) |
METHOD1. Pour milk into the Bread Maker; close Lid.2. Press the MODE Button to select YOGURT, use the TIME Button to set the time (8-12 hours) then press the START/STOP Button to begin heating.3. When Bread Maker beeps after it reaches 110°F, whisk in the yogurt until combined thoroughly.4. Press the START/STOP to begin the cycle.5. When a cycle is complete, refrigerate yogurt for 4 hours or up to 2 weeks.TIP:Yogurt is deliciously served with a spoonful of the Cherry Jam on page 29. You can also add some store-bought granola for added texture. For Greek-style yogurt, strain the yogurt overnight in a paper towel-lined strainer set over a bowl in the refrigerator.
Limited Warranty
This warranty covers all defects in workmanship or materials in the mechanical and electrical parts, arising under normal usage and care, in this product for a period of 12 months from the date of purchase provided you are able to present a valid proof-of-purchase. A valid proof-of-purchase is a receipt specifying the item, date purchased, and cost of the item. A gift receipt with the date of purchase and item is also acceptable proof of purchase. The product is intended for household use only. Any commercial use voids the warranty.
This warranty covers the original retail purchaser or gift recipient. During the applicable warranty period within normal household use, we will repair or replace, at our discretion, any mechanical or electrical part which proves defective or replaces the unit with a comparable model.To obtain service under the terms of this warranty, call Toll Free (866) 4444033.THIS LIMITED WARRANTY COVERS UNITS PURCHASED AND USED WITHIN THE UNITED STATES AND CANADA AND DOES NOT COVER:
• Damages from improper installation.• Defects are other than manufacturing defects.• Damages from misuse, abuse, accident, alteration, lack of proper care and maintenance, or incorrect current or voltage.• Damage from service by someone other than an authorized dealer or service center.This warranty gives you special legal rights and you may also have other rights to which you are entitled which may vary from the state (province) to state (province).Proof of purchase is required to validate the warranty.Shipping and handling charges may apply.
References
[xyz-ips snippet=”download-snippet”]