
![]()
![]() Pls ensure that you have carefully read all instructions fully before installing and using this appliance. Failure to follow these instructions will invalidate your warranty.
Pls ensure that you have carefully read all instructions fully before installing and using this appliance. Failure to follow these instructions will invalidate your warranty.
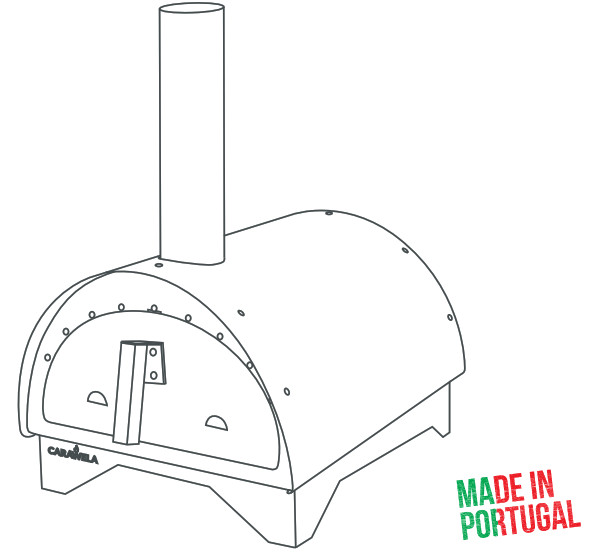 Minimo Portable Pizza OvenUser Manual
Congratulations on your new fire oven!
You are almost ready to start cooking, pls take a few moments to review these safety guidelines and instructions
Safety guidelines
![]() Pls keep children and pets at a safe distant at all times. While operating your oven will reach very high temperatures.
Pls keep children and pets at a safe distant at all times. While operating your oven will reach very high temperatures.![]() Always use protective heat resistant gloves to handle tools and pots. Never put your hand or arm into the oven when lit, unless you are wearing adequate heat resistant gloves.
Always use protective heat resistant gloves to handle tools and pots. Never put your hand or arm into the oven when lit, unless you are wearing adequate heat resistant gloves.![]() Beware of flying sparks from the mouth of the oven. Ensure that no combustible materials are within range of your oven at any time.
Beware of flying sparks from the mouth of the oven. Ensure that no combustible materials are within range of your oven at any time.![]() Do not close the oven’s door while there is fire with flames inside the oven. Closing the door will cut off oxygen to the fire, eventually causing a sudden fire eruption when the door is removed and oxygen flows into the oven again.
Do not close the oven’s door while there is fire with flames inside the oven. Closing the door will cut off oxygen to the fire, eventually causing a sudden fire eruption when the door is removed and oxygen flows into the oven again.![]() Do not alter the oven in any way, it has been designed in order to optimize its safety and functionality.
Do not alter the oven in any way, it has been designed in order to optimize its safety and functionality.![]() Do not burn rubbish or flammable fluids in your oven.
Do not burn rubbish or flammable fluids in your oven.
Combustible guidelines
Always use natural untreated firewood, never pressure treated or painted wood such as old fence posts. We advise that you try to use silver birch. Do not use charcoal, pellets, chipped wood products or sappy wood such as pine within your oven.Never use any type of accelerant, such as petrol, paraffin or similar products. These are extremely dangerous and can lead to explosions within your oven.
Benefits of cooking with fire
When cooking with fire is essential to start by making a fire that allow the oven to reach high temperature. Once the oven is heated the refractory brick floor becomes a radiator for the heat, enabling food to cook from underneath as well as from above.In your oven the fire and smoke will be drawn through the oven and across the food as it cooks, adding an incredible flavour to your cooking. This is something impossible to achieve when cooking by other means.Heat will allow food to cook, while flames will roast it. The balance between the heat within the oven and the flames present is the key to a perfect result.Wood fired pizzas have a characteristic crispy base and slightly roasted toppings. This happens as the refractory brick floor is very hot and flames are present within the oven. Carawela’s ovens achieve very high temperatures easily (usually within 15 minutes), so you’ll be able to cook pizzas extremely quickly (2-3 minutes), which means you can cater for a lot of people in a short period and at a fraction of the cost of a barbeque. Cooking meat, fish, vegetables, or bread becomes easy once you mastered the balance between heat generated by embers (allow for slow cooking) and flames (more intense heat that roasts). Food susceptible of liberating juices (fish, meat, etc.) should be cook in deep tins.
Components & assembly
Carawela’s Minimo Oven comes with the following components: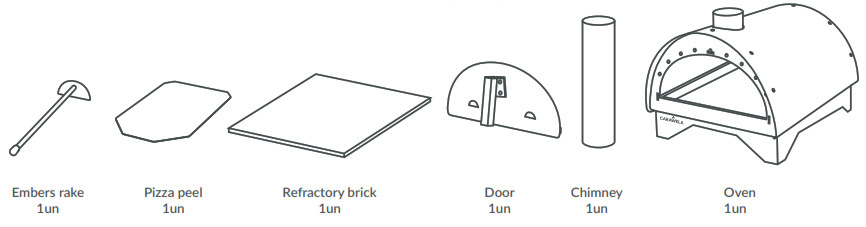
In order to have your new oven ready to cook you just need to get the components together: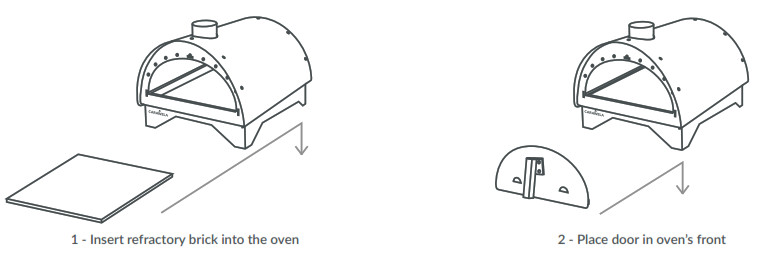

Lighting instructions
- Build a tower of kindling over a natural firelighter in the middle of the refratory stone, towards the front of the oven;
- Set light to the firelighter and ensure that the kindling lights as the fire builds;
- Keep adding kindling pieces to the fire (pls respect safety guidelines) every couple of minutes to help the fire gain size and heat; after a few minutes the fire should have built to a reasonable size and the heat should now be quite intense (when you are unable to hold your hand any closer than about 9″ / 23cm from the mouth of the oven);
- Allow the fire to keep building for a further 5 minutes (keep feeding it) and the fire should then be ready to push to the back of the oven using the embers rake;
- Once the fire has been pushed back, add around 3 or 4 pieces of quality wood (pls respect the combustible guidelines), we recommend pieces of around 6″ x 1″ / 15 x 2,5cm;
- You should now have a good bed of red embers along with a healthy flame and are now ready to start cooking;
- Every 15 minutes or so, you will see that the flame is starting to die. If you wish to keep cooking, simply add 3-4 more 6″ / 15cm logs accordingly in order to maintain a healthy fire and heat;
- Use the pizza peel to introduce and remove pizzas from the oven and lightly dust the peel with flour or semolina in order to prevent the pizzas from sticking to the peel.
Maintenance
- Over time (as is the case of any wood fired oven), the top of the opening and the door on your oven can become black as the soot from the fire builds up. This is very easy to reduce by simply cleaning the oven opening with soap and water and a soft sponge;
- The external skin of your oven can also be cleaned using soap and water and a soft sponge when needed;
- The floor of the oven should be cleared of ashes and embers when fully cold. Once you have removed the embers, please clean the refractory brick by using a brush to dust it down and remove any embers residue. Doing this will keep the refratory brick of your oven in the best condition and will ensure that your oven will be ready for use when you come to use it next time. It is perfectly acceptable to turn the refractory brick over between uses;
- Before storing the oven for a long period apply WD-40 or paraffin wax, using a cloth or cotton buds, to the exterior metal surfaces of the oven to protect against corrosion;
- When not in use the oven should be covered or shielded from the elements;
![]() Do not use cleanser containing acids, turpentine or xylene.
Do not use cleanser containing acids, turpentine or xylene.![]() Do not use metal brush or abrasive cleaners on the oven as the surfaces can get scratched.
Do not use metal brush or abrasive cleaners on the oven as the surfaces can get scratched.![]() Do not use the refractory brick wet as it absorbed moisture, causing it to crack (which does not diminish brick’s ability to cook).
Do not use the refractory brick wet as it absorbed moisture, causing it to crack (which does not diminish brick’s ability to cook).![]() Beware when disposing of ashes before they have fully cooled down (natural cooling can take up to 24 hours). If you need to remove the ashes from the oven in order to speed up cooling process:
Beware when disposing of ashes before they have fully cooled down (natural cooling can take up to 24 hours). If you need to remove the ashes from the oven in order to speed up cooling process:
- put on some protective gauntlet gloves to protect your hands and arms;
- get a square-edged metal tray (a roasting tin works well) and hold it against the mouth of the oven;
- pull the embers with the embers rake into the metal tray;
- place the tray onto the floor (not on a combustible surface) and pour cold water onto the embers so that all the heat is doused out.
Warranty conditions
Warranty requests will be valid only upon presentation of purchase receipt to dealer. Warranty covers damages to the oven’s finish within 30 days from the date of purchase, and only if the oven has not yet been fired. Warranty is considered void in the following circumstances:
- small defects and slight imperfections, as significant manual labour is involved in the making;
- defects arising from improper or careless use and wrong installation;
- color alteration and corrosion and rust formation resulting from exposure to atmospheric agents or improper use o chimica products;
- defects resulting from physical alteration, improper or intentional damage;
- damages resulting from lack of regular maintenance;
- damages caused by transport;
- damages arising from circumstances beyond our control;
- normal wear of parts;
- costs for assembly and delivery of parts under warranty;
- damages resulting from professional use (restaurants, catering, etc.). This warranty is limited to repair or replacement of damaged parts resulting from normal use and maintenance.
 www.carawela.com[email protected]

References
[xyz-ips snippet=”download-snippet”]