
OPERATING INSTRUCTIONS FOR:AC CAPRI Silent 9K WAC901G
Visit woods.se for more information and updated instruction manuals.For an extended warranty register your product at warranty-woods.com
Visit our website to:Get usage advice, updated brochures, troubleshoot and service informationRegister your product for additional services: www.warranty-woods.comCUSTOMER CARE AND SERVICEAlways use original spare parts.When contacting our Authorised Service Centre, ensure that you have the following data available:Model number, receipt and serial number.The refrigerant used in the portable air conditioners is the environmentally friendly hydrocarbon R290. This refrigerant is odorless and compared to the alternative refrigerant, the R290 is an ozone-free refrigerant.Warning / Caution-Safety information.General information and tips.Environmental information.Subject to change without notice.
WOOD’S FOR CLEAN AND HEALTHY INDOOR AIRThe brand Wood’s was born with the Wood’s family over 65 years ago in the Canadian city of Guelph, Ontario. This is where Wood’s began developing and manufactoring dehumidifiers in 1950. Since then Wood’s has helped several hundred thousand households to prevent damages from mold damp and to breathe cleaner air. Our portable air conditioners are suitable for use in most climates, where capacity is good even at different temperatures and humidity levels. They are used with good results in premises that become hot such as living rooms, offices or bedrooms. The amount of hot air that the air conditioner removes depends on the temperature, humidity level, and placement. External weather conditions may also affect the performance of the air conditioner.Wood’s air conditioners are safe in operation and intended for continuous use over many years.
HOW DOES THE AIR CONDITIONING UNIT WORK?Low pressure gives cold airThe main element of the air conditioner is a coolant, which under low pressure is converted to gas. The process “creates cold”, which is transmitted inward, while keeping the warm air out.A liquid coolant is passed through an expansion valve and into a pipe where pressure is low. The coolant evaporates and turns into a gas. The process absorbs heat from the surroundings and the pipe is cooled.A fan blows the cold air into the room.The gas is passed through a compressor which increases the pressure and converts the gas into a liquid. In this process, heat is released, which is led to pipes on the opposite side and blown out by a fan.A thermostat shuts off the unit when the indoor air is cold enough.
SECURITY WARNINGS
Flammable material. This appliance contains R290/Propane a flammable refrigerant. Refer to this manual for safety information. Read technical manual Read operators manual.
SAFETY INFORMATIONBefore the installation and use of the appliance, carefully read the supplied instructions. The manufacturer is not responsible if an incorrect installation and uses causes injuries and damages.Always keep the instructions with the appliance for future reference.Children and vulnerable people safety![]() WARNINGRisk of injury or permanent disability.This appliance can be used by children aged 8 years and above and persons with reduced physical, sensory or mental capabilities or lack of experience and knowledge if they have been given supervision or instruction concerning the use of the appliance in a safe way and understand the hazards involved.Children and vulnerable people safety
WARNINGRisk of injury or permanent disability.This appliance can be used by children aged 8 years and above and persons with reduced physical, sensory or mental capabilities or lack of experience and knowledge if they have been given supervision or instruction concerning the use of the appliance in a safe way and understand the hazards involved.Children and vulnerable people safety![]() WARNINGRisk of injury or permanent disability.This appliance can be used by children aged 8 years and above and persons with reduced physical, sensory or mental capabilities or lack of experience and knowledge if they have been given supervision or instruction concerning the use of the appliance in a safe way and understand the hazards involved.Do not let children play with the appliance.Children of less than 3 years should be kept away unless continuously supervised.Keep all packaging away from children.Cleaning and user maintenance shall not be made by children without supervision.General SafetyThis appliance is intended to be used in household and similar applications such as: Family room, living room, staff kitchen areas in shops, offices, and other working environments. The rating plate is located at the side or back of the Air Conditioner. Keep ventilation openings clear of obstruction.Do not use mechanical devices or other means to accelerate the defrosting process, other than those recommended by the manufacturer.The appliance shall not be stored in a room with operating ignition sources (for example open flames, an operating gas appliance, or an operating electric heater. Do not pierce or burn.Be aware that refrigerants may not contain an odor. Do not use water spray and steam to clean the appliance. Clean the appliance with a moist soft cloth. Only use neutral detergents. Do not use abrasive products, abrasive cleaning pads, solvents, or metal objects.If the supply cord is damaged, it must be replaced by the manufacturer, its Authorised Centre or similarly qualified persons in order to avoid a hazard.
WARNINGRisk of injury or permanent disability.This appliance can be used by children aged 8 years and above and persons with reduced physical, sensory or mental capabilities or lack of experience and knowledge if they have been given supervision or instruction concerning the use of the appliance in a safe way and understand the hazards involved.Do not let children play with the appliance.Children of less than 3 years should be kept away unless continuously supervised.Keep all packaging away from children.Cleaning and user maintenance shall not be made by children without supervision.General SafetyThis appliance is intended to be used in household and similar applications such as: Family room, living room, staff kitchen areas in shops, offices, and other working environments. The rating plate is located at the side or back of the Air Conditioner. Keep ventilation openings clear of obstruction.Do not use mechanical devices or other means to accelerate the defrosting process, other than those recommended by the manufacturer.The appliance shall not be stored in a room with operating ignition sources (for example open flames, an operating gas appliance, or an operating electric heater. Do not pierce or burn.Be aware that refrigerants may not contain an odor. Do not use water spray and steam to clean the appliance. Clean the appliance with a moist soft cloth. Only use neutral detergents. Do not use abrasive products, abrasive cleaning pads, solvents, or metal objects.If the supply cord is damaged, it must be replaced by the manufacturer, its Authorised Centre or similarly qualified persons in order to avoid a hazard.
SAFETY INSTRUCTIONS
Installation WARNINGOnly a qualified person must install this appliance.Remove all the packaging.Do not install or use a damaged appliance. The appliance shall be installed, operated and stored in a room with a floor area larger than 12 m². Obey the installation instruction supplied with the appliance.Always be careful when you move the appliance because it is heavy. Always wear safety gloves. Be aware that refrigerants may not contain an odor.Make sure the air can circulate around the appliance.Wait at least 4 hours before connecting the appliance to the power supply. This is to allow the oil to flow back in the compressor.Do not install the appliance close to radiators or other heat sources.Do not install the appliance where there is direct sunlight.Electrical connection WARNINGRisk of fire and electrical shock.The appliance must be connected to a grounded outlet.Make sure that the electrical information on the rating plate matches with the power supply. If not, contact an electrician.Always use a correctly installed shockproof socket.Do not use multi-plug adapters and extension cables.Make sure not to cause damage to the electrical components (e.g. mains plug, mains cable).Contact the Authorised ServiceCentre or an electrician to change the electrical components.The main cable must stay below the level of the main plug.Connect the mains plug to the mains socket only at the end of the installation.Make sure that there is access to the mains plug after the installation.Do not pull the main cable to disconnect the appliance. Always pull at the mains plug.Use WARNINGRisk of injury, burns, electrical shock or fire.Do not change the specification of this appliance.Be careful not to cause damage to the refrigerant circuit. It contains propane (R290), a natural gas with a high level of environmental compatibility. This gas is flammable.If damage occurs to the refrigerant circuit, make sure that there are no flames and sources of ignition in the room. Ventilate the room.Do not put flammable products or items that are wet with flammable products near or on the appliance.Disposal WARNINGRisk of injury.Disconnect the appliance from the main supply.Cut off the main cable and discard it.The refrigerant circuit of this appliance is ozone-friendly.Contact your municipal authority for information on how to discard the appliance correctly.Do not cause damage to the part of the cooling unit that is near the heat exchanger.
SET UP AIR CONDITIONER FOR INSTALLATION
Installation
Important
- This air conditioner may be moved around indoors conveniently; keep the unit in an upright position while moving it. The air-conditioner shall be placed a flat surface.Do not install or operate this air-conditioner in a bathroom or other wet environment.Since a portable air conditioner is on wheels, it is easy to change positions. When the heat turns on, you just move your portable air conditioner into the room and can quickly get started cooling the space.The air conditioner must be operated in an enclosed area to be most effective. Close all doors, windows, and other outside openings to the room. The effectiveness of the Air Conditioner depends on the temperature and humidity level.
- Place the air conditioner in a location that does not restrict airflow through the front of the unit.
- An Air Conditioner operating in a room will have little or no effect in drying an adjacent enclosed storage area, such as a closet unless there is adequate circulation of air in and out of the area. A portable Air Conditioner evacuates the heat from the unit with a ventilation hose through a window or exhaust air valve.
- There should be a minimum of 30 cm distance between the Air Conditioner and the closest object. See the picture for reference.
PRODUCT DESCRIPTION
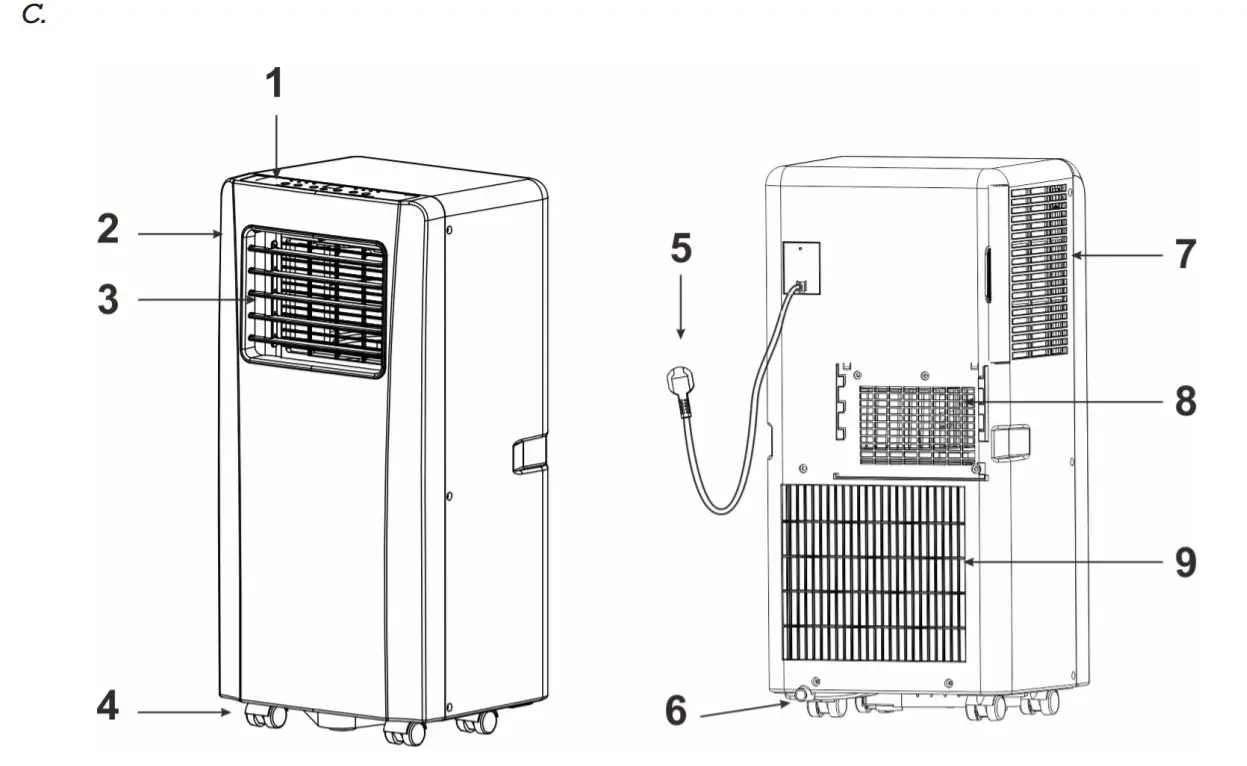
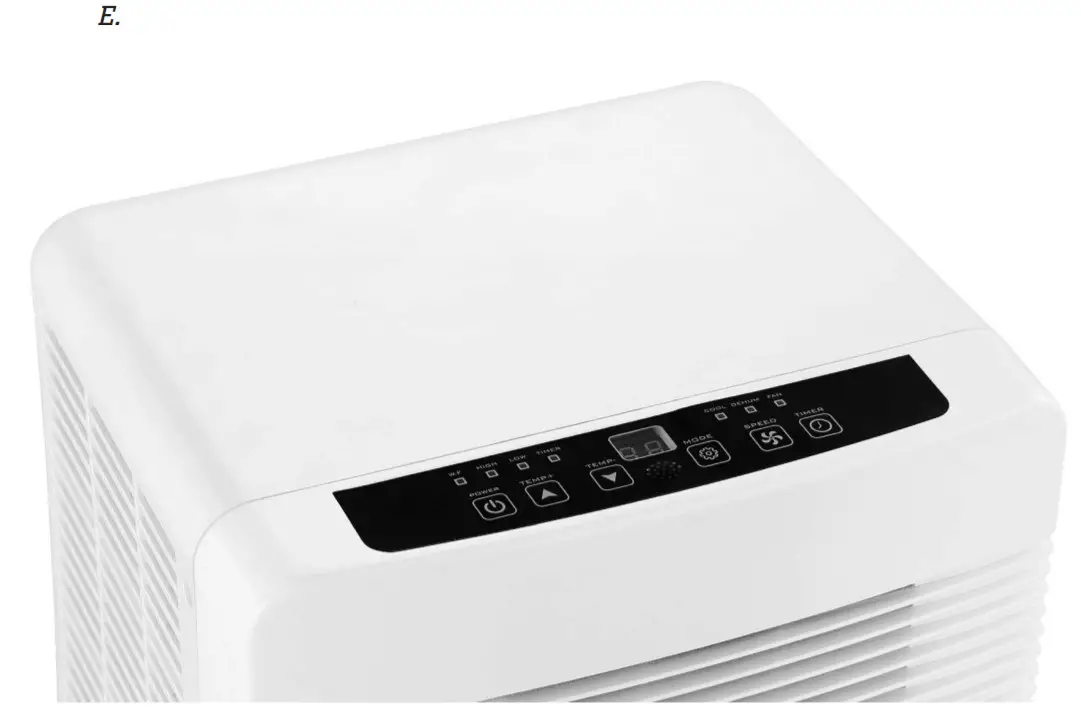
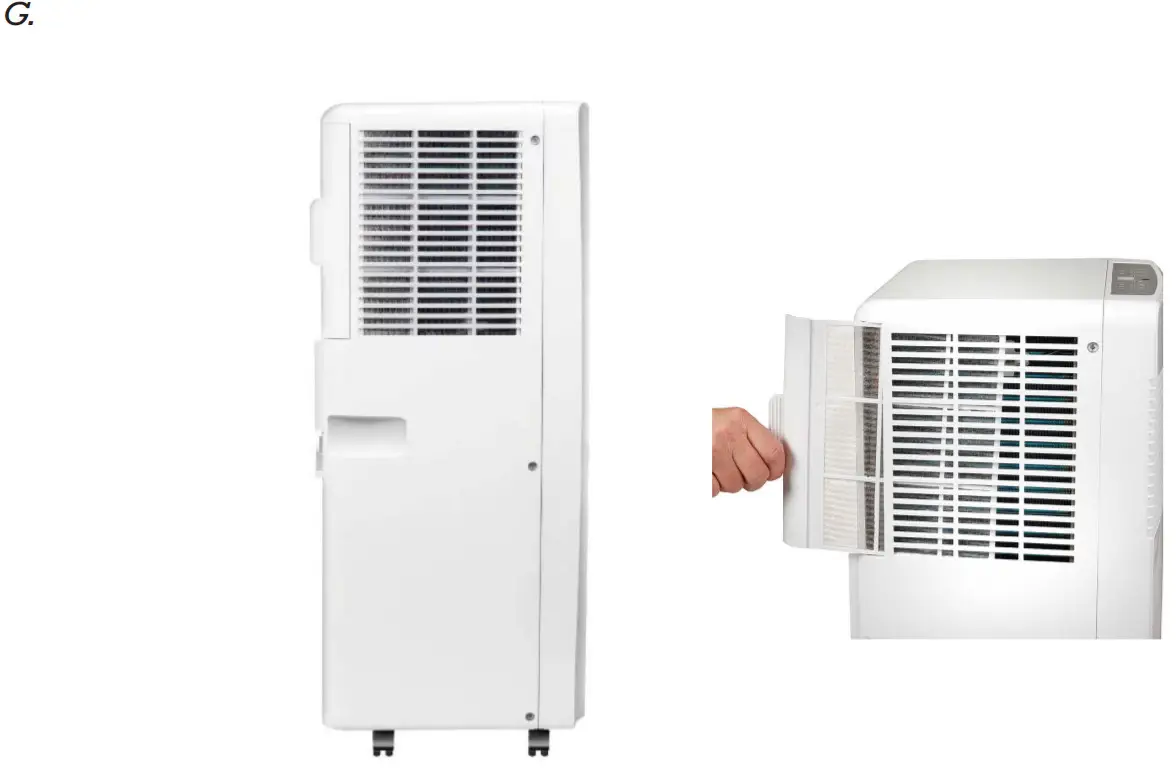
| A1. Exhaust hose2. Housing adaptor3. Window Connector4. Window Kit5. Dowel6. Batteries7. Remote ControllerB1. Product picturesC1. Control panel2. Front cover3. Louver4. Castor5. Back cover6. Power cord7. Drainage outlet8. Air inlet9. Air outletD1. Product back picturesE1. Product top picture | F1. Water full2. High fan speed3. Low fan speed button4. Operation MODE button5. Cooling button6. Dehumidifying button7. FanFA. Power on/offB. Temperature upC. Temperature downD. Operation MODEE. Fan speedF. Timer on/offG1. Picture of air filter on the sideH1. Schematic diagram of filter screencleaningI1. Power on/off2. Timer on/off3. Operation MODE4. Fan speed5. Temperature up6. Temperature down | J1. Remote control electromagnetic installationK1. Twist both ends of the exhaust hose into the Hose Connector.L1. Introduction to Exhaust Hose InstallationM1. Window Slider Kit InstallationN1. Insert bore for window setO1. Connect drain hoseP1. Picture of the water outlet |
FUNCTION OF THE OPERATION MODES AND INSTALLATION DESCRIPTIONS
A. AccessoriesAfter unpacking, please check whether the above-mentioned accessories are included, and check their purposes in the installation introduction in this manual.B. Mobile air conditionerJ. Appearance and Function of Remote Control.Notes:- Do not drop the remote control. Do not place the remote control in a location exposed to direct sunlight.M. Operation Introduction Before starting operations in this section:
- Find a place where there is a power supply nearby.
- Install the exhaust hose, and adjust the window position well.
- Connect drain hose well (only for using a heating model);
- Insert the power cord into an grounded AC220~240V/50Hz socket;
- Press the POWER button to turn on the air-conditioner.
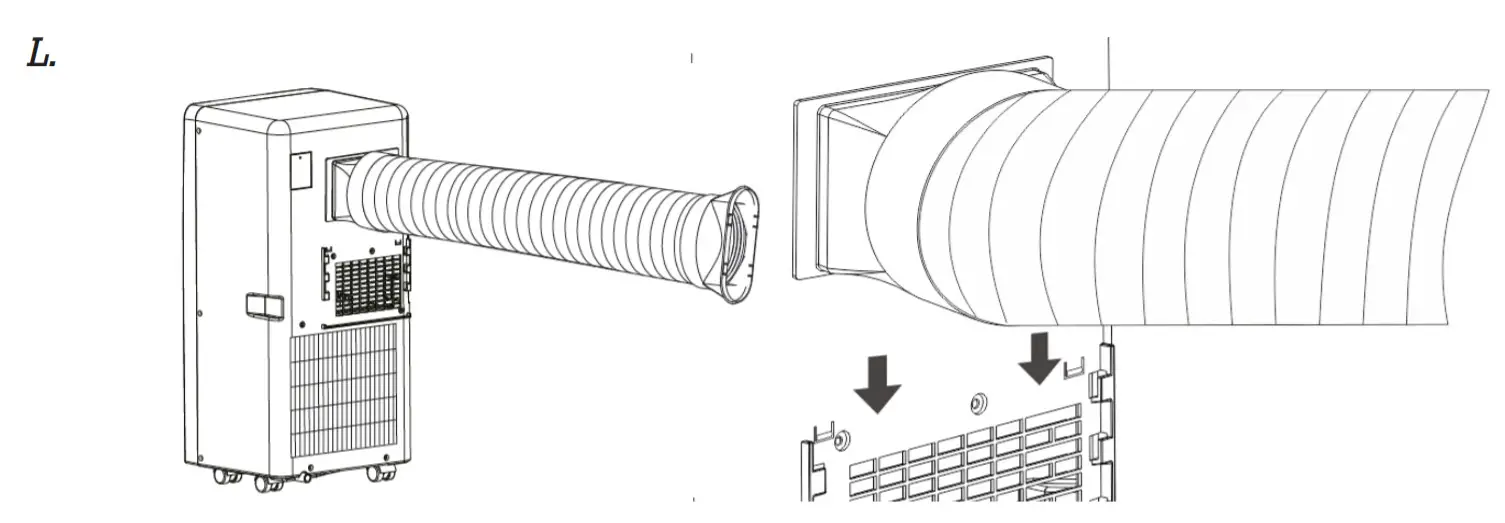
K&L. Introduction to Exhaust Hose InstallationA) Temporary installation
- Twist both ends of the exhaust hose into the Hose Connector.
- Insert the square fixing clip into air the outlet at the back of the air conditioner
- Put the other end of the exhaust hose to the near windowsill.
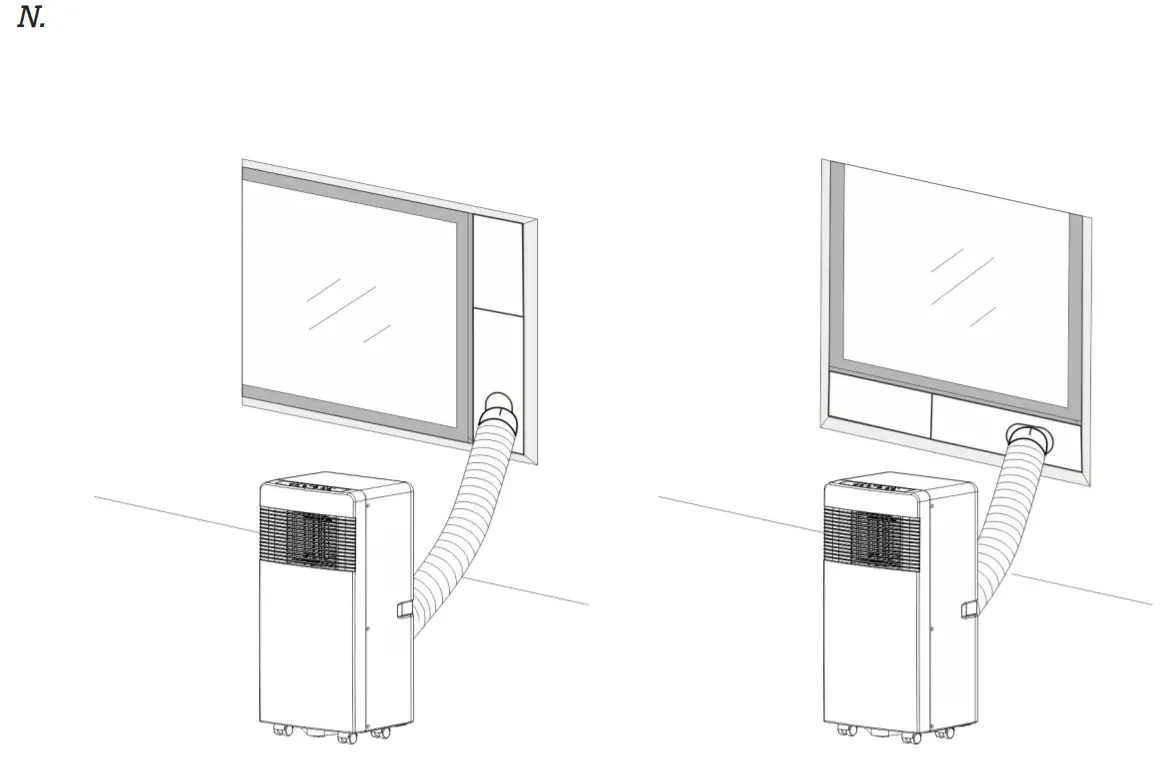
N. Window Slider Kit InstallationThe installation manner of the window slider kit is mostly in “horizontal” and “vertical”. As shown Fig.5 and Fig.5a, check the min. and max. size of the window before the installation.
- Install the window kit on the window ;
- Adjust the length of the window slider kit according to the window width or height, and fix it with the dowel;
- Insert the Window Connector hose to the hole of the Window Kit.
- Before cleaning, be sure to disconnect the unit from any electric supply outlet;
- Do not use gasoline or other chemicals to clean the unit;
- Do not wash the unit directly;
- If the conditioner is damaged, please contact the dealer or repair shop.
1. Air Filter2. Clean the Air-conditioner Surface First, clean the surface with a neutral detergent and wet cloth, and then wipe it with a dry cloth.E. Before usingCheck up whether the exhaust hose has been mounted properly.Cautions for cooling and dehumidifying operations:-When using functions on cooling and dehumidifying, keep an interval of at least 3 minutes between each POWER.-Power supply meets the requirements.-The socket is for AC use.-Do not share one socket with other appliances.-Power supply is AC220-240V, 50Hz
- Cooling operation-Press the “Mode” button till the “Cool” icon appears.-Press the “
 ”or“ ”button to select the desired room temperature.(16°C -31°C )-Press the “Fan Speed” button to select wind speed.
 - Dehumidifying operationPress the “Mode” button till the “Dehumidify” icon appears .-Automatically set the selected temperature to current room temperature minus 2°C .-Automatically set the fan motor to LOW wind speed.
- Fan operation-Press the “Mode” button till the “Fan” icon appears.-Press the “Fan Speed” button to select wind speed.
- Heating operation (this function is not available for a cold-single unit)-Press the “Mode” button till the “Heat” icon appears.-Press the “ ”or“ ” button to select the desired room temperature.(16°C-31°C)-Press the “Fan Speed” button to select wind speed.
- Timer operationTimer ON setting:-When the air-conditioner is OFF, press the “Timer” button and select a desired ON time through the temperature and time setting buttons.-“Preset ON Time” is displayed on the operation panel.-ON time can be regulated at any time in 0-24 hours.Timer OFF setting-When the air-conditioner is ON, press the “Timer” button and select a desired OFF time through the temperature and time setting buttons.-“Preset OFF Time” is displayed on the operation panel.-OFF time can be regulated at any time in 0-24 hours.
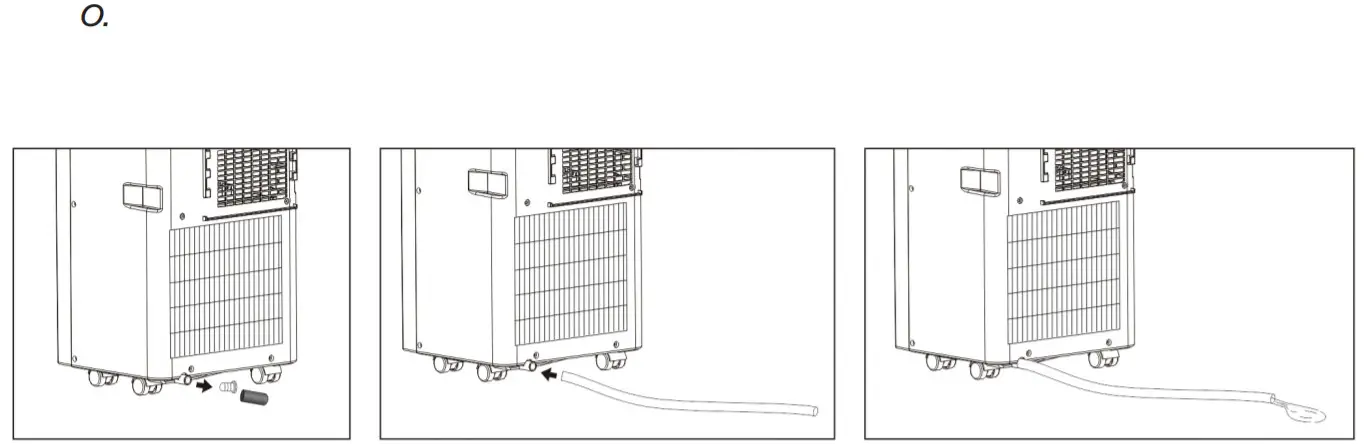
- Continuous DrainageInternal Tank Water-Full Alarm FunctionThe inner water tank in the airconditioned one water level safety switches, it controls the water level.When the water level reaches an anticipated height, the water full indicator lights up. When the water is full, please remove the rubber blockage from the drainage hole at the bottom of the unit, and drain all water outside.Continuous Drainage-When you plan to leave this unit unused for a long time, please remove the rubber blockage from the drainage hole at the bottom of unit, and drain all water outside.-You can use the continuous drainage with a drainage hose connected to the bottom drain hole when the unit working at the HEAT mode.-Continuous drainage is not needed to be applied when the unit working at the COOL or DEHUMIDIFY mode.The unit can evaporate the condensate water automatically by the splash motor. Make sure thedrainage holes are stemmed well.-If the water splash motor is damaged, continuous drainage can be used.
To connect the drain hose to the bottom drain hole, the unit can also work well.-If the splash motor is damaged, intermittent drainage can also be used. Under this condition, when the water full indicator lights up, please connect a drain hose to the bottom drainage hole, then all the water in the water tank will be drained outside. The unit can also work well.
MaintenanceClean the unit with a soft moist cloth. Do not use solvents or strong cleaners as this might damage the surface of the unit.Service If the Air Conditioner requires servicing,you must first contact your local retailer.Proof of purchase is required for all warranty claims.Storage instructionsEnd of Season Storage
- Screw off the drain cover and pull out the stopper to drain condensate water completely.
- Keep unit running in fan mode for half-day to dry inside of unit completely to prevent it from going moldy.
- Turn off the unit, pull out plug then wrap the power cord around the wirewinding pillar, insert the plug into the universal fixing hole at the back panel of the unit, install the water stopper and drain cover.
- Remove the heat exhaust hose assembly, clean it, and keep it properly.Notes:Hold the exhaust hose assembly with both hands when removal.Push the fasteners aside on the exhaust air outlet using your thumbs, then pull out the exhaust hose assembly.
- Pack the air-conditioner properly with a soft plastic bag and put it in a dry place with appropriate dust-proof measures, and keep the unit away from children.
- Take out the batteries from the remote control and keep it properly.Note:Assure the unit is stored in a dry place. All accessories of the unit shall be protected together properly Power cord holder and universal socket can well protect the power cord.The high position of exhaust air outlet, easy assembly and venting quickly.Intelligent, environmental-friendly and energy-saving with the self-evaporative cooling system.24-hour Timer function, unique on/off reminding music.3-minute delay re-starting protection to the compressor and other multiple protection functions.
| PROBLEM | CAUSE | REMEDY |
| The unit does not start when pressing the on/off button | The water full indicator lamp blinks and the water tank is full. | Dump the water out of the water tank. |
| Room temperature is higher than the setting temperature (Electric heating mode) | Reset the temperature | |
| Room temperature is lower than the set temperature. (Cooling mode) | Reset the temperature | |
| Not cool enough | The doors or windows are not closed. | Make sure all the windows and doors are closed. |
| There are heat sources inside the room. | Remove the heat sources if possible | |
| The exhaust air hose is not connected or blocked. | Connect or clean the exhaust air hose. | |
| The temperature setting is too high. | Reset the temperature | |
| Air inlet is blocked. | Clean the air inlet. | |
| High noise level | The ground is not level or not flat enough | Place the unit on flat, level ground if possible |
| The sound comes from the flowing of the refrigerant inside the air conditioner | It is normal. |
If you are having trouble with your dehumidifier, please refer to the below troubleshooting. If nothing of the below works, please contact your retailer for servicing of your Air Conditioner.
| ERROR CODES | CAUSE | REMEDY |
| EO Code | Room temperature sensor failed | Replace room temperature sensor (the unit can also work without replacement.) |
| E2 Code | Water tank full when cooling | Take off the rubber stopper and empty the water. |
TECHNICAL DATA
| AC Capri Silent 9K | |
| Cooling capacity | 2,6W |
| Power consumption | 1,0KW |
| Air flow: | 320m³ / h |
| Energy class | A |
| Dehumidification | 24 L / 24h |
| Temperature setting | 16-31°C |
| Working temperature | 18-43°C |
| EER | 2,6 |
| Refrigerant gas | R290/160g |
| Noise level in decibels | 65dB |
| Weight | 19kg/20kg |
| Dimensions in mm, L x Bx H | 330x280x680 |
 NOTE!Register at www.warranty-woods.com and read about how to get an extended warranty. Please visit www.woods.se for more information.Recommended limits for useThe best operating ambient temperature for cooling is 17-35 °C. The unit runs up to +43°C.Fuse Parameter: φ5.0x20mm 3.15A, 250Vac.
*Technical changes and improvements may occur. All values are approximate and may vary due to external circumstances such as temperature, ventilation, and humidity. *This marking indicates that this product should not be disposed of with other household wastes throughout the EU. To prevent possible harm to the environment or human health from uncontrolled waste disposal, recycle it responsibly to promote the sustainable reuse of material resources. To return your us device, please use the return and collection systems or contact the retailer where the product was purchased. They can take this product for environmentally safe recycling.
report this ad
Wood’s is marketed and distributed by:Woods TES Sweden AB.Maskingatan 2-4441 27, AlingsåsSweden.woods.se[email protected]+46 317613610
References
[xyz-ips snippet=”download-snippet”]