![]()
INSTALLATION AND CARE GUIDEELECTRONIC WASHLET TOILET :B0980S
Compliance with the following codes & standard:
- 2015 Uniform Plumbing Code® ( UPC )
- 2018 International Plumbing Cod®e ( IPC )
- 2018 International Residential Code® ( IPC )
- CSA B45.5 / IAPMO Z124-2017- Plastic Plumbing Fixtures

Customer Service Phone: 562-229-0088. (Monday – Friday 9 AM – 5 PM Pacific Time)Or Email: [email protected]
Safety instructions
Please read the instructions carefully before installation and keep it available for future maintenance or reference.Failure to observe this instruction can cause bodily injury and property damage.
Symbol illustration
 WarningIndicates that failure to follow the instruction may cause serious injury or a fatal.
CautionIndicates that failure to follow the instruction may cause bodily injury or property damage.
| Symbol | Indication |
 |
Prohibited activities |
|
Mandatory activities |
| Warning |
|
 |
Do not throw cigarettes and other burning stuff into the toilet, otherwise, it might cause a fire. |
|
Never disassemble, repair or modify this product. Doing so may cause fire or electrical shock.Do not wash the main unit or electrical plug with water or detergent.Doing so may cause fire or electrical shock.Do not handle the electrical plug with wet hands. Doing so may cause electrical shock.It is prohibited to use other electric appliances in the same socket.It is forbidden to use the power extension or unstable loose outlet; otherwise, it may cause fire or electrical shock.If the supply cord is damaged,it must be replaced by the manufacturer, its service agent, or similarly qualified persons in order to avoid a hazard.This product is an electric appliance, so it must be placed far away from water. Please don’t drench urine and other liquid to it.Do not put a hand or other stuff over the outlet of the air dryer or block the outlet of the air dryer.Doing so may cause burn and electrical shock.Do not lay on side or upside the product during the electrical circuit, to avoid fire or burning. |
| Mandatoryactivities |
Do not install or use the product in wet places as steam room etc.This product must be reliably grounded, and ensure that the AC socket is ground to the earth. The ground lead should be used three-pin socket. If you are unsure whether it is reliably grounded, a qualified electrician or maintenance personnel should help to check and ensure. The electrical power source socket wiring should be left null line and right fire line. Never reverse power line wiring. |
| Mandatoryactivities |
This product should be used with 110V, 50Hz electrical current only, the load current is at least 13A. The power plug must be equipped with a ground fault circuit interrupter or ground fault electrical leakage protector or similar high sensitive, rapid type leakage switch (Rated sensitive current under 6mA).It is recommended to use water-proof electrical outlet which should be installed in the place where is not easily got wet.The old aging water supply hose can not be used, otherwise it might cause leakage, fire or electrical shock. Installation of the bidet seat should include specified components and a new water supply hose.When moving the product from a cold or wet environment into normal room temperature, wait for 2 hours until the condensation water is fully volatilized.Doing so can prevent the product from electrical short-circuit. |
| Caution |
|
|
When it thunders, it is strongly recommended to pull out the power plug.Do not use the product in places close to the bathtub or water tank.Do not place the product in water or other liquids.Do not touch the product that has fallen into liquids, immediately pull out the power plug.Do not stand on the ceramic toilet. Do not hit the ceramic. A heavy impact on ceramic leads to damage and water leakage.Never embed ceramic toilet base in cementitious material ( such as cement mortar). It may lead to expansion crack.Do not stand on product unit, seat, and cover.Do not use lacquer thinner, petrol, liquid medicine, detergent, insecticide, toilet cleaner and scrubbing brush to clean the product.Only use tap water or potable water; otherwise, it may cause chafing.Exposure to direct sunlight is prohibited.This product is equipped with a soft-closing seal cover. Heavy pressing or pushing may damage the soft-closing damper.Do not connect the water supply to the heater outlet. Make sure inlet water the temperature at 3~35 ℃, exceeding the specified range will result in the built-in heating module not working.Do not lean against the seat cover when using the product, to avoid damage. Do not try flushing the newsprint,diapers, sanitary napkins and other items easy to check the toilet.Stop using the product and shut off the power when the product malfunctions, please contact service people for professional service. |
|
|
When installing, disassembling, repairing, and maintaining the product, you must unplug the power supply and close the water supply valve.Do not use in an environment below 0 °C. If the room temperature is below 0 °C, the water in the tank must be discharged to prevent the tank from freezing.If it is not used for a long time, the power must be turned off and the water in the water tank should be discharged. When used by people(including children) who lack physical, sensory, intellectual abilities, or lack of experience and common sense, This product needs to be used under the supervision of a person and patients with heart disease should use it with caution.Do not let children play with this product.To prevent damage caused by freezing, please implement warmth measures to increase the temperature of the toilet. |
| Main Unit | Rating pressure | 110V.50Hz |
| Rating power | 1120W | |
| Overall unit Waterproof | IPX4 | |
| Water pressure range | Minimum water pressure 0.08MPa Maximum water pressure 0.8MPa | |
| Electrical wire | length is about 2 2m | |
| Toilet | Average flush volume | 1.28GPF( Full flush 1.6G/Half flush 1.1G) |
| Flushing mode | Siphonic jet | |
| Rough-in distance | 1T | 15 3/4″ |
| Outlet outside diameter | 3 118″-3 3/4″ | |
| Drainage method | Down-drain | |
| Cleaning device | Heating power | 1400W |
| Water temperature | 6 different level adjustments | |
| Water volum | 3 different level adjustments | |
| Cleansing mode | Rear washing/Massage washing . Feminine washing/ Massage washing. Pulse massage(optional) | |
| Spray cleansing location | 5 different level adjustments | |
| Water pressure protector | Pressure stab&er, Automatic pressure discharging | |
| Anti-fouling device | Automatic cleaning nozzle. Anti-syphon devise. Anti-backflow devise. Filter device | |
| Safety device | Thermal fuse, Water temperature sensor, Ground protection.Thermostat,Over-temperature protection –Leakage protection plug | |
| Dryingdevice | Warm wind speed | Over 0.2m3/min |
| Warm wind temperature | 6 different level adjustments | |
| Heating power | 250W | |
| Safety device | Thermal fuse. Temperature sensor. Thermostat | |
| Deodorization | Deodorization Method | Diatoms Deodorization |
| Heated seat | Surface temperature | 6 different level adjustments | |
| Heating power | SOW | ||
| Heated burning protection | The seat temperature will automatically decrease to level 1 in 10 minutes after using | ||
| Safety device | Sensed area. Temperature sensor.Thermal fuse. Bimetal thermostatteakage protection plug | ||
| Caringdevice | Night light assembly | Intelligent.Often in the off state.Normally on | |
| User ID setting | To avoid disturbance from remote controls by multi-user | ||
| Automatic flushinc | Automatic flush after using the toilet | ||
| Flushing upon power off | Manual flushing the toilet after using | ||
| Foot-sensing flushing function | Foot-sensing flushing function is available (optional) | ||
| Differ in shape | Auto lid open Close | Slow close | Auto lid open-close |
| Antibacterial site | Seat. Spray nozzle |
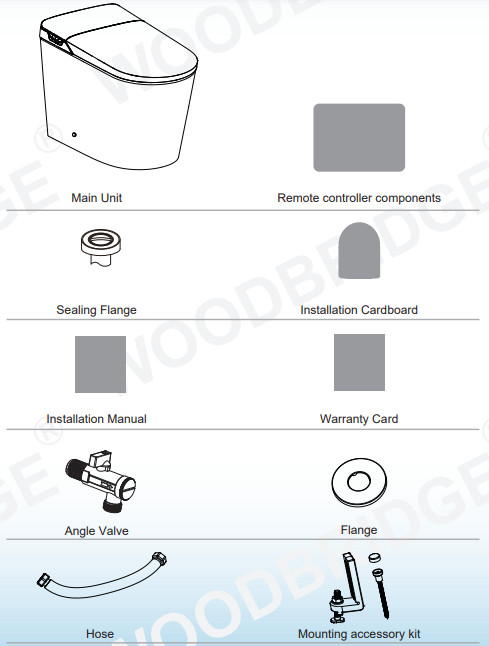
List of materials
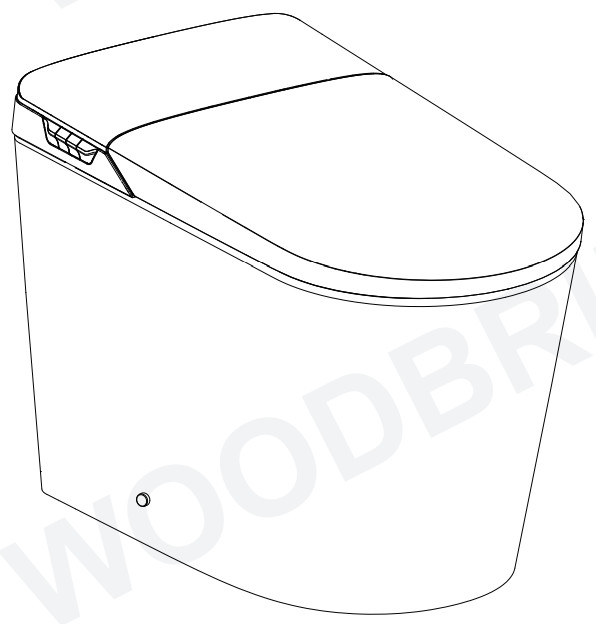
Technical drawing
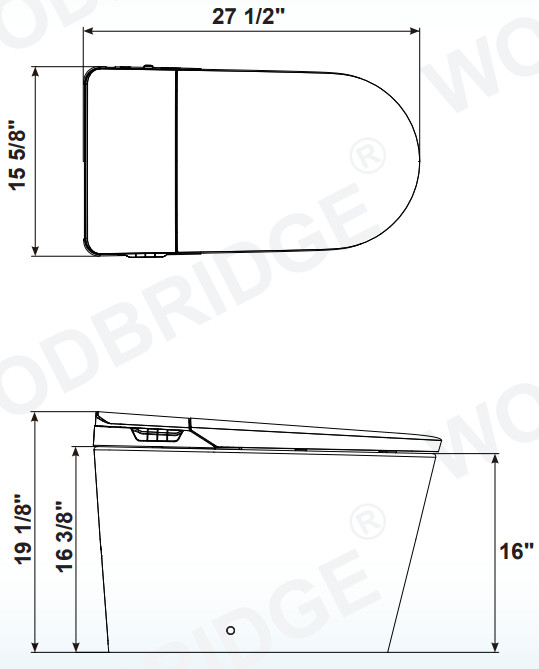
- The product drawing is for reference only, and we reserve the right to modify the appearance of the product.
- If the appearance of the product is changed, the actual product shall prevail.
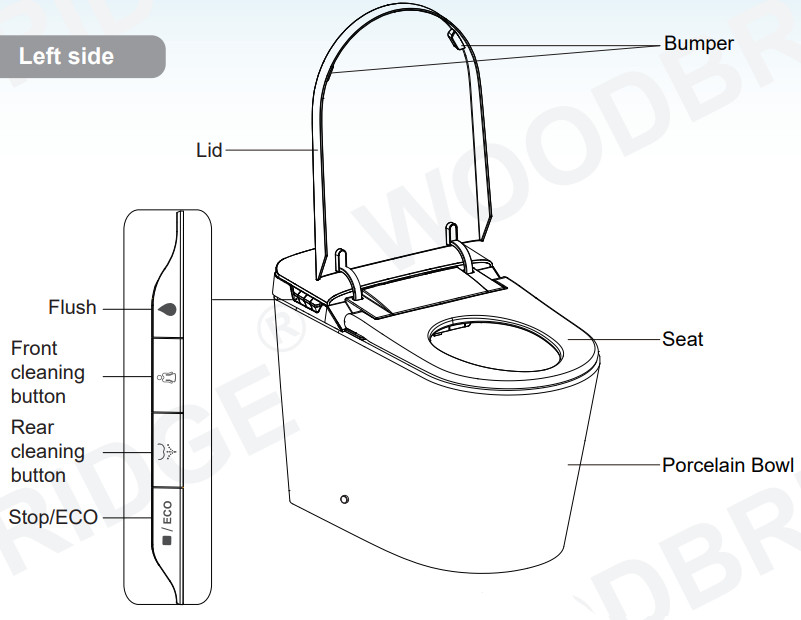
Parts identification

Installation of ceramic toilet
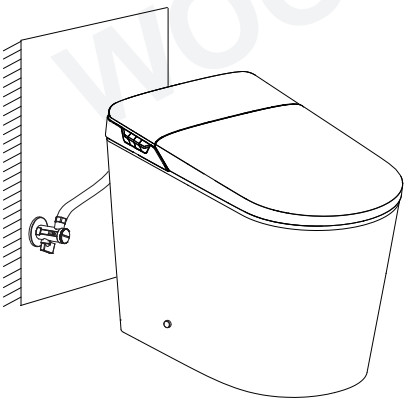
- Installation of mating angle valveDraw drain outlet centerline on the floor, Install angle valve at the proper position on the wall according to the dimension of the toilet.

- Cardboard installationAlign cardboard with the centerline of the drain outlet.Draw contour lines according to cardboard.
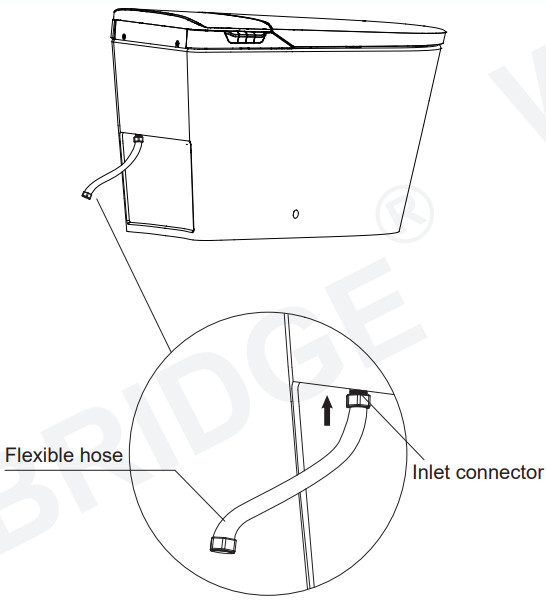
- Connect a flexible hose to the water inletConnect one end of the new hose to the water inlet and tighten it.
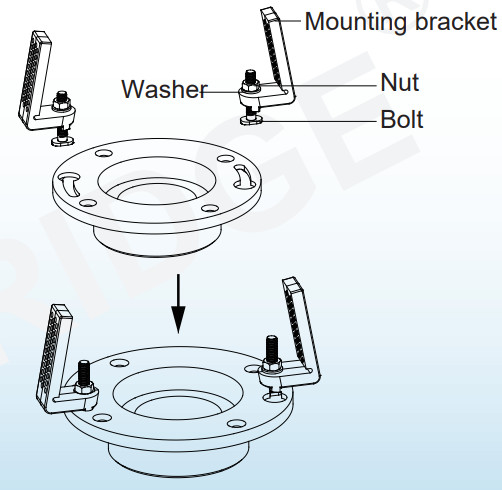
- Mounting bracket installationAssemble the mounting bracket with bolts and then install them to the pre-installed flange plate on the ground and lock tight with nuts.
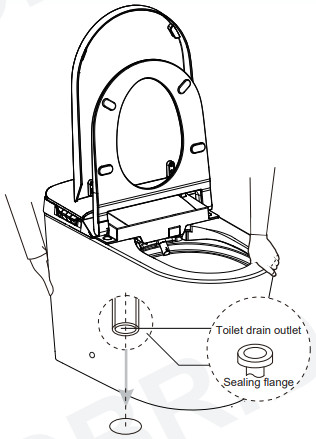
- Porcelain toilet installationInstall sealing flange into drain outlet.Install ceramic toilet on the corresponding position according to contour line.Tips:The toilet is heavy, and it needs to open the seat cover to carry it by two people.
- Screw installationPut the screw through the fixing sleeve and then install it through the holes(on both sides of the toilet ceramic) to the mounting racket on the ground, and lock tight with a tool; Put the decorative cap on the fixing sleeve.
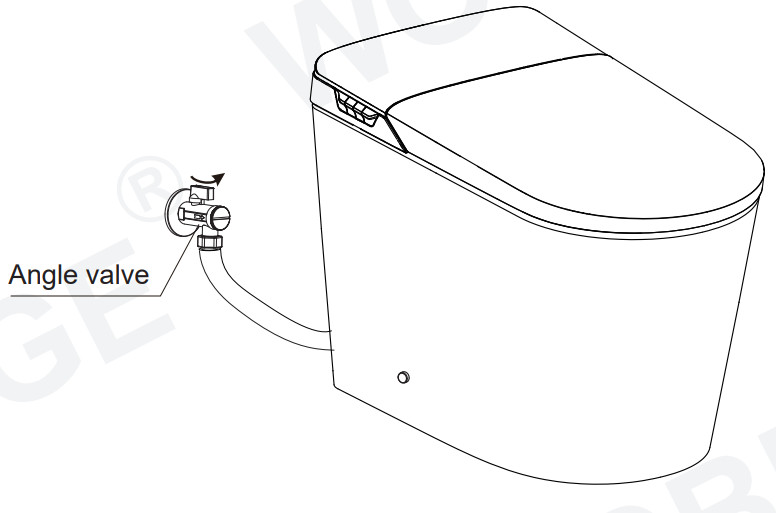
- Connect a hose to angle valveConnect another end of the new hose to the angle valve and tighten it.
- Silicone SealantApply high-quality mildew glass glue around the lower edge of the toilet.Tips:Please clean the drain outlet;Please make sure the porcelain toilet sits perfectly on the drain outlet.


 Tips:The toilet is heavy, and it needs to open the seat cover to carry it by two people.
 Tips:Please clean the drain outlet;Please make sure the porcelain toilet sits perfectly on the drain outlet.
Previous preparation
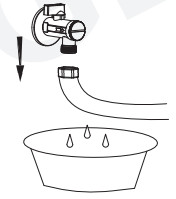
- Turn on the angle valveCheck thread connection, make sure no leakage is found, unscrew angle valve anticlockwise to maximum opening.(Tips: When opening for the first time, the angle valve handle has a larger torque)
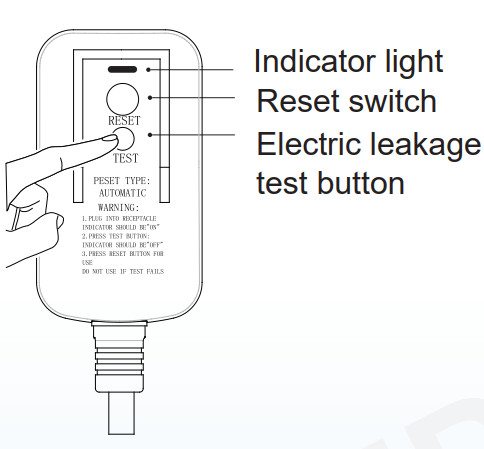
- Power ConnectionInsert power line leakage protection plug into the power socket, press the reset switch, plug indicator lights on indicating that the power is on.Tips:Press electric leakage test button prior to usage, the reset switch pops up indicating that the leakage protection function is normal. Press the TEST button (then RESET button) every month to assure proper operation.
- Self-inspection1. The main unit buzzer rings “beep”, first blue light on, then blue light off; red light up again, start self-inspection.2. The main unit buzzer rings another “beep”, self-inspection finish.3. Start function mode for normal usage.
Auto lid open/close
If you purchase the intelligent toilet with an auto lid open/close function, the product can achieve the function of the auto lid open/close. The factory default of this function is on closed situation, so please start the auto lid open/close function by using the remote.
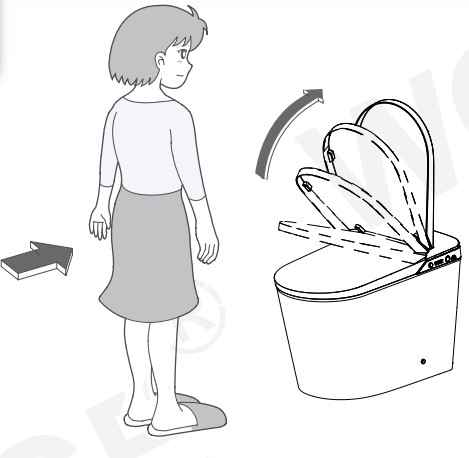
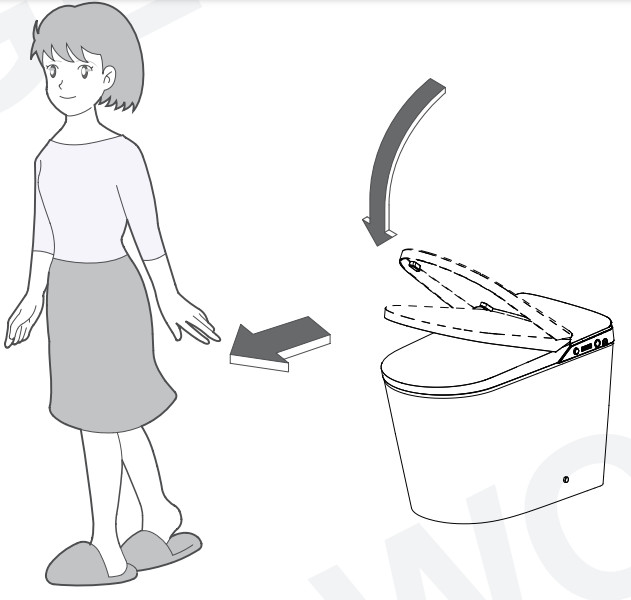
- When the user close to the toilet1. When a user is close to the seat, and the human body sensing window detects the action of the user, the power and energy-saving indicator lights on, and then the seat cover opens automatically.
- After Using toiletThe seat cover closes automatically 180 seconds later after user leaves.
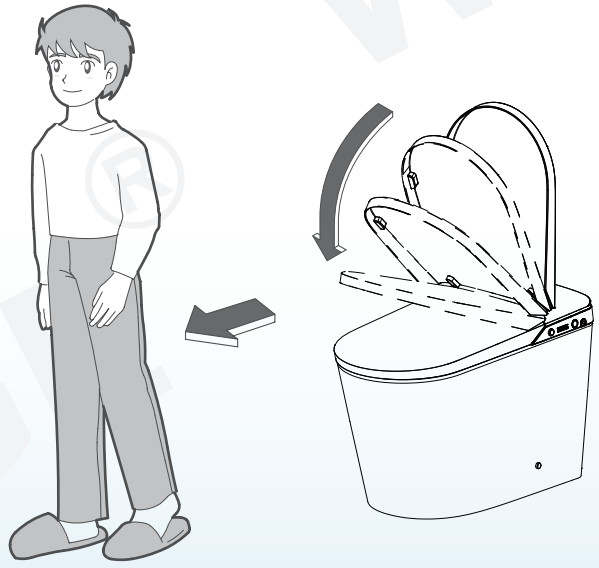
- When male users stand to use the toilet1. Open the seat by remote controller or hand.2. The lid and seat will be closed 180 seconds later after the user leaves.
If you buy an electronic toilet with the foot-sensing lid open function, the lid can be automatically open by touching the sensing area with your foot. When the toilet lid and the seat are both closed, touch the sensing area with your foot to open the toilet lid; When the toilet lid is open and the seat is closed, touch the sensing area with your foot to open the seat; When the toilet lid and seat are both open, touch the sensing area with your foot to activate half flush.
Daily maintenance
Main unit care and maintenance
- Shut off power supply at maintenance.
- Wipe the stain with a soft damp cloth.
- Safety self-inspectionAfter cleaning, re-connect the toilet with the power supply.

Spray nozzle maintenance and care
- Nozzle self-cleaningWhen no user is seated, press the “Rear Wash/massage” button on the main unit, the nozzle will automatically extend and flow out the washing water.
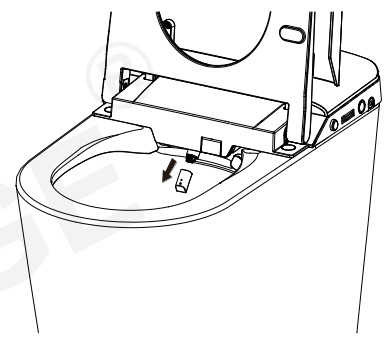
- Spray nozzle disassembleWhen the nozzle moves forward, the nozzle can be disassembled to clean.
- Use soft cloth or soft brush to cleanDo not pull or push the wand,to avoid damage.
- Nozzle retractionPut the nozzle back to the front of the boom and press the “Stop” button to automatically retract the nozzle

Emergency troubleshooting
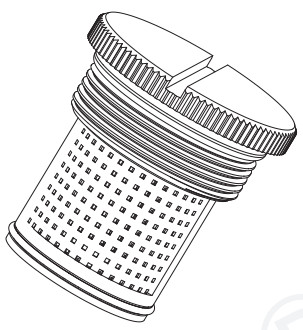
Maintenance of filter netTime for maintenance: It is under normal water pressure but poor flush performance occurs.
- Unscrew angle valve nut
- Remove filter net
- Use a toothbrush to clean the filter net
- Reinstall filter net and angle valve nut

Electricity and water supply cut-off
- No powerActivate flushing by pressing the flush button manually.
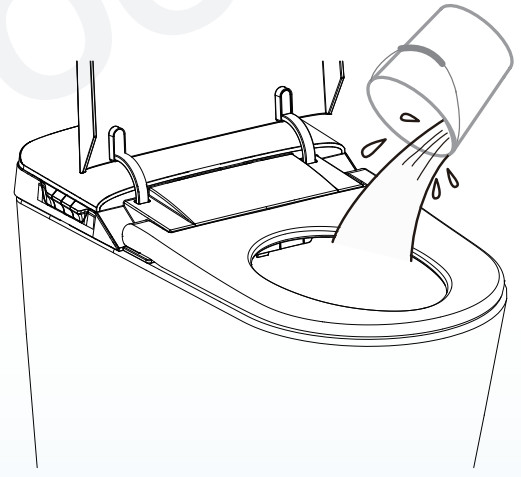
- No water supplyFlush the toilet bowl with about 2 gallons of waterNote: Avoid water spilling from the bowl.

Failure of remote control
- Operate the panels on the Smart bidet seat
- Battery replacementTake remote control from wall bracket Open battery cover to replace the battery and put back to the wall bracketTips: When replacing the battery, the gear set by the remote control will return to the default value and needs to be reset.
When the product is left unused for a long timeEspecially in winter when no one at home for a long time, please drain out the water inside the tank and pipe to prevent freezing.
To discharge water
- Drain out the water inside tankTurn off the angle valve, flush all water inside by pressing and holding the manual flush button.
- Drain out the water inside the pipeUnscrew the hose connector off-angle valve, drain the water in the pipe and reinstall.
- Unplug and cut off the electricity
- Handle the remaining water in the bowl It is suggested to put some antifreeze into the water inside the bowl.
Tips: Make sure to turn on the water supply and power when you use the toilet again. Note: Before water discharging, the power must be cut off.
The illustration of Main Unit Keys
| The illustration of main unit buttons | ||
 |
1.Press and hold the “Stop’ button on the unit, the unit enters the shutdown mode (red light off), press the “stop button” again, the unit returns to the working mode (lights red).(In the shutdown mode | |
| except for the “Stop’ button on the main unit, any button (including the unit and the remote control) is invalid].2.When the user is seated, press the “Stop” button on the main unit to stop the feminine washing, rear washing or drying function. When the user is not seated, press the “Stop” button on the main unit repeatedly. The main unit switches over between working mode (red light) and power save mode (blue light). | ||
 Rear washing/ massage Rear washing/ massage |
1. When people are seated, press the “rear cleaning” button, to wash the rear portion of the body; Press the “rear cleaning” button repeatedly, then turn on/off the mobile massage function; Press the “stop” button to stop. When one circle cleaning is finished and the body remains seated, the dry function will be automatically turn on and will stop after one cycle.2. When no one is seated, press the “rear cleaning” button, the wand will stretch out, people can wash the nozzle and wand manually, press the “stop” button, the wand will retract. | |
| When people is seated, press the “Front cleaning” button, to wash the front portion of the body; Press the “Front cleaning” button repeatedly, then turn on/off the mobile massage function; Press the “stop” button to stop. When one circle cleaning is finished and the body remains seated, the dry function will be automatically turn on and will stop after one cycle. | ||
| 1. When the user is seated, long press the “flushing” button on the main unit to turn on the drying function. After drying for one cycle, it will stop automatically. During the drying process, press the “Stop” button to stop the drying function.2. In the non-off mode, short press the “flushing” button on the main unit to turn on the flash function. [Under the rear wash or the email wash function, the flush function is invalid; when the nozzle is manually cleaned, the flush function is activated after the nozzle is fully extended and retracted into position]. |
Tips:
- The Power light is off / Energy saving light is on when the product is in energy-saving mode; The power light is on/energy-saving light is off when it is in working mode; all lights are off in standby mode.
- The default setting of all functions is on the middle level, after using the controller, shift to the level set last time.
Troubleshooting Guide
| Problem | Cause | Solution |
| No water from Nozzle | Water inlet hose bent to cause blocking | Solve the problem of bending of the water inlet hose |
| The Inlet Valve is off | Turn on the inlet valve | |
| Water supply is cut off | Connect water supply and wait for the water | |
| Weak water cleaning | Water inlet hose bent to cause partial blocking | Solve the problem of bending of the water inlet hose |
| The Inlet valve is not fully turned on | Turn on the inlet valve fully | |
| Inlet filter blocked | Clean the filter | |
| Low water temperature | The water temperature is set on the normal temperature level | Reset the water temperature |
| Low seat temperature | The seat temperature is set on the normal temperature level | Reset the seat temperature |
| In standby mode | Switch to functional mode and use it after 3 minutes of use | |
| Low wind temperature | The wind temperature is set on the normal temperature level | Reset the wind temperature |
| No wind out | In standby mode or power save mode | Shift to function mode to use dry function |
| Spray wand cannot retract | Power off | Push back the wand lightly and wait for the power |
| Get stuck by impurities | Clear away the impurities | |
| Spray wand cannot stretch out | Power off | Push back the wand lightly and wait for the power |
| Not sit in the sensing area | Sit right in the sensing area | |
| The remote control cannot display | The battery of the remote controlis installed in the opposite direction | Reload the battery |
| Malfunction of deodorization | The user doesn’t reach the sensing area in the seat | Adjust to reach the sensing area |
| The deodorization function keeps working after user leaves | It’s a normal phenomenon if the deodorization function keeps working after a user leaves to ensure eliminating smell entirely | |
| Caution |
If the problems cannot be solved as per the above methods, please the power, and contact service providers for maintenance.If the leakage circuit breaker often trips off, it means the product have electricity leakage, so please shut off the power, and contact the service provider for maintenance. |
Product Warranty Card
| Model No. | Customer Name |
| Seller: | Date of Purchased: |
| Invoice No. | Customer contact: |
| Distributor | Distributor Phone |
Thank you for choosing our product. This product is warranted for One(1) year since the purchasing date for free repair of problems arising out of defects in workmanship while using in accordance with installation manual and usage cations for intended purposes. If the product does not work properly with the warranty period, please contact your nearest service center. This certificate must be presented to obtain free service under this warranty.Our company reserves the right to replace the product by other similar models.We can serve to fix or repair the product at a reasonable service charge, after the expiration of the warranty period.Service charges shall be paid even during the warranty period if breakage or damage is caused by any of the following events (including but without limitation).
- The user’s negligence or mistake in operation, unreasonable repair or alteration.
- Product are damaged by negligence or mistake during installation.
- The movement of the installation location of the product.
- Using the product outside of intended use in residential housing or commercial hotels.
- The use of a nonspecified power supply (voltage, rating pressure)
- The dirt, sand, and impurities that causing invalid operations.
- Damages due to force majeure (including but not limited to natural disaster) or other incidents.
- The user fails to use in compliance with the warning or caution described in the installation manual.
Remark.Please fill in the date, seller correctly. If there are some mistakes, the warranty will get invalid.This three-year warranty for free of charge of repair service is only for the items listed in the warranty.The purchasing date is subject to the purchasing invoice or receipt.Please keep this warranty and invoice/receipt available for repair or maintenance.


Customer Service Phone: 562-229-0088. (Monday – Friday 9 AM – 5 PM Pacific Time)Or Email: [email protected]www.woodbridgebath.comASVFAF0321011A-1.0
References
[xyz-ips snippet=”download-snippet”]