INSTALLATION AND USER MANUAL

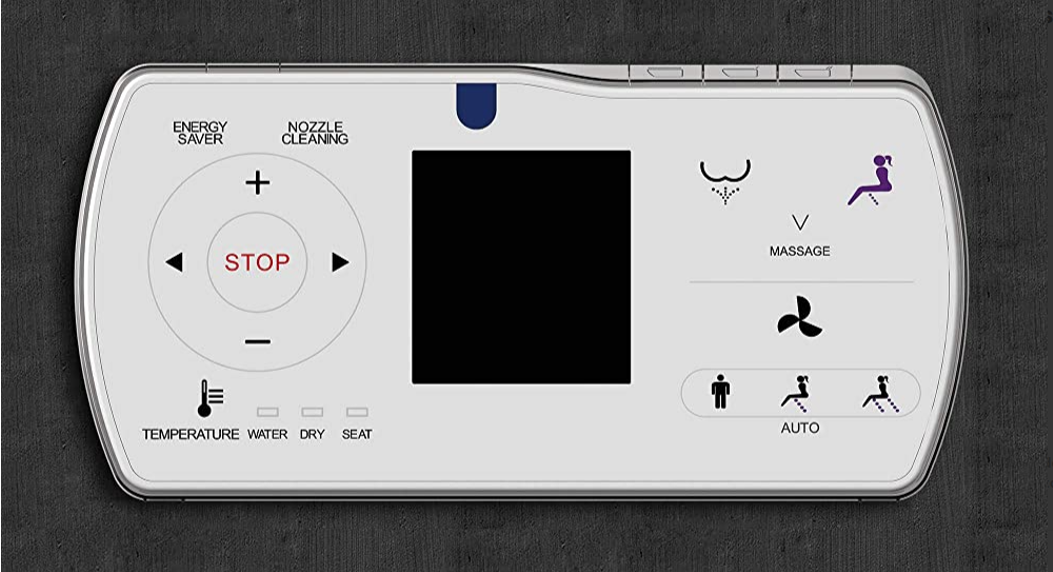
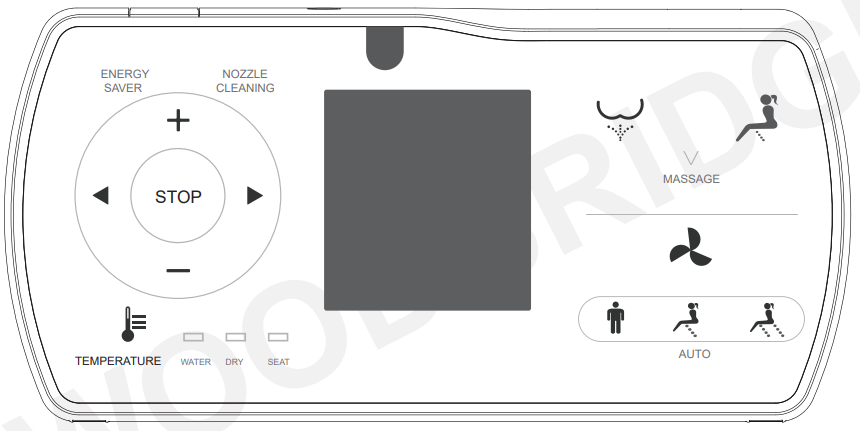
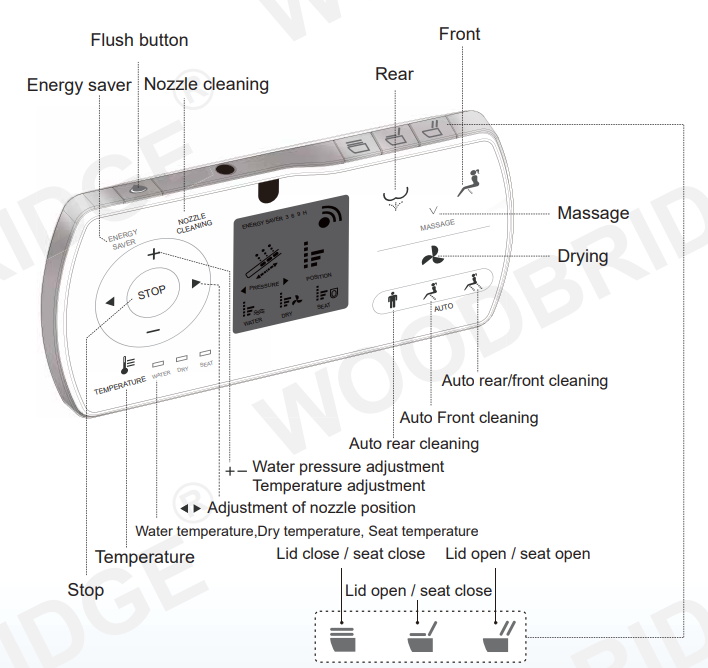
Remote Control Illustration
 Thank you for choosing our product. Please read the instructions carefully before installation and keep it available for future maintenance or reference.

Customer Service Phone: 562-229-0088. (Monday – Friday 9 AM – 5 PM Pacific Time) Or Email: [email protected]
Remote control illustration
Remote control installation
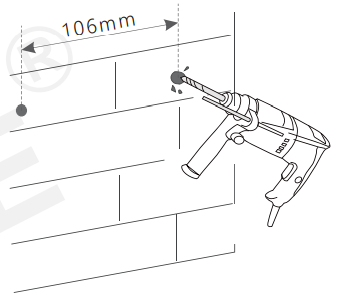
Remote control hanger installation
- Drill two holes, which are parallel to the floor, on the wall with depth of 35mm, and center distance between two holes of 106mm.Make sure end-user be able to reach the remote control when sitting on the seat

- Insert expansion tube into the hole on the wall, install the hanger to the wall with a screw, and paste the double faced adhesive tape on hanger to the wall, tighten the screw.
- Install battery and place remote control to the hanger.

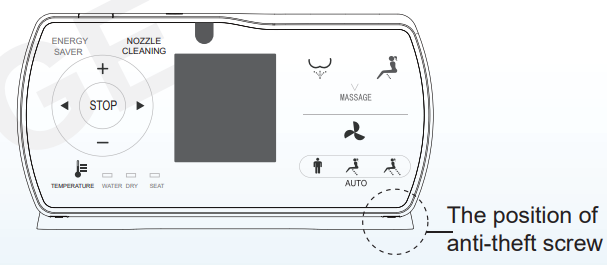
Notice: Please do not install and use the product in moist place, such as steam room, and prohibit to place in the space where is easily got wet.In public place, please use screw to fix the remote control with bracket in avoid remote control missing.
Notice: If the toilet you buy is with auto open/close function, the remote control is as the picture above. Please refer to page 8 for operation method and turning off auto open/close function.
Rear/Front cleaning
Press “Rear”/“Front” button, the water comes out of wand to clean the rear/front portion of body. It automatically stops after a cycle of cleaning. If press “STOP” button when using, the function will stop immediately.
Massage
Press “MASSAGE” button to activate massage function, the nozzle moves forward and back to extend the cleaning scope; Press “MASSAGE” button again to stop the function.
Drying Operation
Press “DRY” button, warm wind comes out of wand to dry. After a cycle or user leaves the seat, it automatically stops.
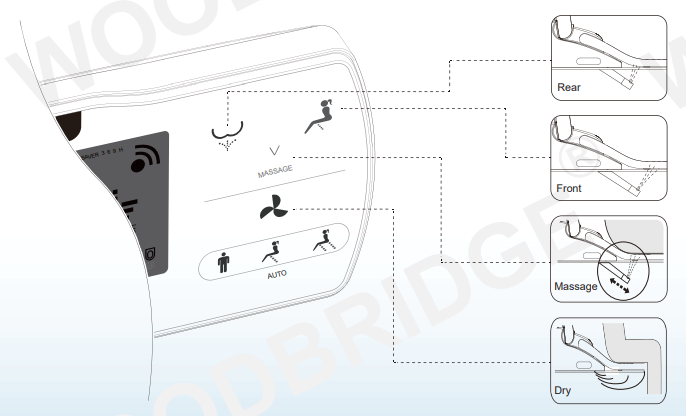
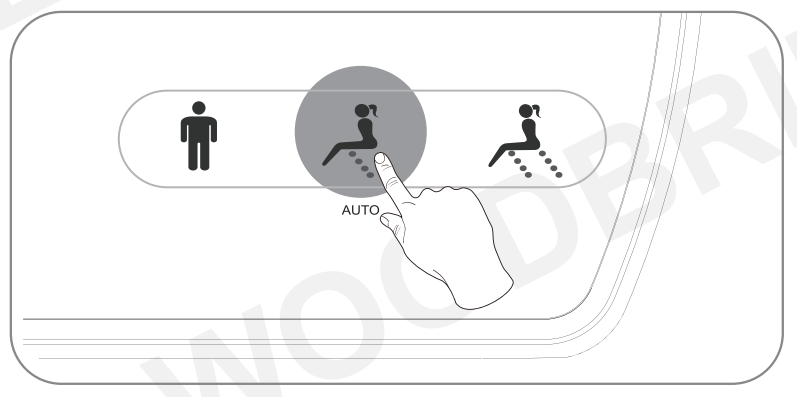
Auto function
Full-automatic function can be achieved by three “AUTO” buttons, convenient and practical. User can pre-set the suitable nozzle position, water pressure, and temperature and save the setting. Full-automatic function will be activated by pressing the related function button when using afterwards.

|
 Auto rear and front cleaning →Rear cleaning 90s →Front cleaning 90s →Dry 180s .→Automatic stop (Refer to page 14 for automatic setting detail)
Energy saver
Setting energy saver timePress “ENERGY SAVER” button, LCD screen shows energy saver and figures. It shows three options of energy saver period as 3-6-9-off, which can be selected accordingly. For example, user can set from 9:00 to 15:00 as energy saver according to following operation. (2)Press“ENERGY SAVER”button again, LCD screen shows figure “6”, and the “ENERGY SAVER”icon disappear after 3 seconds, the setting succeeds. The toilet enters the energy saver mode from 9:00 to 15:00 every day. During this period, power light is off, and the energy saver light is on. It goes back to normal operation mode after energy saver time.

(3)Cancel energy saver set: Press“ENERGY SAVER”button continuously until this function is cancelled. (Nothing display on the screen.)Energy saver:The toilet will be under energy saver mode automatically after setting. Under energy saver mode, seat temperature is on low temperature status (first level) to achieve energy saver.Notice:If user sits on the seat, the energy saver mode is paused, and enters into the function mode, the seat starts to heat immediately (under opening seat temperature circumstance). The energy saver mode restores after user leaves.When the energy saver mode is set, the icon disappears automatically, which is normal set.
Spray nozzle position adjustment
During “REAR” or “FRONT”, press spray nozzle button of “![]() ” and “
” and “![]() ”, to move the position forward and backward by adjusting 5 levels.
”, to move the position forward and backward by adjusting 5 levels.
Water pressure adjustment
During “REAR” or “FRONT”, press water pressure button of “+” and “-”, to adjust pressure for rear and front cleaning.
Automatic deodorization
Remark:The deodorization function starts to work automatically as the user sits on the seat and stops automatically 3 seconds after the user leaves the seat. When drying, the function of automatic deodorization stops.

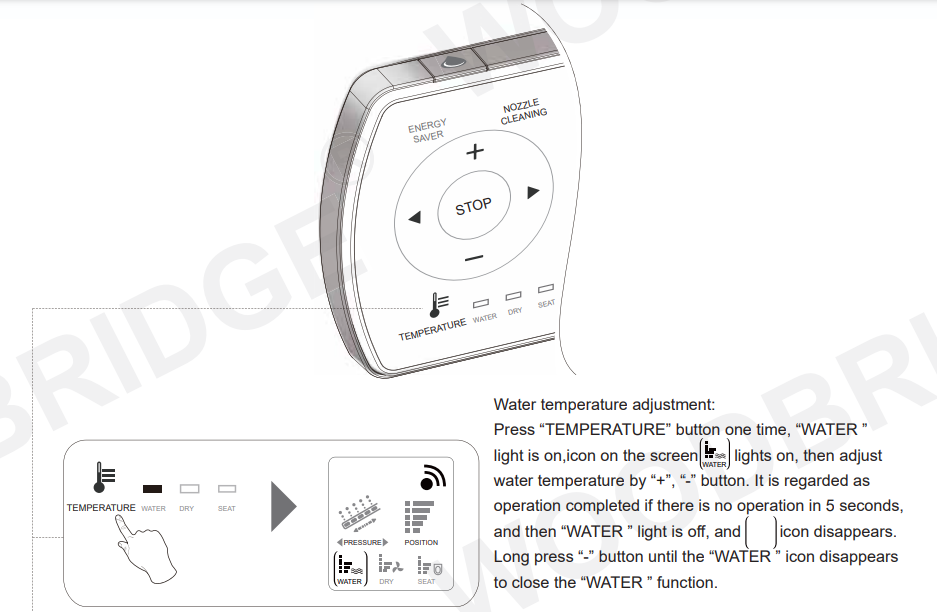
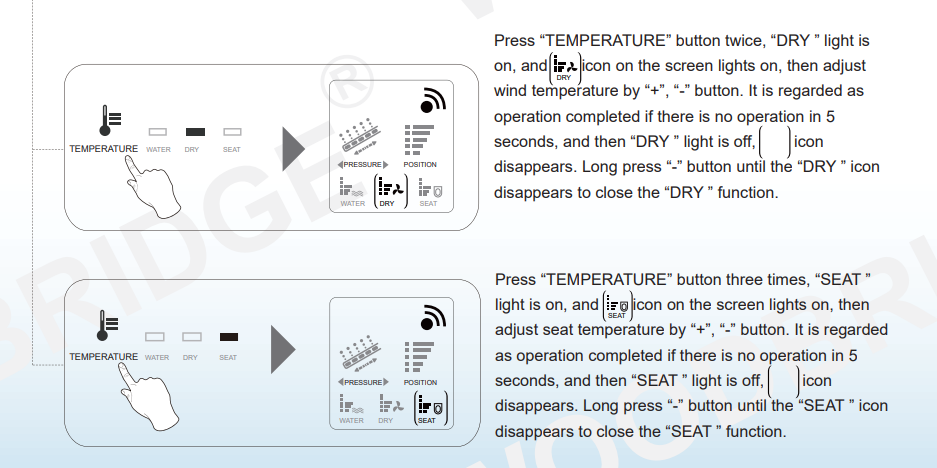
Temperature adjustment
Full flush
Press “FLUSH” button to activate full flushing.Auto lid open/close (Only for toilet with this function)Press “![]() ” button to close seat cover.Press “
” button to close seat cover.Press “ ![]() ” button to open lid and close seat.Press “
” button to open lid and close seat.Press “ ” button to open lid and seat.

Nozzle cleaning

Set Auto Function
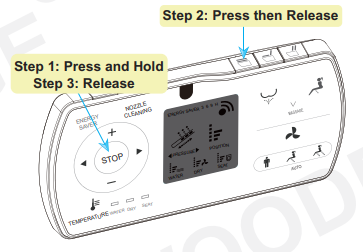
Activate/Deactivate some functions with combination buttonAuto open/closePress and hold “STOP” button (step 1), then press and release “![]() ” ,button (step 2) , it is the mode of auto-open/close, lastly release the “STOP” button (step 3). Repeatabove action to stop this function. (This key combination is only for toilet seat with auto open/close function. The default setting of auto open/close is in the off status,so itneeds to be turned on at the first time use.)
” ,button (step 2) , it is the mode of auto-open/close, lastly release the “STOP” button (step 3). Repeatabove action to stop this function. (This key combination is only for toilet seat with auto open/close function. The default setting of auto open/close is in the off status,so itneeds to be turned on at the first time use.)
Activate/Deactivated Night light
To activate/deactivate the light, press and hold the “STOP” button (step 1), then press and release the “DRY” button (step 2) , lastly release the ‘STOP” button(step 3). Makesure you hear a beep sound to confirm the setting is completed or you will have to restart the same process again.
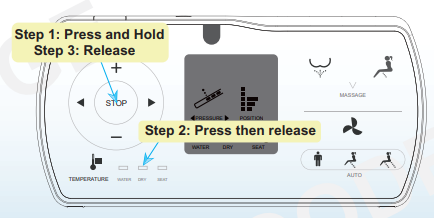
Please note night light feature is default at the off status because the room must be completely dark for the light to turn on. Repeat the process and the night light will switch to intelligent status. Repeat above process constantly, the night light will switch between off status and intelligent status.
Set automatic Rear cleaning function
The default setting of automatic function is water pressure on level three, nozzle position on level three, water temperature, wind temperature and seat temperature on level three, the massage function is in the off state. User can re-set based on personal preference.
- Adjust water pressure, nozzle position, temperature by function button in below grey circle, and open/close massage function.For example, the nozzle position is on level 2, and massage function is open; the water pressure is on level 4; water temperature is on level 2, while dry temperature and seat temperature are on level 1.
- After setting is completed, long press rear cleaning automatic button for 3 seconds to save the setting.
- After above steps, quick press “ ” afterwards when using, LCD displays the previous saved settings of rear cleaning level, temperature level and massage status. By this time, the toilet operates rear cleaning 90s, and then dry 180s automatically without pressing other buttons.
- During automatic rear cleaning, user still can change the level, temperature and massage status, and press “REAR” button 3 seconds to save the new settings.
 For example, the nozzle position is on level 2, and massage function is open; the water pressure is on level 4; water temperature is on level 2, while dry temperature and seat temperature are on level 1.
Quiet mode
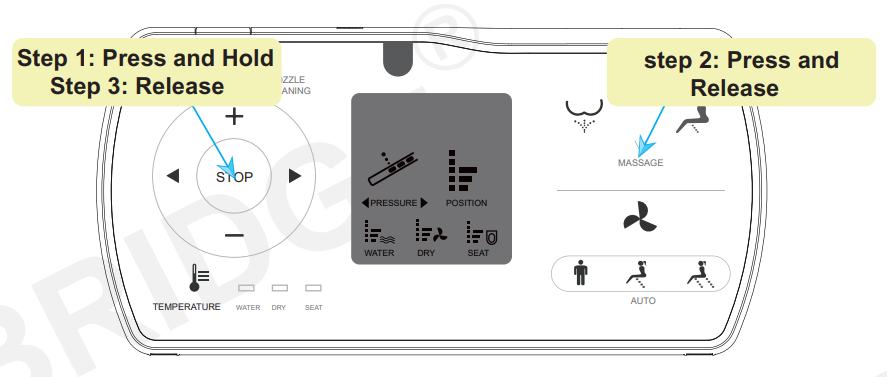
To activate/deactivate the Quiet mode, press and hold the “STOP” button (step 1), then press and release“MASSAGE” button (step 2), lastly release the “STOP” button(step 3). Make sure you hear a beep sound to confirm the setting is completed or you will have to restart the same process again.Repeat the process to start buzzer function.
User code
The user code needs to be set to avoid disturbance from remote controls when more than one toilet is use in the house.Turn on the toilet for setting while turn off others.
- Press and hold “STOP”button (step 1) and then press and release “REAR” button (step 2), lastly release “ STOP” button (step 3) to enter to user code setting.Theremote control shows only water pressure and spray position level. Characters are blinking on the screen.
- Press water pressure buttons of “+”and “-”to choose user code 1-9.
- Press and hold “STOP”button and then press and release “REAR” button again, lastly release the “STOP” button and remote control will save the setting and exituser code setting window,the buzzer will ring “click” to indicate successful setting.The sum of water pressure and position level on LCD is the user code.Restart to clear the user code and reset
Automatic flush buttonPress and hold “STOP” button (step 1) and then press and release “FLUSH” button (step 2), lastly release “STOP” button (step 3) to start or close automatic flushing function.When the automatic flushing function is turned on, toilet will automatically flush after detecting user sitting for more than 6 seconds and leaving the seat for more than 3.5 seconds.

Set automatic Front cleaning function
- Press spray nozzle position adjustment button to adjust nozzle to suitable position; Press “+”, “-” to adjust water pressure; set temperature level; open/ close massage function.
- Press “ ” front cleaning automatic button for 3 seconds, see below picture, and save the setting.
- After above steps, quick press “ ” afterwards when using, LCD displays the previous saved settings of front cleaning level, temperature level and massage status. By this time, the toilet operates rear cleaning 90s, and then dry 180s automatically without pressing other buttons.
- During automatic front cleaning, user still can change the level, temperature and massage status, and press “FRONT” button 3 seconds to save the new settings.
Set automatic Rear and Front cleaning combination functionNote: During using toilet, user can find the suitable level and temperature after comparing repeatedly. Please set the automatic Rear and Front cleaning combination function during using toilet.The first stage: rear cleaning 90s
- Automatic Rear and Front cleaning combination function includes rear cleaning 90s, front cleaning 90s and drying 180s. User can adjust level and temperature in different stages.1. After user sits on the toilet, press automatic Rear and Front cleaning button, it starts to rear cleaning about 90s.2. Adjust nozzle position, water pressure, wind temperature, seat temperature and open/close massage function during rear cleaning.3. After adjust the parameters, remote control saves the parameters under the first stage.4. During adjusting, if user adjusts many times, the remote control saves the latest parameter.The second stage: front cleaning about 90s
- After finishing rear cleaning, toilet enters front cleaning stage automatically.User can set nozzle position, water pressure, temperature and open/closemassage function, and the remote control saves the latest parameterunder the second stage.The third stage: Drying about 180s
- After finishing front cleaning, toilet enters drying stage automatically. User can set wind temperature, and the remote control saves the latest parameter under the third stage.
- After set all parameters, quick press “ ” button afterwards when using, LCD displays the previous saved settings. By this time, the toilet operates rear cleaning, front cleaning and drying automatically by one-button operation.If user needs to change previous settings, please repeat step 1-3.
 1. After user sits on the toilet, press automatic Rear and Front cleaning button, it starts to rear cleaning about 90s.2. Adjust nozzle position, water pressure, wind temperature, seat temperature and open/close massage function during rear cleaning.3. After adjust the parameters, remote control saves the parameters under the first stage.4. During adjusting, if user adjusts many times, the remote control saves the latest parameter.The second stage: front cleaning about 90s
Remark:By pressing the button, the signal indicator will flash which means the signal is sent out;Then the buzzer rings “click” means the main unit receives the signal andexecutesthe instruction. If the signal indicator doesn’t flash, that means the button is not efficiently pressed and needed to be re-pressed. If the buzzer does not ring, that means the main unit doesn’t receive the signal. Please regulate the remote control direction and re-press the button.
In case of power cut during wand’s spray operation, the wand cannot go back to place, please wait until the power is reset. In case of a power cut for a long period, pleasepush the wand softly back by hand. Do not push hard, to avoid damage to wand and electrical machine.
The body should touch the seat and the buzzer rings “click”, which means functions of front cleaning, rear cleaning and drying are in operation. The nozzle will continueto spray for 1-2 seconds after user stands up during spray operation, so please press “STOP” button before standing up.
Use nozzle self-cleaning function after user leaves the seat. After cleaning, if user doesn’t press “NOZZLE CLEANING” or “STOP” button, nozzle wand will go backafter 10 minutes or user sits on the seat.

Thank you for using WoodBridge products!
Customer Service Phone: 562-229-0088. (Monday – Friday 9 AM – 5 PM Pacific Time) Or Email: [email protected]
References
[xyz-ips snippet=”download-snippet”]