
WORKPRO Angle Polisher with Variable Speed Instruction Manual W125020A
Thank you for buying a WORKPRO product. Your angle polisher with variable speed has been engineered and manufactured to WORKPRO’s high standard for dependability, ease of operation, and operator safety. When properly cared for, it will give you years of rugged, trouble-free performance.
![]() WARNING: To reduce the risk of injury, the user must read and understand the operator’s manual before using this product.
WARNING: To reduce the risk of injury, the user must read and understand the operator’s manual before using this product.
SAVE THIS MANUAL FOR FUTURE REFERENCE
INTRODUCTION
This tool has many features for making its use more pleasant and enjoyable. Safety, performance, and dependability have been given top priority in the design of this product making it easy to maintain and operate.
IMPORTANT SAFETY INSTRUCTIONS
![]() Warning: Read and understand all instructions. Failure to follow all instructions listed below may result in electric shock, fire, and/or serious personal injury.
Warning: Read and understand all instructions. Failure to follow all instructions listed below may result in electric shock, fire, and/or serious personal injury.
READ THESE INSTRUCTIONSWORK AREA
- Keep your work area clean and well lit. Cluttered benches and dark areas invite accidents.
- Do not operate power tools in explosive atmospheres, such as in the presence of flammable liquids, gases, Power tools create sparks which may ignite the dust or fumes.
- Keep bystanders, children, and visitors away while operating a power tool. Distractions can cause you to lose control.
ELECTRICAL SAFETY
- Double insulated tools are equipped with a polarized plug (one blade is wider than the other). This plug will fit in a polarized outlet only one way. If the plug does not fit fully in the outlet, reverse the plug. If it still does not fit, contact a qualified electrician to install a polarized outlet. Do not change the plug in any way. Double insulation eliminates the need for the three-wire grounded power cord and grounded power supply system.
- Avoid body contact with grounded surfaces such as pipes, radiators, ranges, and refrigerators. There is an increased risk of electric shock if your body is grounded.To reduce the risk of fire or electric shock, do not ex-pose this product to rain or moisture. Store indoors.
- Do not abuse the cord. Never use the cord to carry the tools or pull the plug from an outlet. Keep cord away from heat, oil, sharp edges, or moving parts. Replace damaged cords immediately. Damaged cords increase the risk of electric shock.
- When operating a power tool outside, use an outdoor extension cord marked “W-A” or “W”. These cords are rated for outdoor use and reduce the risk of electric shock
PERSONAL SAFETY
- Stay alert, watch what you are doing and use common sense when operating a power tool. Do not use tool while tired or under the influence of drugs, alcohol, or medication. A moment of inattention while operating power tools may result in serious personal injury.Dress properly. Do not wear loose clothing or jewelry. Contain long hair. Keep your hair, clothing, and gloves away from moving parts. Loose clothes, jewelry, or long hair can be caught in moving parts.
- Avoid accidental starting. Be sure switch is off before plugging in. Carrying tools with your finger on the switch or plugging in tools that have the switch on invites accidents.
- Remove adjusting keys or wrenches before turning the tool on. A wrench or a key that is left attached to a rotating part of the tool may result in personal injury.
- Do not overreach. Keep proper footing and balance at all times. Proper footing and balance enables better control of the tool in unexpected situations.
- Use safety equipment. Always wear eye protection. Dust mask, nonskid safety shoes, hard hat, or hearing protection must be used for appropriate conditions.
- Do not wear loose clothing or jewelry. Contain long hair. Loose clothes, jewelry, or long hair can be drawn into air vents.
- Do not use on a ladder or unstable support. Stable footing on a solid surface enables better control of the tool in unexpected situations.
TOOL USE AND CARE
- Use clamps or other practical way to secure and support the workpiece to a stable platform. Holding the work by hand or against your body is unstable and may lead to loss of control.
- Do not force tool. Use the correct tool for your application. The correct tool will do the job better and safer at the rate for which it is designed.
- Do not use tool if switch does not turn it on or off. Any tool that cannot be controlled with the switch is dangerous and must be repaired.
- Disconnect the plug from power source before making any adjustments, changing accessories, or storing the tool. Such preventive safety measures reduce the risk of starting the tool accidentally.
- Store idle tools out of the reach of children and other untrained persons. Tools are dangerous in the hands of untrained users.
- Maintain tools with care. Keep cutting tools sharp and clean. Properly maintained tools with sharp cutting edges are less likely to bind and are easier to control.
- Check for misalignment or binding of moving parts, breakage of parts, and any other condition that may affect the tool’s operation. If damaged, have the tool serviced before using. Many accidents are caused by poorly maintained tools.
- Use only accessories that are recommended by the manufacturer for your model. Accessories that may be suitable for one tool, may become hazardous when used on another tool.
- Keep the tool and its handle dry, clean and free from oil and grease. Always use a clean cloth when cleaning. Never use brake fluids, gasoline, petroleum-based products, or any strong solvents to clean your tool.Following this rule will reduce the risk of loss of control and deterioration of the enclosure plastic.
SERVICE
- Tool service must be performed only by qualified repair personnel. Service or maintenance performed by unqualified personnel may result in a risk of injury.
- When servicing a tool, use only identical replacement parts. Follow instructions in the Maintenance section of this manual. Use of unauthorized parts or failure to follow Maintenance Instructions may create a risk of shock or injury.
SAFETY WARNINGS
- This product is not intended for use by persons (including children) with reduced physical, sensory or mental capabilities, or lack of experience and knowledge, unless they have been given supervision or instruction concerning use of the product by a person responsible for their safety.
- Children should be supervised to ensure that they do not play with the product.
![]() WARNING! Read all safety warnings and all instructions. Failure to follow the warnings and instructions may result in electric shock, fire and/or serious injury. Save all warnings and instructions for future reference.The term “power tool” in the warnings refers to your mains-operated (corded) power tool or battery-operated (cordless) power tool.
WARNING! Read all safety warnings and all instructions. Failure to follow the warnings and instructions may result in electric shock, fire and/or serious injury. Save all warnings and instructions for future reference.The term “power tool” in the warnings refers to your mains-operated (corded) power tool or battery-operated (cordless) power tool.
TAKE SPECIAL CARE TO GUARD AGAINST THESE DUSTS, INCLUDING THE FOLLOWING:
- All persons entering the work area must wear an approved mask specially designed for protection against harmful / toxic dusts, in addition to using the dust extraction facility, and keeping work area well ventilated.
- Children and pregnant women must not enter the work area.
- Do not eat, drink or smoke in the work area.
VIBRATION AND NOISE REDUCTION
To reduce the impact of noise and vibration emission, limit the time of operation, use low-vibration and lownoise operating modes as well as wear personal protective equipment.Take the following points into account to minimize the vibration and noise exposure risks:
- Only use the product as intended by its design and these instructions.
- Ensure that the product is in good condition and well maintained.
- Use correct application tools for the product and ensure they in good condition.
- Keep tight grip on the handles/grip surface.
- Maintain this product in accordance with these instructions and keep it well lubricated (where appropriate).
- Plan your work schedule to spread any high vibration tool use across a number of days.
EMERGENCY
Familiarise yourself with the use of this product by means of this instruction manual. Memorise the safety directions and follow them to the letter. This will help to prevent risks and hazards.
- Always be alert when using this product, so that you can recognise and handle risks early. Fast intervention can prevent serious injury and damage to property.
- Switch off and disconnect from the power supply if there are malfunctions. Have the product checked by a qualified professional and repaired, if necessary, before you operate it again.
RESIDUAL RISKS
Even if you are operating this product in accordance with all the safety requirements, potential risks of injury and damage remain. The following dangers can arise in connection with the structure and design of this product:
- Health defects resulting from vibration emission if the product is being used over long periods of time or not adequately managed and properly maintained.
- Injuries and damage to property due to broken application tools or the sudden impact of hidden objects during use.
- Danger of injury and property damage caused by flying objects
![]() WARNING!
WARNING!
This product produces an electromagnetic field during operation! This field may under some circumstances interfere with active or passive medical implants! To reduce the risk of serious or fatal injury, we recommend persons with medical implants to consult their doctor and the medical implant manufacturer before operating this product!
![]() WARNING
WARNING
Some dust created by power sanding, sawing, grinding, drilling and other construction activities contains chemicals known to cause cancer, birth defects or other reproductive harm. Some examples of these chemicals are:
- Lead from lead-based paint
- Crystalline silica from bricks and cement and other masonry products
- Arsenic and chromium from chemically treated timber
Your risk from these exposures varies, depending upon how often you do this type of work. To reduce your exposure to these chemicals:
- Work in a well-ventilated area.
- Work with approved protective equipment, such as those dust masks that are specially designed to filter microscopic particles.
SAFETY WARNINGS COMMON FOR GRINDING, SANDING, WIRE BRUSHING,POLISHING, OR ABRASIVE CUTTING-OFF OPERATIONS
- This power tool is intended to function as a sander and polisher. Read all safety warnings, instructions, illustrations and specifications provided with this power tool. Failure to follow all instructions listed below may result in electric shock, fire and/or serious injury.
- Operations such as grinding, wire brushing, or cutting-off are not recommended to be performed with this power tool. Operations for which the power tool was not designed may create a hazard and cause personal injury.
- Do not use accessories which are not specifically designed and recommended by the tool manufacturer. Just because the accessory can be attached to your power tool, it does not assure safe operation.
- The rated speed of the accessory must be at least equal to the maximum speed marked on the power tool. Accessories running faster than their RATED SPEED can break and fly apart.
- The outside diameter and the thickness of your accessory must be within the capacity rating of your power tool. Incorrectly sized accessories cannot be adequately guarded or controlled.
- The arbor size of wheels, flanges, backing pads or any other accessory must properly fit the spindle of the power tool. Accessories with arbor holes that do not match the mounting hardware of the power tool will run out of balance, vibrate excessively and may cause loss of control.
- Do not use a damaged accessory. Before each use inspect the accessory such as abrasive wheels for chips and cracks, backing pad for cracks, tear or excess wear, wire brush for loose or cracked wires. If power tool or accessory is dropped, inspect for damage or install an undamaged accessory. After inspecting and installing an accessory, position yourself and bystanders away from the plane of the rotating accessory and run the power tool at maximum no-load speed for one minute. Damaged accessories will normally break apart during this test time.
- Wear personal protective equipment. Depending on application, use face shield, safety goggles or safety glasses. As appropriate, wear dust mask, hearing protectors, gloves and workshop apron capable of stopping small abrasive or workpiece fragments. The eye protection must be capable of stopping flying debris generated by various operations. The eye protection must be capable of stopping flying debris generated by various operations. The dust mask or respirator must be capable of filtering out particles generated by your operation. Prolonged exposure to high intensity noise may cause hearing loss.
- Keep bystanders a safe distance away from work area. Anyone entering the work area must wear personal protective equipment. Fragments of workpiece or of a broken accessory may fly away and cause injury beyond immediate area of operation.
- Hold power tool by insulated gripping surfaces only, when performing an operation where the accessory may contact hidden wiring or its own cord. An accessory contacting a “live” wire may make exposed metal parts of the power tool “live” and shock the operator.
- Position the cord clear of the spinning accessory. If you lose control, the cord may be cut or snagged and your hand or arm may be pulled into the spinning accessory.
- Never lay the power tool down until the accessory has come to a complete stop. The spinning accessory may grab the surface and pull the power tool out of your control.
- Do not run the power tool while carrying it at your side. Accidental contact with the spinning accessory could snag your clothing, pulling the accessory into your body.
- Regularly clean the power tool’s air vents. The motor’s fan will draw the dust inside the housing and excessive accumulation of powdered metal may cause electrical hazards.
- Do not operate the power tool near flammable materials. Sparks could ignite these materials.
- Do not use accessories that require liquid coolants. Using water or other liquid coolants may result in electrocution or shock.
- Maintain labels and nameplates on the tool. These carry important safety information. If unreadable or missing, contact Harbor Freight Tools for a replacement.
- Avoid unintentional starting. Prepare to begin work before turning on the tool.
- Do not depress the spindle lock when starting or during operation.
- Do not leave the tool unattended when it is plugged into an electrical outlet. Turn off the tool, and unplug it from its electrical outlet before leaving.
- Use clamps (not included) or other practical ways to secure and support the workpiece to a stable platform. Holding the work by hand or against your body is unstable and may lead to loss of control and personal injury.
- This product is not a toy. Keep it out of reach of children.
- People with pacemakers should consult their physician (s) before use. Electromagnetic fields in close proximity to heart pacemaker could cause pacemaker interference or pacemaker failure. In addition, people with
- pacemakers should:
- Avoid operating alone.
- Do not use with power switch locked on.Properly maintain and inspect to avoid electrical
- shock.Properly ground power cord. Ground fault circuit Interrupter (GFCI) should also be implemented – it prevents sustained electrical shock.
- The warnings, precautions, and instructions discussed in this instruction manual cannot cover all possible conditions and situations that may occur. It must be understood by the operator that common sense and caution are factors which cannot be built into this product, but must be supplied by the operator.
ADDITIONAL SPECIFIC SAFETY INSTRUCTIONS
![]() WARNING! RISK OF PERSONAL INJURY:
WARNING! RISK OF PERSONAL INJURY:
- Always use proper guards when grinding and wear eye protection. Use only accessories rated at least 4000/min.
- Failure to properly seat the bonnet to the pad may result in the bonnet being thrown from the pad.
- Always maintain a firm grip on the Waxer/Polisher handle(s) to prevent loss of control.
- Use of this tool can generate and/or disburse dust, which may cause serious and permanent respiratory or other injury. Always use NIOSH/OSHA approved respiratory protection appropriate for the dust exposure. Keep direct particles away from face and body.Note: Only those dust masks suitable for working with lead paint dust and fumes should be used. Ordinary painting masks do not offer this protection. See your local hardware dealer for the proper NIOSH/OSHA approved mask.
![]() CAUTION: TO REDUCE THE RISK OF INJURY OR PROPERTY DAMAGE:
CAUTION: TO REDUCE THE RISK OF INJURY OR PROPERTY DAMAGE:
- Make sure that adjusting keys and wrenches are detached from the unit before turning it ON.
- Use clamps or another practical way to secure and support the work piece to a stable platform. Holding the work by hand or against your body is unstable and may lead to loss of control.
- Do not use tool if ON/OFF Trigger does not turn it ON or OFF. Any tool that cannot be controlled with the power switch is dangerous and must be repaired.
- Operate this waxer/polisher ONLY on AC current on which the voltage is within correct limits (120 volts). Never attempt to operate on DC current. To do so may seriously damage the waxer/polisher.
- Always disconnect the unit’s cord plug from power source before making any adjustments, changing bonnets or storing the tool to reduce the risk of accidentally starting the waxer/polisher.
- Check for misalignment or binding of moving parts, breakage of parts, and any other condition that may affect the waxer/polisher’s operation. If damaged, have the tool serviced before using.
- Use only accessories that are supplied or recommended by the manufacturer for this model. Refer to the “Accessories” section of this Instruction Manual for more information.
- NEVER allow Gasoline, Brake Fluids or any petroleum-based products to come in contact with plastic parts or power cord. They contain chemicals that can damage, weaken or destroy plastic and insulation.
SYMBOLS
On the product, the rating label and within these instructions you will find among others the following symbols and abbreviations. Familiarize yourself with them to reduce hazards like personal injuries and damage to property.
- V~: Volt, (alternating voltage)
- Hz: Hertz
- W: Watt
- /min or min-1: Per minute
 Lock / to tighten or secure.
- Note / Remark.
- Read the instruction manual.
- Wear eye protection.
- Wear protective gloves.
- mm: Millimetrekg: Kilogram
- dB(A): Decibel (A-rated)
- m/s²: Metres per second squared
- Unlock / to loosen.
- Caution / Warning.
- Wear hearing protection.
- Wear a dust mask.
- Wear protective, slipresistant footwear.
- Switch the product off and disconnect it from the power supply before assembly, cleaning, adjustments, maintenance, storage and transportation.
- This product is of protection class II. That means it is equipped with enhanced or double insulation.
- Conforms to American directives.
- Waste electrical products should not be disposed of with household waste. Please recycle where facilities exist. Check with your Local Authority or local store for recycling advice.
KNOW YOUR PRODUCT
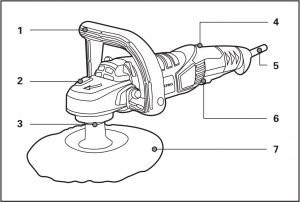
- Auxiliary handle
- Spindle lock button
- Grinder spindle
- Speed adjustment
- Power cord
- ON/ OFF Switch
- Backing pad
TECHNICAL SPECIFICATION
|
Model #: |
W125020A |
|
Rated Voltage: |
120V~60Hz |
|
Rated Power: |
10A |
|
No-load Speed: |
1500-4000RPM |
| Diameter: |
7in (180mm) |
UNPACKING
- Unpack all parts and lay them on a flat, stable surface.
- Remove all packing materials and shipping devices if applicable.
- Make sure the delivery contents are complete and free of any damage. If you find that parts are missing or show damage do not use the product but contact your dealer. Using an incomplete or damaged product represents a hazard to people and property.
- Ensure that you have all the accessories and tools needed for assembly and operation. This also includes suitable personal protective equipment.
SET UP BEFORE USE
INTENDED USE
The machine is intended for polishing and sanding of painted or fiberglass surfaces. For reasons of electrical safety the machine must not be damp or operated in a humid environment. The machine may only be used for dry sanding, buffing or polishing
![]() WARNING! To reduce the risk of injury, turn the unit off and disconnect it from the power source before installing and removing accessories, before adjusting or making repairs. An accidental start-up can cause injury.
WARNING! To reduce the risk of injury, turn the unit off and disconnect it from the power source before installing and removing accessories, before adjusting or making repairs. An accidental start-up can cause injury.
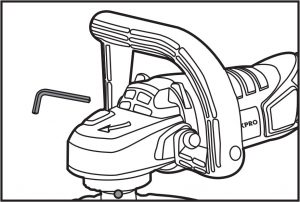
INSTALLING THE AUXILIARY HANDLES
- TO PREVENT SERIOUS INJURY: Do not operate this tool without an auxiliary handle properly installed.
- The D-handle (included) may be installed for either right-hand or left-hand use.Option 1: using with the D-handle. Attach the D-handle to the sides of the front cover, using the hex key and two hex head bolts.
- Note: Slide the hex key through the hole in the handle to access the bolt on the long side of the handle.
- Option 2: Using with a side handle (side handle not included).This tool can be used with many standard angle grinder side handles which can be installed on either side.


INSTALLING THE BACKING PAD/FOAM PAD
- The accessory MUST be:
- Rated to at least 4000 rpm.
- No larger than 7” (180 mm) in diameter.
- Fitted with a threaded opening of 5/8”
- Undamaged
- A backing pad.
- Press in and hold the Spindle Lock Button to prevent the Spindle from turning.
- Thread the Backing Pad onto the spindle until firmly secured in place.
![]() WARNING!
WARNING!
- To reduce the risk of injury, turn the unit off and disconnect it from the power source before installing and removing accessories, before adjusting or making repairs. An accidental start-up can cause injury.
- To install pad or disc on Velcro backing plate, center the pad or discover plate and press firmly.
- To remove pad or disc from Velcro backing plate grip pad or disc firmly and pull from plate.
OPERATION INSTRUCTIONS
ON/OFF TRIGGERPress the ON/OFF trigger to turn the unit ON. Release it to turn the unit OFF.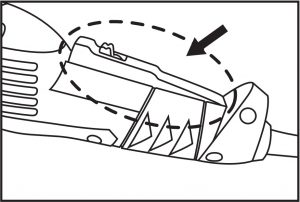
SPEED CONTROL DIALThe speed control dial features 5 settings (numbered 1 to 5 on the dial), allowing you to increase or decrease speed from 1,500 to 4,000 RPM. Optimal speed setting for each application is dependent on work surface and personal preference; however manufacturer recommends using lower settings for waxing/polishing and higher settings for sanding. As a rule, when sanding, you will generally want to use a higher setting on harder materials and lower setting on softer materials. It is also recommended that you first experiment on a piece of scrap of the same material as your work surface to determine what gives you the best combination of finish quality and removal rate for your application.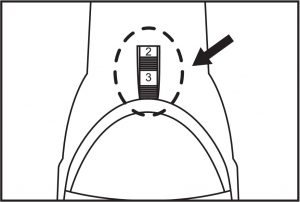
SPINDLE LOCK BUTTONA spindle lock button has been provided for locking the spindle of your tool in a stationary position. Depress and hold the lock button while installing, changing, or removing accessories.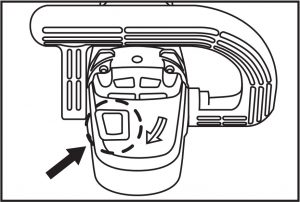
POLISHING
- Make sure the surface to polish has been thoroughly washed, and is free of dust, dirt, oil, grease, etc.
- Place a clean foam pad (sold separately) securely Onto the backing pad.
- Apply about two tablespoons of wax (not included) Evenly on the clean foam pad.CAUTION! Do not apply the wax directly to the surface of the vehicle. The amount of wax needed will vary according to the size of the vehicle being waxed.
- Rotate the Speed Dial to select the desired speed between 1 and 5.
- NOTICE: Only use the slower speeds for polishing. Otherwise, damage may occur to the paint being polished. WORKPRO Tools is not responsible for damage to the vehicle’s finish due to improper use of this polisher/sander.
- Plug the power cord into an electrical extension cord (not included). Then, plug the extension cord into a grounded, GFCI-protected, 120 volt electrical outlet.
- Note: always start and stop the polisher/sander while it is held firmly against the surface of the vehicle. Failure to do so may result in the foam pad or polishing bonnet being thrown from the polishing pad.
- To start, position the unit on the area to be polished, grip the polisher/sander firmly with both hands and press the trigger. Release the trigger to stop. To use the lock on button, while holding in the trigger, press the lock on button, then release the trigger. The polisher/sander will stay on. Press and release the trigger to stop.
- Keep pressure off of the polisher/sander when operating. The foam pad should LIGHTLY contact the polishing surface.
- Begin using the polisher/sander to apply wax to the vehicle. Apply the wax to all flat surfaces with broad, sweeping strokes in a crisscross pattern. Apply the wax evenly over the surface of the vehicle.
- Add additional wax to the polishing pad as needed. To add additional wax:
- Stop the tool and allow the polisher/sander to come to a complete stop.
- Add a small amount of wax evenly over the pad surface.
- Avoid using too much wax. For additional applications of wax to foam pad, reduce the amount of wax. The foam pad will not absorb as much wax in subsequent applications.
- Resume operation.
- Note: The most common error when waxing/polishing a vehicle is applying too much wax.If the Foam Pad becomes saturated with wax, applying wax will be more difficult and will take longer. Applying too much wax may also reduce the life of the Foam Pad. If the Foam Pad continually comes off the Backing Pad during use, too much wax may have been applied.
- After the wax has been applied to the vehicle’s surface, turn off the polisher/sander. Unplug the power cord from the electrical extension cord.
- Remove the foam pad from the backing pad and with your hand and the foam pad, apply wax to any hard to reach areas of the vehicle such as around lights, door handles, under bumpers, etc.
- Allow sufficient time for the wax to dry.
- Replace the foam pad and place a clean polishing bonnet (sold separately) securely onto the foam pad.
- Note: Tightly pull the string to secure the polishing bonnet. Secure the string and keep it out of the way by tying several knots.
- Note: Start and stop the polisher/sander only while it is held firmly against the surface of the vehicle. Failure to do so may result in the bonnet being thrown from the foam pad.
- Start the polisher/sander and begin buffing off the dried wax.
- When you have removed as much wax as you can with the polisher/sander, turn off and unplug the polisher/sander.
- Remove the polishing bonnet from foam pad. Using the polishing bonnet, remove the wax from all hard to reach areas of the vehicle.
- NOTICE: To prevent damage to the foam pad, polishing bonnet, and vehicle finish: Only apply the pad/bonnet flat against the surface, see below.

SANDING
- Make sure that the surface to be sanded is wiped clean of all dirt and debris, especially that of previous courser sanding sessions, which will scratch the surface of a finer grit sanding session.
- Attach the desired grit sanding disc (sold separately) onto the backing pad.
- Rotate the speed dial to select the desired speed setting.
- Plug the power cord of the polisher/sander into a grounded 120 volt, electrical outlet.
- To start, grip the polisher/sander firmly with both hands and press the trigger. Release the trigger to stop. To use the lock on button, while holding in the trigger, press the lock on button, then release the trigger. The polisher/sander will stay on. Press and release the trigger to stop.
- Wait until the polisher/sander has reached full speed, then gently contact the surface.
- Keep heavy pressure off of the polisher/sander when operating. Allow the sanding disk to do the work.
- Move the polisher/sander in a uniform pattern up and down or side to side as you sand to ensure even sanding.
- Periodically, stop the polisher/sander and check for possible disc wear. Replace used or worn sanding discs when necessary.
- When finished, turn off and unplug the polisher/sander.
- Allow the tool to come to a complete stop before setting it down.
- To prevent accidents, turn off the tool and disconnect its power supply after use. Clean, then store the tool indoors out of children’s reach.
MAINTENANCE
- BEFORE EACH USE, inspect the general condition of the tool. Check for:
- Loose hardware
- Misalignment or binding of moving parts
- Cracked or broken parts
- Damaged electrical wiring, and any other condition that may affect its safe operation
- AFTER USE, wipe external surfaces of the tool with clean cloth.
- Periodically blow dust and grit out of the motor vents using dry compressed air. Wear ANSI-approved safety goggles and NIOSH-approved breathing protection while doing this.
- Periodically recheck all nuts, bolts, and screws for tightness.
- Remove foam pad from backing pad when polisher/sander is not in use. This will allow backing pad to dry and retain its original shape. Wash with mild soap and water before storing.
- The polishing bonnet may be machine washed in cold water with mild detergent. Do not put in the dryer.
- Use only a clean cloth and mild detergent to clean the body of the polisher. Do not use solvents. Do not immerse any part of the tool in liquid.
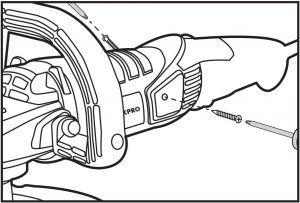
- CARBON BRUSH MAINTENANCE. The carbon brushes may require maintenance when the motor performance of the tool decreases or stops working completely. To maintain the brushes:
- Remove the carbon brush cover on each side of the motor housing.
- Remove the carbon brushes from the housing. Keep track of which orientation the old carbon brushes were in to prevent needless wear if they will be reinstalled.
- If either carbon brush is worn down by more than 1/2, replace them both.
- To clean old carbon brushes before reusing them, rub the contact areas with a pencil eraser.
- Reinsert the old carbon brushes in the same orientation to reduce wear.
- When installing, make sure the carbon portions of the brushes contact the motor armature, and that the springs face away from the motor. Also, make sure the springs operate freely.
- Replace the Carbon Brush Covers. Do not over tighten.
- Replace the Carbon Brush Covers. Do not over tighten.
Note: New carbon brushes tend to spark when first used until they wear and conform to the motor’s armature.WARNING! If the supply cord of this power tool is damaged, it must be replaced only by a qualified service technician.
TROUBLE SHOOTING
|
Problem |
Possible Causes |
Likely Solutions |
|
Tool will not start. |
|
|
|
Tool operates slowly. |
|
|
|
Performance decreases over time. |
Carbon brushes worn or damaged. | Replace brushes. |
|
Excessive noise or rattling. |
Internal damage or wear. (Carbon brushes or bearings, for example.) | Have technician service tool. |
|
Overheating. |
|
|
|
Tool does not sand or polish effectively. |
|
|
[xyz-ips snippet=”download-snippet”]