
WORX WG896 12 AMP 2-in-1 Lawn Edger/Trencher Instruction Manual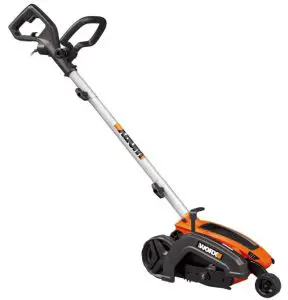
Product Overview
- AUXILIARY HANDLE
- ON/OFF SWITCH
- EXTENSION CORD RETAINER
- HANDLE ADJUSTMENT KNOB
- LOCKING KNOB
- UPPER SHAFT
- LOWER SHAFT
- REAR WHEEL
- BLADE GUARD
- BLADE
- FRONT WHEEL
- EDGE GUIDE KNOB
- CUT DEPTH KNOB
Installation Instructions
TECHNICAL DATA
- Rated Voltage: 120V~60Hz
- Rated Power: 12A
- Rated No-load speed: 4700/min
- Protection class: /II
- Blade diameter: 7-1/2”
- Blade cutting depth: 1”, 1-1/4”, 1-1/2”
- Machine weight: 14 lbs
ACCESSORIES
7-1/2” Blade (WA0034)
We recommend that you purchase your accessories from the same store that sold you the tool.Use good quality accessories marked with a well-known brand name. Choose the type according to the work you intend to undertake. Refer to the accessory packaging for further details. Store personnel can assist you and offer advice.
IMPORTANT SAFETY INSTRUCTIONS
WARNING: When using electric gardening appliances, basic safety precautions should always be followed to reduce the risk of fire, electric shock, and personal injury, including the following:
WARNING: Read all instructions
WARNING: Some dust created by power sanding, sawing, grinding, drilling and other construction activities contains chemicals known to the state of California to cause cancer, birth defects or other reproductive harm. Some examples of these chemicals are:
- Lead from lead-based paints;
- Crystalline silica from bricks and cement and other masonry products
- Arsenic and chromium from chemically treated lumber
Your risk from these exposures varies, depending on how often you do this type of work. To reduce your exposure to these chemical: work in a well ventilated area, and work with approved safety equipment, such as those dust masks that are specially designed to filter out microscopic particles.
WARNING: This product maybe contains lead, phthalate or other chemicals known to the State of California to cause cancer, birth defects and other reproductive harm. Please wash your hands after use.
FOR ALL APPLIANCES
- Avoid Dangerous Environment –Don’t use appliances in damp or wet locations.
- Don’t Use In Rain.
- Keep Children Away – All visitors should be kept at a distance from work area.
- Dress Properly – Do not wear loose clothing or jewelry. They can be caught in moving parts. Use of rubber gloves and substantial footwear is recommended when working outdoors.Wear protective hair covering to contain long hair.
- Use Safety Glasses – Always use face or dust mask if operation is dusty.
- Use Right Appliance – Do not use appliance for any job except that for which it is intended.
- Ground Fault Circuit Interrupter (GFCI) protection should be provided on the circuit(s) or outlet(s) to be used for the gardening appliance. Receptacles are available having built-in GFCI protection and may be used for this measure of safety.
- WARNING -To reduce the risk of electric shock, use only with a extension cord intended for outdoor use, such as an extension cord of cord type SW-A, SOW-A, STW-A, STOW-A, SJW-A, SJOW-A, SJTW-A. or SJTOW-A.
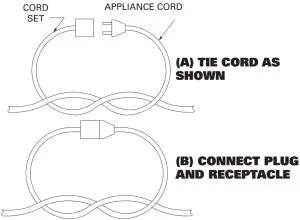
- Extension Cord – Make sure your extension cord is in good condition.When using an extension cord, be sure to use one heavy enough to carry the current your product will draw. An undersized extension cord will cause a drop in line voltage resulting in loss of power and overheating. Table 1 shows the correct size to use depending on cord length and nameplate ampere rating. If in doubt, use the next heavier gage. The smaller the gage number, the heavier the cord. To reduce the risk of disconnection of appliance cord from the extension cord during operating:
- Make a knot as shown in Figure 1; or
- Use one of the plug-receptacle retaining straps or connectors described in this manual.
- Avoid Unintentional Starting – Don’t carry plugged-in appliance with finger on switch. Be sure switch is off when plugging in.
- Don’t Abuse Cord – Never carry appliance by cord or yank it to disconnect from receptacle. Keep cord from heat, oil, and sharp edges.
- Don’t grasp the exposed cutting blades or cutting edges when picking up or holding the appliance.
- Don’t Force Appliance – It will do the job better and with less likelihood of a risk of injury at the rate for which it was designed.
- Don’t Overreach – Keep proper footing and balance at all times.
- Stay Alert – Watch what you are doing.Use common sense. Do not operate appliance when you are tired.
- Disconnect Appliance – Disconnect the appliance from the power supply when not in use, before servicing, when changing accessories such as blades, and the like.
- Store Idle Appliances Indoors – When not in use, appliances should be stored indoors in dry, and high or locked-up place – out of reach of children.
- Maintain Appliance With Care – Keep cutting edge sharp and clean for best performance and to reduce the risk of injury. Follow instructions for lubricating and changing accessories. Inspect appliance cord periodically, and if damaged, have it repaired by an authorized service facility. Inspectextension cords periodically and replace if damaged. Keep handles dry, clean, and free from oil and grease.
- Check Damaged Parts – Before further use of the appliance, a guard or other part that is damaged should be carefully checked to determine that it will operate properly and perform its intended function. Check for alignment of moving parts, binding of moving parts, breakage of parts, mounting, and any other condition that may affect its operation.A guard or other part that is damaged should be properly repaired or replaced by an authorized service center unless indicated elsewhere in this manual.
SAVE THESE INSTRUCTIONS
Table 1Minimum gauge for extension cords
| Volts | Total length of cord in feet | |||
| 120V | 25 | 50 | 100 | 150 |
| 240V | 50 | 100 | 100 | 300 |
| Ampere rating more than not more than | AWG | |||
| 0-6 | 18 | 16 | 16 | 14 |
| 6-10 | 18 | 16 | 14 | 12 |
| 10-12 | 16 | 16 | 14 | 12 |
| 12-16 | 14 | 12 | Not recommended |
NOTE: Only the applicable parts of the Table need to be included. For instance, a 120-volt product need not include the 240-volt heading.
Figure 1Method of securing extension cord
FOR ALL DOUBLE-INSULATED APPLIANCES
- Replacement PartsWhen servicing use only identical replacement parts.
- Polarized Appliance ConnectionsTo reduce the risk of electric shock, this appliance has a polarized plug (one blade is wider than the other) and will require the use of a polarized extension cord. The appliance plug will fit into a polarized extension cord only one way.If the plug does not fit fully into the extension cord, reverse the plug. If the plug still does not fit, obtain a correct polarized extension cord. A polarized extension cord will require the use of a polarized wall outlet. This plug will fit into the polarized wall outlet only one way.If the plug does not fit fully into the wall outlet, reverse the plug. If the plug still does not fit, contact a qualified electrical to install the proper wall outlet. Do not change the equipment plug, extension cord receptacle, or extension cord plug i any way.
SAVE THESE INSTRUCTIONS
ADDITIONAL SAFETY RULES FOR EDGER-TRIMMERS
- Keep guards in place and in working order
- Keep blades sharp.
- Keep hands and feet away from cutting area.
SYMBOLS
![]() To reduce the risk of injury, user must read instruction manual
To reduce the risk of injury, user must read instruction manual![]() Warning
Warning![]() Double insulation
Double insulation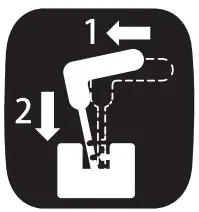 Edging position
 Trenching position
![]() Before any work on the machine itself, pull the power plug from the outlet
Before any work on the machine itself, pull the power plug from the outlet Blade continues to rotate after the machine is switched off. Wait until all machines components have completely stopped before touching them
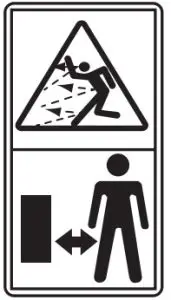 Keep bystanders away
ASSEMBLY & OPERATION
| Action | Figure |
| Assembly | |
| Assembling the Shaft | See Fig. A |
| Assembling the Auxiliary Handle | See Fig. B |
| Attaching the Extension Cord | See Fig. C1 & C2 |
| Operation | |
| Setting to the edging position | See Fig. D1 |
| Edging | See Fig. D2 &D3 |
| Adjusting cut depth | See Fig. E1 & E2 |
| Setting to the trenching/ landscaping position | See Fig. F |
| Trenching and landscaping operation | – |
| Removing and attaching the blade | See Fig. G1 & G2 |
OPERATION INSTRUCTION
NOTE: The edger is a major appliance and should not be operated simultaneously with other major appliances on the same household circuit.
WARNING: Make sure that other persons and pets are at least 100 feet away.
EDGING
- Before starting the edger, line up the tool so the edge guide rests against the edge of the paved surface. Both rear wheels should be on the paved surface when edging. (See Fig. D2)
- To avoid kickback of edger, tilt the handle down so the blade is above the ground (See Fig. D3).
- Turn switch ON and allow blade to spin without moving tool.
- Slowly lift the handle to lower the blade, finding the edge of the paved surface and start edging. Then move tool forward slowly along edge of paved surface, keeping the edge guide pressed lightly against the pavement edge. For the first edging each season, it is best to move forward slowly because grass is thickest then. Subsequent edging will b completed more rapidly. If the tool slows down, back it up an inch or two until the blade comes up to normal speed. During edging some sparks may be generated from hitting stones. This is normal. Do not attempt to edge when the grass or soil is wet or moist—for electrical safety and to prevent clogging of the blade chamber. If you must edge under conditions that cause the blade chamber to become clogged, release trigger, wait for blade to come to complete stop! UNPLUG TOOL open door and remove clogged material with a stick. To continue to operate the tool in a clogged condition will seriously overload the motor.
CAUTION: Do not attempt to unclog the blade chamber by dropping or tapping the tool on the ground. This can damage the unit. Keep hands clear of edge guide and blade when cleaning as these wear to a very sharp point during edging.
TRENCHING AND LANDSCAPING OPERATION
The Edger can also be used for Trenching. The blade will leave a small trench for placingWire underground.Because of the direction of the Blade rotation the Edger can kickback towards the operator if it hits an obstruction such as thick, matted grass. Keep a firm grasp on the Handle, especially when trenching in thick, matted material.The Edger can be used in Landscaping applications, including cutting along the edges of flower and shrubbery beds, around trees, and cutting in preparation for sod removal.Before trenching, inspect and ensure there are no exposed or buried cables, pipes or other objects that may create a hazard or interfere with operating the Edger.Set depth to only that required for the job.
REMOVING AND ATTACHING THE BLADE
The blade, two spacers and hex head nut with conical washer should be attached to yourEdger in the order shown. Check that the blade has been properly mounted before using your Edger.The Edger Blade has two wear indicators that show when the original blade needs to be replaced. When the blade wears to the small holes, it should be replaced.(See Fig. G1 & G2)
STORAGE
WARNING! Be sure the tool is unplugged.
Remove and clean any debris from the outside of the edger and inside of guard before storage. See MAINTENANCE section.If necessary, the edger may be stored by hanging on a hook by its handle.
CAUTION: DO NOT HANG EDGER ON THE SWITCH TRIGGER OR POWER CORD!
NOTE: Do not store the tool on or adjacent to fertilizers or chemicals. Such storage can cause rapid corrosion.
MAINTENANCE
Use only mild soap and damp cloth to clean the tool. Never let any liquid get inside the tool; never immerse any part of the tool into a liquid.
 report this ad
IMPORTANT: To assure product SAFETY and RELIABILITY, repairs, maintenance and adjustment should be performed by authorized service centers or other qualified service organizations. Use only identical replacement parts. Inspect and thoroughly clean your edger at the beginning of each edging season for longer life and better performance.
References
[xyz-ips snippet=”download-snippet”]