User Manual3.5 inch Wireless Video Door Phone
The wireless video door phone is a 2.4G wireless high-tech household intelligent product integrating doorbell, photo-taking, intercom, monitor, and unlocking functions into one.Its user-friendly adjustable angel camera broadens users’ views. Especially its unique human body detection sensor will detect people when human-body is approaching the door and indoor monitor shall be activated, show the image of the outdoor on its screen and take a photo automatically. Therefore, even you were not at home, you also could know who visited you. This model is the guarantee for your home security.This product does not use wires. It is convenient to install and simple to use. It’s specially designed for villas. An outdoor unit can work with three matched handsets with a max, working distance of 300 meters in an open area.Adopting the latest energy-saving technology, its stable performance, and fashionable appearance design make it the first choice of your high-quality intelligent life.
Introduction
Thank you for choosing this wireless video door phone. Please read this manual carefully to fully understand its usage, perfect functions, and simple operation.Before using this product, please read these Attentions carefully to ensure the safe and proper operation of this product.The Company reserves the right to modify this Manual from time to time without prior notice.
Safety Warning & Attentions
- Do not place this product on an uneven or unstable table-board to prevent failure or damage caused by falling.
- Only the battery and charger designated by the Company can be used on this product.Application of other products may lead to leakage, overheating, blowout and fire of the battery.
- Do not violently strike, shake or toss the wireless video door phone to prevent failure and fire caused to the wireless video door phone.
- Do not put battery, charger or wireless video door phone in the microwave oven or high-pressure device; otherwise, damage and fire of electrical circuit and other accidents may be caused.
- Do not use this product in a place with flammable and explosive gas; otherwise, product failure and fire may be caused.
- Do not place this product in a place with high temperature, high humidity or a large amount of dust; otherwise, product failure may be caused.
- Do not dismantle or remodel this product, otherwise, damage, creepage, and electrical fault may be Caused.
- Place tiny metal objects such as drawing pins at a place far away from the speaker. As the speaker has magnetic properties while working, it will attract these tiny metal objects, which may lead to personal injuries or damage of the speaker.
- Do not project the lens at a strong light source, such as the sun; otherwise, damage of the image sensor may be caused.
- Do not press the terminal of the lens with much force; otherwise, personal injury or damage of the device may be caused.
- If this product is made wet by mistake, shut it down, remove the battery, and restart the product after confirming it completely dry after 24 hours.
- Use a clean and dry soft cloth to clean the lens, infrared lamp, and light sensor.
- !Warning: the improper operation will void the warranty!!
Product Overview
- Fashion appearance —— adopt European design, full of modern science and technology feeling, suitable for houses of various decorative styles.
- Hidden antenna —— adopt built-in antenna design, protect the antenna effectively.
- Extra-large range of vision —— 120°
- Adjustable camera angle—up to 15° from centerline in any direction
- High-resolution color LCD screen —— adopt 3.5-inch mainstream TFT digital LCD screen, achieve outstanding clarity.
- High-speed transmission —image transmission speed is 25fps, the image is clear and fluent.
- Infrared Night-Vision —— Infrared light shall turn on automatically when outside light is dim
- 7 kinds of ringtones —— users can select the desired doorbells ringtones freely
- Monitor function —— simple and convenient to use, view the outdoor scenes and take photos just by pressing one key.
- Auto-detection ——Camera includes a built-in PIR sensor that activates the camera and takes photos of the visitor when he or she approaches
- Intercom function —— can achieve two-way intercom between outdoor and indoor unit, and between two indoor units
- Unlock function—— Remotely unlock the door by monitor
- Auto circulating memory ——can store 240 photos, auto circulating
- USB data port—— charge or software updating by USB port
- Multiple supporters —— table charger
- Multi-machine extended function —— support two outdoor units and three indoor monitors at most.
- Long-distance transmission —— communication distance can reach 300 meters in open space.
- Outdoor unit waterproof ——IP55
- AC/DC Power——Camera powered by AC9~16 V / DC5~16 V
Performance parameters
| Outdoor unit | Power | Specific lithium battery 3400mAh |
| Consumption | 400mA | |
| Outline dimension | 134’74’31mm | |
| Weight | 122g | |
| Environmental condition | Temperature: -10t +50-C | |
| Waterproof grade | IP55 | |
| Placement | Hang on out wall | |
| Surface material | ABS & hardware accessories | |
| Camera | 300,000pixels | |
| View angle | 120° wide-angle (Extra 15° adjustable) | |
| Night vision pattern | Infrared lamps | |
| PIR | 3M*100° | |
| Working time | 3hours continuously | |
| Standby time | 6 months | |
| Charge time | 3hours | |
| External power | AC9-16V/DC5-16V |
| Indoor monitor | Power | Specific lithium battery BP-6M(1100mAh ) |
| Consumption | 400mA | |
| Outline dimension | 126484’20mm | |
| Weight | 110g | |
| Environmental condition | Temperature: -0t:-+40t | |
| Placement | Table style | |
| LCD size | 3.5″ TFT color screen | |
| Wireless communication mode | 2.4GHz | |
| Images spread | 25fps | |
| Picture format | PEG | |
| Working time | 3hours continuously | |
| Standby time | 300hours | |
| Charge time | 3hours | |
| External power | DCSV SA | |
| Application distance | About 300m in open space |
Product Diagram
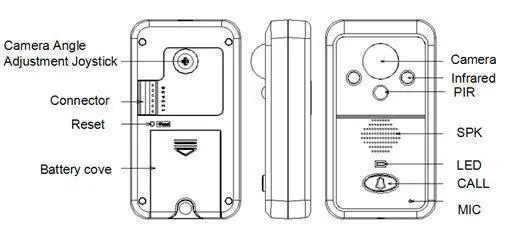
Outdoor Unit
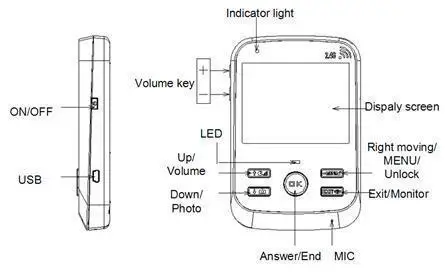
Indoor Unit
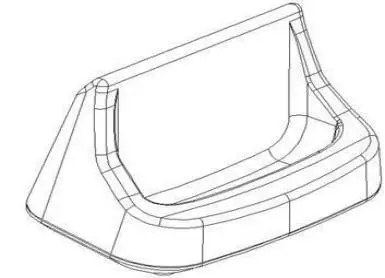
Charging base for indoor unit
Installation Guide
- The outdoor unit shall be installed at 1.4~1.7 meters above the floor, and avoid facing the sunlight directly. Please do not install on the metal wall, metal door, or metal plate, which influence the transmission signal.

- Installation stepsA.Fix the rain cover on the wall with screws.B.Put the outdoor unit into rain cover, and install the screw at the bottom.
- Connect DC line according to the wiring diagram (the diameter of the hole for wire getting through should be 16~30mm). Red wire (positive pole) connects to point 1; black wire (negative pole) connects to point 2. If powered by AC power, connect the wire to point 1 and point 2.
- Electronic lock and power supply connection, as shown below: If electric lock maintains always open: connect to point 4 If electric lock maintains always close: connect to point 5 Two power lines of lock: one connects to lock, one connects point 6.Note: electric lock and power supply should be prepared by the user.
- The camera lens can be adjustable.


Attentions During Installation
- The outdoor photosensitive sensor should not be hidden or blocked by other objects.
- Do not face the outdoor unit to sunlight directly.
- Install the connection line correctly, otherwise, door phone disabled may be caused.
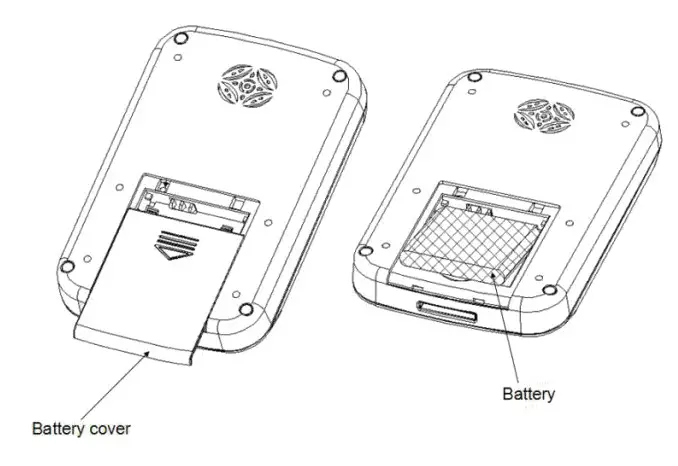
Battery Installation
- Move the battery cover downward parallelly, and then take it off.
- Insert battery along with the battery slot, notice the front and reverse side of the battery
- Fit on the battery cover.
Keys’ functions of the indoor unit
- off-hook/on-hook and confirm
- Up option
- Down option, take a photo
- Right option, menu, unlock
- Exit, monitor
- “ON/OFF” Turn on/off the device
- Volume key(+/-) Adjust the volume of the indoor unit
UI Operation Instruction
- Turn on/offOutdoor unit: Install the battery to turn on. Take out the battery to turn it off.(DC/AC9-16V, Lithium battery)Indoor Unit: BP-6M Lithium battery, USB charging. Press the “on/off” key for about 3S to turn on. And press the “on/off” key for about 3S to enter the shutdown interface: select“Yes” to turn off.
- UI of Indoor Unit
 View&delete photo record. Can store 240pcs photos. “A” means automatically taking photos.“M” means manual taking photos. “P” means motion sensor photos. “T” means alarm photos.Will automatically cover the earliest photo when memory is full.Message for missed call. Will have a message if miss any call or ring. Can keep10 messages at most. The message with photo(automatically taking the photo). Automatically cover the earliest message when more than 10 messages. It will not have a new message if the indoor unit is shut down or powered off.
 Time&date setting. Can set time,date.For example,12:00 01-06-2017.
 Ring setting. There are 7 rings. You can select the ring as you like. Meanwhile, can adjust the ring volume by pressing the “+-” key. Volume has 6 levels.
 Language selection. English.The factory default language is English.
 Setting. Enter settingsA. Motion detection. Open PIR or turn off.B. Backlight time. Setting backlight time from 10-60s,5s per level, total 10 levels.C. Ring time. Setting the ring time from 10-the 30s, 10s per level, total 3 levels.D. Paring: give code, receive codeE. Version: show the firmware version number.
Communication Instruction.
1. Intercom between outdoor unit and indoor unit.A. Press the “Call” key on the outdoor unit-indoor unit will ring-show ![]() on screen-press “OK” key to answer the call-will show
on screen-press “OK” key to answer the call-will show ![]() on the screen. Can be able to the intercom.B. During intercom, press
on the screen. Can be able to the intercom.B. During intercom, press ![]() key, intercom without sound, and show
key, intercom without sound, and show ![]() on the screen.C. During intercom, press
on the screen.C. During intercom, press ![]() key to take video. It Will show
key to take video. It Will show ![]() on the screen.D. During intercom, press
on the screen.D. During intercom, press ![]() the key to take a photo record and show it
the key to take a photo record and show it ![]() on the screen.E. Press “+ -” key to adjust the volume of indoor nit, and show it
on the screen.E. Press “+ -” key to adjust the volume of indoor nit, and show it ![]() on the screen.G. During intercom, show
on the screen.G. During intercom, show![]() on indoor unit screen, the below battery iron is for outdoor unit power,it will be red color when low power.H.
on indoor unit screen, the below battery iron is for outdoor unit power,it will be red color when low power.H.![]() the number stands for different indoor units. The green lines stand for intercom signal.I. When standing by, press the key
the number stands for different indoor units. The green lines stand for intercom signal.I. When standing by, press the key ![]() to monitor outside.J. PIR: when turning on the motion sensor, the outdoor unit camera sense person within 2 meters and will take 3pcs photos to record automatically. Motion sensor icon
to monitor outside.J. PIR: when turning on the motion sensor, the outdoor unit camera sense person within 2 meters and will take 3pcs photos to record automatically. Motion sensor icon![]() K. Anti-tamper alarm of outdoor unit. When the rain covers separate from the device, it will alarm with a big sound. At the same time, will take a 5pcs photos record. It Will show
K. Anti-tamper alarm of outdoor unit. When the rain covers separate from the device, it will alarm with a big sound. At the same time, will take a 5pcs photos record. It Will show ![]() on the screen.1. Intercom between indoor units.A. If there are only 2 indoor units, press
on the screen.1. Intercom between indoor units.A. If there are only 2 indoor units, press![]() the key, and can call another indoor unit.A. If there are 3 indoor units, call another 2 indoor units. Press
the key, and can call another indoor unit.A. If there are 3 indoor units, call another 2 indoor units. Press ↑ key to call the smallerID no. indoor unit. Press the key to call the bigger ID no. Indoor unit.(for example, to call ID2 indoor unit, press. To call ID3 indoor unit, press key.)
Pairing operation steps.
1V1 Match code (put outdoor unit next to the Indoor monitor)Select “code” in setting on the indoor monitor — press OK key– enter into the match code mode.Meanwhile, long-press the “Reset hole” on the outdoor unit back, until you hear one “Beep” sound, then release.When the indoor monitor displays “Successful”, the outdoor unit has “di-di-di” three sounds, which means matching successfully.If matching failed in 16 seconds, the indoor monitor shows “failed”, the outdoor unit makes a” di” sound. Please try the above steps again.NOTE: By default, the monitor is paired well with the outdoor unit.
1V2 – Match codeSelect “Give code ” on the 1 st paired indoor monitor –press OK key–enter into the giving code mode On the new (second) indoor monitor, select “receive code” — press OK key. It will have “di-di-di” three sounds, and display” Successful” on the screen, which means matching the 2 monitor ok.1V3 – Match codeSelect “Give code ” on the 2nd paired indoor monitors –press OK key– enter into the giving code mode.On the new (third) indoor monitor, select“receive code”– press the OK key. It will have “di-di-di” three sounds, and displays “successful” on the screen, which means matching the 3 monitor ok.Add one more outdoor unit – Match code 3rd Select “Give code ” on anyone paired indoor monitor –press OK key–enter into giving code mode.On the new (second) outdoor unit: Long press the “reset” hole until you hear “di-di,” two sounds. If match successfully, the outdoor unit will have “di-di-di” three sounds and means adding the 2nd outdoor unit ok.After matching ok, please use the No. 2 outdoor unit to call all indoor monitors for testing. if not ok, please repeat the above steps again.
Package Include
Manual -–1Rain cover -–1Outdoor camera -–1Indoor monitor -–1Table charger for monitor -–1Adaptor for outdoor camera DC5V -–1Adaptor for indoor monitor -–1DC Line for the outdoor camera-–1USB line for indoor monitor-–1Lithium battery –2Screws -–4
Statement
 report this ad
The standard configuration for a door phone is one indoor monitor and one outdoor unit.The door phone has a finished code match and can be used directly.If you need more pieces of indoor monitors or outdoor units, please contact yourlocal distributors (Maximum 2 outdoor units to 3 indoor monitors supported).For the added units, please reference the Give Code and Receive Code in the Code Menu.
General faults and solutions
| Fault | Cause(s) | Solution(s) |
| Can not startup | Neglected to press the switch button | Press switch button |
| Lithium battery is not installed | Install lithium battery | |
| Low battery | Charge up lithium battery | |
| No connection to power adapter when the battery runs out | Connect to the power adapter | |
| Can not charge | The adapter connector doesn’t connect to the charging port of the machine correctly | Reconnect correctly |
| The adapter doesn’t connect to 110V-240V alternating current | Plug into the socket to connect to alternating current | |
| Outdoor unit cannot call or connect to Indoor monitor | Code match failed | Clear code, and re-match code |
| Image has noisypoint or flickers | The handset is placed near to TV player, microwave oven,daylight lamp or mobile phone which produces electromagnetic wave interference. | Keep handset far away from the interference items |
| No signal forIndoor monitor | The outdoor unit doesn’t connect to the power | Connect to the power |
| Distance between outdoor unit and Indoor monitor is too far | Adjust to the appropriate distance | |
| Disturbed by the magnetic field around | Keep handset far away from magnetic field. |
[xyz-ips snippet=”download-snippet”]