Quickstart GuidePortable HD LED ProjectorEXP-PRJ-HD
WyreStorm recommends reading through this document in its entirety to become familiar with the product’s features before beginning the installation process.
In the Box
1x EXP-PRJ-HD Video LED Projector1x IR Remote Control1x HDMI cable1x 3.5 > RCA AV Cable1x US Power Adapter1x User Manual (This Document)
IMPORTANT! Safety Precautions
- Please read through this guide carefully before operating the projector.
- Note the voltage marked on the label place on the bottom of the projector.
- To avoid voiding the warranty, do not open and prevent physical damage to the projector, as the unit contains non-serviceable parts – Refer all servicing to qualified service personnel.
- Do not look directly into the projector lens while the machine is operating to avoid exposure to the eyes.
- To prevent the risk of electric shock or fire hazard due to overheating, do not cover the unit or obstruct ventilation openings with material, newspaper, cardboard, or anything that may restrict airflow into the unit.
- Do not expose this unit to rain, moisture, sprays, drips or splashes, and ensure that no objects containing liquids are placed on the unit, including cups, glasses, and vases.
- Unplug the unit from the power supply during lightning storms or when unused for long periods of time.
- Protect the power cable from being walked on, pinched, or restricted in any way, especially at plug connections.
- Only use attachments/accessories specified by the manufacturer.
- To extend the projector’s life span, power down the projector when not in use.
- To prevent eye strain/injury, it is suggested to limit viewing time to 3-4 hours at a time.
Warranty InformationWyreStorm Technologies LLC warrants that its products to be free from defects in material and workmanship under normal use for aperiod of two (2) years from the date of purchase. Refer to the Product Warranty page on wyrestorm.com for more details on our limitedproduct warranty.
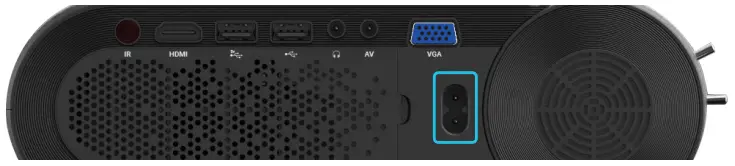
Interface
Remote Control Introduction
Note: To prevent remote performance issues, battery damage, leakage and/ or rupture, avoid mixing brands and old/new batteries.
Setup and Operation
- Set the projector within the specified distances to obtain the best picture possible. Level the projector as best as possible to fully utilize the adjustment levers.Note: This adjustment may need to be made once the projector is on in conjunction with the keystone and focus levers. See below for further details on keystone and focus adjustments.
Further height adjustments can be made with a built-in stand-by screw adjustment. Furthermore, a tripod or a projector mount can be used with the provided threaded borehole found at the bottom of the projector.
- Connect desired input sources to each input on the rear of the projector.
Note: USB port with 5V is used for USB devices that require 5V power, such as an external USB hard drive. If desired, also connect headphones/auxiliary sound system to the audio output port at this time.
- Connect the provided power cable to the back of the projector and into the wall outlet.

- Press the Power button located on the projector or on the remote to power the projector on/off.
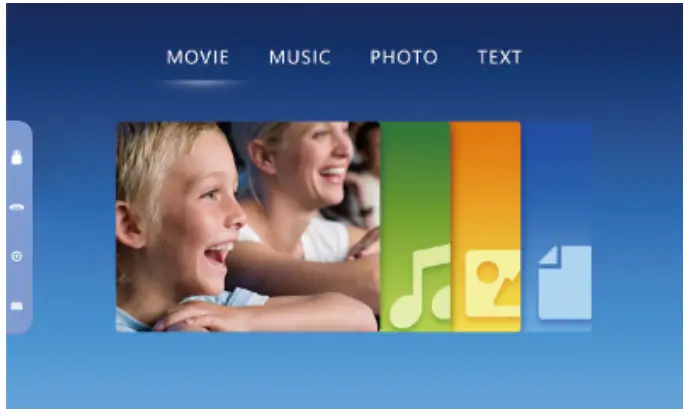
Projector Main MenuAfter the boot screen (2-5 seconds) the projector’s main menu will appear, allowing the user to select the desired video source.
Focus and Keystone CorrectionKeystone and Focus correction can be achieved simply by turning the dials on the projector.
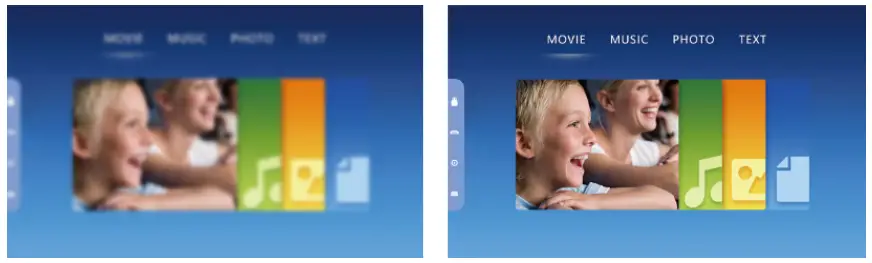
Keystone CorrectionIt may be necessary for the projector to be placed in a position that could cause the image to appear distorted. Using the Keystone lever, slide up/ down adjusts vertical keystone to help resolve image distortion; see below image for example.
Image FocusSometimes when placing the projector at the proper distance, fine-tuning of the projector is necessary for an optimal image. Alongside the Keystone, the lever is the Focus lever. Like the Keystone lever, slide up/down to achieve the best image possible.
USB ConnectionThe Multimedia menu is where the projector accesses the USB connections.
Movie, Music, Photos, and Text are the 4 forms of multimedia that can be selected from the USB ports. See the below table for supported formats.
| Multimedia | Supported Audio | MP3/WMA/OGG/AAC/FLAC/APE/WAV |
| Supported Image | JPEG/BMP/PNG | |
| Supported Video | 3GP/AVI/MKV/FLV(FLV)/MOV/ MP4/MPG/VOB/MPG/RMVB/RM | |
| Supported Text | TXT |
Choose the desired file and press the play/pause button to access it.
HDMI ConnectionThe HDMI option allows the connection of HDMI devices such as media players, Blu-ray players, and laptops.
| SupportedResolutions | 576p, 480p, 720p, 1080p, 640×480, 800×600, 1024×768, 1280×1024, 1280×720, 1440×900, 1920×1080, 1366×768, 1280×800, 1440×960, 1600×1200, 1680×1050 |
The HDMI port on the EXP-PRJ-HD supports MHL input, which allows the connection of a mobile phone/tablet. Consult the manufacture of the mobile phone/tablet to verify compatibility. A supported MHL HDMI cable is also required.
AV ConnectionWith the included AV cable, the AV port allows connections of composite sources such as older game consoles and DVD players.
VGA ConnectionThe VGA port allows connections of VGA sources such as a laptop or PC.
Audio OutputThe 3.5mm port allows the connection of headphones or auxiliary cable to connect to a speaker or audio system. The audio will be routed to this output and no audio will come out of the speaker.
Note: Due to Dolby copyright, this projector does not support Dolby-related decode.
Menu SettingsPressing the ![]() button will display the below menu. Toggle items by pressing
button will display the below menu. Toggle items by pressing ![]() and
and ![]() keys on the remote. Pressing “OK” will enter the menu item.
keys on the remote. Pressing “OK” will enter the menu item.
Picture MenuThe Picture menu allows the user to adjust the picture mode (standard, soft, user, dynamic), Color Temperature (Cold, Medium, User), Aspect Ratio (Auto, 4:3, 16:9), and Noise Reduction (Off, Low, Middle, High, Default), Projector Mode (Front, Back) and Image scaling, which gives the user the ability to adjust the image into the screen.

Sound MenuIn the Sound menu, the user has the ability to set the Audio Balance (-50 to +50), Auto Volume (Open, Off, Low, Middle, High, Default), and Surround Sound (Off, SRS, Surround).
Time MenuIn the TIME menu, the user has the ability to set the clock of the projector.The user can also set an off/on time and set sleep time, which is useful for parental control or as a reminder to take a break from screen time. Lastly, a sleep time can be set to auto-sleep to save, which after inactivity the projector will power down to extend bulb life when not in use.
Settings MenuIn the settings menu, the user is able to set the language, set the projector back to factory setting, and upgrade software.
Specifications
| Display Type | TFT LCD |
| Native Resolution | 1280*720 RGB |
| Input Resolution | 1920*1080 |
| Light Source | LED |
| Expected Bulb Life | 30,000 Hours |
| Lens Coating | Multiple Coated Lens (F=134) |
| Lens Focus | Manual Operation |
| Projection Distance | 1.5 – 4.5m (4.9 – 14.7ft) |
| Projection Size | 111.8 – 355.6cm (44 – 140in) |
| Projection Ratio | 1:04 |
| Aspect Ratio | 16:09 |
| Optimum Projection Size | 152cm (60in) |
| Optimum Imaging Distance | 1.5m (4.9ft) |
| Color Palette | 16M |
| Keystone | Manual Operation ± 15° |
| Power Input | 100V – 240V 50/60Hz |
| Wattage | 72W |
| Input Interface | HDMI, USB, VGA, AV |
| Output Interface | 3.5mm Audio Jack |
| Speaker | 3W |
| Dimensions | 245x166x81.5mm (9.6×6.5×3.2in) |
| Weight | 1.25kg (2.7lbs) |
Note: WyreStorm reserves the right to change product specification, appearance, or dimensions of this product at any time without prior notice.
Copyright © 2020 WyreStorm Technologies | wyrestorm.comEXP-PRJ-HD Quickstart Guide | 200803
 report this ad
UK: +44 (0) 1793 230 343 | ROW: 844.280.WYRE (9973)[email protected]
References
[xyz-ips snippet=”download-snippet”]