![]() Quick Start Guide
Quick Start Guide
Important Notices
CE DECLARATION![]() Hereby, X-Rite, Incorporated, declares that this device is in compliance with the essential requirements and other relevant provisions of Directives 2014/35/EU (LVD), 2014/30/EU (EMC), and RoHS 2015/863.FEDERAL COMMUNICATIONS COMMISSION NOTICENOTE: This equipment has been tested and found to comply with the limits for a Class B digital device, pursuant to Part 15 of the FCC Rules. These limits are designed to provide reasonable protection against harmful interference in a residential installation. This equipment generates, uses, and can radiate radio frequency energy and, if not installed and used in accordance with the instructions, may cause harmful interference to radio communications. However, there is no guarantee that interference will not occur in a particular installation. If this equipment does cause harmful interference to radio or television reception, which can be determined by turning the equipment off and on, the user is encouraged to try to correct the interference by one or more of the following measures:
Hereby, X-Rite, Incorporated, declares that this device is in compliance with the essential requirements and other relevant provisions of Directives 2014/35/EU (LVD), 2014/30/EU (EMC), and RoHS 2015/863.FEDERAL COMMUNICATIONS COMMISSION NOTICENOTE: This equipment has been tested and found to comply with the limits for a Class B digital device, pursuant to Part 15 of the FCC Rules. These limits are designed to provide reasonable protection against harmful interference in a residential installation. This equipment generates, uses, and can radiate radio frequency energy and, if not installed and used in accordance with the instructions, may cause harmful interference to radio communications. However, there is no guarantee that interference will not occur in a particular installation. If this equipment does cause harmful interference to radio or television reception, which can be determined by turning the equipment off and on, the user is encouraged to try to correct the interference by one or more of the following measures:
- Reorient or relocate the receiving antenna.
- Increase the separation between the equipment and receiver.
- Connect the equipment into an outlet on a circuit different from that to which the receiver is connected.
- Consult the dealer or an experienced radio/TV technician for help.
INDUSTRY CANADA COMPLIANCE STATEMENTCAN ICES-003 (B) / NMB-003 (B)
Safety Information
EQUIPMENT INFORMATIONUse of this equipment in a manner other than that specified by X-Rite, Incorporated may compromise design integrity and become unsafe.![]() WARNING: This instrument is not for use in explosive environments.
WARNING: This instrument is not for use in explosive environments. Instructions for disposal: Please dispose of Waste Electrical and Electronic Equipment (WEEE) at designated collection points for the recycling of such equipment.If this product is used in a manner not specified by the instruction, the safety protection provided by the device may be impaired or become inoperable.Unauthorized dismantling of the device will void all warranty claims.
Package Contents
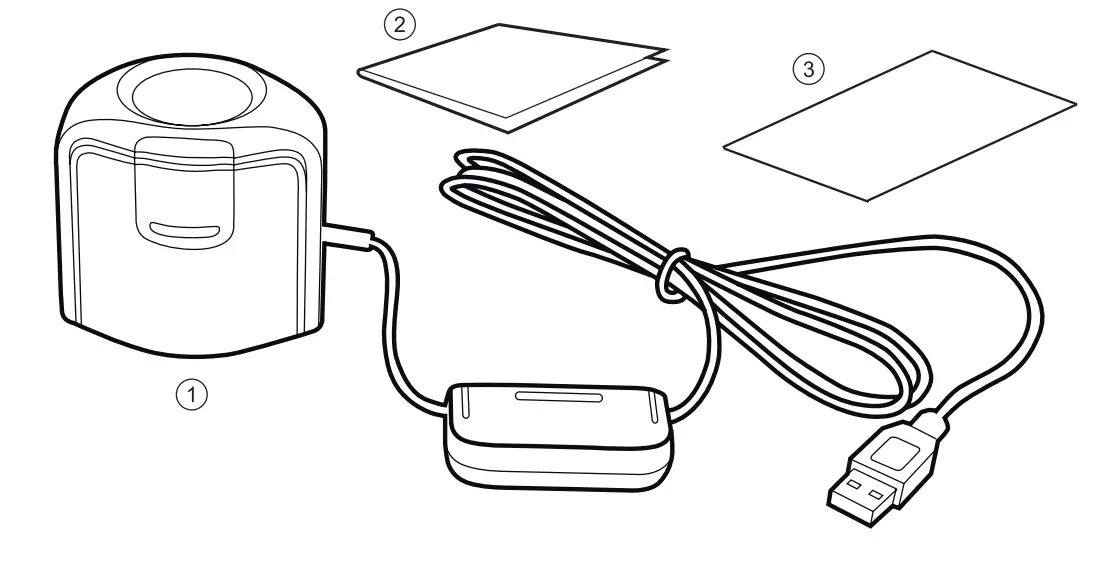
- i1Display
- Quick Start Guide
- Software download instructions
Software Information
| Device | Software Application |
Download URL |
| il Display Studio | i1 Studio | xrite.com/getilStudio |
| il Display Pro | i1 Profiler | xrite.com/getilProfiler |
| il Display Pro PLUS | i1 Profiler | xrite.com/getilProfiler |
Installation 1
Before you can use your device, you will need to install the software application onto your computer.Please do not plug in the instrument USB cable to your computer until after you have installed the software application.
- For the i1Display Pro and i1Display Pro PLUS devices, visit www.xrite.com/geti1Profiler to download the i1Profiler application and install the software application on your computer.For the i1Display Studio device, visit www.xrite.com/geti1Studio to download the i1Studio application and install the software application on your computer.
- Review all of the instructions in this Quick Start Guide before you start using your new device. For more detailed information, please visit www.xrite.com.
Installation 2

After you have completed the software installation process, attach the device to your computer’s USB port.
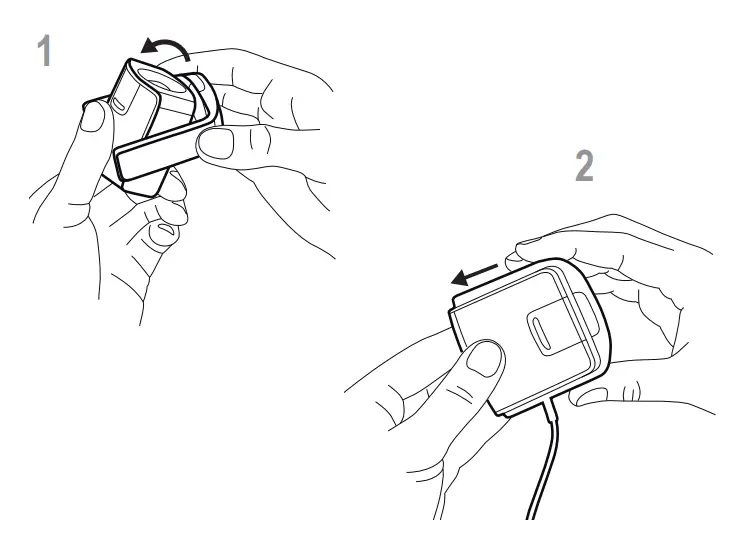
Overview 1
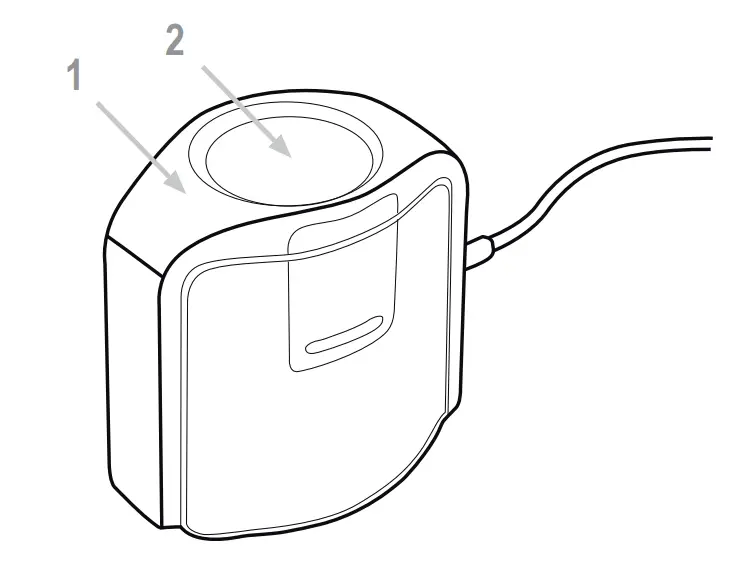
- Ambient Diffuser Arm.
- Ambient Diffuser
Overview 2
Ambient diffuser arm snaps into place over measurement optics. Be sure to lift up on the ambient diffuser arm before attempting to rotate into different measurement positions.
Overview 3
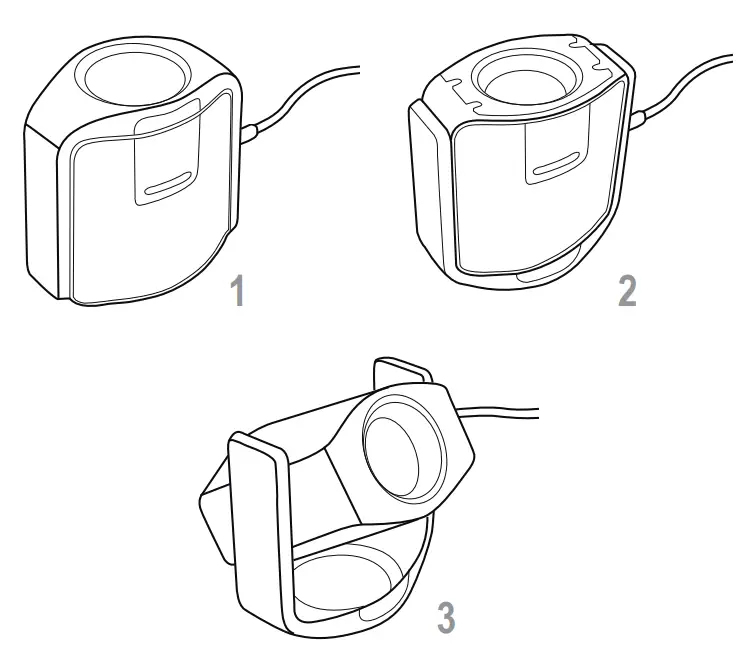
Measuring Modes
- Ambient Light Measurement
- Emissive Light Measurement
- Projector Measurement
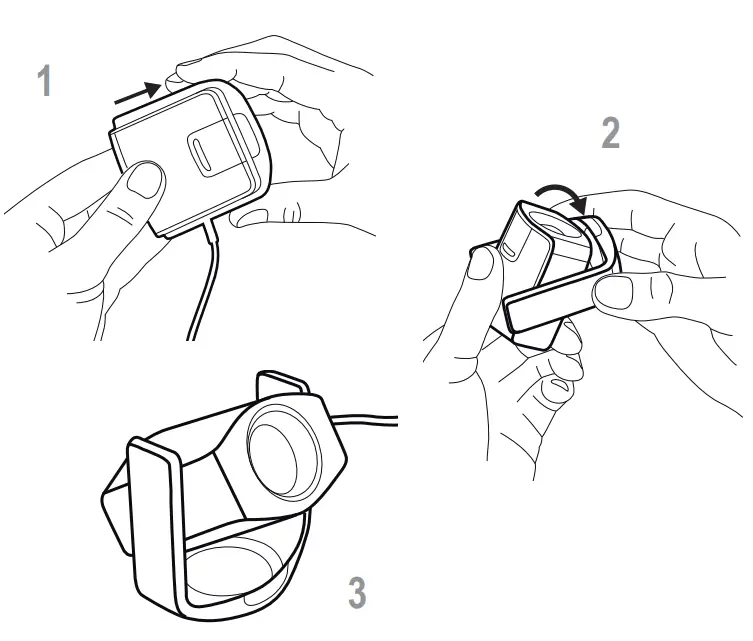
Monitor measurement 1
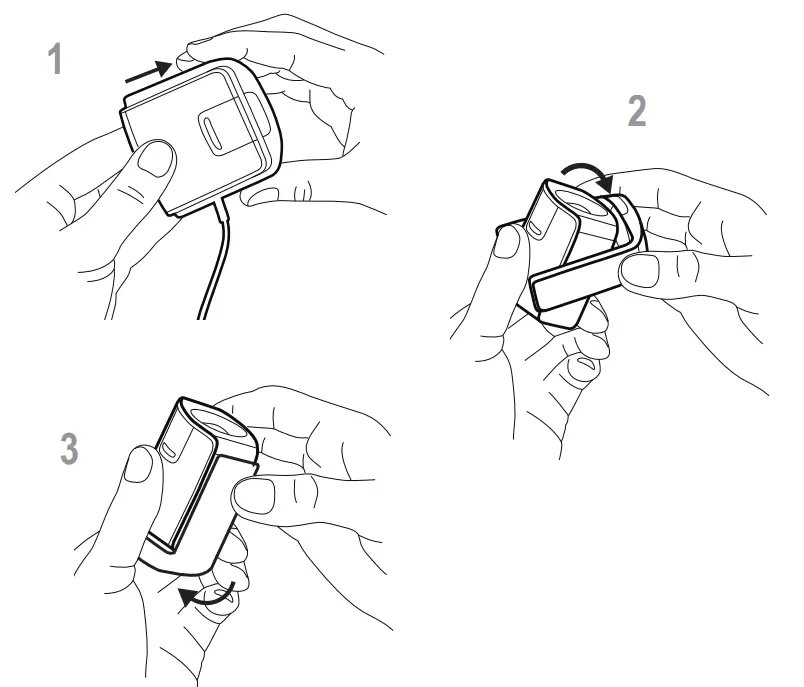
For display measurements:
- Lift up on ambient diffuser arm.
- Rotate ambient diffuser arm to the rear position.
- The ambient diffuser arm will snap into place when located in the rear position.
Monitor measurement 2

To adjust the position of the counterweight, depress the button on the counterweight and slide the counterweight simultaneously to the desired location.
Monitor measurement 3
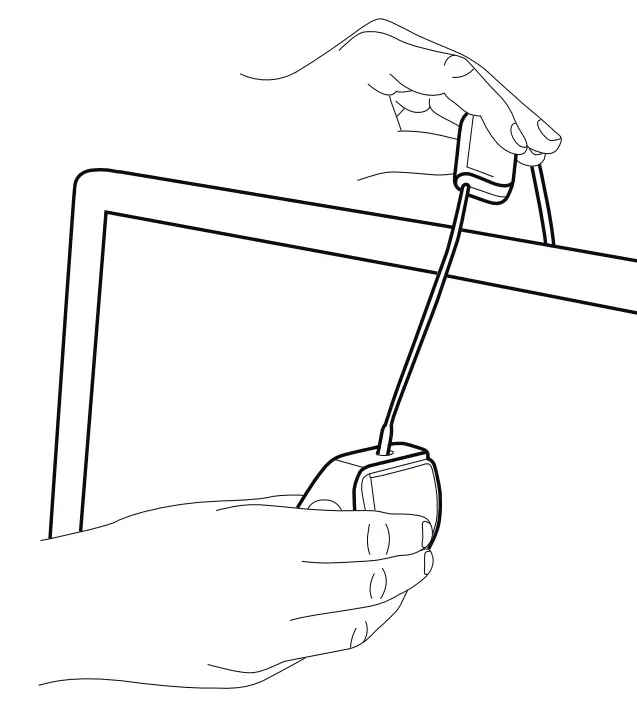
To mount the device on your display, position the optics in contact with the center of your display. Then position the USB cable and counterweight behind your display.
Monitor measurement 4
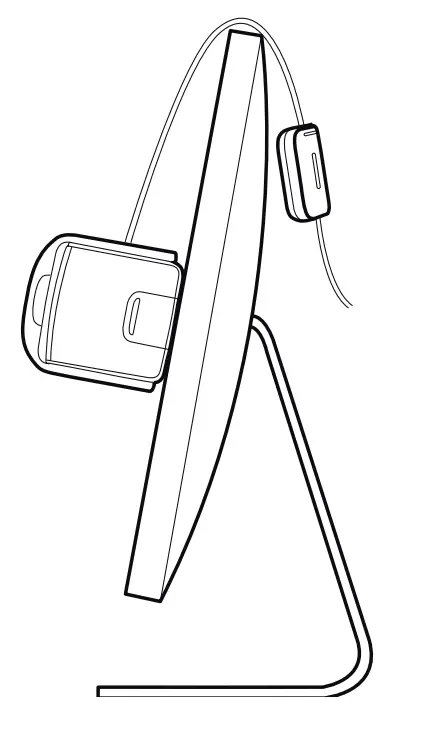
Adjust the position of the counterweight according to the size of your display. Be sure the foam pad on the front of the device sits flat on your display.
Ambient light measurement
For ambient light measurements:
- Rotate the ambient diffuser arm until the diffuser is positioned over the optics.
- Press down on the ambient diffuser arm until it snaps into place over the optics.
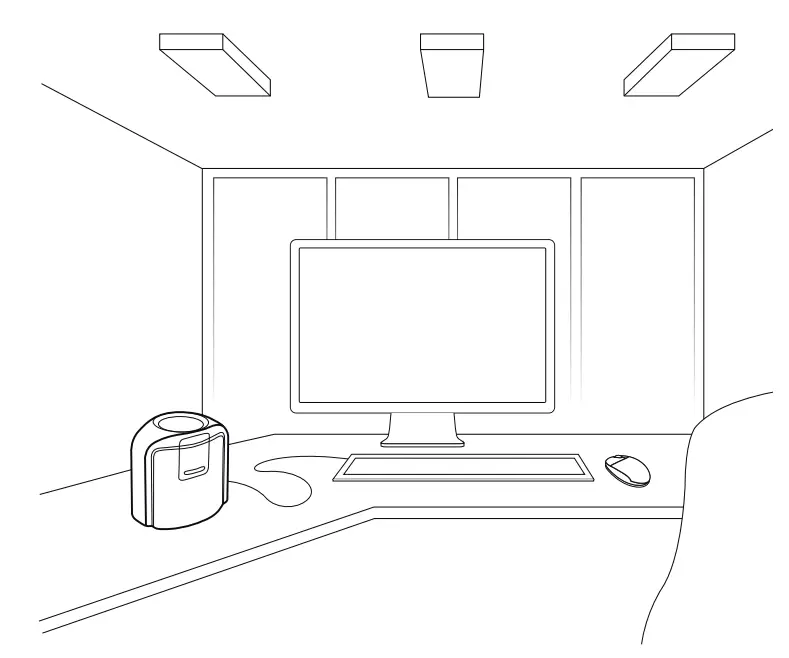
Position the device on your work surface next to your display with an ambient diffuser pointing upwards.
Projector Measurement 1
For projector measurements:
- Lift up on ambient diffuser arm.
- Rotate ambient diffuser arm halfway towards the rear position.
- Use the ambient diffuser arm as a stand for the device and position the device on a table in front of the projector screen. (A threaded tripod mount is also available on the bottom of the device for use with a tripod.)
Projector Measurement 2
Rotate the device up or down and pivot left or right until the device optics are pointing towards the center on the projector screen. For best results, position the device as close to the projector screen as possible and set room lighting to intended viewing conditions.
Warranty Conditions
Warranty ConditionsX-Rite warrants this product against defects in material and workmanship for a period of twelve (12) months from the date of sale, unless different local regulations apply. During the warranty period, X-Rite will either replace or repair at its discretion defective parts free of charge.This warranty shall not apply to any goods supplied hereunder which after shipment are damaged, altered in any respect, or subjected to negligent treatment. X-Rite`s sole and exclusive obligation for breach of the above warranties shall be the repair or replacement of any part, without charge, which within the warranty period is proven to X-Rite`s reasonable satisfaction to have been defective. Repairs or replacement by X-Rite shall not revive an otherwise expired warranty, nor shall the same extent the duration of a warranty. X-Rite shall in no event be liable for losses or costs to Buyer in manufacturing, or for Buyer`s overhead, other expenses, lost profits, goodwill, or any other special, indirect, consequential, incidental, or other damages to people or property resulting from a breach of any of the foregoing warranties. There are no other warranties, either express or implied, which extend beyond the warranties set forth herein. The express warranties contained herein are in lieu of all other warranties, express or implied, including, but not limited warranty or merchantability and fitness for a particular purpose or application. No representations, conversations, or statements not expressly set forth herein shall be binding upon X-Rite as a warranty, guarantee, or any other form of assurance. To obtain warranty service, you must take the product, or deliver the product freight prepaid, in either its original packaging or packaging affording an equal degree of protection, to an authorized X-Rite service center. Proof of purchase in the form of a bill of sale or receipted invoice which is evidence that the unit is within the warranty period must be presented to obtain warranty service.
Care, Support, & Service
 report this ad
CareKeep the ambient diffuser in place over the optics when not in use. The ambient diffuser will prevent dust or dirt from accumulating on the lens.If cleaning is needed, first use a lens blower brush to remove loose dust. If necessary, wipe the lens gently with a soft lint-free cloth.NOTE – Never use water, solvents, or detergents to clean the lens or body of the device, as these may cause damage or deformation.Always use and store the device between 10° C to 35° C at 20% to 80% relative humidity (non-condensing).ServiceDo not try to dismantle the device for any reason. Unauthorized dismantling of the equipment will void all warranty claims.Contact the X-Rite support or the nearest X-Rite Service Center, if you believe that the unit does not work anymore or does not work correctly.Service CenterVisit www.xrite.com to locate the nearest X-Rite Service Center or contact your X-Rite dealer for more information.
|
Part Name |
Toxic and harmful substances or elements | |||||
| (Pb) | (Hg) | (Cd) | (Cr(VI)) | (PBB) |
(PBDE) |
|
| Diffuser Plastic and Polymeric Parts |
○ |
○ |
○ |
○ |
○ | ○ |
| Optics and Optical Components |
X |
○ | ○ | ○ | ○ | ○ |
| Circuit Modules |
X |
○ | ○ | ○ | ○ |
○ |
|
USB A Cable and Cable Assemblies |
○ | ○ | ○ | ○ | ○ |
○ |
| Cable WeightPlastic and Metal Components | X | ○ | ○ | ○ | ○ |
○ |
 ○: Indicates that the content of the toxic and hazardous substance in all the homogenous material of the part is below the concentration limit requirement as described in SJ/T 11363-2014.
![]() X: Indicates that the content of the toxic and hazardous substance in at least one homogenous material of the part exceeds the concentration limit requirement as described in SJ/T 11363-2014.
X: Indicates that the content of the toxic and hazardous substance in at least one homogenous material of the part exceeds the concentration limit requirement as described in SJ/T 11363-2014.
![]() Corporate HeadquartersX-Rite, Incorporated4300 44th Street SE, Grand Rapids, Michigan 49512Phone 1 800 248 9748 or 1 616 803 2100Fax 1 800 292 4437 or 1 616 803 2705European HeadquartersX-Rite Europe GmbHAlthardstrasse 70, 8105 Regensdorf, SwitzerlandPhone (+41) 44 842 24 00, Fax (+41) 44 842 22 22Asia Pacific HeadquartersX-Rite Asia Pacific LimitedSuite 2801, 28th Floor, AXA TowerLandmark East, 100 How Ming Street, Kwun Tong, Kowloon, Hong KongPhone (+852) 2 568 6283, Fax (+852) 2 885 8610Please visit www.xrite.com for a local office near you.TM Trademark of X-Rite.Part No. EODIS3-550 (09/19)
Corporate HeadquartersX-Rite, Incorporated4300 44th Street SE, Grand Rapids, Michigan 49512Phone 1 800 248 9748 or 1 616 803 2100Fax 1 800 292 4437 or 1 616 803 2705European HeadquartersX-Rite Europe GmbHAlthardstrasse 70, 8105 Regensdorf, SwitzerlandPhone (+41) 44 842 24 00, Fax (+41) 44 842 22 22Asia Pacific HeadquartersX-Rite Asia Pacific LimitedSuite 2801, 28th Floor, AXA TowerLandmark East, 100 How Ming Street, Kwun Tong, Kowloon, Hong KongPhone (+852) 2 568 6283, Fax (+852) 2 885 8610Please visit www.xrite.com for a local office near you.TM Trademark of X-Rite.Part No. EODIS3-550 (09/19)
References
X-Rite エックスライト 日本公式サイト – X-Rite エックスライト 日本公式サイト
色差仪_色差计_进口色差仪品牌 – 爱色丽 X-rite官网
i1Profiler Product Support
i1Studio and i1Display Studio – Getting Started
i1Studio and i1Display Studio – Getting Started
i1Profiler Product Support
i1Studio and i1Display Studio – Getting Started
X-Rite Color Management, Measurement, Solutions, and Software
[xyz-ips snippet=”download-snippet”]