
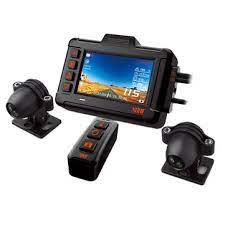
XBHT Motorcycle Motor Vehicle Dedicated Driving Recorder Xb702
The installation guide
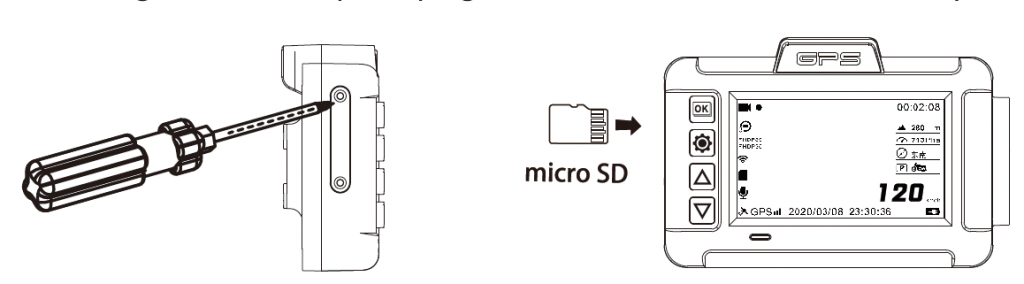
- Memory card: Please insert the micro SD memory card into the card slot in the correct direction installation before use. Please install a micro SD memory card as required. (It is recommended to use U3 and above specifications and at least 8GB)Reminder: To screw the waterproof plug, you only need to twist the screw to a level with the edge of the waterproof plug. There is no need to twist it too deep!

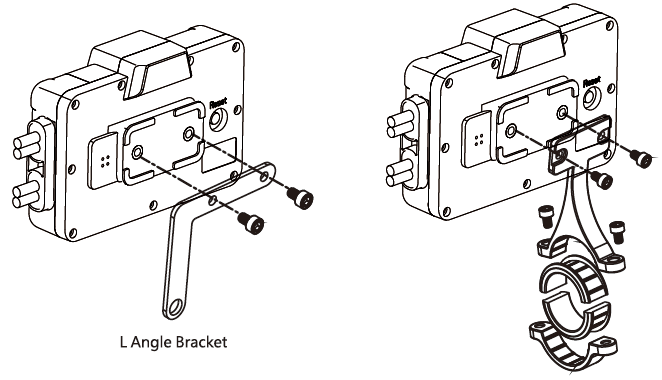
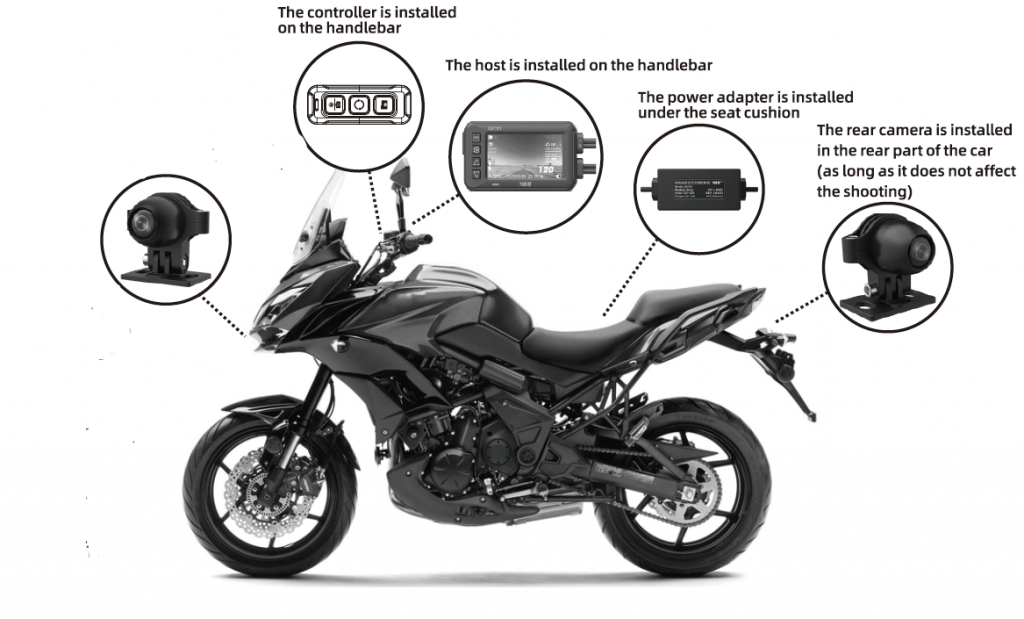
- Recorder host installation: TheXb702host house can be used for the installation of handlebars of different sizes. bracket Please select the installation place and adjust the angle before tightening the screws.
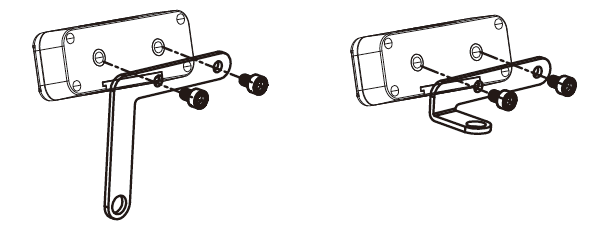
- Controller installation: The Xb702 controller is matched with two metal brackets, which can be installed with the handlebars. Please select the installation place and adjust the angle before tightening the screws.
- Camera installation: Rotate the camera left and right to adjust, so that the white point of the camera is centered upward and corresponds to the middle position of the bracket.

Installation Combination Diagram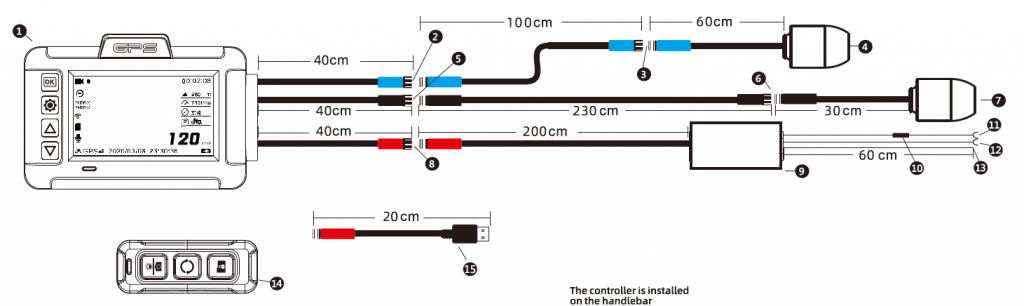
- Host
- Connect to the front camera (blue connector)
- Connect to the front camera (blue connector)
- Front camera
- Connect to t e rear camera (black connector)
- Connect to the rear camera (black connector)
- Rear camera
- Connect to the power adapter(red connector)
- Power adapter
- Fuse
- Red B+ (positive power supply)
- Black ground wire (negative power supply)
- Yellow ACC power wire
- Handlebar controller
- USB power supply line (can be connected to mobile power supply or motorcycle with USB port for power supply, input voltage requirement: SV2A)Tips: Please connect the ACC power cord to the motorcycle ACC line (it does not have to be pulled to the front node, it is ok to use line that which is, when turn on the key on the vehicle, it is power on, and when turn off the key, it is power off), and the recorder can be controlled by the motorcycle switch key to switch on and off.
Function Operation
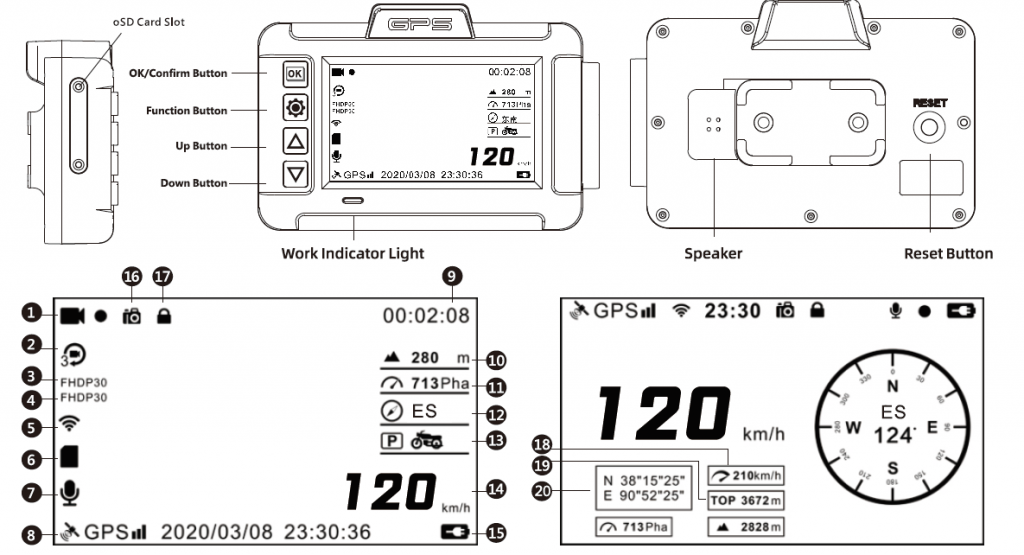

- Recording Status (Flashing Red Dot Indicates Recording)
- Loop Recording Time
- Front Camera Resolution
- Rear Camera Resolution
- Wi Fi Status(White icon is Not connected, Green icon is Connected)
- Memory Card Status
- Microphone Status
- GPS Status (White Blinking Icon is Not Positioned , Green Static Icon Is Positioning)
- Recording Time
- Altitude
- Air Pressure
- Compass
- Parking Monitoring Status
- Real-Time Speed
- Power Supply status
- Take Pictures
- LockUp Video
- Maximum Speed
- Highest Altitude
- Latitude And Longitude
- Racing mode selection
- League tables
- The real-time speed
- Racing distance
- Length of race time
Confirm Button (OK button): Short press to start/pause recording.Setting button: After the video is paused, short press to enter the video setting interface (press the up and down buttons to select the item to be set – press the enter key to enter – press the up and down keys to select the desired content – press the enter key to confirm the selection), short press again to enter the system setting interface, and short press for the third time to exit the setting.Setting button: After the video is paused, long press to enter the camera interface (short press to take a photo, and one photo on the front and rear cameras), long press again to enter the play mode, it is able to view the shooting and videos and photos (press the up and down keys to select the file that needs to be viewed – short press to play – short press again to pause play/long press to end play), long press for the third time to return to the video interlace. In the setting function options, it is the confirmation button.Up button: In the Settings function is the up function. Short press the video interface to switch the front and rear camera wind mode.Down Button: Short press to control to turn on and off the Microphone. It is the function of “Select Down” under the setting interface.Work indicator light: flashes every second when recording, flashes quickly when the file is locked, and always on when recording is paused.
Connection mode between remote control and host: Long press the unlock button for 1 o seconds, the indicator flashes slowly for three times and then quickly, after successful pairing, the recorder host will issue an card wipe” sound.Controller keys and operations
Photograph/display brightness adjustment button: press the button to take a picture (front and back cameras each take a picture). Long press to adjust the brightness of the display screen (three levels of brightness adjustment).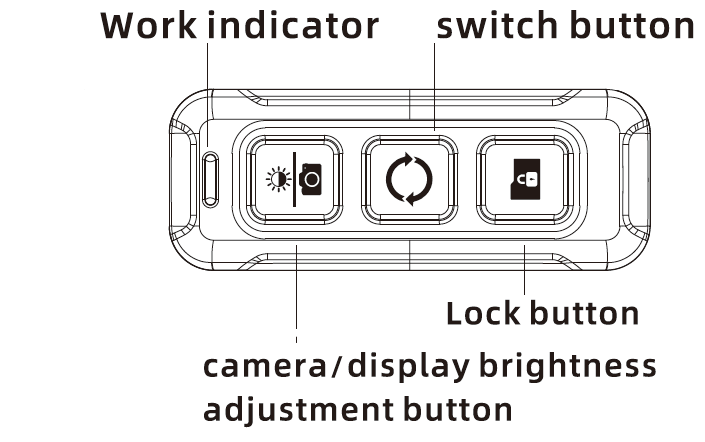
Switch button:
- 1. Long press to switch data sheet interface and video display interface.
- Short press to switch the mode of front and back cameras.
Lock button:
Press to lock/unlock button to lock the file (in the recording state, short press the lock file device will preserve the file being recorded by the front and back cameras) Working indicator light: the indicator light will be on when the key is operated.Warm reminder: controller can be replaced Coin-cell battery, specification :CR2032,3V.
Menu Setting Interface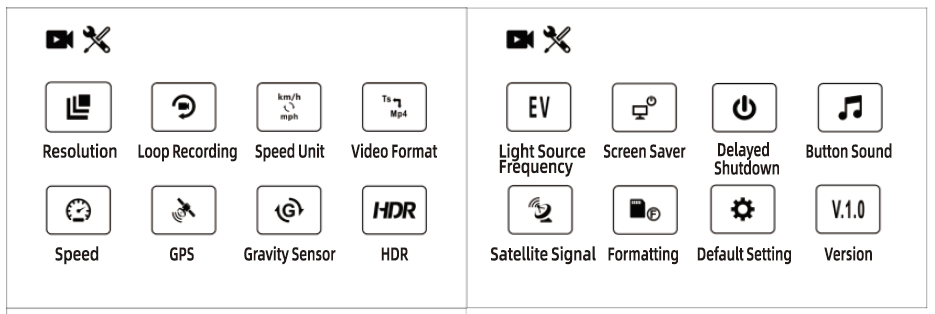
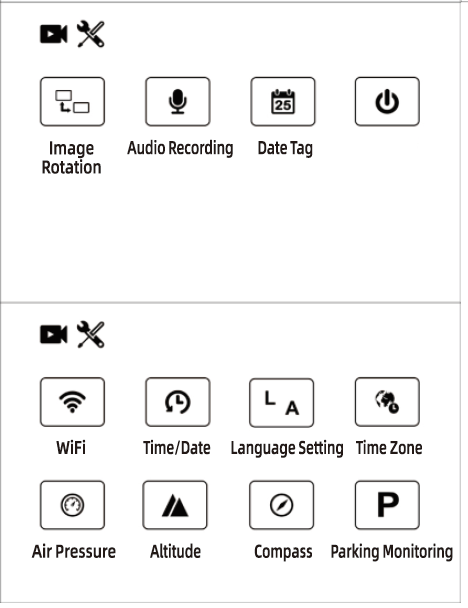
Loop recording: select the file segment time lengthHOR: HOR on/off Exposure compensation: setting selection Gravity sensing: design collision sensing sensitivityVideo recording audio: On/OffData Label: On/OffCompass Label: On/Off. the recorder shows compass data when it is turned on, and the recording file also has dataAir pressure: On/Off, the recorder displays air pressure data when it is turned on, and the recording file also has dataAltitude: On/Off, the recorder displays air pressure data when it is turned on, and the recording file also has dataVehicle speed: On/Off. the recorder displays speed data when it is turned on, and the recording file also has dataImage rotation: For the rear camera to switch between the front image/minor image on the screen, turn it on as a mirror image effect (flip to left end right)Speed unit conversion: kilometer/mile speed unit selectionGPS: GPS On/OffSatellites: display the number and star value of the searched satellitesWi-Fi: On/ OffVideo Format: TS/MP4 format selectionDemonstration of shutdown: after the motorcycle turns off the key, the recorder will shut down with a delay (only available when connected to the B+ line) Parking monitoring: On/Off, after turning on the motorcycle key parking status, the recorder will start to record for 30 seconds after being hit by a collision, silently booting/display is not bright (1. need to connect to the B+ line, 2. turn on the gravity sensor).
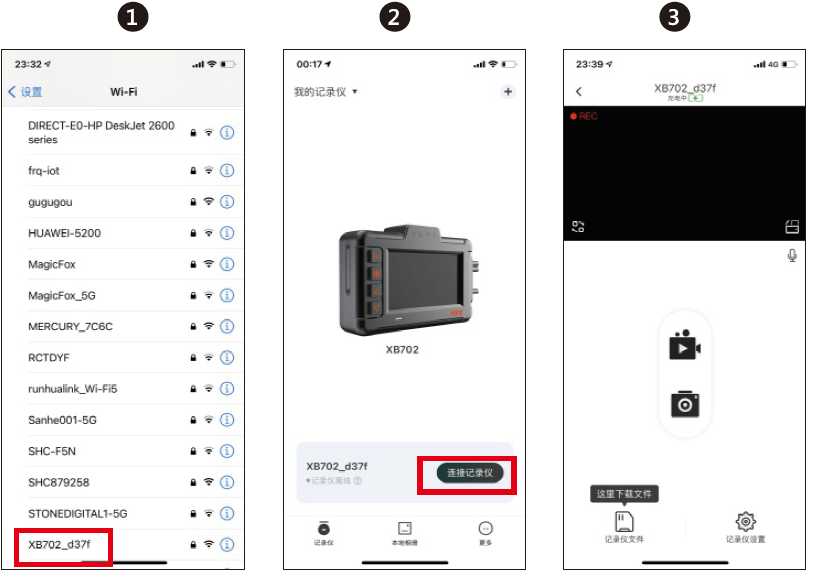
APP Operation to Connect to Mobile Phone
- Scan APP QR code on mobile phone or search XBHT in application market to download and install (suitable for both Android/IDS system)
- The mobile phone searches for the wifi signal of the recorder, and the recorder signal will be found as: XB702_)()()(, after selecting it, enter the password: 12345678 to connect
- Open APl1 to complete the connection
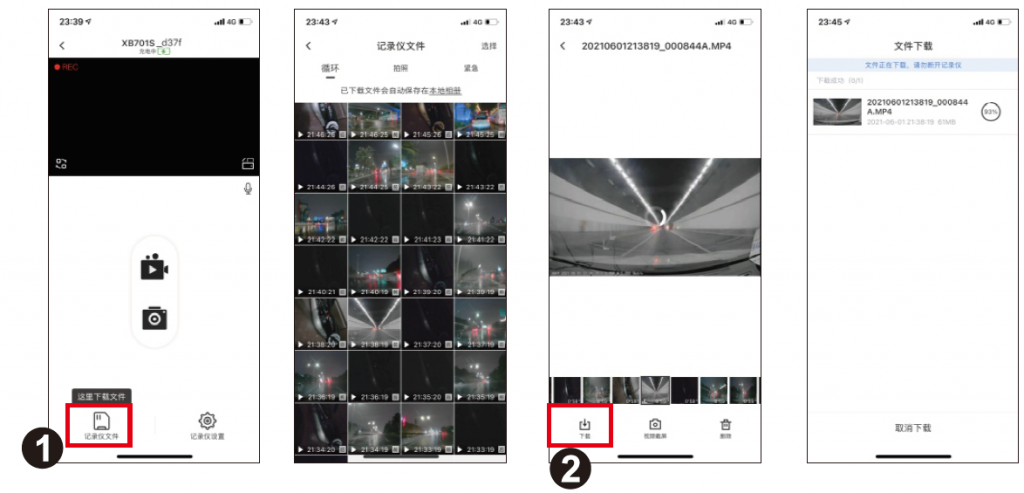
GPS Track View
Mobile phone APP operation:
- Click on the Recorder file to view the video file.
- Select the video file and click Play. Click 11 Download” to download the video file to the APP album.
- Watermark switch operates video display/turn off data watermarking.
- Click “Edit” to combine the watermark data with the video.
- Click “Save” to save the video directly to the phone album without watermark data.
- Click “Save Video” to save the video with watermark data to the phone album.

Common Problem Handling
Maximum support 256G memory card, in order to ensure the normal work of recording, please use a regular brand memory card. Must use a u3 high-speed card (with read speed above 100 mb/s, write speed above 60mb/s. Do not pull out the memory card and cameras connection line!
- If after the motorcycle turns on by key, the rear recorder does not turn on, please check whether the power supply line is normal.
- If the cameras has no picture or a single camera has no picture, confirm whether the camera interface is inserted in place, and interchange the two cameras to test whether there is a problem with the cameras.
- If there is a flickering screen or only one camera screen when using the USB cable for power supply, please check whether the connected use power port has reached the output of SV2A.
Hardware Specification Table

![]()
[xyz-ips snippet=”download-snippet”]