
Instruction Manual

XCM FPS Black PCB
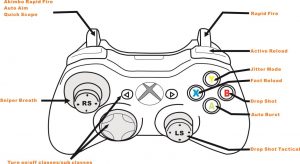
Product features:
Special mod :Jitter mod : shoots a bullet and rapidly changes to another gun/weapon.
- Drop shot mod: prone and rapid fire
- Fast reload mod: quickly reloads the gun, and change gun/weapon, gives you a plenty of time to shoot your opponent
- Burst mod: changes from single shot to rapid fire.
- Sniper breath mod: Automatically hold on to breath.
- Turbo Melee: shoot and Melee
- Auto Zoom Zombie: Zoom and locks down the enemy.
- Akimbo: When the mode is activated, gamer only need to press the RT button and it will automatically press the LT button simultaneously as well for shooting with 2 guns
- Quick scope: aim then quick shot.
Modding controller instruction:
- We use the left direction of D –pad and Back button, so the modded controller will use the left direction of D –pad and Back button for shifting the mode (we are now using the left direction on D –pad mode for instance , if you use the Back button for shifting the mode ,please use it to instead of the left direction on D –pad),if you want to change the setting between the left direction on D –pad and Back button, please press and hold the Back button before activate the controller or press the left direction on D –pad and guide key to turn on the wireless controller.
- After setting the mode, you don’t need to reset it again and don’t worry to erase the setting when replacing the battery.
- Some mode or sub-mode can be selected but some mode only works on specific game.
Basic instruction:
Choosing your mode:
After modifying your wireless controller, you will have 3 major modes (indicated by Purple, Green and Blue LED), these 3 major modes can allow you to select your favorite mode and save, double click the left direction on D –pad or Back button for shifting these 3 modes, when the top right light on the ring of guide key (purple light) is on, you are in mode 1, you can shift the mode by clicking on the left direction D –pad or Back button, if you have passed the 3 modes, the LED indicator turns off on the Guide key, it means you have turned off the mode.

Selecting Sub-modes
After choosing the major mode, you are able to set sub-modes, each major mode has 2 sub-modes, the sub-modes will be shown on the bottom right ring of the Guide key ,(the 4th player LED indicator), you are able to set the sub-mode under the 3 major modes (Purple, Green and Blue), if you are in any of the Major mode, you can turn on the sub-mode function – press the left direction on the D –pad once or the Back button once, the 4th player LED indicator on the Guide key lights up, that means the Sub-mod is now turned on, under the Sub-modes, you can keep pressing the left direction on D –pad (or Back button) to select the sub-mode and the option of your choice, the setting method and details of how to operate the Sub-modes is shown below.

Sub-Mode option:

3 Rapid fire setting.
After modding the controller, you are able to control the speed of the rapid fire. The rapid fire speed can be set to 5 shots per sec or 15 shots per sec. Each Sub-mode has its own rapid fire setting.
Setting method:
- Choose one Major mode, the 2nd player LED indicator on the Guide key will lit up (Purple, Green ,Blue)
- Choose the Sub-mode, the 4th player LED indicator on the Guide key lights up.
- Press and hold the Left of D-pad (or Black button) and wait until the Second player LED lights up in Red, the 3rd player LED blinks, it means you entered the rapid fire setting.
- Release the left D pad (or Black button), use the LT and RT button to select the rapid fire speed of your choice, press the LT button once, the 3rd player LED blinks slowly, you have chosen 5 shots per Sec. Press the RT button, the 3rd player LED is blinks quickly, you just selected the 15 shots per Sec.
- After setting the rapid fire function, press and hold the Left Direction on D pad (or Back button) ,the system will automatically return back to Major mode.
- All 6 types of the Sub-mode rapid fire are set according to the above method.
Jitter Mod (Auto Burst)
Shoots a bullet and rapidly changes to another gun/weapon.
Turn on full automatic function: Press and hold the Y button and the Left direction of D pad (or Back button) till the 4th player LED on the Guide key turns Yellow, the Jitter mod function is now activated, you have 3 options, you can shift the option by pressing the Y button and the Left direction D pad (or Back button), wait until the Yellow LED blinks to your choice, and after choosing the right option, quickly release the Y button and Left direction of D pad (or Back button) to finish the setting. The 4th player LED flashes the number of times indicate the option you chose. For example, if it only blinks once, you have chosen option 1.
Option 1: Shoots once than rapidly changes to another gun/weapon.Option 2: While using the LT to Aim, the auto change gun/weapon function is disabled. Option 3: While using the LT to Aim, the auto change gun/weapon function is disabled, but the rapid fire function is turned ON.
Note: In option 2 and 3, the auto change gun/weapon function stays activate if LT is not activated.
Drop Shot Mod
Prone down and rapid fire
Hold down the RT button, the character will prone down and rapid fire.
Activate this mod: Press and hold the B button and the Left side of D-pad (or Back button), wait until the 4th player LED turns Red, the mode is now activated, there is 2 options to chose from, shift between these 2 options by pressing and holding the B button and the Left side of D-pad (or Back button), wait until the Red light in the 4th
player position flashes the number of times for the option you choose, now quickly release the B button and the left side of D pad (or Back button) ,the setting is now completed, (The number of blinks on the 4th player LED indicates the option you have choosing. For example, if it blinks only once, you have chosen the option 1.)
Option 1. By pressing the LT button, disables the Drop shot and rapid fire function, it is suitable when using the machine gun.Option 2. By pressing the LT button, disables the Drop shot function, but the rapid fire function is still turned ON, suitable for signal shot or semi-auto shot weapon.
Note: In option 1 or 2, the Drop shot function stays activated if the LT button is not activated.
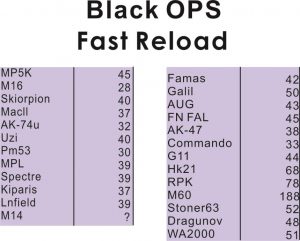
Fast Reload Mod(COD)
Quickly reloads the gun, and changes to the other gun/weapon, gives you a plenty of time to shoot your opponent
How to activate the mode: quickly press the X button for 3 times, the 3rd player light turns to Red, the fast reload mod is now activated, if you want to adjust the speed of the fast reload mode, please turn on the mode (it doesn’t work if you have another Sub-mod turned on), press and hold the X button and the left side of the D pad (or Back button) till the 2nd player light turns Red, you are able to adjust the speed by pressing on the LT and RT button (1-255), after entering the mod, press the left side of the D pad to save the setting. (LT button is for decreasing the reload speed and RT is for increasing the reload speed, the 3rd player light indicates ten digits, the 4th player light represents single digit, for example, if the 3rd player light flashes 3 times and the 4th player light flashes 8 times, it represents 38)
According to the following information to adjust the speed of the fast reload mod (The below weapons are just for your reference, if some weapon can’t be set properly, please using 37-48 parameter for setting.)
Burst Mod
Changes the single shot to rapid fire.
Activate the Auto rapid fire function (Burst mode):Press and hold the A button and the left side of the D pad (or the Back button), wait until the 4th player light turns Green, the mode is now activated, to shift to another options, press and hold the left side on the D pad (or the Back button) again, wait the green light blinks to your choice, quickly release the A button and the left side of the D pad (or the Back button), the setting is now completed,
(The 4th player LED flashes the number of times the option you chose. For example, if it only flashs once, you have chosen the option 1.)
- Option 1 : Signal shot or Semi-auto weapon in bursts of 2 bullets.
- Option 2 : Signal shot or Semi-auto weapon in bursts of 3 bullets.
- Option 3 : Signal shot or Semi-auto weapon in bursts of 4 bullets.
- Option 4 : Signal shot or Semi-auto weapon in bursts of 5 bullets.
Sniper Breath Mod (COD games Only)
Automatically hold on to breath.(MI4-CBR)
Activate this mode: Press and hold the A button and the left side on the D pad (or the Back button), wait until the 4th player light turns purple, the mode is now activated, it has 2 options for selection, shift this 2 options by pressing the LS button and the left side of the D pad (or the Back button) wait until the 4th player light flashes to your choice, quickly release the Left analog stick and the left side of the D pad (or the Back button), the setting is now complete.
(The 4th player LED flashes the number of times the option you chose. For example, if it flashs once, you have chosen the option 1.)
Option 1. Automatically holds breath when scoped using the LT button (left trigger)Option 2. Automatically holds breath when scoped in with left trigger, takes 2 shots when right trigger is pulled.
Turbo Melee Shoot and MeleePressing the RT button will make the character shot and melee, gamer can quickly attack multiple enemies.
How to activate the mod: Hold and press the RS button and the left side of the D pad (or the Back button), wait until the 4th player light turns RED, the mode is now activated, there are 2 option modes, switch between another options by pressing and holding the RS button and the left side on the D pad (or the Back button) again, wait until the RED light flashes to your choice, quickly release the RS button and the left side on the D pad (or the Back button), the setting is now complete.
(The 4th player LED flashes the number of times the option you chose. For example, if it flashs once, you have chosen the option 1.)
Option 1 : By pressing the LT button, disables the Turbo Melee function, better on machinegun.Option 2: By pressing the LT button, disables the Turbo Melee function, the rapid fire function is still activated, suitable on sigle shot or Semi-auto weapons.
Note: The Turbo Melee stays on, if the LT button doesn’t get pulled.
Auto-Zoom Zombie(COD)
Auto Zoom and fire immediately
How to activate the mode:Hold and press the LT button and the left side on the D pad (or the Back button), wait until the 4th player light turns Light Blue, the mode is now activated, there are 2 option modes, switch between another options by pressing and holding the LT button and left side of the D pad (or the Back button) again, wait until the light flashes to your choice, quickly release the LT button and the left side of the D pad (or the Back button), the setting is now complete.
(The 4th player LED flashes the number of times the option you chose. For example, if it flashs once, you have chosen the option 1.)
Note: this mode doesn’t work on PVP gameplay. ( Player(s) versus player(s) )Option 4. Press and hold the LT button, it will auto-zoom to the closest target in Zombie Option 5. Press and hold the LT button, it will auto-zoom the closest target in Zombie, rapid fire is enable, suitable for single shot weapons.
Akimbo When the mode is activated, gamer only need to press the RT button and it will automatically press the LT button simultaneously as well for shooting with 2 guns (Work only when holding 2 weapons at the same time)
How to activate the mode.Hold and press the LT button and the left side on the D pad (or the Back button), wait until the 4th player light turns Blue, the mode is now activated, there has 3 option modes, switch between another options by pressing and holding the LT button and left side of the D pad (or the Back button) again, wait until the light flashes to your choice, quickly release the LT button and the left side of the D pad (or the Back button), the setting is now complete.
(The 4th player LED flashes the number of times the option you chose. For example, if it flashs once, you have chosen the option 1.)
Option 1 : With this option, you are able to use the LT or RT button individually or at the same time, the rapid fire function is enable in this option.Option 2 : with this option, you only need to press the RT button, the LT button is automatically pulled with the RT button simultaneously.Pressing the LT button, the RT button won’t be fired with it, the LT only works with its own weapon.Note: You are able to set the rapid fire speed on both option 1 and 2, and you can’t exceed the bullet limits.Option 3: With this option, you only need to press the RT button, the LT button is automatically pulled with the RT button simultaneously. Pressing the LT button also works for its own weapon (Press the RT button, the right and left weapon fires intervals)..Quick Scope aim then quick shot.
How to activate the mode.Hold and press the LT button and the left side of the D pad (or the Back button), wait until the 4th player light turns Blue, the mode is now activated, it has only one option mode, quickly release the LT button and the left side on the D pad (or the Back button), the setting is now complete. Option 6. Aim then quick shot, the rapid fire speed can be adjusted (Press the LT button, the RT button is automatically pulled with the LT button simultaneously, lock down the enemy then shoot.
Modding tutorial
- LS button attached with connecting wire

- RS button attached with connecting wire.


Modding Steps
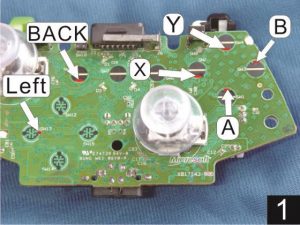
- As shown on the picture, using the cutter to gently scratch off these 6 buttons carbon layer (Y、B、A、X、BACK、Left b-pad).
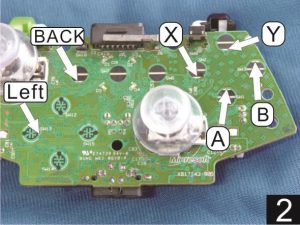
- After scratching off the carbon layer. (As shown on the picture 2.)
- Put on the soldering tin on those places (the surface must be smooth and with a small amount of tin solder, the soldering time can’t be too long in case of damaging the PCB.(As shown on the picture 3.)
- Put the soldering tin on to the XCM fps black PCB (Y、B、A、X、BACK、LeftD-pad) (the surface must be smooth and with a small amount of tin solder, the soldering time can’t take too long in case of damaging the PCB. (As shown on the picture 4.)
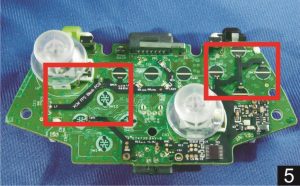
- Properly place the XCM fps black PCB onto the wireless controller PCB. (As shown on the picture 5.)
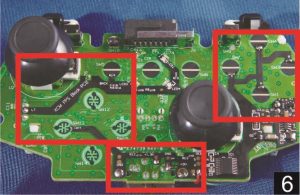
- Solder these points (LT、RT、GND、Left D-pad、Back、X,、B、A、Y、 V+、 +1.9V、K、+3V )in order, it is better to use tweezers to press and hold the XCM fps black PCB to let it stick perfectly on to the controller PCB. (As shown on the picture 6.)
- Solder the LS/RS button attached with the connecting wire to the XCM fps black PCB LS and RS points. (As shown on the picture 7.)
- Solder the other side of LS/RS button attached with connecting wire to the controller PCB H and G point (As shown on the picture 8.)
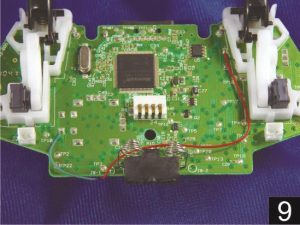
- Lay the LS/RS button with attached connecting wire properly. (As shown on the picture 9.)
- Modification is completed, put on the controller shell.


XCM FPS Black PCB Instruction Manual – XCM FPS Black PCB Instruction Manual –
Questions about your Manual? Post in the comments!
[xyz-ips snippet=”download-snippet”]