Xianda WT002 Instruction Manual

1. Introduction
1.1 Product Descriptions
Thank you for choosing WT002 Motorcycle Bluetooth Communication System.The WT002 is a Bluetooth Headset designed for the motorcycle rider and passenger who wish to have clear and reliable wireless communications while riding. This headset is compatible with Bluetooth cellular phones and can be suited to any sort of helmet for motorcyclists.It can satisfy all kinds of needs, such as wireless dialling, receiving calls, listening to MP3 music and receiving GPS voice prompt.Of course, there is no doubt that it is very fashionable and beautiful.Let’s start the fashion journey and learn more about your products.

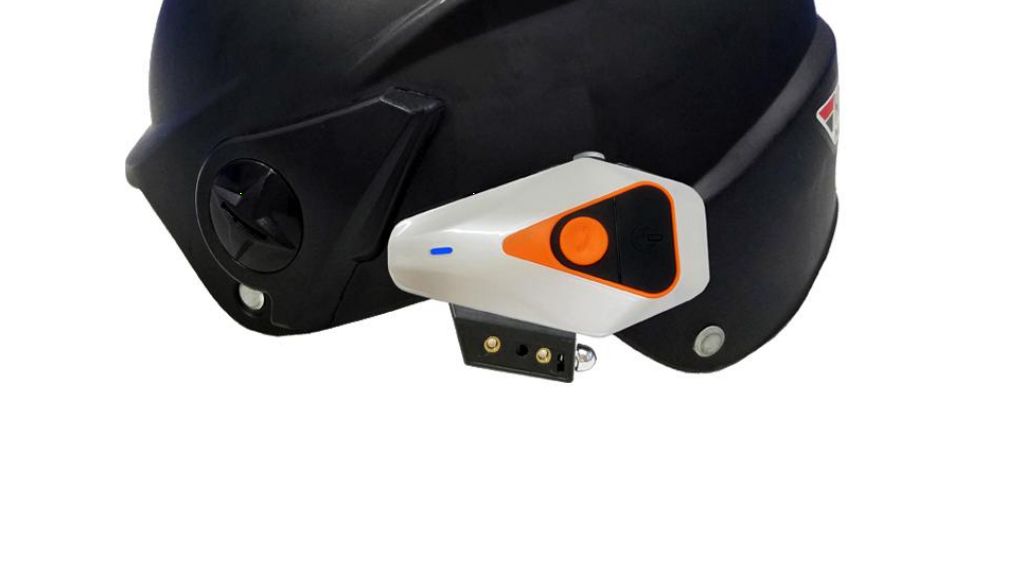
- Power/ Intercom Button
- Phone Button
- LED Indicator Light
- Charger and Headset Socket
- Headset Plug
- Earphone
- Microphone
1.2 Main Functions
- Direct full duplex intercom between interphone and interphone up to 1000 m. Interphone for bluetooth enable within 10 m visible range of the cell phone.
- Answer calls, reject calls and hang up calls.
- Automatic answering calls.
- Support FM radio.
- Enjoy the cell phone music through A2DP or connect GPS.
- Control cell phone music through AVRCP: forward, backward, play, pause.
- Automatic switching among bluetooth cell phone, intercom, stereo music.
- The DSP eliminates noise and wind sound processing to ensure clear call quality when running at high speed.
- Button panel is water-proof and sun-proof, while the design is durable.
- Support the last number redialing
2. Package Contents

3. Installation Procedure
3.1 Installation method with plastic clamp
- Loosen the screws on the back of clamp with the provided screw driver.
- Open the lining of helmet, insert the clamp in the proper position on the left of helmet and fasten the screw(overly fastened screw can damage the clamp)
- Slide the receiver down into the slots on the headset clamp mount.Make sure that it is locked in securely.
- Open the lining of helmet(at ear ‘s position),clean the EPS surface and affix the Velcro on with the rough surface.
- Affix the hook surface of earphone to the rough surface of Velcro and properly tidy the helmet lining.
- Insert the headphone plug into the corresponding headphone jack on the receiver to finish the installation.

3.2 Installation method with velcro clamp
You can directly use the Velcro to mount the interphone on the edge of helmet. See the following pictures.
- Tear off the white paper on velcro and stick the velcro onto clamp&helmet
- Stick the clamp with velcro onto helmet
- Slide the receiver down into the slots on the headset clamp mount.Make sure that it is locked in securely.

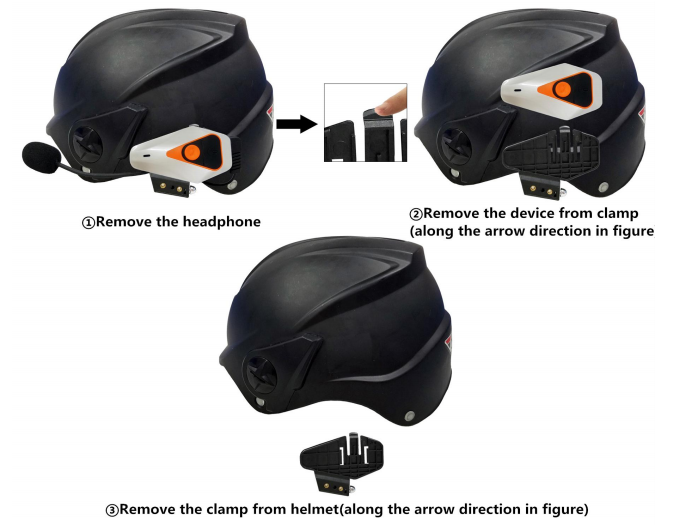
4. Quick removal of the bluetooth device
5.1 Turning on / of the unit
On: Press the power /intercom button for 4 seconds until you hear a “Di” tone.The blue light will flash 3 times swiftly and then turn into regular intervals.
Off: Press the power /intercom button for 5 seconds or until you hear 2 “Di” tones and the lights extinguish.
Note: When turn of the unit, please don’t loosen the power /intercom button when hear “dudu” tone. If so, the Bluetooth memory will be cleared away.
5.2 Phone Controls
- To answer a call – Shortly press the Phone button once.
- Auto receive call – Dependant on the phone the unit will automatically answer the call after 8-16 seconds of ringing.
- To reject a call – Press the Phone button and hold until you hear a “Du” (around 2 seconds).
- To end a call – Whilst call is active shortly press the Phone button once.
- Last number redial – When in standby mode. Press and hold the Phone button for 2 seconds until you hear a “Du”.
Note: Depending on the phone some or all of these functions may not work, or operate differently.
5.3 Music Controls
- Play / Pause – Shortly press phone button once
- Next Track – Turn the “+” button and let go
- Previous Track – Turn the “-” button and let go
5.4 To Start FM radio
- After turn the unit on, double press the Phone button to start FM radio(you can hear a “Du”).When there is no call or intercom.
- Short press:“+” or “-” button you can adjust the channel.
- When FM radio is on, double press the Phone button to stop FM radio.
Note: In order to make FM radio the best effect, you should pay attention to the following instruction:
ⅰ:The line of earphone is unfolded.ⅱ:Try to listen to the FM radio outside or near the window.
5.5 Start/End the Bluetooth Intercom
Start: When the two paired Bluetooth intercom headsets are in standby mode, shortly press the Power/Intercom button on either one of the two paired devices and a voice prompt will be heard after completing the intercom connection.
End: Shortly press the Power/Intercom button and intercom closes after a “bee” prompt tone.
5.6 To Adjust the Volume
Long press “+” button to increase and long press “-” button to decrease. This function is also fit for intercom/music/FM radio function.
Note: Depending on the phone some or all of these functions may not work, or operate differently.
5.7 To Reset the pairing memory
→If you have problems pairing, then it is best to reset the pairing memory
- Turn on the relevant unit into standby mode. Press the power/intercom button for 3-5 seconds till a “dudu” can be heard.
- Let go of the button when the tone is heard.(The unit will turn off)
- Restart, the memory will be erased. (Pair again)
5.8 Switching mode
- Switch Between Intercom and Music/FM Radio:When in intercom mode, shortly press the Power/Intercom button and a “bee” prompt tone can be heard. After, switching between music and FM radio, please refer to “②”.
- Switch Between Music and FM Radio: Double press the Phone button to FM Radio. When listening to the FM Radio, double press the phone button to exit FM Radio, then shortly press the Phone button once time to music.
- A. If the intercom headset is also connected to the mobile phone, when there is a phone call, the intercom will automatically disconnect, switch to the mobile phone headset to answer the call, and automatically resume the intercom state after the call ends; B. The operation needs to be effective within a limited distance; C. It takes about 5 seconds to switch back from the mobile phone call state to the Bluetooth intercom state.
6. Pairing method
6.1 Pairing with Bluetooth enabled mobile phone
- Ensure the Bluetooth intercom headset is off and within 1m visible range of the Bluetooth enabled mobile phone to be paired.
- Turn on the unit into standby mode (only need blue light flashing).
- Open the Bluetooth function on your mobile phone. (Some phones need to be set up so that all Bluetooth devices around can be detected).
- Bluetooth on your phone will search the device until you see bluetooth name.
- Click bluetooth name on your phone, you will hear “ DiDi ” tone when pair successfully.
6.2 Pairing between two devices
- Ensure both devices are off and within 1m visible range of each other.Press down both devices Power/Intercom button for 8 seconds until you see the red light and blue light flash alternatively, both devices enter pairing status.
- Quickly press the Power/Intercom button on either two devices.Then it will search for the other devices for pairing.When the blue light flashes regularly it means pairing is successful.
- If this fails retry it ensuring both red/blue light sequences are initiated simultaneously and are close together. Also ensure any other Bluetooth devices are turned off.
- When paired, you do not need to go into pairing mode again. In future you only need to go into standby mode (blue light flashing) on both units and press the button on one of the devices.
Note: When 2 bluetooth devices need to pair for intercom, also need to connect mobile phone, you should following the instruction:
i: Firstly, two Bluetooth devices need to pair for intercom successfully,(see the above instruction), then turn off the two Bluetooth devices.
ii: Turn on one of Bluetooth devices, also turn on the mobile phone Bluetooth, let the mobile phone connect the Bluetooth device successfully.
iii: Turn on the other Bluetooth device, next, you only need to press the Bluetooth device (any one of two is OK) power/intercom button, the two Bluetooth devices can intercom now.
6.3 Pairing between three devices
- Follow the above procedure for each combination of the three units. (A-B, B-C, A-C).
- Ensure the third unit is switched off when pairing the other two devices.
- Only one connection can be live at a time. When successfully paired the connections can be switched by ending any live call and returning to standby.
- From Standby press the power/intercom button 1 time for one of the pairings to be called, or 2 times for the other pairing to be called. The pairing for 1 or 2 presses will depend on the sequence in which you paired the 3 helmets, but once paired the relevant pairings will maintain the number.
- A will press the power/intercom button 1 time to call B and 2 times to call C;B will press the button 1 time to call C and 2 times to call A;C will press the button 1 time to call A and 2 times to call C.
7. Technical parameters of product
Bluetooth version: 3.0+EDRFrequency: 2.4GHzSupports: A2DP and AVRCPSupported Bluetooth Profiles: Bluetooth Headset and Hands free Profiles with Automatic Detection.Operating Range: Up to 10m for cellphonesBattery Type: Rechargeable Lithium Polymer 750mAhStand by: Up to 500hrsTalking time: Phone up to 16 hours;Intercom up to 13 hoursCharging Time: About 4 hoursPower Adaptor: DC 5V 1A (Optional)
8. Battery and charging instructions
Before using this device, Please charge the headset with charger. Please ensure that the battery is fully recharged when you first time use it.We have provided you with the ability to charge the system via the USB port of your computer or if you are away on a trip, you can use Multi-voltage USB power adapter.
The charging cable has a small USB plug for the headset and the large USB plug for the computer or AC adapter; please observe to correct orientation of the USB plug and socket before inserting
- Insert the USB plug of the charging cable, into the USB small jack of the headset; you can either charging by computer or AC adapter.
- While charging, the red LED on the headset module will illuminate, when the charging is finished, the red LED will extinguish. A normal charge from a low battery will take about 4 hours.
Note: if you do not use the headset for a month or more, to protect the Poly-Li battery, please charge the headset at least every month. (The fault damaged by wrong charging will be not guaranteed.

[xyz-ips snippet=”download-snippet”]