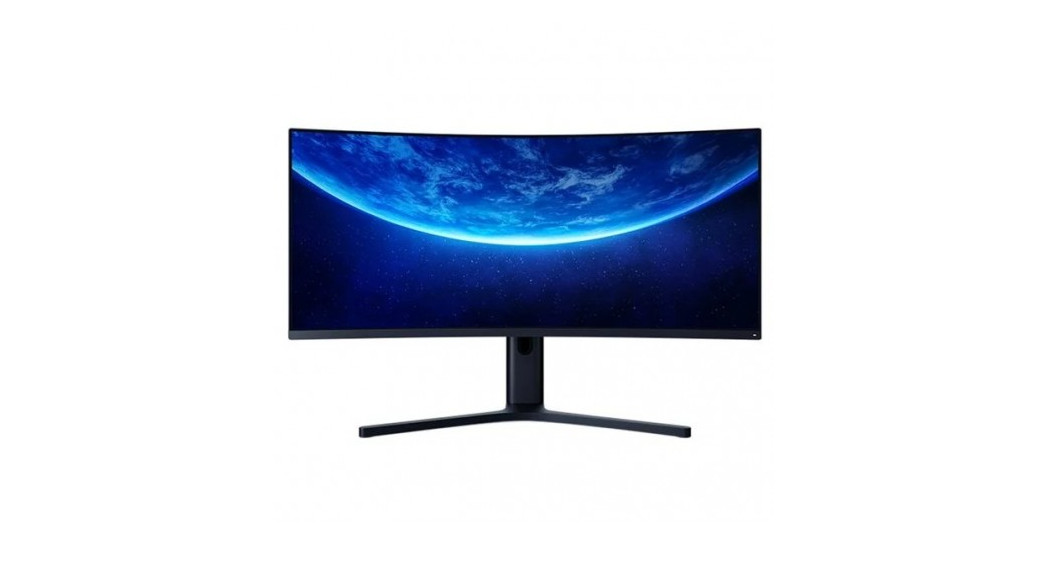
 Mi Curved Gaming Monitor 34″ User Manual
Read this manual carefully before use, and retain it for future reference.
Product Overview
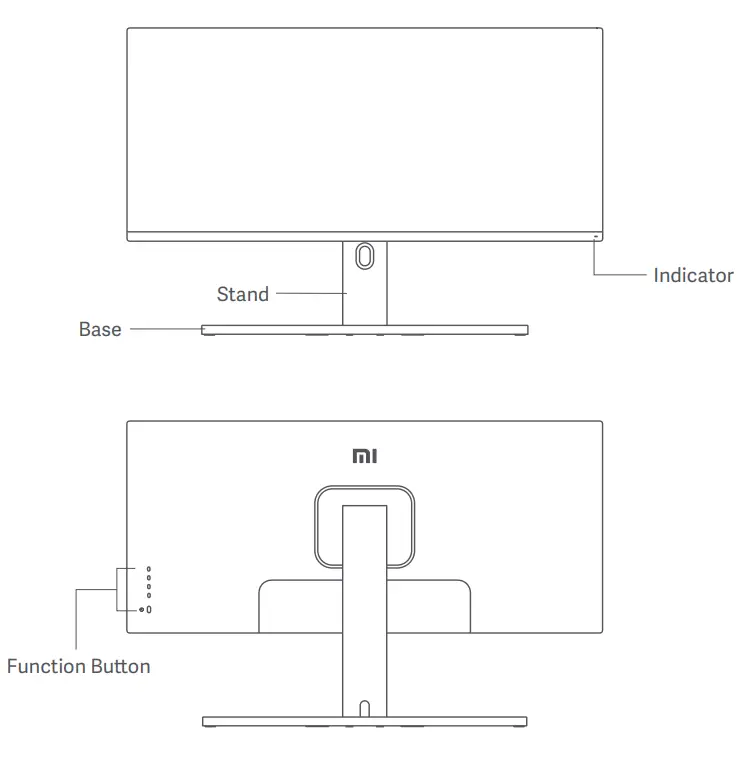
Monitor Overview

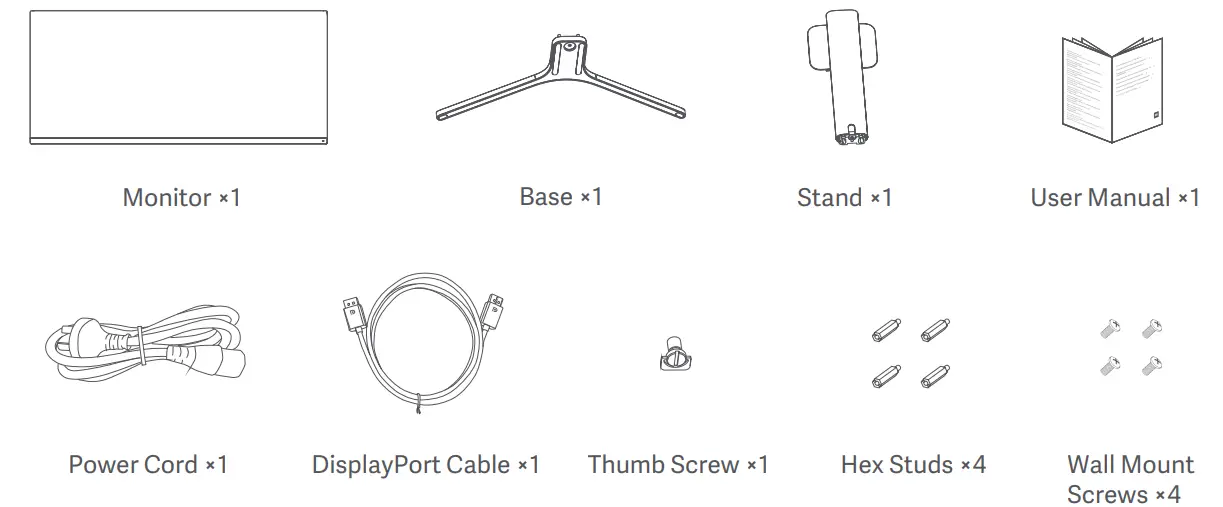
Package Contents

Installation
Installing the Base
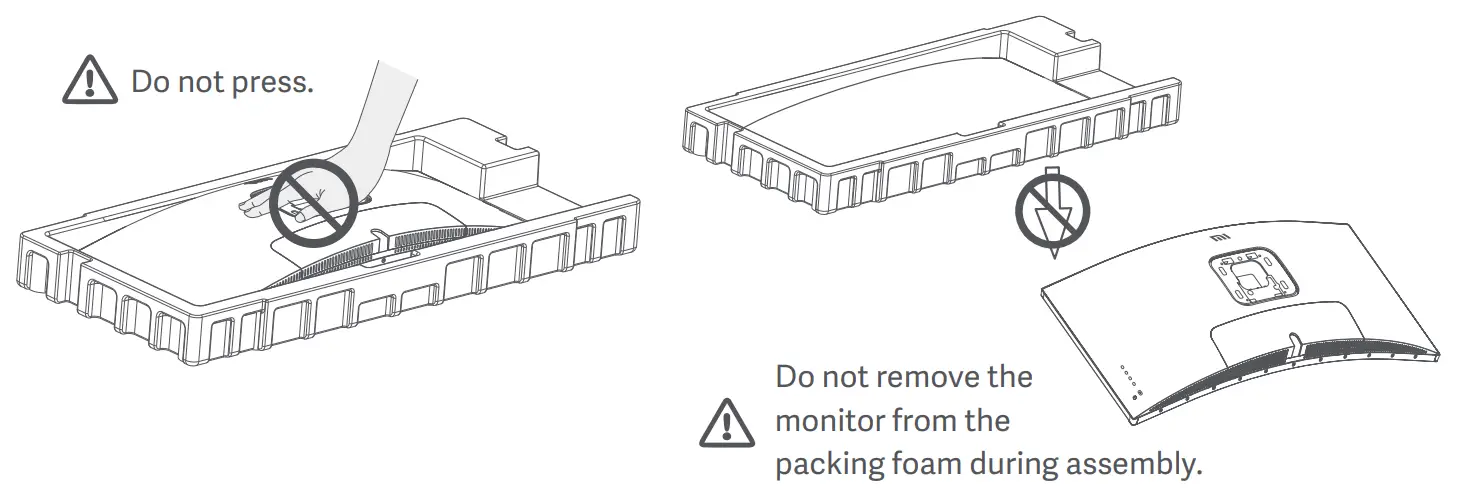

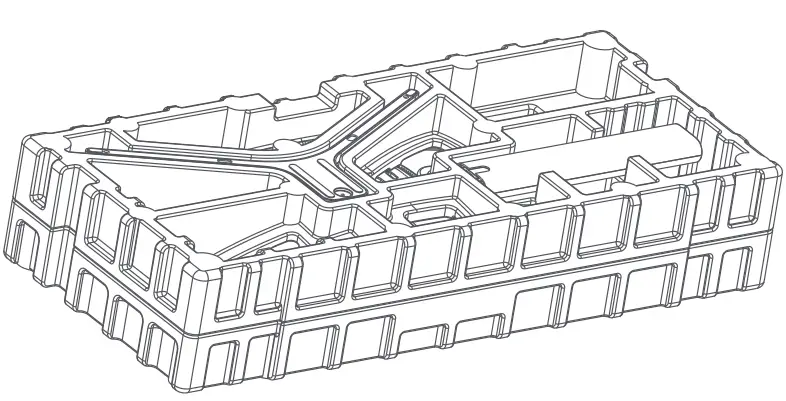

- Remove the foam-encased component from the box and place it on a flat stable surface. Do not remove the monitor from the packing foam.

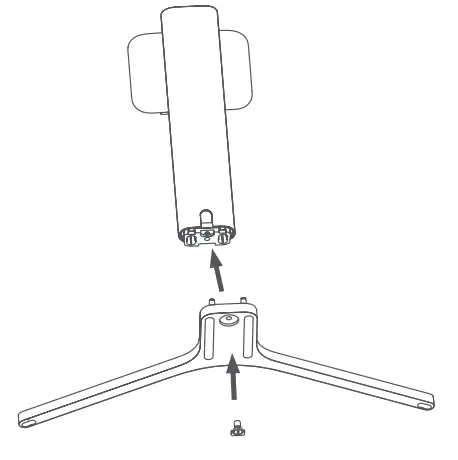
- Fasten the stand to the base using the included thumbscrew.

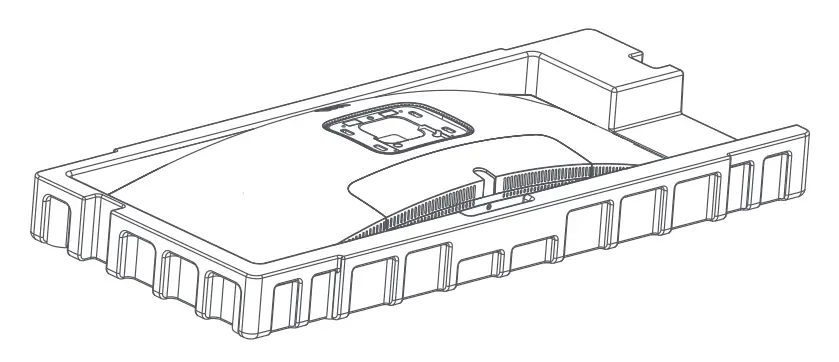
- Remove the top foam layer and the plastic bag to expose the mounting point on the back of the monitor.

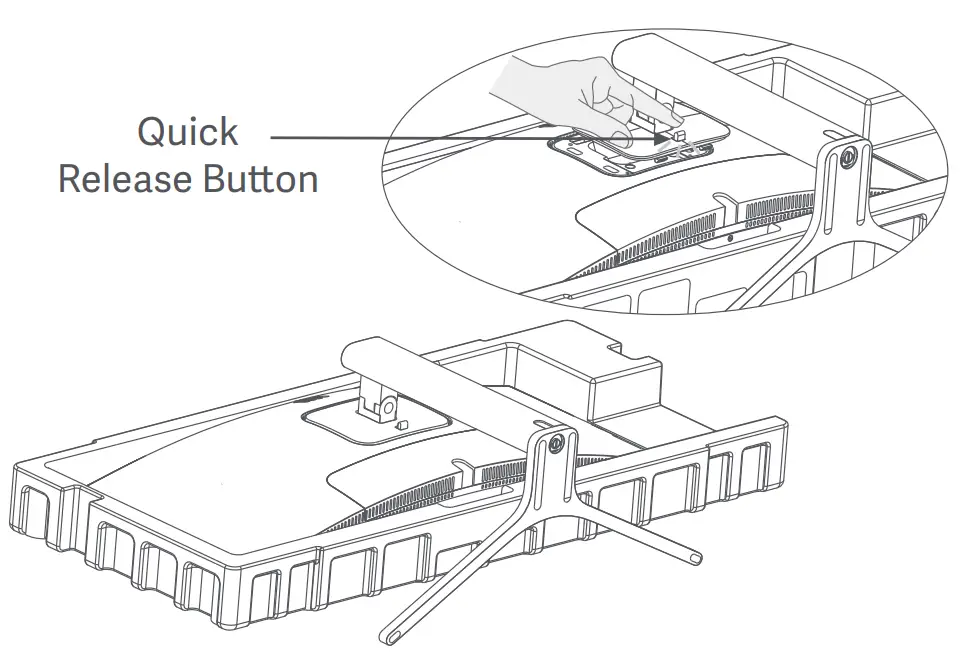
- Attach the stand* by pressing it into the slot on the back of the monitor until it clicks into place.* To remove the stand, press the quick-release button.

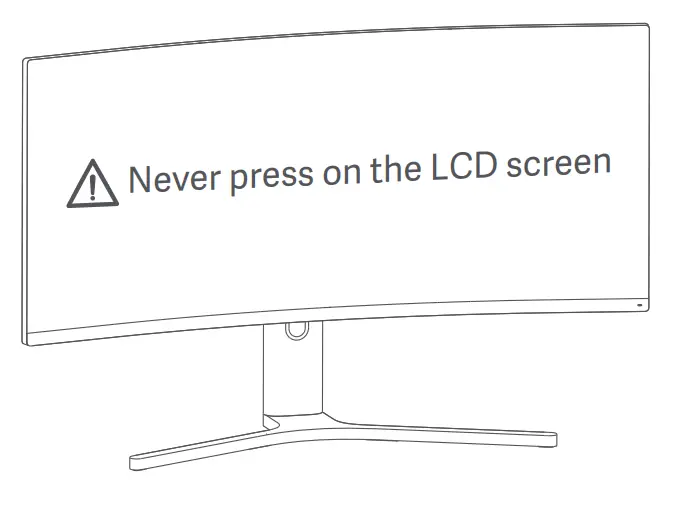

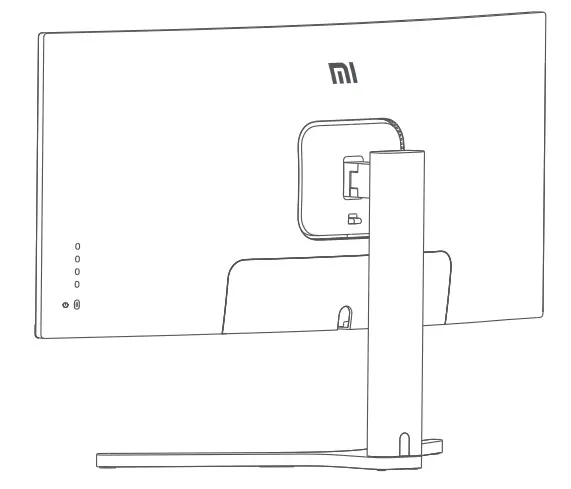
- Use both hands to carefully take out the fully assembled monitor and place it on a flat stable surface.Note: To avoid damaging the screen, be careful not to press on the LCD screen when standing it up.
Cable Management
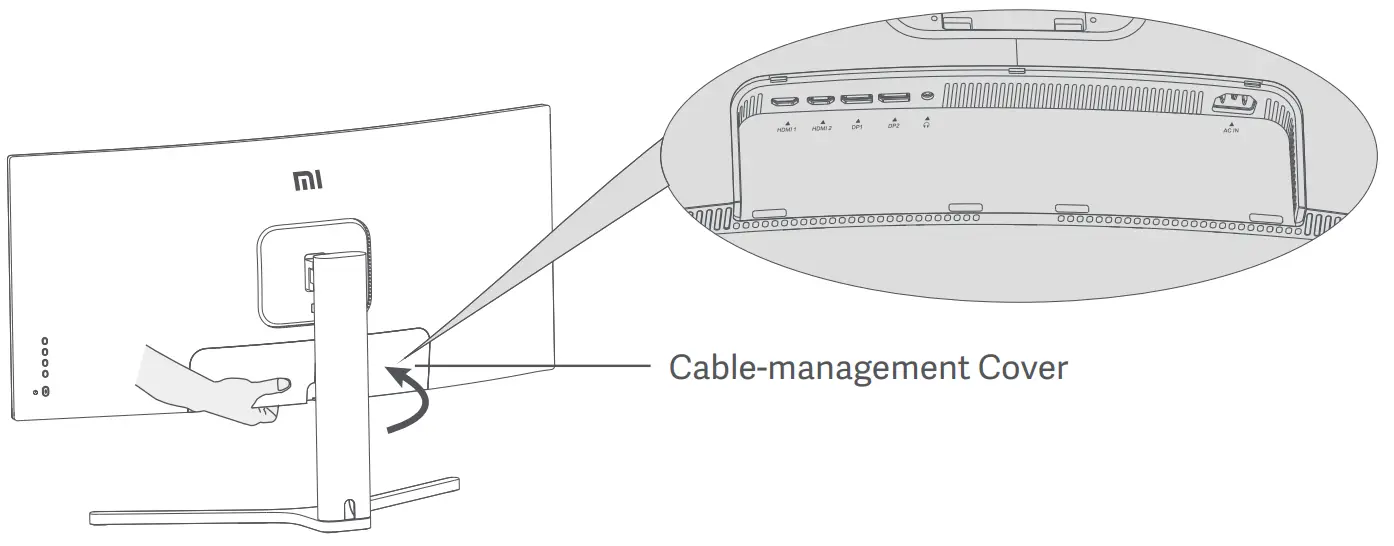

- Remove the monitor’s cable-management cover and the stand’s cover.

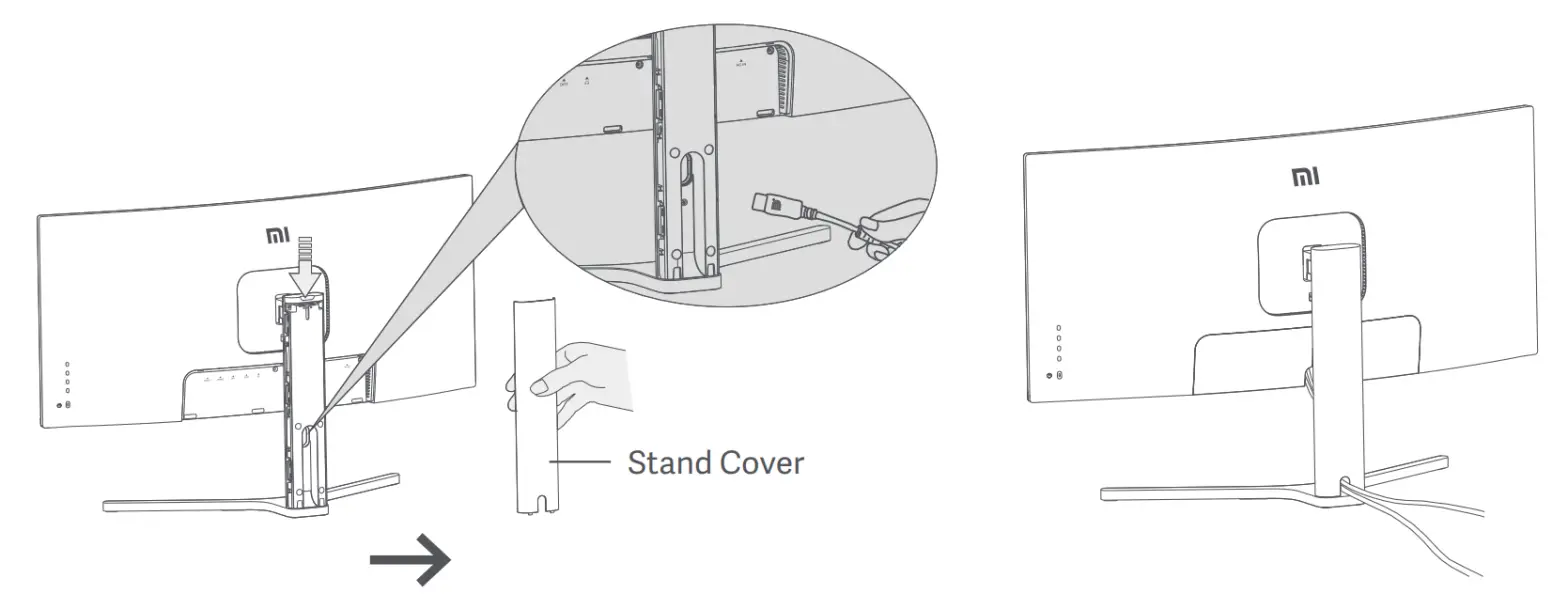
- Feed the power cord and the signal cable through the opening in the stand and connect them to the monitor.After all, cables are in position, install both covers.Note: The nameplate of this monitor is near the AC IN port, you can find it by removing the cable-management cover.
Wall Mount Installation
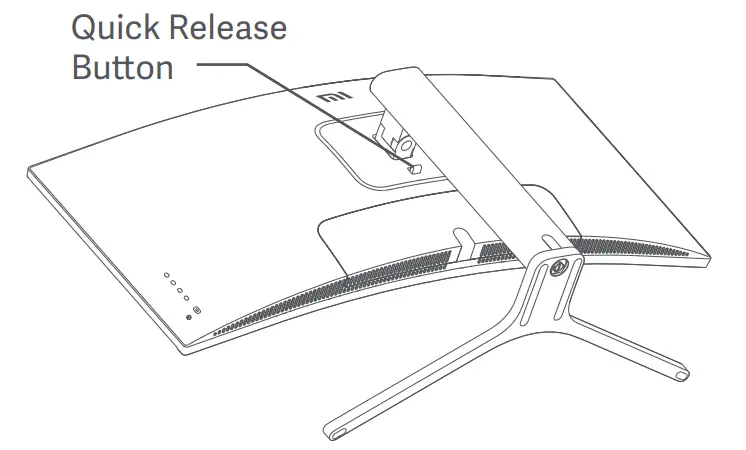

- Press the quick-release button to remove the monitor’s stand.

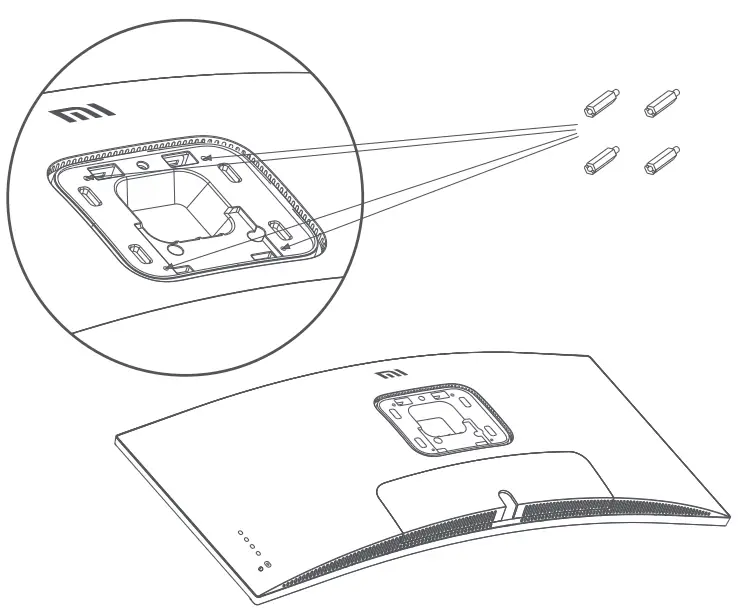
- Fasten the 4 hex studs to the back of the monitor in the positions indicated, then attach the wall mount (sold separately) to the hex studs (mounting holes are spaced 100 × 100 mm apart).

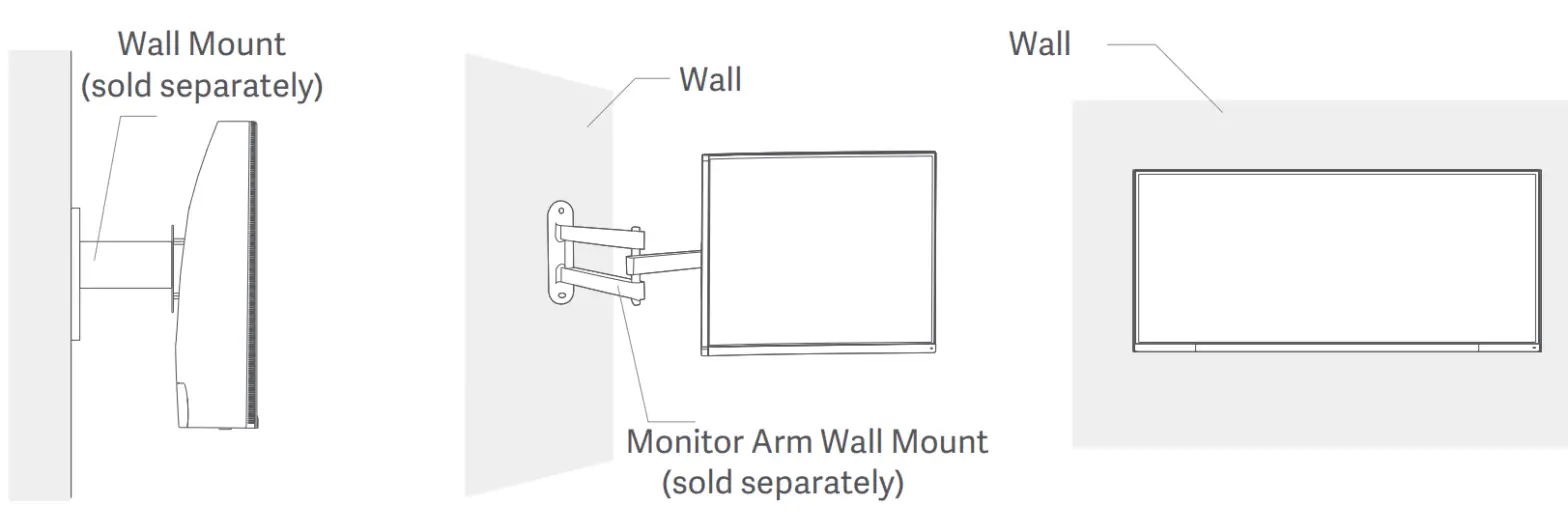
- Refer to the instructions of the wall mount to mount the monitor.Note: Do not press on the LCD screen during the mounting process to avoid damaging the screen.
![]()
![]()
Instructions
Connections
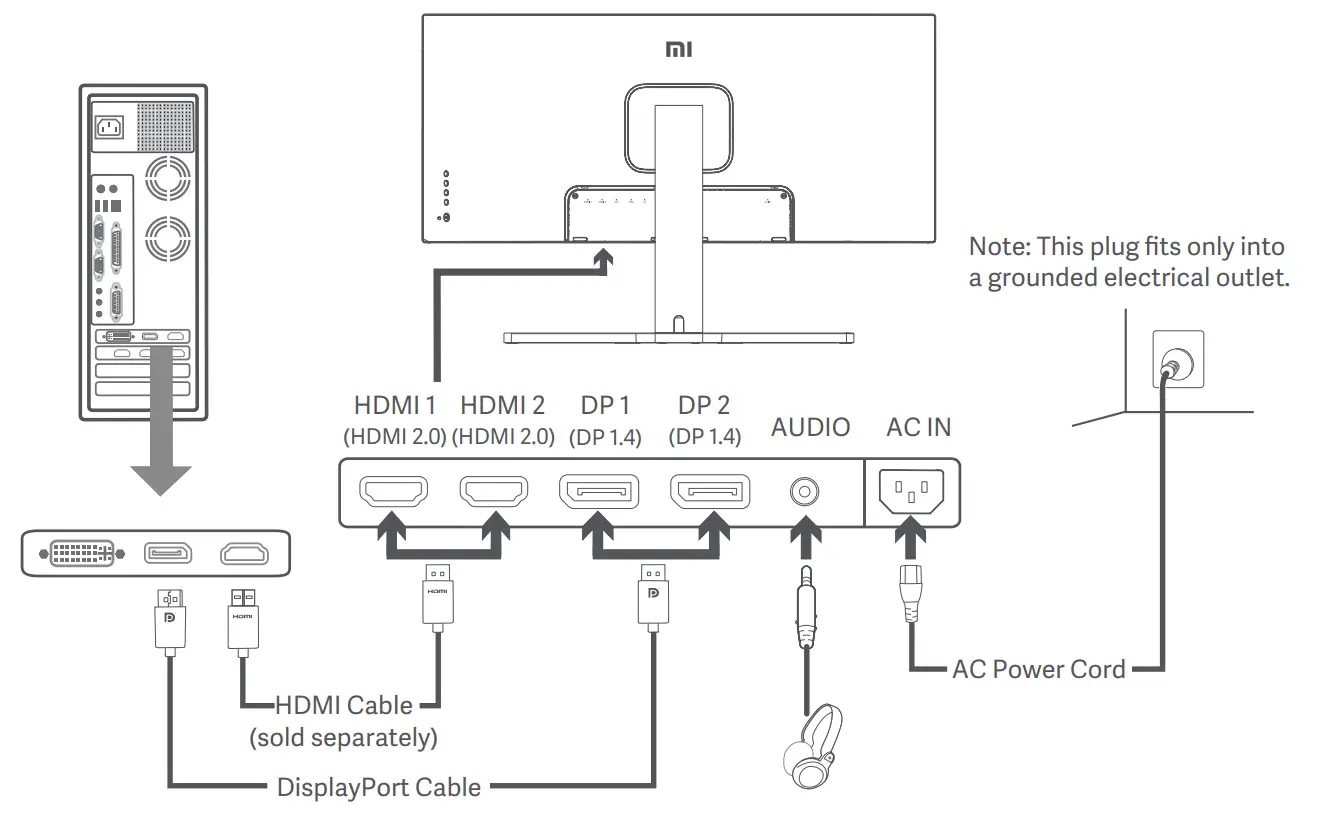
- Connecting the DisplayPort cable (only when using DisplayPort).a. Make sure the monitor and the computer are both turned off.b. Connect one end of the DisplayPort cable to the computer’s DisplayPort output port and the other end to one of the monitor’s DisplayPort input ports.
- Connecting the HDMI cable (sold separately) (only when using HDMI).a. Make sure the monitor and the computer are both turned off.b. Connect one end of the HDMI cable to the computer’s HDMI output port and the other end to one of the monitor’s HDMI input ports.
- Connect a headset or any 3.5 mm compatible external audio device to the monitor’s audio output port.
- Plug both the power cords of the computer and the monitor into a power outlet.
![]()
![]()
![]()

![]()
![]()
![]()
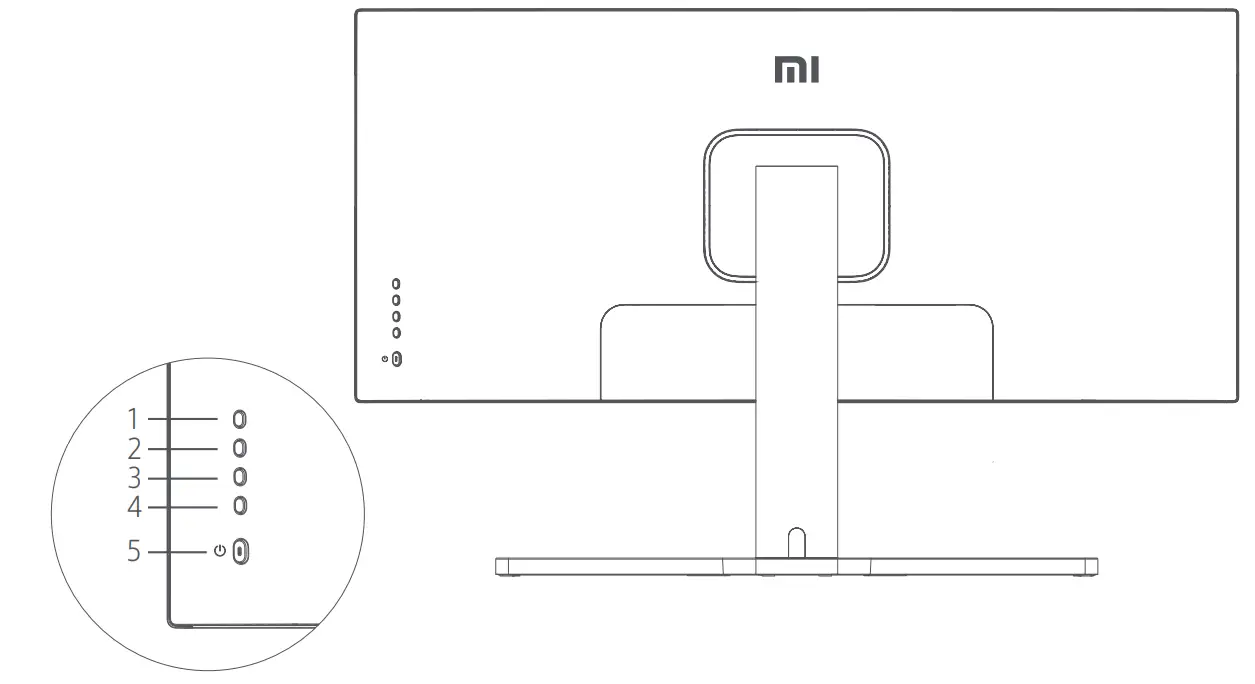

| Button Function | ||
| 1 | M | Menu/Select |
| 2 | Up | |
| 3 | Down | |
| 4 | E | Exit/Go Back |
| 5 | On/Off |
On/Off Button
| Press | Turn On/Off |
Indicator Status
| Dimmed | Off | |
| Lit | On | |
| Blinking | In sleep mode |
Menu Description
|
Mi Monitor |
Standard Mode Enabled |
|
| Brightness | ||
| Dynamic Brightness | ||
| Black Level | ||
| Contrast |
|
|
| DCR | ||
|
Main Menu |
Submenu | Description | Adjustable Range |
Default |
| Brightness /Contrast | Brightness | Adjust the monitor’s brightness | 0-100 | 80 |
| Dynamic Brightness | Adjust the monitor’s dynamic brightness | On/Off | Off | |
| Black Level | Adjust the monitor’s black level | 0-100 | 50 | |
| Contrast | Adjust the monitor’s contrast | 0-100 | 75 | |
| DCR | Adjust the monitor’s dynamic contrast ratio (DCR) | On/Off | Off | |
| Image | Color Temperature | Adjust the monitor’s color temperature | Standard/Warm/ Cool/Custom | Standard |
| Hue | Adjust the monitor’s hue | 0-100 | 50 | |
| Saturation | Adjust the monitor’s saturation | 0-100 | 50 | |
| Gamma | Adjust the monitor’s gamma | 1.8/2.0/2.2/2.4/2.6 | 2.2 | |
| Aspect Ratio | Adjust the monitor’s aspect ratio | Full Screen/16:9/1:1/Auto | Full Screen | |
| PQ Settings | Sharpness | Adjust the monitor’s sharpness | 0-100 | 50 |
| Response Time | Adjust the monitor’s response time | High/Medium/Low/Off | Off | |
| Noise Reduction | Adjust the monitor’s noise reduction | High/Medium/Low/Off | Off | |
| Motion Response Time | Reduces motion blur at high refresh rates | On/Off | Off | |
| Smart Mode | Standard Mode | Set to standard mode | Only one mode can be selected at a time | Standard Mode |
| Eco Mode | Set to eco mode | |||
| Game Mode | Set to game mode | |||
| Movie Mode | Set to movie mode | |||
| Low Blue Light Mode | Set to low blue light mode | |||
| RTS | Set to RTS mode | |||
| Window Settings | Single Window | Only display the main window | Select an input source | Single Window |
| Picture-by-Picture (PBP) | Display two video inputs side by side | Window 1 Input Source Window 2 Input Source | ||
| Picture-in-Picture (PIP) | Display the main window and a subwindow | Window 1 Input Source Window 2 Input Source Window 2 Position
Window 2 Size |
||
| Settings | Language | Select the menu language | English/Espariol/Pycaol/ Francais/Italiano/Deutsch /Polski/IN.1)1 | English |
| Audio Input | Select an audio input source | HDMI 1/HDMI 2/ DP 1/DP 2 | / | |
| Volume | Adjust the monitor’s volume | 0-100 | 50 | |
| FreeSync | / | On/Off | Off | |
| Information | Monitor information such as current resolution/input source | / | / | |
| Restore Factory Settings | / | / | / |
Eye Health
To avoid eyestrain, or neck, arm, elbow, and shoulder pain caused by using the computer for a long time, please follow the suggestions listed below:
- Keep the monitor at a distance of 20–28 inches (approx. 50–70 cm) from your eyes.
- Blink more often to relieve eye fatigue when staring at the monitor.
- Give your eyes a 20-minute break after using the monitor for two hours.
- Take your eyes off the monitor and look at something a certain distance away for at least 20 seconds.
- Stretch your body to help relieve tension on the neck, arms, back, and shoulders.
Low Blue Light DescriptionIn recent years, eye damage caused by blue light has attracted more and more attention. In general, the wavelength of blue light is 400–480 nm, and the wavelength of harmful blue light is 415–455 nm.This monitor has a function to help reduce your exposure to blue light emission. You can enable the low blue light mode via the settings menu.
Precautions
- Do not use this monitor in damp or humid environments such as bathrooms, kitchens, basements, or near swimming pools.
- Make sure the monitor is placed on a stable surface. If the monitor falls down or is knocked over, it may cause personal injury or damage to the monitor.
- Store and use the monitor in a cool, dry, ventilated place. Keep the monitor away from radiation and heat sources.
- Do not cover or block the heat dissipation vents on the back of the monitor. Do not place the monitor on a bed, sofa, blanket, etc.
- The monitor’s operating voltage range is indicated on a label on the back of the monitor. If you are unsure what voltage your power supply is, please contact the monitor’s distributor or local power company.
- If you do not plan to use the monitor for a long period of time, unplug it from the electrical outlet so as to prevent possible damage from power surges or lightning strikes.
- Do not overload electrical outlets, as this may cause a fire or an electric shock.
- Do not insert any foreign objects into the monitor, as this may cause a short circuit which can lead to a fire or an electric shock.
- Do not attempt to disassemble or repair the monitor yourself to avoid the risk of an electric shock. If the monitor is not functioning properly, please contact our after-sales service department for assistance.
- Do not excessively pull, twist, or bend the power cord.
Troubleshooting
|
Issue |
Possible Causes |
Solutions |
| Unable to turn on | No power |
|
| Image is dark | Brightness/ Contrast not adjusted properly |
|
| Image is jittery or has ripples | Interference |
|
| The indicator is blinking, no image on the screen | No signal, entering sleep mode… |
|
| Monitor displays: Out of range | Resolution is incorrect |
|
Specifications
| Name | Mi Curved Gaming Monitor 34″ |
| Model | XMMNTWQ34 |
| Rated Voltage | 100-240 V – |
| Rated Frequency | 50/60 Hz |
| Rated Current | 2 A |
| Rated Power | 54 W (TYP), 80 W Max. |
| Screen Size | 34″ |
| Viewable Image Size (Diagonal) | 86.36 cm |
| Dot Pitch | 0.07725 (H) x 0.23175 (V) |
| Brightness | 300 cd/m2 (TYP) |
| Contrast | 3000:1 (TYP) |
| Color Gamut | 16.7 M |
| Aspect Ratio | 21:9 |
| Response Time | 4 ms (GTG) |
| Maximum Resolution | 3440 • 1440 |
| Recommended Resolution | 3440. 1440 |
| Refresh Rate | 144 Hz |
| Item Dimensions | 810.39 (L) . 242.53 (W) . 520.61 (H) mm |
| Net Weight | 8 kg |
| Operating Temperature | 0°C to 45°C |
| Operating Humidity | 10-90% RH |
| Atmospheric Pressure | 86-106 kPa |
Regulatory Compliance Information
WEEE Disposal and Recycling Information![]()
![]()
![]()
![]()
For the Product Information Sheet, please scan the QR code below.


References
[xyz-ips snippet=”download-snippet”]

