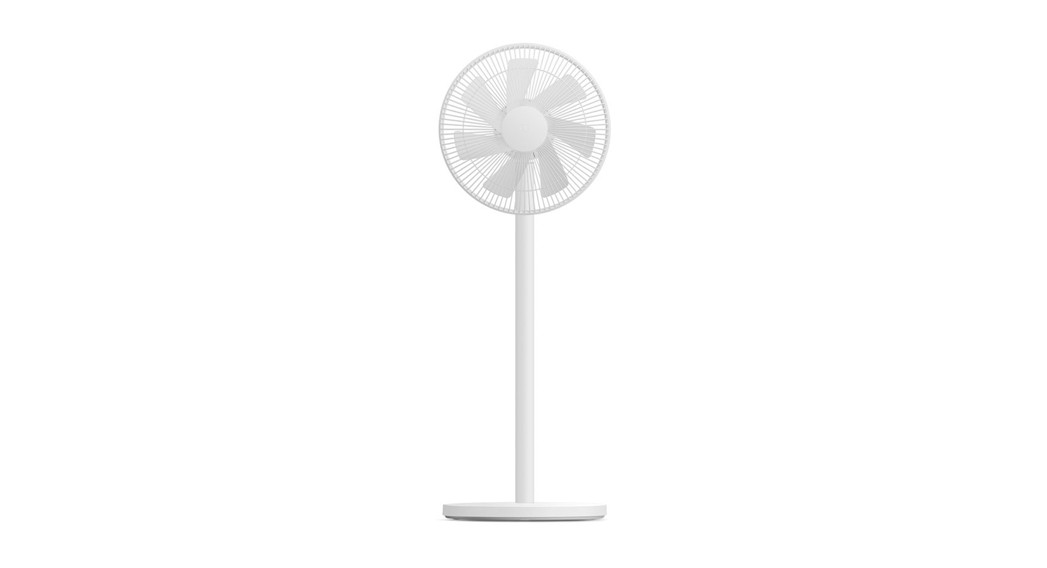
Mi Smart Standing Fan 1CUser Manual

Safety Instructions
Read this manual carefully before use, and retain it for future reference.
PrecautionsInstallation
![]() Make sure the fan is properly installed according to the instructions, so as to avoid electric shocks, fire, personal injury, or other damage.
Make sure the fan is properly installed according to the instructions, so as to avoid electric shocks, fire, personal injury, or other damage.![]() Do not connect the fan to a power outlet as long as it is not assembled.
Do not connect the fan to a power outlet as long as it is not assembled.
Handling the Fan![]() Turn off and unplug the fan before moving it.
Turn off and unplug the fan before moving it.![]() Firmly hold the fan stand to avoid it from falling down and causing personal injury.
Firmly hold the fan stand to avoid it from falling down and causing personal injury.
Using the Fan![]() (Immediately stop using the fan if it makes unusual sounds, gives off bad odors, overheats, or rotates irregularly.
(Immediately stop using the fan if it makes unusual sounds, gives off bad odors, overheats, or rotates irregularly.![]() Do not lean on or tilt the fan while it is running.
Do not lean on or tilt the fan while it is running.![]() Do not push the fan’s head repeatedly so as to avoid damage to the internal mechanism.
Do not push the fan’s head repeatedly so as to avoid damage to the internal mechanism.
Power Cord
![]() Unplug the power cord before repairing or moving the fan.
Unplug the power cord before repairing or moving the fan.![]() Always unplug the fan by pulling the power plug rather than the cord.
Always unplug the fan by pulling the power plug rather than the cord.![]() when the power cord is damaged, it must be replaced with a genuine power cord purchased from the manufacturer or after-sales service department.
when the power cord is damaged, it must be replaced with a genuine power cord purchased from the manufacturer or after-sales service department.
WarningsImproper use may lead to electric shocks, fire, personal injury, or other damage.
- This appliance can be used by children aged 8 years and above and persons with reduced physical, sensory or mental capabilities or lack of experience and knowledge if they have been given supervision or instruction concerning use of the appliance in a safe way and understand the hazards involved. Children shall not play with the appliance. Cleaning and user maintenance shall not be made by children without supervision. (For European countries or regions)
- This appliance is not intended for use by persons (including children) with reduced physical, sensory or mental capabilities, or lack of experience and knowledge unless they have been given supervision or instruction concerning use of the appliance by a person responsible for their safety. Children should be supervised to ensure that they do not play with the appliance. (For no European countries or regions)
- Once assembly is completed, it’s strictly forbidden to remove the guards for any purpose.
- Children should be supervised to ensure that they do not play with the appliance.
- If the supply cord is damaged, it must be replaced by the manufacturer, its service agent or similarly qualified persons in order to avoid a hazard.
Safety Instructions
Read this manual carefully before use, and retain it for future reference.
WarningsImproper use may lead to electric shocks, fire, personal injury, or other damage.
- Do not use this fan in a place where it is easy to fall over or where there are other unstable objects nearby.
- Do not use this fan in hot and humid environments such as a bathroom.
- Do not use this fan if its power cord is damaged or its power plug is loose.
- Do not use this fan if its front grille is not installed, or its rear grille is loose or fell off.
- Do not allow adults who are incapable of operating this fan or children to use it.
- Do not disassemble or repair this fan.
- Do not pinch, bend, or twist the power cord too much, so as to prevent it from exposing or breaking its core.
- Do not insert your fingers or any object into the front grille, rear grille, or fan blades when the fan is in use.
- Keep hair and fabrics away from the fan to avoid getting them caught in the fan.
- Do not use any improper power outlet.
- Do not use the supplied power cord with any other device.
Package Contents

Note: Illustrations of the product, accessories, and user interface in the user manual are for reference purposes only. The actual product and functions may vary due to product enhancements.
Overview

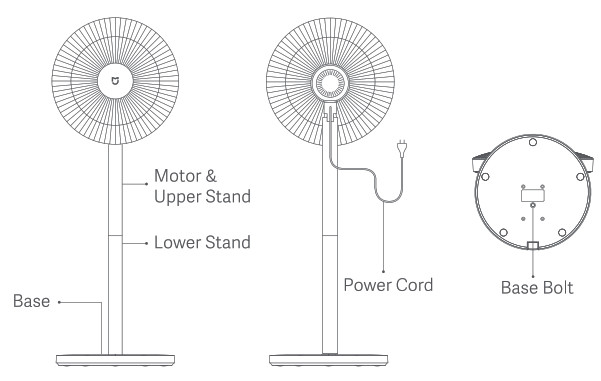
Installation Instructions

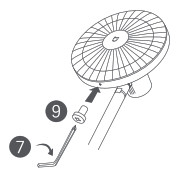
1(1). Standing fan mode: Connect 3 lower stands to 1 upper stand, then install 3 it onto 4 base as shown in the figure. 3. Use the included 7Allen key to turn 8 base bolt clockwise to fix the stand to the base.

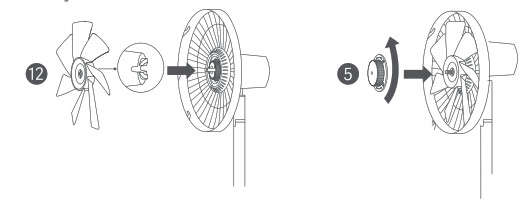
Step 2: Open the fan assemblyDisassemble 2 fan assembly as shown in the figures below: (!)Turn the front grille counterclockwise until the grilles are properly loosened. 2 Then remove 11 front grilles from rear grille and take out 12 fan blade assembly.
Step 3: Install the rear grilleMake sure” ![]() ” points up when installing @ rear grille onto the motor, and turn 0 rear grille knob clockwise to tighten the rear grille to the motor.
” points up when installing @ rear grille onto the motor, and turn 0 rear grille knob clockwise to tighten the rear grille to the motor.

Step 4: Install the fan blade assemblyAlign the center hole of 12 fan blade assembly with the motor’s shaft and install it onto the shaft, then install 5 fan blade assembly knob onto the motor’s shaft. Turn the knob counterclockwise in order to fix the fan blade assembly to the motor’s shaft.
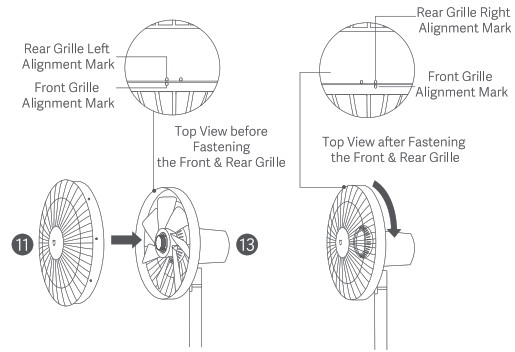
Step 5: Install the front grille1. Align 11 Front Grille Alignment Mark with 13 Rear Grille Left Alignment Mark, and make sure the front grille is properly embedded into the rear grille.2. Turn the front grille clockwise until the Front Grille Alignment Mark aligns the Rear Grille Right Alignment Mark. Make sure the grilles are securely fastened.
Step 6: Fasten the front grilleInsert 8 fan grille screw into the hole at the bottom of the fan grille. Turn the screw clockwise by using the included 7 Allen key to tighten it.
How to Use
Connect to a power outletPlug the power cord into a power outlet. Once you hear a beep, the fan is connected successfully.
 Turn on/offTurn on
Press the button ![]() to start the fan. When turned on for the first time, the default speed is slow (1).Turn off When the fan is working, press and hold the button
to start the fan. When turned on for the first time, the default speed is slow (1).Turn off When the fan is working, press and hold the button ![]() to stop it.
to stop it.
Switching Speed/ModeSwitching speed
Press the button ![]() to adjust the speed. With each press, the corresponding status indicator will be on (see the table below). The fan will remember and apply the last used speed mode when turned on again.
to adjust the speed. With each press, the corresponding status indicator will be on (see the table below). The fan will remember and apply the last used speed mode when turned on again.
| Fan Speed | Slow (1) | Medium (2) | Fast (3) |
| Indicator Status |
Note: ![]() means the indicator is on;
means the indicator is on; ![]() means the indicator is off.
means the indicator is off.
Switching mode
Press and hold the button ![]() to switch between direct breeze and sleep mode. The sleep mode indicator is on while in sleep mode, and off while indirect breeze mode.Note: The fan is set to direct breeze by default. The fan will remember and apply the last used mode when turned on again.
to switch between direct breeze and sleep mode. The sleep mode indicator is on while in sleep mode, and off while indirect breeze mode.Note: The fan is set to direct breeze by default. The fan will remember and apply the last used mode when turned on again.
Enable/Disable OscillationPress the button ![]() to enable or disable 90″ oscillation. The fan will remember and apply the last used oscillation setting when turned on again.
to enable or disable 90″ oscillation. The fan will remember and apply the last used oscillation setting when turned on again.
Delayed Turn-offPress the button ![]() to cycle through the delayed turn-off times: 1 hour, 2 hours, 3 hours, and disabled, and the corresponding status indicator(s) will be on (see the table below). Five seconds after using the delayed turn-off function, the status indicator(s) will display the corresponding status of the currently selected speed.
to cycle through the delayed turn-off times: 1 hour, 2 hours, 3 hours, and disabled, and the corresponding status indicator(s) will be on (see the table below). Five seconds after using the delayed turn-off function, the status indicator(s) will display the corresponding status of the currently selected speed.
| Scheduled Status | Disabled | 1 hour | 2 hour | 3 hour |
| Indicator Status |
Note: ![]() means the indicator is on;
means the indicator is on; ![]() means the indicator is off. For more delayed turn-off options (up to 8 hours), please go to the Mi Home/Xiaomi Home app.
means the indicator is off. For more delayed turn-off options (up to 8 hours), please go to the Mi Home/Xiaomi Home app.
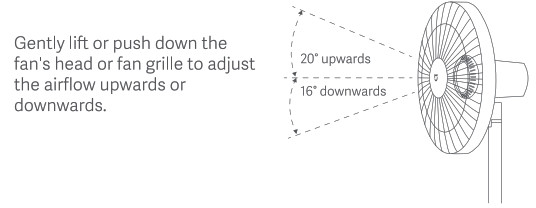
Adjust the Airflow Direction
Connect with Mi Home/Xiaomi Home App

http://home.mi.com/do/index.html?model=dmaker.fan.1c
Scan the QR code to download and install the app. You will be directed to the connection setup page if the app is installed already. Or search “Mi Home/Xiao mi Home” in the app store to download and install it. Open Mi Home/Xiaomi Home app, tap”+” on the upper right and then follow prompts to add your device.
The app is referred to as the Xiaomi Home app in Europe (except for Russia). The name of the app displayed on your device should be taken as the default.
Note: The version of the app might have been updated, please follow instructions based on the current app version.![]()
Connecting to Wi-FiSimultaneously press and hold the buttons ![]() and
and ![]() . Once you hear a beep, the fan is awaiting a connection, then you can pair it with a device via the app.
. Once you hear a beep, the fan is awaiting a connection, then you can pair it with a device via the app.
Wi-Fi Indicator Status:
| Wi-Fi Status | Awaiting connection | Connecting | Connected | Couldn’t connect |
| Indicator Status | Blinking orange | Blinking blue | Blue | Orange |
Resetting the Wi-FiThe Wi-Fi connection needs to be reset on the circumstances listed in the table below.
| The Mi account that the fan is paired with has been changed. |
| The router that the fan is connected to has been changed. |
| The account or password of the router that the fan is connected to has been changed. |
| The Mi Home/Xiaomi Home app cannot control the fan. |
Simultaneously press and hold the buttons ![]() and
and ![]() . Once you hear a long beep, the Wi-Fi connection has been reset successfully and then the Wi-Fi is awaiting a connection.
. Once you hear a long beep, the Wi-Fi connection has been reset successfully and then the Wi-Fi is awaiting a connection.
Child Safety LockEnablingYou can enable the function of child lock in the Mi Home/Xiaomi Home app. Once it is enabled, the fan will not respond to button operations but instead of all indicators blinking twice with two beeping sounds.
DisablingYou can disable the function of child lock in the Mi Home/Xiaomi Home app. Resetting the Wi-Fi connection or unplugging and plugging in the fan again can also disable this function.
Troubleshooting
|
Fault |
Possible Cause |
Solution |
| The fan doesn’t work | No electricity from the power outlet or the fan does not connect to the power. | Connect to a power outlet that meets the fan’s requirements. |
| The fan blade assembly or the grilles are not installed properly. | Follow the steps in the user manual to check and make sure
they are securely installed. |
|
| Child lock is enabled. | Disable the child lock in the Mi Home/Xiaomi Home app, or disconnect the fan from power then connect again. | |
| Wi-Fi is unable to connect | The Wi-Fi connection is 5 GHz. | Connect to a 2.4 GHz Wi-Fi connection. |
| The fan is offline for more than half an hour. | Reset the Wi-Fi connection. | |
| Fan blades are stuck | Fan blades are stuck by a foreign object. | Unplug the fan and remove the foreign object. |
Importer:Beryko s.r.o.www.beryko.cz
References
[xyz-ips snippet=”download-snippet”]