XINYU Ball, Strobe Chase and Laser User Manual
SAFETY INTRODUCTION
- SAFETY INTRODUCTION• If the device has been exposed lo temperature changes due to environmental changes, do not switch it on immediately. The arising condensation could damage the device. Leave the device switched off until it has reached room temperature.
- It is essential that the device is earthed. A qualified person must carry out the electric connection.
- Make sure that the available voltage is not higher than stated at the end of this manual.
- Make sure the power cord is never crimped or damaged. If it is damaged, ask your dealer or authorized agent to replace the power cord.
- Always disconnect from the mains, when the device is not in use or before cleaning it. Only handle the power cord by plug. Never pull out the plug by tugging the power cord.
- DISCONNECT DEVICE: Where the MAINS plug or an appliance coupler is used as the disconnect device, the disconnect device shall remain readily operable.
- Due to the magnifying type lens, please keep the Jens out o
CAUTION
- Be very careful during installation. Since you will be working with a dangerous voltage you can suffer a life-threatening electric shock when touching live wired
- Never look directly into the light source, as sensitive persons may suffer an epileptic shock.
- Please be aware that damages caused by manual modifications to the device are not subject lo warranty. Keep away from children and non-professionals.
- The light doesn’t include any spare parts for repair, please check if all the parts are well installed and screws are fitted tightly before operating. Do not use the light when the cover is open.
GENERAL GUIDELINES
- signed for indoor use only.
- Do not shake the device. Avoid brute force when installing or operating it.
- Operate the device only after having familiarized yourself with its functions. Do not permit operation by personnot qualified for operating the device. Most damages are the result of unprofessional operation.
- Please use the original packaging if the device is to be transported.
- For safety reasons, please be aware that all modifications on the device are forbidden. Furthermore, any other operation may lead to short-circuit, bums, electric shock, lamp explosion, crash, etc. lfthis device will be operated in any way different to the one described in this manual, the product may suffer damages and the guarantee becomes void.
Power Supply ind Slgn1I Cable Connection
- Mains Power connectionThe exclusive plug should be used between the connection of unit and power. Please ensure that the rated voltage and frequency arc accordance with the power supply. The required input voltage and frequency arc: 220-240Vac – 50-60HzWe suggest that every light has 1111 independent switch so that you can tum on or tum off the light randomly.Note: the ground wire (yellow/green double-color wire) must be safely connected, the electrical installation must be in accordance with the related standardsCAUTION: When installing the device, make sure there is no highly inflammable material within a distance of min.Sm!
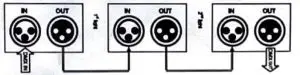
- Connection of Signal CableYou can use the 3-pin XLR cable to connect the output socket of the master and the input socket of the slave light.Connect the DIGITAL OUT socket of the master and the lN socket of the slave light, then. connect the OUT socket to the IN socket of the next light. Ordinal to connect all the lights as below:
 The connection between the output of master and input of product, it’s available to use the 3 pins XLR cable which provided by the manufacturer. Signal cable from the OMX output of the controller to the input of the first master light, and connect to the DMX input of second slave light from the DMX output of the fmt master light, analogously, till connected oil the slave lights, and insert the las! connector to the output of the final light (Notice: the diameter of core of every cable should be 0.5mm at least, double core shelter cable should be used). The signal connecting must use the attached 3 pins XLR cable. Notice, all the internal lead wire of the 3 pins XLR cable should not touch to each other or connect to the connector.A OMX signal terminator is recommended on the last unit of the chain. DMX terminator is a XLR connector with a 1200 resistor between the pin 2 and pin 3 of the XLR connector.
 The connection between the output of master and input of product, it’s available to use the 3 pins XLR cable which provided by the manufacturer. Signal cable from the OMX output of the controller to the input of the first master light, and connect to the DMX input of second slave light from the DMX output of the fmt master light, analogously, till connected oil the slave lights, and insert the las! connector to the output of the final light (Notice: the diameter of core of every cable should be 0.5mm at least, double core shelter cable should be used). The signal connecting must use the attached 3 pins XLR cable. Notice, all the internal lead wire of the 3 pins XLR cable should not touch to each other or connect to the connector.A OMX signal terminator is recommended on the last unit of the chain. DMX terminator is a XLR connector with a 1200 resistor between the pin 2 and pin 3 of the XLR connector.
lliustration _Part:

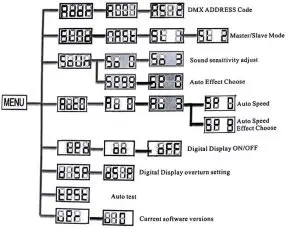
- Menu
- Up
- Down
- Enter
LCD display different functions: (Press button\’”Enter\’” 10 enter)
DMX512 Channels:
| Function Module | 15•ch | Funcfon | Value |
| BAll | 1 | Dimmer | 000-255 0’X•- 1005 |
| 2 | Strobe | 000-008 Open | |
| 009-255 Stroboscope (Speed 0 – 100%) | |||
| 3 | Red | 000- 255 OF- 100% | |
| 4 | Green | 000- 255 OF- 100R | |
| 5 | Bute | 000- 255 OF- 100% | |
| 6 | Moon Rotate | 000• 010 Stop | |
| 011- 255 Rotate Slow to Fast | |||
| Wash | 7 | Dimmer | 000-255 0%- 100& |
|
Stmbe |
000-008 Open
009•255 Stroboscope (Speed 0 – 100%) |
||
| 9 | Red | 000- 255 0X- 1tI0R | |
| 10 | Green | 000• 255 0’X- 100% | |
| 11 | Bule | 000- 255 0R- 1II0R | |
| 12 | Yellow | 000- 255 0’S›- 100′ | |
| Laser | 13 | Laser R | 000- 007 off |
| 008- 127 on | |||
| 128- 255 onfoff Switch | |||
| 14 | LGaser | 000- 007 off | |
| 008- 127 on | |||
| 128- 255 onfoff Switch | |||
| 15 | Pan Rotate | ||
| o11•120 Movement forward fast -* 8hn* | |||
| 121•134 Stop | |||
| ]35-245 Movement rortvard Slow -* Fast | |||
| 246•255 Stop |
Connected with OMX console, machines ( under address code AOO I ) could controlled by OMX console.When master/slave mode, slave machine OMX Channels must set 39 Channels mode Under address code mode, long press “Enter” last 5 seconds, can adjust max brightness of light. After finished setting, long press address code last 5 seconds returning to address code mode.
Mmtr/Slave mode:Under no any OMX console controlled, setting LCD display of all light to DOOi, then, only need lo operate one of machine (master), the other machines(slave) running synchronously with master machine .Under OMX console controlled. setting slave machine lo 39 Channels mode first, then master/slave setting to DOOi.
- CHI0/CH38 Two channel modes, only all setting to 38 channels mode can make masterfslave.
MASTER-SLAVE:Without Contro11er, How to use Master-slave function ?Use signal line to connect all the machine one by one, Then set “dOO I” for all the machine. Then choose one of the unit as Master Unit, when you operate the Master Unit, the other (Slave) Unit will follow its operation.
The following points have to be considt!red during tl,e inspection: .All screws for installing the devices or parts of the device have to be tightly connected and must not be corroded.There must not be any defonnations on the housing, glass pane, fixations and installation spots.The electric power supply cables must not show any damage, material fatigue or sediments. Further instructions depending on the installation spot and usage have to be adhered lo by a skilled installer and any safely problems have to be removed.We recommend a frequent cleaning of the device. Please use a moist, lint-free cloth. Never use alcohol or solvents.
CAUTION: Disconnect from mains before starting maintenance operation
CLEANING AND USING FREQUENCY OF PRODUCT
Please make sure that the light is power off before dismantling or maintaining, it’s very important to keep the light clean. Frequent cleaning wiU ensure maximum brightness output, but also prolong the life time. It’s suggested to use the high quality, professional glass detergent and soft cloth to clean the light. It’s not allowed to use alcohol or chemical solvent. The inner part of1be light should be cleaned by vacuum cleaner at least once a year. When the light doesn’t work, please check. if the fuse is burnt out or not. If it is, the same fuse should be replaced, find out the faulty and restart the light. But please note the repair must be handled by professional.
TECHNICAL SPECIFICATIONS
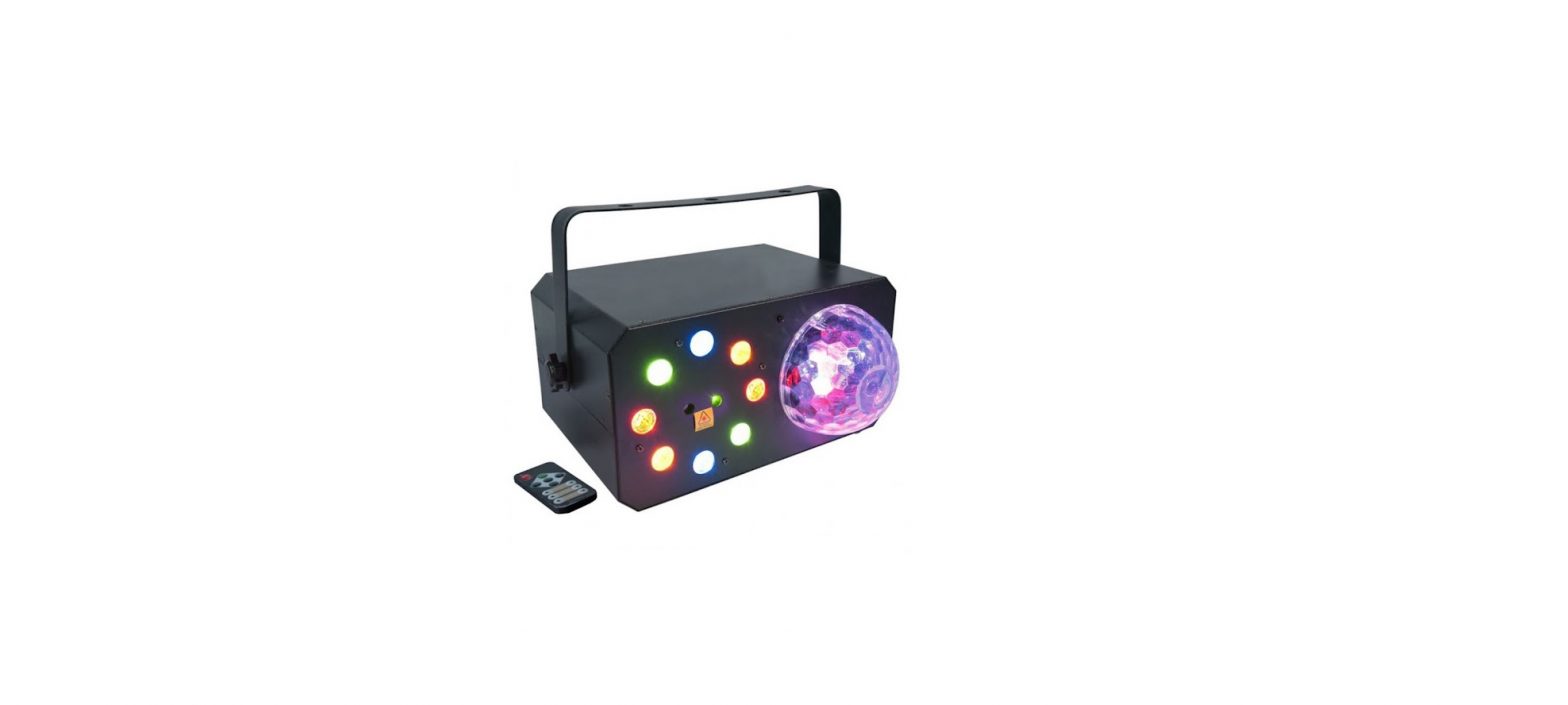
Channels: …. 15 DMXChannelsControl mode: …….. Auto, Sound, Master-slave, OMXLED power:….. 6x3W RGBWAV+8x I W ROBY LED’s +Red&Grecn LaserWorking environment: ……….. 20°C – 40°CVohage: ……… AC 220-240VFrequency: …………… 50-60HzPower: ……… 55WLong life LEDs: ……… 50000hoursN.W ………….. 4kg
Please read this manual carefully before 011ernting the products.Information under this mnnunl $Objects to update without prior advice
[xyz-ips snippet=”download-snippet”]