Xplova NOZA SNOZA S INTERACTIVEBIKE POWER TRAINERQuick Start Guide
Additional Remarks on Adapter
NOTE: The picture above is the description of the accessories in the manual. The product images are for reference only; actual spec. and color are based on the real product in the package.
- Instructions on the pre-installation of Adapter A
NOTE: Adapter A has been pre-installed on the main body of the Noza S so it is ready to be used directly with Adapter B.
- Description of Adapter B.Adapter B specifications, please refer to the picture to the right.
- NOTE/Remove the protection paper that wrapped around the flywheel.
- Description of Adapter disassembling tool/Use a 5mm hexagon wrench to install or disassemble Adapter A
Adapter A
Use 17mm open-end wrench to install or disassemble Adapter C
Adapter C
KNOWING YOUR NOZA S
Package contents
Knowing your NOZA S
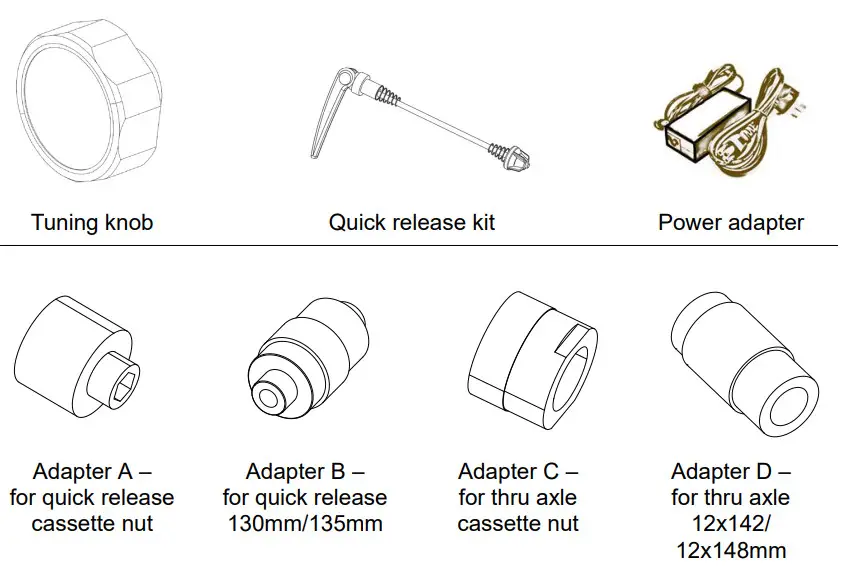
Note: Accessories may vary by country or region.
Introduction of product appearance
ASSEMBLY INSTRUCTIONS
Assembling the Xplova NOZA S
- Open the packing box, remove the Styrofoam top cover and take out installation tools and accessories from the accessory bag.• For front bottom tube installation use: spring washer * 1, flat washer * 1, hexagon bolt * 1, tuning knob * 1• For rear bottom tube installation use: square head hexagon bolt * 2, hexagon nut * 2, decorative bolt cover * 2

- Take out the NOZA S bike trainer main unit and front bottom tube from the Styrofoam bottom cover and install according to the illustrations.TIP: Press down the spring button when installing. When the installation is done, make sure the button goes through the locating hole on the front leg.
- Put the front leg on the ground as a support to lift the trainer, put a square head hexagon bolt through the square hole on the rear bottom tube and secure it tightly with the trainer main unit. Then use the socket wrench to screw the hexagon nut tight and install the decorative bolt cover.
- After installing the tuning knob according to the illustration, screw tight the knob to finish assembling the trainer.
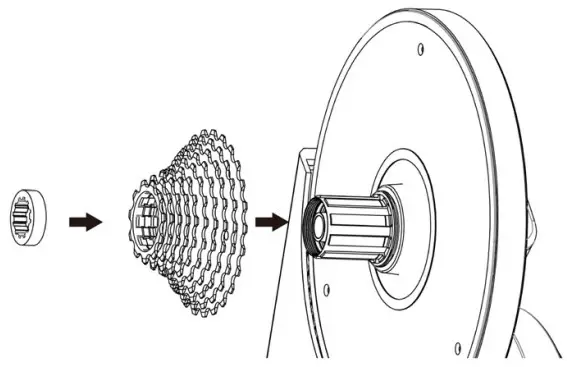
- Install the cassette (sold separately) into the cassette body and lock the cassette nut to prevent loosening.

Attention:The Xplova NOZA S bike trainer cassette body is compatible with Shimano and SRAM cassette which can be directly installed with an 11speed cassette.If you are using a non-11-speed cassette, please fit the cassette washer on the bottom of the cassette body first before installing the cassette.
Attaching the cassette (sold separately)
- Attaching a compatible 11-speed cassetteAttach the cassette onto the cassette body manually and use the cassette nut to secure it on the cassette body. Use the cassette removal socket to secure it tightly on the NOZA S cassette body (the tool is not included).
- Attaching a 9-speed or 10-speed cassetteBefore attaching a 9-speed or 10-speed cassette, you need to put the 1.8mm cassette washer onto the cassette body first and then secure the cassette tightly on the NOZA S cassette body as mentioned above.
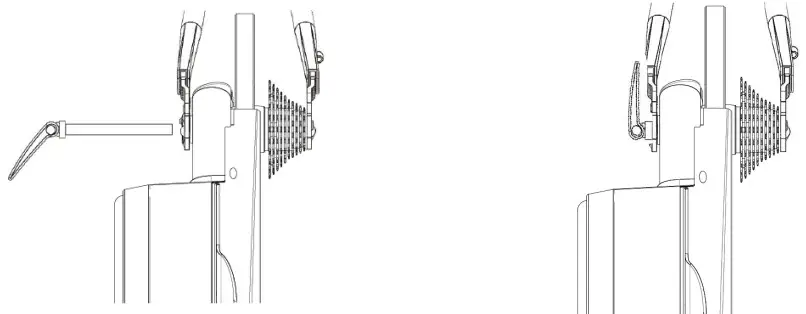
- 130mm or 135mm quick release installationWhen installing on a quick release bicycle frame, you need to use adapter A, adapter B and the quick release kit (these three accessories are included in the package). Please refer to the illustration on the right for the installation.
- 142mm or 148mm thru-axle installationWhen installing on a thru-axle bicycle frame, you need to use adapters C and D (the two accessories are included in the package). Please refer to the illustration on the right for the installation.Please use the supplied power adapter and plug one end into a wall outlet. Connect the other end to the power jack on the bike trainer as shown in the illustration on the right.
Mounting your bicycle
Shift the chain on your bicycle to the smallest sprocket of the cassette and then remove the rear wheel. Align the bicycle chain with the smallest sprocket of the cassette and then put on the chain as well as mount the bicycle on NOZA S’ axle to have the bicycle in a suitable position for riding.Please use the bicycle quick release lever properly with care. When the arc of the rotating arm of the quick release lever is toward the outside, it means the lever is in a released state. Rotate the rotating arm of the lever clockwise to tighten the quick-release lever. The rotating arm of the quick release lever should be placed on theother side of the NOZA S’ cassette. Please refer to the following illustration for the installation of the thru-axle bicycle. Insert the thru-axle from the other side of the cassette and tighten the axle.
Attention:
- Please firmly tighten the quick release lever and the thru-axle to prevent damage to property or the human body. If you cannot tighten the quick release lever and the thru-axle, please contact your dealer or Xplova customer service. Please DO NOT attempt to use the NOZA S in this situation.
- When mounting the bicycle, please lift its front wheel and press the frame down to make the bicycle firmly mounted on the NOZA S.
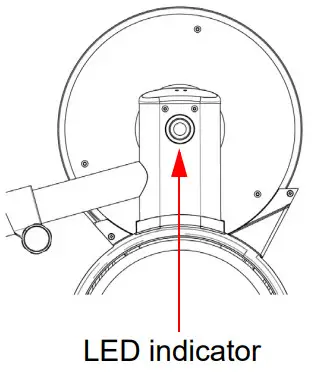
Indicator descriptions
NOZA S has two indicator lights, one indicates system status, the other indicates communication status. See illustration for locations of the two indicator lights:
| System indicator light | |
| System on status | Alternate flashing of red lightand blue light twice |
| Standby status | Blue light always on |
| Riding status | Blue light flashing |
| System abnormal | Red light always on |
| Communication indicator light | |
| Bluetooth connected | Blue light always on |
| Bluetooth not connect | Blue light flashing |
Cycling game QSG
- Please download some cycling game training software on PC/MAC or smartphone. Here are a few key games:• ZWIFT: www.zwift.com• Rouvy: rouvy.com• Onelap: www.onelap.cn
- Install games and set up a connection to NOZA S.
- Once you mount the bike, you are ready to start the game training experience.
Training program and uploading riding data
Use the Xplova Workout app to control the NOZA S and use multiple training programs.If you want to conduct a more detailed analysis, you can use the Xplova Workout app to upload to the website for analysis.
More of the amazing functions
If you want to experience the full functions of the NOZA S, we recommend that you install the Xplova Workout app on your smart phone. The Xplova Workout app can let you:
- View/store training records
- Upload the records to different platforms (such as Xplova, Strava, TrainingPeak and so on)
Please go to Google Play or App Store to search for “Xplova Workout” to download and install the app. If you want to get a better understanding of the product, please go to our official website at www.xplova.com and download the User Manual.
Specifications
| Dimensions (installed) | 593 x 514 x 465 mm |
| Total Weight (unboxed) | 17.0 KG |
| Flywheel Weight | 5.9 KG |
| Sound Level | 58 dB (@30KPH) |
| Max Power Output | 2500 W (@58KPH) |
| Max Simulated Incline | 18% (@70KG) |
| Accuracy | ±2.5% |
| Drivetrain | Cassette is not included.Requires purchase/installation of new cassette: 8/9/10/11 Speed SRAM/Shimano |
| Connectivity | ANT+, ANT+ FE-C, and Bluetooth Smart |
| Firmware Upgradable | Yes |
| Electrical Requirements | 100 – 240 Volt, 1.5 A, 50 Hz – 60 Hz |
| Box Dimensions | 700 x 300 x 500 mm |
SAFETY PRECAUTIONS AND REGULATIONS
Safety precautions before use
- Specs of the Xplova NOZA S power adapter are as follows:• Input: 100 ~ 240 VAC / 1.5 A• Output: 12 VDC / 5.0 A• Power plug: External diameter 5.5 m/m; internal diameter 2.5 m/m; length 10~12 m/m
- Only use the power adapter certified by the Xplova NOZA S. Non-compliant power adapters will cause irreparable damage to the bike trainer.
- When the bike trainer is active, please do not touch it and you should keep nonusers, animals or objects away from it to avoid danger.
- Consult your coach before you start any training plans.
- Please DO NOT put your hands or any object near the spinning parts of the Xplova NOZA S.
- The flywheel/cassette of the Xplova NOZA S might get hot after you use it for a while. Please DO NOT touch the flywheel/cassette within a short time.
- Please DO NOT attempt to disassemble the bicycle when the cassette is running.
- When you are using the Xplova NOZA S, keep your children and pets away from it to prevent injury.
- The Xplova NOZA S can only be installed and used on a firm, level ground.
- When training is in progress, please ride safely.
- Keep away from water.
- Before training, you should check if the bicycle is firmly secured to the Xplova NOZA S.
- The Xplova NOZA S can only be used after it is completely assembled.
- When using the Xplova NOZA S, you can only use accessories and power adapters certified by Xplova.
Notices
- Xplova shall not be held responsible for users using software, applications, and devices from other companies that result in malfunctioning of the Xplova NOZA S.
- As ANT+™ and Bluetooth are mutually exclusive, it is impossible for the Xplova NOZA S to send data simultaneously through ANT+™ or Bluetooth, i.e., when one of the protocols is in use, the Xplova NOZA S will automatically stop the other protocol to avoid the possibility of causing NOZA S programs to misbehave.
- Radio devices may cause interference and may change or completely prevent the Xplova NOZA S from functioning normally. Therefore, when training using the NOZA S, it is advised to stay away from high voltage power lines, traffic signals, railway power lines, buses, or trams.
- When the Xplova NOZA S is not in use, make sure not to expose it to direct sunlight for long periods of time.
DisclaimerAttention! Xplova shall not be held responsible for temporary or permanent injury to the user out of using the Xplova NOZA S (either directly or indirectly).
Maintenance and care
- When cleaning the bike trainer, please use neutral lubrication oil. DO NOT use corrosive detergents.
- DO NOT burnish the surface of the bike trainer or drill holes. Scratches or drilled holes will lead to the occurrence of cracks.
- Please place the bike trainer indoors and keep it dry to avoid damage from humidity.
Federal Communications Commission (FCC) Statement
This device complies with part 15 of the FCC Rules. Operation is subject to the following two conditions: (1) This device may not cause harmful interference, and (2) this device must accept any interference received, including interference that may cause undesired operation.Changes or modifications not expressly approved by the party responsible for compliance could void the user‘s authority to operate the equipment.This equipment has been tested and found to comply with the limits for a Class B digital device, pursuant to part 15 of the FCC Rules. These limits are designed to provide reasonable protection against harmful interference in a residential installation.This equipment generates, uses and can radiate radio frequency energy and, if not installed and used in accordance with the instructions, may cause harmful interference to radio communications. However, there is no guarantee that interference will not occur in a particular installation. If this equipment does cause harmful interference to radio or television reception, which can be determined by turning the equipment off and on, the user is encouraged to try to correct the interference by one or more of the following measures:
- Reorient or relocate the receiving antenna.
- Increase the separation between the equipment and receiver.
- Connect the equipment into an outlet on a circuit different from that to which the receiver is connected.
- Consult the dealer or an experienced radio/TV technician for help.
This device complies with radio frequency (RF) exposure limits adopted by the Federal Communications Commission for an uncontrolled environment. This equipment should be installed and operated to ensure a minimum of 20 cm spacing to any person at all times.
CE Compliance Statement
2402 MHz ~ 2480 MHz, power: -0.81 dBm This device meets the EU requirements and the International Commission on NonIonizing Radiation Protection (ICNIRP) on the limitation of exposure of the general public to electromagnetic fields by way of health protection. This equipment should be installed and operated to ensure a minimum of 20 cm spacing to any person at all times.
 |
Waste Electrical and Electronic Equipment (WEEE)This symbol means that according to local laws and regulations your product and/or its battery shall be disposed of separately from household waste. When this product reaches its end of life, take it to a collection point designated by local authorities. Proper recycling of your product will protect human health and the environment. |
report this adHereby, Xplova Inc. declares that the radio equipment type bike power trainer is in compliance with Directive 2014/53/EU.The full text of the EU declaration of conformity is available at the wwww.xplova.com
Xplova Limited Product Warranty Policy
This Limited Product Warranty shall apply to Xplova products including all accessories as contained within the original Xplova gift box. Xplova warrants that products from its authorized distributors and retailers will meet the applicable product specifications and be free from all defects in material and workmanship during the Limited Product Warranty Period, one year starting from the date of original purchase, if the products are used and serviced in accordance with the user manual and other documentation provided to the purchaser at the time of purchase. This Limited Product Warranty is subjected to the following terms and conditions:
- To obtain warranty service, proof of purchase, an original or copy of the sales receipt from the original retailer, is required.
- This Limited Product Warranty is only valid and enforceable in the country/region where the product is sold.
- This Limited Product Warranty is at the sole option of Xplova to either repair or replaces the defective product during the Limited Product Warranty Period. Xplova will not replace missing components from any package purchased through online auctions.
- To obtain warranty service, contact your local Xplova authorized retailer or Xplova for shipping instructions and an RMA number.
- This Limited Product Warranty covers expenses for inspecting and repairing the product during the Limited Product Warranty Period. The defective product shall be delivered by the purchaser at his/her own expense to the designated premises together with the proof of purchase and RMA number.
- Xplova will return the repaired or replaced product to the drop-zone for collection by the customer in good working condition. All replaced faulty products or components will become the property of Xplova. If Xplova repairs or replaces the product, the repaired or replaced product shall continue to be warranted for the remaining time of the original warranty period or for three (3) months from the date of repair or replacement, whichever is longer.
- Before returning any units for service, be sure to back up data and remove any confidential, proprietary, or personal information from the Product. Xplova is not responsible for damage to or loss of data.
- Xplova reserves the right to add, delete or amend the terms and conditions at any time without prior notice on its website indicated below.
- THIS LIMITED WARRANTY SHALL NOT APPLY IF THE DAMAGE WAS CAUSED BY ANY OF THE FOLLOWING:A. The product serial number has been removed, erased, defaced, altered or is illegible.B. The damage is resulting from the use of the product in a manner other than its normal and customary manner.C. Deterioration of the product due to normal wear and tear.D. The damage is arising from improper installation, unauthorized repair, alteration or modification to this product by third parties other than Xplova or its designee.E. The damage is arising from operating with components or accessories not officially authorized or provided by Xplova or used in other than its intended use.F. The damage is arising from exposure to abnormally corrosive conditions or operation with extreme heat or humidity.
- XPLOVA WILL NOT BE LIABLE FOR INCIDENTAL OR CONSEQUENTIAL LOSSES OR DAMAGES TO ANY NATURE, INCLUDING BUT NOT LIMITED TO LOST PROFITS OR COMMERCIAL LOSS, TO THE FULLEST EXTENT THAT THOSE LOSSES OR DAMAGES CAN BE DISCLAIMED BY LAW.
- This Limited Product Warranty does not affect the customer’s statutory rights in law specific to the country of purchase, such rights remain protected. Some countries do not allow the exclusion or limitation of incidental or consequential loss or damage, or limitation of the implied warranties, in those circumstances the preceding limitation of exclusions may not apply to such customers.
Warranty Coverage:
- Under normal conditions of use, the product main unit and components get a one year free after-sales maintenance service.
- Please present the original purchase approval or receipt with this Product Warranty upon requesting a service. A service fee might be charged in accordance with this Product Warranty.
Please note the Limited Product Warranty Period and service availability and response times may vary from country to country and may also be subject to registration requirements in the country of purchase. If you require assistance regarding warranty conditions or any other inquiries, please contact the original retailer or Xplova. Website: https://www.xplova.com
Thank you again for purchasing the Xplova NOZA S.Xplova reserves the right to design, change specifications, and improve quality.Should you have any questions regarding use of the bike trainer,please visit our website at: www.xplova.com.© 2019. All Rights Reserved.Xplova NOZA SThis revision: 08/ 2019
References
[xyz-ips snippet=”download-snippet”]