
DIGITAL KEYBOARD PSR-F51
PRECAUTIONS
PLEASE READ CAREFULLY BEFORE PROCEEDINGPlease keep this manual in a safe and handy place for future reference.
For AC adaptor
WARNING:
- This AC adaptor is designed for use with only Yamaha electronic instruments. Do not use for any other purpose.
- Indoor use only. Do not use in any wet environments.
CAUTION:
- When setting up, make sure that the AC outlet is easily accessible. If some trouble or malfunction occurs, immediately turn off the power switch of the instrument and disconnect the AC adaptor from the outlet. When the AC adaptor is connected to the AC outlet, keep in mind that electricity is flowing at the minimum level, even if the power switch is turned off. When you are not using the instrument for a long time, make sure to unplug the power cord from the wall AC outlet.
For PSR-F51
WARNING:Always follow the basic precautions listed below to avoid the possibility of serious injury or even death from electrical shock, short-circuiting, damages, fire or other hazards. These precautions include, but are not limited to, the following:
Power supply/AC adaptor
- Do not place the power cord near heat sources such as heaters or radiators. Also, do not excessively bend or otherwise damage the cord, or place heavy objects on it.
- Only use the voltage specified as correct for the instrument. The required voltage is printed on the name plate of the instrument.
- Use the specified adaptor (page 11) only. Using the wrong adaptor can result in damage to the instrument or overheating.
- Check the electric plug periodically and remove any dirt or dust which may have accumulated on it.
- ڈo not connect the instrument to an electrical outlet using a multiple connector. Doing so can result in lower sound quality, or possibly cause overheating in the outlet.
- When removing the electric plug from the instrument or an outlet, always hold the plug itself and not the cord. Pulling by the cord can damage it.
- Remove the electric plug from the outlet when the instrument is not to be used for extended periods of time, or during electrical storms.
Do not open
- This instrument contains no user-serviceable parts. Do not open the instrument or attempt to disassemble or modify the internal components in any way. If it should appear to be malfunctioning, discontinue use immediately and have it inspected by qualified Yamaha service personnel.
Water warning
- Do not expose the instrument to rain, use it near water or in damp or wet conditions, place on it any containers (such as vases, bottles or glasses) containing liquids which might spill into any openings. If any liquid such as water seeps into the instrument, turn off the power immediately and unplug the power cord from the AC outlet. Then have the instrument inspected by qualified Yamaha service personnel.
- Never insert or remove an electric plug with wet hands
Fire warning
- Do not put burning items, such as candles, on the unit. A burning item may fall over and cause a fire.
Battery
- Follow the precautions below. Failure to do so might result in explosion, fire, overheating or battery fluid leakage.– Do not tamper with or disassemble batteries.– Do not dispose of batteries in fire.– Do not attempt to recharge batteries that are not designed to be charged.– Keep the batteries separate from metallic objects such as necklaces, hairpins,coins, and keys.– Use the specified battery type (page 11) only.– Use new batteries, all of which are the same type, same model, and made by the same manufacturer.– Always make sure all batteries are inserted in conformity with the +/- polarity markings.– When the batteries run out, or if the instrument is not to be used for a long time, remove the batteries from the instrument.– When using Ni-MH batteries, follow the instructions that came with the batteries. Use only the specified charger device when charging.
- Keep batteries away from small children who might accidentally swallow them.
- If the batteries do leak, avoid contact with the leaked fluid. If the battery fluid should come in contact with your eyes, mouth, or skin, wash immediately with water and consult a doctor. Battery fluid is corrosive and may possibly cause loss of sight or chemical burns.
If you notice any abnormality
- When one of the following problems occur, immediately turn off the power switch and disconnect the electric plug from the outlet. (If you are using batteries, remove all batteries from the instrument.) Then have the device inspected by Yamaha service personnel.– The power cord or plug becomes frayed or damaged.– It emits unusual smells or smoke.– Some object has been dropped into the instrument.– There is a sudden loss of sound during use of the instrument.
Location
- Do not place the instrument in an unstable position where it might accidentally fall over.
- Before moving the instrument, remove all connected cables, to prevent damage to the cables or injury to anyone who might trip over them.
- When setting up the product, make sure that the AC outlet you are using is easily accessible. If some trouble or malfunction occurs, immediately turn off the power switch and disconnect the plug from the outlet. Even when the power switch is turned off, electricity is still flowing to the product at the minimum level. When you are not using the product for a long time, make sure to unplug the power cord from the wall AC outlet.
Connections
- Before connecting the instrument to other electronic components,turn off the power for all components. Before turning the power on or off for all components, set all volume levels to minimum.
- Be sure to set the volumes of all components at their minimum levels and gradually raise the volume controls while playing the instrument to set the desired listening level.
Handling caution
- Do not insert a finger or hand in any gaps on the instrument.
- Never insert or drop paper, metallic, or other objects into the gaps on the panel or keyboard. This could cause physical injury to you or others, damage to the instrument or other property, or operational failure.
- Do not rest your weight on, or place heavy objects on the instrument, and do not use excessive force on the buttons, switches or connectors.
- Do not use the instrument/device or headphones for a long period of time at a high or uncomfortable volume level, since this can cause permanent hearing loss. If you experience any hearing loss or ringing in the ears, consult a physician.
Yamaha cannot be held responsible for damage caused by improper use or modifications to the instrument, or data that is lost or destroyed.
Always turn the power off when the instrument is not in use.Even when the [ ![]() ] (Standby/On) switch is in standby status (display is off), electricity is still flowing to the instrument at the minimum level.When you are not using the instrument for a long time, make sure you unplug the power cord from the wall AC outlet.Make sure to discard used batteries according to local regulations.
] (Standby/On) switch is in standby status (display is off), electricity is still flowing to the instrument at the minimum level.When you are not using the instrument for a long time, make sure you unplug the power cord from the wall AC outlet.Make sure to discard used batteries according to local regulations.
NOTICETo avoid the possibility of malfunction/ damage to the product, damage to data, or damage to other property, follow the notices below:
Handling and Maintenance
- Do not use the instrument in the vicinity of a TV, radio, stereo equipment, mobile phone, or other electric devices. Otherwise, the instrument, TV, or radio may generate noise. When you use the instrument along with the application on your iPhone/iPad, we recommend that you set “Airplane Mode” to “ON” on your iPhone/iPad in order to avoid noise caused by communication.
- Do not expose the instrument to excessive dust or vibrations, or extreme cold or heat (such as in direct sunlight, near a heater, or in a car during the day) to prevent the possibility of panel disfiguration, damage to the internal components or unstable operation. (Verified operating temperature range: 5° – 40°C, or 41° – 104°F.)
- Do not place vinyl, plastic or rubber objects on the instrument, since this might discolor the panel or keyboard.
- When cleaning the instrument, use a soft, dry/dry or slightly damp cloth. Do not use paint thinners, solvents, cleaning fluids, or chemical impregnated wiping cloths.
Information
About copyrights
- Copying of the commercially available musical data including but not limited to MIDI data and/or audio data is strictly prohibited except for your personal use.
- This product incorporates and bundles computer programs and contents in which Yamaha owns copyrights or with respect to which it has license to use others’ copyrights. Such copyrighted materials include, without limitation, all computer software, style files, MIDI files, WAVE data, musical scores and sound recordings. Any unauthorized use of such programs and contents outside of personal use is not permitted under relevant laws. Any violation of copyright has legal consequences. DON’T MAKE, DISTRIBUTE OR USE ILLEGAL COPIES.
About functions/data bundled with the instrument
- Some of the preset songs have been edited for length or arrangement, and may not be exactly the same as the original.
Included Accessories
- Owner’s Manual (this book)
- AC Adaptor*1
- Online Member Product Registration*2
- Music rest* 1: May not be included depending on your particular locale. Check with your Yamaha dealer.* 2: The PRODUCT ID on the sheet will be needed when you fill out the User Registration form.
 Music RestInsert the music rest into the slots as shown.
Online Material (for Yamaha Online members)
 Song Book (only in English, French, German and Spanish):Contains music scores for the preset Songs (excluding Song 001) of this instrument. After completing the user registration at the website below, you can download this Song Book free of charge.Yamaha Online Member: https://member.yamaha.com/myproduct/regist/You will need the PRODUCT ID on the sheet “Online Member Product Registration” packaged with this manual in order to fill out the User Registration form.
About this manual
- The illustrations and displays as shown in this manual are for instructional purposes only, and may appear somewhat different from those on your instrument.
- iPhone and iPad are trademarks of Apple Inc., registered in the U.S. and other countries.
- The company names and product names in this manual are the trademarks or registered trademarks of their respective companies.
 Remove the transparent protective film that was applied to the display prior to shipment from the factory.
Connecting Headphones or External Audio Equipment (PHONES/OUTPUT Jack)
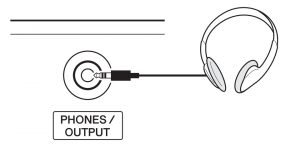
Any pair of stereo headphones with a stereo phone mini plug can be plugged in here for convenient monitoring. The speakers are automatically shut off when a plug is inserted into this jack. The PHONES/OUTPUT jack also functions as an external output. You can connect the PHONES/OUTPUT jack to a keyboard amplifier, stereo system, mixer, tape recorder, or other line-level audio device to send the instrument’s output signal to that device.
CAUTION:
- See the “Connections” and “Handling caution” section in the Precautions.
Power Requirements
Although the instrument will run either from an AC adaptor or batteries, Yamaha recommends use of an AC adaptor whenever possible. An AC adaptor is more environmentally friendly than batteries and does not deplete resources.
Using an AC Adaptor
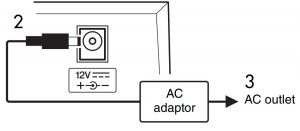
- Make sure that the power of the instrument is off.WARNING: Use the specified adaptor (refer to “Specifications”). Using the wrong adaptor can result in damage to the instrument or overheating.
- Connect the AC adaptor to the power supply jack.
- Plug the AC adaptor into an AC outlet.
 CAUTION:When using a power adaptor, even when the power is off, a small amount of electricity is still being consumed by the instrument. When you are not using the instrument for a long time, make sure to unplug the AC adaptor from the wall AC outlet.
 CAUTION:When using a power adaptor, even when the power is off, a small amount of electricity is still being consumed by the instrument. When you are not using the instrument for a long time, make sure to unplug the AC adaptor from the wall AC outlet.
Notice for the AC adaptor
Depending on your particular locale, the AC adaptor having a separable plug should be used. In this case, make sure to follow the explanations below for your safety.
If the plug is accidentally removed from the AC adaptorWithout touching the metallic section, slide the plug into place as shown below then push it in completely until you hear the click sound.

Slide the plug as indicated.The shape of the plug differs depending on locale.
WARNING:
- Make sure to keep the plug attached to the AC adaptor.Using the plug alone can cause electric shock or fire.
- Never touch the metallic section when attaching the plug.To avoid electric shock, short circuit or damage, also be careful that there is no dust between the AC adaptor and plug.
Using Batteries
WARNING:See the “Battery” section in the Precautions.
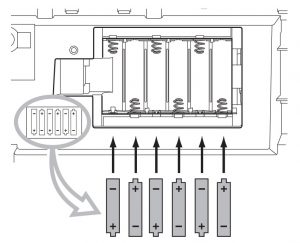
Installing the batteries
- Make sure that the power of the instrument is off.
- Open the battery compartment cover located on the instrument’s bottom panel.
- Insert six new 1.5V “AA” size alkaline batteriesor 1.2V rechargeable Ni-MH batteries (recommended), being careful to follow the polarity markings on the inside of the compartment.
- Replace the compartment cover, making sure that it locks firmly in place.

Setting Up
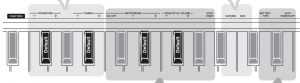
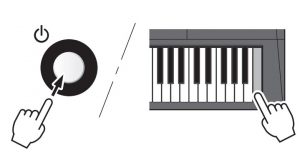
First, refer to the Power Requirements section for important instructions on using the instrument with AC power or batteries. To turn on the power, press the [ ] (STANDBY/ ON) switch. To set the power to standby, press the switch again.
Adjusting the Volume
Use the MASTER VOLUME [+]/[-] buttons to adjust the sound level of the instrument. To restore the default value, press both buttons simultaneously.
Functions
The Functions provide various “hidden” detailed settings for the instrument.
Changing the Tempo
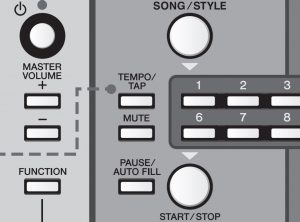
This affects both Song/Style playback and Metronome speed. Press the [TEMPO/TAP] button then use the Number buttons or [+]/[-] buttons while “tEP” or the current tempo value is shown.
Tapping out a Tempo—Tap Start
You can start a Style or Song at a desired speed by simply tapping out the tempo with the [TEMPO/TAP] button.Tap the button four times for time signatures in 4 (such as 4/4) or three times for time signatures in 3 (such as 3/4).
Songs (No. 001–030)
The Songs showcase the performance possibilities of the instrument, with 30 specially recorded pieces—for playing and practicing along with, or just for listening.*All Songs play back in succession repeatedly until stopped manually.To select a Song, press the [SONG/STYLE] button, then use the Number buttons or [+]/[-] buttons. See the list on the panel for quick reference in selecting Songs. To play the Song, press the [START/STOP] button; to stop it, press the button again.With the Songs, you can do the following:Pause a Song during playback. While the Song is playing, press the [PAUSE/AUTO FILL] button. To resume playback, press the button again.Mute the melody track of a Song, so that you can play or practice the melody yourself. Simply press the [MUTE] button and start Song playback.Use the OTS (One Touch Setting) Voice.Use the Sync Start Function.
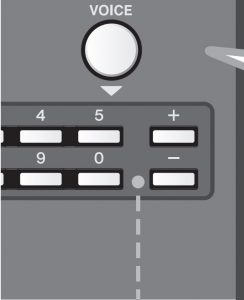
Number buttonsUse the Number buttons to directly select a Voice, Style or Song.For example, to select Voice 003, press the [VOICE] button, then buttons 0, 0, 3 in succession.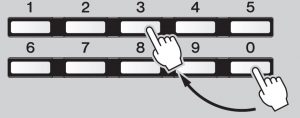 [+]/[-] buttonsUse these buttons to move up [+] or down [-] through the values. Holding down either button continuously increases or decreases the value accordingly.
To restore the default value of a setting, press both buttons simultaneously.
Styles (No. 101–214)
The Styles add excitement to your performance—giving you authentic, automatic backing in a wide variety of music genres. Just play chords (or even single-note chords) with your left hand, and enjoy the accompaniment of a full band behind you!To select a Style, press the [SONG/STYLE] button, then use the Number buttons or [+]/[-] buttons. See the list on the panel for quick reference in selecting Styles. To start the Style, press the [START/STOP] button; to stop it, press the button again.Playing the StylesTo properly play a Style and hear the backing parts, you’ll need to play chords in the left side or accompaniment section of the keyboard (keys C1–F#2) while the rhythm is playing.
Try playing various chords with your left hand while you play a melody over the accompaniment with your right.* If you select one of the PIANIST category Styles, which have no rhythm parts, no sound is produced even when you press the [START/STOP] button. If this happens, play a chord in the Accompaniment section of the keyboard to play back other accompaniment parts.With the Styles, you can do the following: Play Auto Fills, to add rhythmic interest to yourperformance. While a Style is playing, press the [PAUSE/AUTO FILL] button. Mute the instrumental backing of the Style and play only the rhythm. While a Style is playing, press the [MUTE] button. This also lets you play over the full range of the keyboard while the drums/percussion are playing. To restore full Style playback, press the [MUTE] button again and play a chord in the auto accompaniment section of the keyboard.Start the Style as soon as you play a chord in the accompaniment section (or any key, when Mute function is on) of the keyboard. To do this, set Sync Start to on.Use the OTS (One Touch Setting) Voice.
Voices
The Voices are the heart of the PSR-F51, letting you play over 120 realistic instrument sounds from the keyboard.To select a Voice, press the [VOICE] button, then use the Number buttons or [+]/[-] buttons. See the list on the panel for quick reference in selecting Voices.With the Voices, you can do the following:Select Dual Voices for playing two Voices in a layer (Voices 093–113.)Select Split Voices for playing different Voices from specific keyboard sections (Voices 114–120.)* When a Dual or Split Voice is selected, turning on the Duo function may produce unexpected results in the Voice(s) and the Voice ranges, etc. of the two sections.Select the OTS (One Touch Setting) Voice (Voice 000.) When this is called up and you select a Style or Song, the instrument automatically selects the most appropriate Voice for playing with that Style or Song. To turn this function off, select another Voice.
The Functions
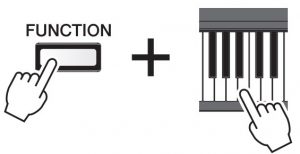 These detailed settings provide extra convenience and enhanced operation. To set the Functions, hold down the [FUNCTION] button, and then simultaneously press the appropriate key on the keyboard as indicated. Use the [+] and [-] keys to change the value, or the Default key to call up the default value (indicated with underline).
Transpose/Tuning
TRANSPOSEChanges the pitch of the instrument in semitones, for playing in different keys.Range: -12 – 0 – 12TUNINGFinely changes the pitch of the entire instrument in roughly 0.2 Hz steps, for tuning to other instruments.Settings: 427.0 – 440.0 – 453.0 Hz (27.0 – 40.0 – 53.0)
Performance
SUSTAINWhen this is set to On, the Voices played from the keyboard have a long decay or sustain.Settings: On/Off (Son/SoF)DUOWhen this is on, the keyboard is split into two sections (C1–F#3 and G3–C6), with the sameVoice and range. Use this when playing or learning with another player.Settings: On/Off (don/doF)
Metronome/Volume/Sync Start
METRONOME ON/OFFThe Metronome plays a steady click sound for practicing. Change the speed with the Tempo control (page 8).Settings: On/OffMETRONOME BeatSets the number of beats (clicks) in a measure. Set this to 4 for a 4/4 time signature; or 3 for 3/4.Settings: 0 – 4 – 16SONG/STYLE/METRONOME VOLUMEAdjusts the volume of the Style/Song/Metronome sound, letting you adjust the balance between those sounds and the keyboard Voice.Settings: 0 – 12 – 15SYNC START On/OffLets you start the Style or Song by playing a chord or key (page 9).Settings: On/Off * When set to on, the current display indication flashes.
Utility
BATTERY TYPEChanges the type of battery to be used. Be sure to change this to match the batteries you’ve installed.Settings: Alkaline/Manganese (AL) or Rechargeable (nl)AUTO POWER OFFChanges the amount of time that elapses before the power is automatically turned off. TheOff setting disables this feature.Settings: Off/5/10/15/30/60/120 min.
Backup
Backup ParametersThe following settings are maintained even when the power is turned off. Master Volume Level, Auto Power Off setting, Tuning, Sustain On/off, Battery Select
Initialization
 This operation initializes the backup data. While holding down the highest white key on the keyboard, press the [
 ![]() ] (Standby/ On) switch to turn the power on.
] (Standby/ On) switch to turn the power on.
Specifications
Dimensions(W x D x H): 940 x 306 x 109 mm (37” x 12-1/16” x 4-5/16”)Weight: 3.4 kg (7 lbs., 8 oz.) (not including batteries)Keyboard: 61 standard-size keysDisplay: LED displayVoices:* Polyphony: 32 notes* Preset: 120Accompaniment Styles:* Preset: 114* Style Controls: Main, Fill-inSongs: Preset: 30Connectivity: MINI PHONES/OUTPUT, DC INAmplifiers: 2.5W + 2.5WSpeakers: 8cm × 2Power Supply:* AC Adaptor: PA-130* Batteries: Six 1.5V “AA” size Alkaline, Manganese or 1.2V Ni-MH rechargeable batteries or equivalentPower Consumption: 6W (When using PA-130 AC Adaptor)Auto Power Off Function: YesIncluded Accessories:* Owner’s Manual* AC Adaptor: PA-130 or equivalent–May not be included depending on your particular area. Please check with your Yamaha dealer.* Music Rest* Online Member Product RegistrationOptional Accessories:* AC Adaptor: PA-130 or equivalent* Headphones (HPH-50/HPH-100/ HPH-150)
* The contents of this manual apply to the latest specifications as of the publishing date. To obtain the latest manual, access the Yamaha website then download the manual file. Since specifications, equipment or separately sold accessories may not be the same in every locale, please check with your Yamaha dealer.
Voice List
PIANO
1 Grand Piano2 Bright Piano3 Honky-tonk Piano4 Harpsichord
E.PIANO
5 Electric Piano 16 Electric Piano 27 Electric Grand
ORGAN
8 Drawbar Organ9 Percussive Organ10 Rock Organ11 Pipe Organ12 Reed Organ
ACCORDION
13 Accordion14 Tango Accordion15 Harmonica
GUITAR
16 Nylon Guitar17 Steel Guitar18 12Strings Guitar19 Jazz Guitar20 Clean Guitar21 Muted Guitar22 Overdriven Guitar23 Distortion Guitar24 Ukulele
BASS
25 Acoustic Bass26 Finger Bass27 Pick Bass28 Fretless Bass29 Slap Bass30 Synth Bass
STRINGS
31 Strings 132 Strings 233 Synth Strings34 Pizzicato Strings35 Violin36 Viola37 Cello38 Contrabass39 Orchestral Harp
WOODWIND
40 Flute41 Piccolo42 Recorder43 Oboe44 Clarinet45 Bassoon
SAXOPHONE
46 Tenor Sax47 Alto Sax48 Soprano Sax49 Baritone Sax
BRASS
50 Brass Section51 Trumpet52 Trombone53 French Horn54 Tuba55 Synth Brass
PERCUSSION
56 Vibraphone57 Marimba58 Celesta59 Timpani
SYNTH
60 Square Lead61 Sawtooth Lead62 Bass & Lead63 New Age Pad64 Warm Pad65 Halo Pad66 Crystal67 Brightness
WORLD
68 Pan Flute69 Ocarina70 Banjo71 Kalimba72 Bagpipe73 Dulcimer 174 Dulcimer 275 Harmonium 1 (Single Reed)76 Harmonium 2 (Double Reed)77 Harmonium 3 (Triple Reed)78 Sitar79 Detuned Sitar80 Shehnai81 Tabla82 Indian Kit83 Oud84 Rabab85 Kanoon86 Arabic Kit87 Er Hu88 Yang Chin89 Koto
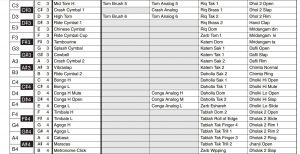
DRUM KITS
90 Standard Kit91 Brush Kit92 Dance Kit
DUAL
93 Octave Piano94 Piano & Strings95 Piano Pad96 E.Piano Pad97 Octave Harpsichord98 Full Organ99 Octave Strings100 Octave Pizzicato101 Strings & Flute102 Strings Pad103 Flute & Clarinet104 Oboe & Bassoon105 Alto Sax & Tenor Sax106 Octave Brass107 Power Brass108 Jazz Section109 Orchestra Tutti110 Trumpet & Trombone111 Fat Lead112 Bell Mixture113 Bell Pad
SPLIT
114 Piano / A.Bass115 E.Piano / E. Bass116 Brass / Tuba117 Trumpet / Trombone118 Flute / Oboe / Clarinet / Bassoon119 Soprano / Alto / Tenor / Baritone Sax120 Trumpet / Horn / Trombone / Tuba
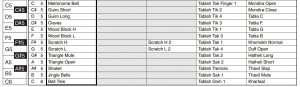
Drum Kit List

Style List
Pop & Rock
101 8BeatModern102 60sGuitarPop103 60s8Beat104 8Beat105 OffBeat106 60sRock107 HardRock108 RockShuffle109 8BeatRock110 16Beat111 PopShuffle112 GuitarPop113 16BtUptempo114 KoolShuffle115 HipHopLight
Ballad
116 PianoBallad117 6/8ModernEP118 6/8SlowRock119 OrganBallad120 PopBallad121 16BeatBallad
Dance&Disco
122 EuroTrance123 Ibiza124 SwingHouse125 Clubdance126 ClubLatin127 Garage128 TechnoParty129 HipHopGroove130 70sDisco131 LatinDisco132 SaturdayNight133 DiscoHands
Swing&Jazz
134 BigBandFast135 JazzBallad136 JazzClub137 Swing1138 Swing2139 Five/Four140 Dixieland141 Ragtime
R&B
142 Soul143 DetroitPop144 6/8Soul145 CrocoTwist146 Rock&Roll147 ComboBoogie148 6/8Blues
Country
149 CountryPop150 CountrySwing151 Country2/4152 Bluegrass
Ballroom
153 VienneseWaltz154 EnglishWaltz155 Slowfox156 Foxtrot157 Quickstep158 Tango159 Pasodoble160 Samba161 ChaChaCha162 Rumba163 Jive
Trad & Waltz
164 March165 6/8March166 PolkaPop167 Tarantella168 Showtune169 ChristmasSwing170 ChristmasWaltz171 ScottishReel172 Waltz173 SwingWaltz174 JazzWaltz175 CountryWaltz176 Musette
World
177 BrazilianSamba178 BossaNova179 Forro180 Sertanejo181 Mambo182 Salsa183 Beguine184 Reggae185 Tijuana186 Duranguense187 CumbiaGrupera188 Joropo189 Parranda190 ModernDangdut191 Keroncong192 Bhajan193 BollyMix194 IndianPop195 HindBallad196 IndyWaltz197 Bhangra198 Kerala199 Rajasthan200 Dandiya201 Qawwali202 Saeidy203 WehdaSaghira204 Laff205 IranianElec206 Emarati
Pianist
207 Stride208 PianoSwing209 Arpeggio210 Habanera211 SlowRock212 8BeatPianoBallad213 6/8PianoMarch214 PianoWaltz
Song List
ORCHESTRA
Song No. Composer
1 Demo Original2 Danse des Mirlitons from “The Nutcracker” P.I. Tchaikovsky3 “Orphée aux Enfers” Ouverture J. Offenbach4 Slavonic Dances No.10 A. Dvořák5 Méditation (Thaïs) J. Massenet6 Frühlingslied F. Mendelssohn7 “The Surprise” Symphony F.J. Haydn
PIANIST
Song No. Composer
8 La Candeur J.F.Burgmüller9 Arabesque J.F.Burgmüller10 Pastorale J.F.Burgmüller11 Innocence J.F.Burgmüller12 Etude op.10-3 “Chanson de l’adieu” F.Chopin13 Valse op.64-1 “Petit Chien” F.Chopin14 Menuett L. Boccherini15 Moments Musicaux op.94-3 F. Schubert16 Prelude (Wohltemperierte Klavier 1-1) J.S. Bach17 La Viollette L.Streabbog18 Für Elise L.v. Beethoven
TRADITIONAL
Song No. Composer
19 America the Beautiful S.A. Ward20 Londonderry Air Traditional21 Wenn ich ein Vöglein wär ? Traditional22 Die Lorelei F. Silcher23 Turkey in the Straw Traditional24 Muss i denn F. Silcher25 To a Wild Rose E.A. MacDowell
DUET
Song No. Composer
26 We Wish You A Merry Christmas (DUET) Traditional27 Ten Little Indians (DUET) Traditional28 Twinkle Twinkle Little Star (DUET) Traditional29 The Cuckoo (DUET) Traditional30 O du lieber Augustin (DUET) Traditional
Web And DownloadYamaha Global Site: http://www.yamaha.com/Yamaha Downloads: http://download.yamaha.com/
Digital Keyboard PSR-F51 User Manual – Digital Keyboard PSR-F51 User Manual –