![]()
TransAcousticTMAcoustic-Electric Guitar System70 Owner’s Manual
Thank you for purchasing the Yamaha TransAcousticTM Guitar. The TransAcousticTM guitar is a unique and innovative instrument that enhances the natural sound and dimension of a Yamaha acoustic guitar by utilizing its body and proprietary technology to offer musicians a new immersive acoustic playing experience. To obtain the best performance and potential from this instrument, we encourage you to read this manual before use. Note that this manual covers only the electronic parts of this product. For information on the other non-electronic parts, refer to the separate Acoustic Guitar Owner’s Manual.
Specifications
- System: System70
- Pickup: Original Bar Sensor (Piezo Type)
- Control: Line Out Volume (Combined w/TA Switch *1), Reverb Effect (Room/Hall), Chorus Effect
- Output Jack: Combination End Pin/Line Out Power Switch *2
- Output Impedance: 150 Ω
- Power: AA battery x2 (alkaline or nickel-metal hydride) *3
- Battery Life: Approximately 10 hours using alkaline batteries (with the TA function in use).*4
- Accessories: Neck adjustment hex wrench x1*5, AA battery x2
- The TA function produces effect sounds from the body of the guitar to add to the guitar’s original sound. The system requires approximately two seconds after the TA function is switched ON before the first effect sound is produced.
- Connect a cab for line output.
- For best performance, we recommend the use of alkaline or nickel-metal hydride batteries. When using nickel-metal hydride batteries, please follow the instructions in the manual provided with the batteries.
- Depending upon operating conditions.
- Included only with models that allow adjustment of the truss rod.* The contents of this manual apply to the latest specifications as of the publishing date. To obtain the latest manual, access the Yamaha website then download the manual file.
PRECAUTIONS
PLEASE READ CAREFULLY BEFORE PROCEEDINGPlease keep this manual in a safe and handy place for future reference.
![]() WARNINGAlways follow the basic precautions listed below to avoid the possibility of serious injury or even death from electrical shock, short-circuiting, damages, fire, or other hazards. These precautions include, but are not limited to, the following:Do not open
WARNINGAlways follow the basic precautions listed below to avoid the possibility of serious injury or even death from electrical shock, short-circuiting, damages, fire, or other hazards. These precautions include, but are not limited to, the following:Do not open
- This instrument contains no user-serviceable parts. Do not open the instrument or attempt to disassemble or modify the internal components in any way. If it should appear to be malfunctioning, discontinue use immediately and have it inspected by qualified Yamaha service personnel.
Water warning
- Do not expose the instrument to rain, use it near water or in damp or wet conditions, place it on any containers (such as vases, bottles, or glasses) containing liquids that might spill into any openings. If any liquid such as water seeps into the instrument, turn off the power immediately and have the instrument inspected by qualified Yamaha service personnel.
If you notice any abnormality
- When one of the following problems occurs, immediately turn off the power and remove all batteries from the instrument, then have the instrument inspected by Yamaha service personnel.– It emits unusual smells or smoke.– Some object has been dropped into the instrument.– There is a sudden loss of sound during the use of the instrument.
Battery
- Follow the precautions below. Failure to do so might result in explosion, fire, overheating or battery fluid leakage.– Do not tamper with or disassemble batteries.– Do not dispose of batteries in a fire.– Do not attempt to recharge batteries that are not designed to be charged.– Keep the batteries separate from metallic objects such as necklaces, hairpins, coins, and keys.– Use the specified battery type only.– Use new batteries, all of which are the same type, same model, and made by the same manufacturer.– Always make sure all batteries are inserted in conformity with the +/- polarity markings.– When the batteries run out, or if the instrument is not to be used for a long time, remove the batteries from the instrument.
- Do not carry or store batteries with other metal objects such as necklaces, hairpins, metal coins, or keys.
- If the batteries do leak, avoid contact with the leaked fluid. If the battery fluid should come in contact with your eyes, mouth, or skin, wash immediately with water and consult a doctor.Battery fluid is corrosive and may possibly cause loss of sight or chemical burns.
![]() CAUTIONAlways follow the basic precautions listed below to avoid the possibility of physical injury to you or others or damage to the instrument or other property. These precautions include, but are not limited to, the following:
CAUTIONAlways follow the basic precautions listed below to avoid the possibility of physical injury to you or others or damage to the instrument or other property. These precautions include, but are not limited to, the following:
Connection
- Before connecting the instrument to other electronic components, turn off the power for all components. Before turning the power on or off for all components, set all volume levels to a minimum.
- Be sure to set the volumes of all components at their minimum levels and gradually raise the volume controls while playing the instrument to set the desired listening level.
Location
- Do not place the instrument in an unstable position where it might accidentally fall over.
Handling caution
- Do not rest your weight on, or place heavy objects on the instrument, and do not use excessive force on the buttons, switches, or connectors.
- Do not use the instrument/device or headphones for a long period of time at a high or uncomfortable volume level, since this can cause permanent hearing loss. If you experience any hearing loss or ringing in the ears, consult a physician.* Yamaha cannot be held responsible for damage caused by improper use or modifications to the instrument, or data that is lost or destroyed.* Make sure to discard used batteries according to local regulations.* Please read the instruction manual for the external audio device such as a guitar amplifier, etc., prior to use.
Part Names/Control Descriptions
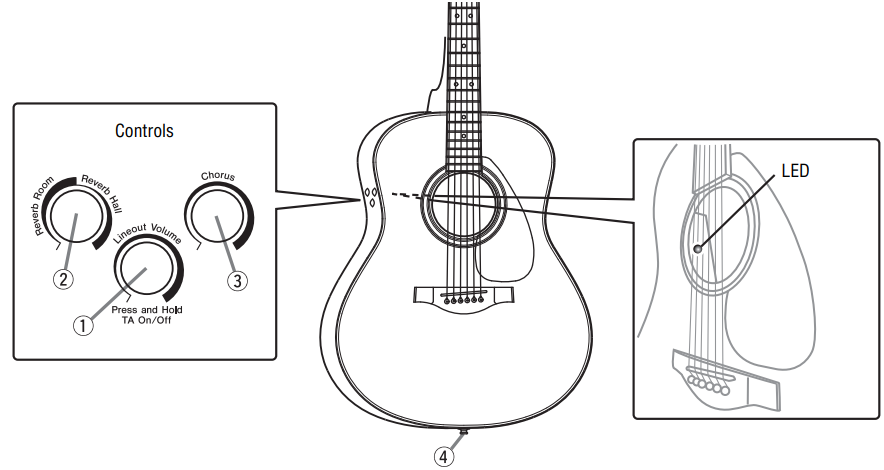
- Line Out Volume Control/TA SwitchTo turn on the TransAcoustic guitar, press this knob for approximately 0.3 seconds. When a cable is connected to the TransAcoustic’s output/ line out jack, the output level can be adjusted by rotating this control to the right (clockwise) to increase the level, or to the left (counterclockwise) to reduce the level.
- Reverb ControlAdjusts the reverb effect. Turning this control to the right (clockwise) increases the level of the effect and selects between the TransAcoustic’s two reverb types: Room and Hall (in the 12:00 position). Turning it all the way to the left (counterclockwise) bypasses/switches the reverb effect off.
- Chorus ControlAdjusts the chorus effect. Turing this control to the right (clockwise) increases the intensity of the chorus effect. Turning it all the way to the left (counterclockwise) bypasses/switches the chorus effect off.
-
Output Jack/Battery HolderThe output jack and battery compartment are combined into a single unit. Inserting a plug into the output jack switches the internal preamplifier ON.* To prolong the life of your battery, please unplug the cable from the output jack when not in use.
LED Display Details
The LED located inside the soundhole flashes red when it is time to change the batteries. Once the LED begins flashing, the remaining operation time is approximately two hours with alkaline batteries and about one hour when using nickel-metal hydride batteries (Time varies according to operating conditions). Please replace the batteries as soon as possible.
| Green LED | Red LED | Condition |
| Lights | Lights | TA Function ON, Line Out ON |
| Lights | TA Function ON | |
| — | Lights | Line Out ON |
| — | Flashing | Battery Warning |
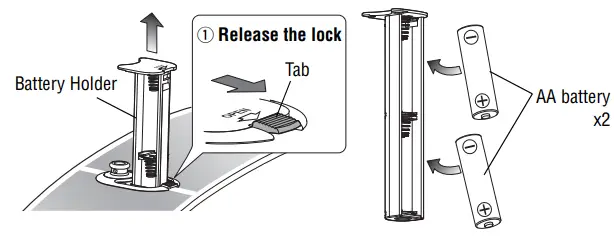
Replacing the Batteries
- Slide the tab on the endpin section in the direction indicated by the arrow in the diagram below to release the lock, then pull out the battery holder.
- Insert two AA batteries making sure that the battery poles are properly aligned with the polarity markings on the battery holder.
- Slide the battery holder back into the endpin section until it locks.* When using nickel-metal-hydride batteries, take care not to damage the battery casing or poles when installing and removing the batteries.

Operating Procedures
Using without an amplifier (Only using the TA function)Add reverb and/or chorus effects to the guitar’s acoustic sound.
- Push the TA switch to turn ON the TA function (green LED lights).
- Use the Reverb and Chorus controls to adjust each effect.
* Please take note that high effect volume levels can result in feedback.
Using with an amplifier, etc. (used as an acoustic-electric guitar)The sound, with effects applied, can be output via the output jack.
- Connect a cable to the output jack to send the signal to external equipment (red LED lights).
- Use the Line Out Volume control to adjust the volume, and the Reverb and Chorus control to adjust each effect.* In this condition, the TA ON/OFF switch can be used to select whether or not to simultaneously generate the effect sound from the guitar’s body. When the TA switch is OFF, the effects are still output via the line-out signal.
- Removing the cable from the output jack switches the power OFF (the TA function also switches OFF at this time).
Auto Power-Off Function
Both the power and the TA function automatically switch off if there is no input for more than 30 minutes.* The auto power-off function is disabled when a cable is connected to the instrument.* The TA function power is also switched off when feedback is produced for more than 30 seconds.
EQ Adjustment mode
This instrument also features an EQ Adjustment mode. In this mode, you can adjust the mid-range EQ of the Effect sounds to create tonal changes or to reduce the acoustic feedback (or howling noise.)Entering the EQ Adjustment modePress the Line Out Volume Control/TA switch and wait until the LED located inside the soundhole starts flashing (approximately 5 seconds).Exiting the EQ Adjustment mode
- Press the Line Out Volume Control/TA switch and wait until the LED located inside the soundhole stops flashing (approximately 5 seconds).
- When the Line Out Volume Control/TA switch is not operated for approximately 30 seconds, the status automatically changesfrom the EQ Adjustment mode to the Normal mode.
Adjusting the mid-range EQ of the Effect sound
Turn the Line Out Volume Control/TA switch.Turning the switch all the way to the right (clockwise) disables the EQ adjustment.Turning the switch to the left (counterclockwise) increases the amount of EQ adjustment applied to the mid-range EQ of the Effect sound.
Saving the settings
The settings for the EQ Adjustment mode are saved automatically.NOTICEWhen exiting the EQ adjustment mode by connecting or disconnecting a cable (to or from the Output jack) while in the EQ adjustment mode, the settings are not saved. The TA settings previously saved are maintained.
Manual Development Group©2020 Yamaha CorporationPublished 12/2020 /2020POHY-A0 VEZ2860
[xyz-ips snippet=”download-snippet”]