
BATON CLAMP SPEAKER BRACKET
BBS251 Installation Manual
Thank you for choosing the YAMAHA Baton Clamp Speaker Bracket. Please read this manual carefully before installing the speaker bracket and keep it in a safe place for future reference.
PRECAUTIONS
- YAMAHA shall not bear any responsibility for accidents caused by failure of the installation components or by deficiencies in the installation method. READ THIS MANUAL THOROUGHLY BEFORE INSTALLING THE BATON CLAMP BRACKET.
- This speaker bracket can only be used with a speaker that weighs less than 30 kilograms (66 lbs.).
- The mounting baton must be able to support at least 10 times the combined weight of the speaker and bracket.
- The mounting baton must be between 34 and 51 mm ( 1-5/16″ – 2″) in diameter.
- Consult with a professional installer and confirm that the mounting pipe has sufficient strength and is of proper material for long-term mounting.
- Check at each step that all parts have been attached correctly and that all bolts and screws have been firmly tightened.
- For secure installation and safe operation, have a professional install the speaker and bracket. YAMAHA accepts no liability for any injury or damage resulting from improper installation or misuse of materials.
- Screws and bolts may loosen over time due to vibration or corrosion. Periodically check and retighten all connections especially in extraordinary cases such as earthquakes or heavy impacts. For maximum safety, have a professional continually check and maintain the speaker and bracket.
PARTS NAME
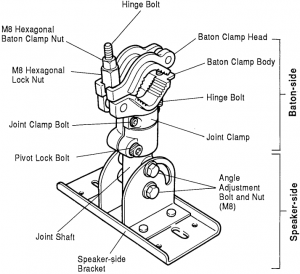
Also supplied: two hexagonal wrenches (large and small)
- The speaker-side bracket requires two (2) M8 bolts and two (2) M8 washers. (When using enclosures as shown in Figure 2, two (2) M8 nuts must be provided as well.)
INSTALLATION PROCEDURE
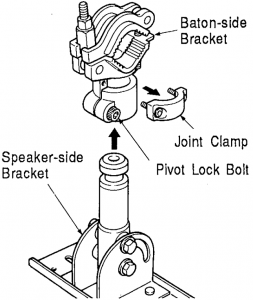
1 Using the large hexagonal wrench provided, loosen the pivot lock bolt. Then, using the small hexagonal wrench, remove the joint clamp bolts and joint clamp. Separate the speaker-side bracket from the baton-side bracket. (Figure 1)
2 Attach the speaker to the speaker-side bracket. [*1]
- For wooden speaker enclosures, if it is possible to open the enclosure, use double M8 nuts and the included flange nut to firmly secure the assembly. (Figure 2)
- For speaker enclosures matched for the speaker-side bracket, use the M8 bolts (2) and washers (2) to securely attach the speaker to the bracket. (Figure 3)
- In all cases, be sure to use bolts with the proper length.
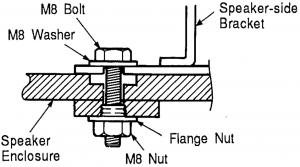
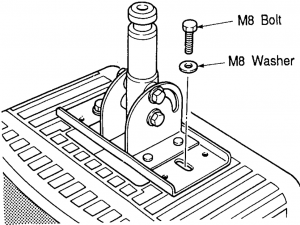
Figure 2 Figure 3
3 Attach the baton-side bracket to the mounting pipe.
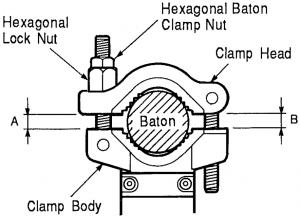
Make sure the space between the baton clamp head and body is nearly equal on either side of the clamp as shown by “A” and “B” in Figure 4.The space at “B” can be adjusted by rotating the entire clamp head in or out as required. Once the proper spacing is obtained, firmly tighten the baton clamp nut. [*2] To be safe, tighten a lock nut securely onto the baton clamp nut. [*3]
* Install the speaker and bracket to minimize the rotational strain between the baton and the baton clamp. The center of gravity of the speaker and bracket should hang directly below the center of the baton.
4 Insert the joint shaft of the speaker-side bracket into the baton-side bracket.
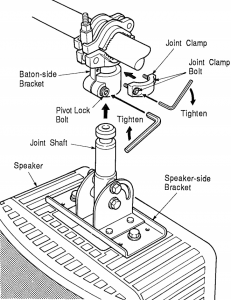
(1) Insert the joint shaft of the speaker-side bracket into the shaft hole of the baton-side bracket. While holding the speaker in position, attach the joint clamp and firmly tighten the joint clamp bolts. [*4] In this condition, the speaker-side bracket can be horizontally rotated 360°.(2) Pivot the speaker to the desired horizontal angle and securely tighten the pivot lock bolt to set the position. [*5](3) Set the vertical angle of the speaker after loosening the angle adjustment bolts and nuts (M8). Firmly retighten the bolts and nuts.* Do not adjust the speaker position without loosening the required bolts and nuts.* If the vertical angle of the speaker is extreme, the baton clamp may slip depending on the material of the baton.(4) After adjustment, check again that the rotational strain between the baton and the baton clamp is minimized. The center of gravity of the speaker and bracket should hang directly below the center of the baton. [*7]* Firmly tighten the hexagonal lock nut and baton clamp nut. [*8]
5 Lastly, recheck the entire installation. Make sure of the following:
• Bracket Attachment to the Speaker [*1]• Bracket Attachment to the Baton (Baton Clamp Nut Tightening) [*2]• Hexagonal Lock Nut Tightening [*3]• Joint Clamp Bolt Tightening [*4]• Pivot Lock Bolt Tightening [*5]• Angle Adjustment Bolt Tightening [*6]• Baton-side Bracket Angle Adjustment .[*7]• Hexagonal Lock Nut and Baton Clamp Nut Tightening [*8]
SPEAKER ANGLE ADJUSTMENT
The speaker bracket can be adjusted for a wide range of listening positions.
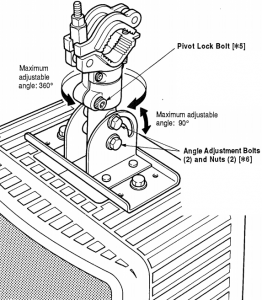
Pivot Lock Bolt [*5]Using the large hexagonal wrench supplied, loosen the pivot lock bolt. Rotate the speaker to the desired angle and retighten the pivot bolt securely.
Angle Adjustment Bolts (2) and Nuts (2) [*6]Using a wrench, slightly loosen the angle adjust-ment bolts and nuts. Adjust the speaker to the desired angle and firmly retighten the bolts and nuts.
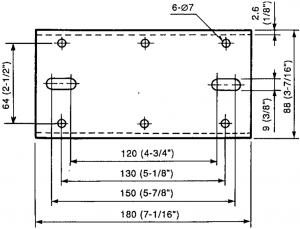
DIMENSIONS
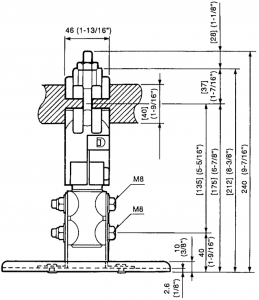
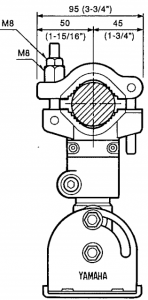
* [ ] dimensions for 40 mm (1-9/16″) baton diameter
Weight: 2.3 kg (5 lbs.)
Units: mm (inch)
YAMAHA CORPORATIONPro Audio Division, #18/3P.O. Box 3, Hamamatsu, 430-8651, Japan
[xyz-ips snippet=”download-snippet”]