
YAMAHA CD Receiver
 CRX-B370
PRECAUTIONS
PLEASE READ CAREFULLY BEFORE USE. BE SURE TO FOLLOW THESE INSTRUCTIONS.
The precautions listed below are to prevent risk of harm to the user and others, as well as to prevent property damage, and to help the user use this unit properly and safely. Be sure to follow these instructions.After reading this manual, be sure to keep it in a safe place where it can be referenced at any time.
|
![]() WARNINGThis content indicates “risk of serious injury or death.”
WARNINGThis content indicates “risk of serious injury or death.”
Laser
- Do not remove the cover for repair. This unit uses a laser. Laser light entering your eyes may cause visual impairment. Request inspections or repairs from the dealer where you purchased the unit or from qualified Yamaha service personnel.
- Do not look into the laser source. If there is nothing to block it, this unit emits a visible laser.Avoid looking at the laser directly. Laser light entering your eyes may cause visual impairment. When the plug is inserted into the AC outlet, do not place your eyes near openings of the disk tray or other openings, and do not try to look inside the unit.
Power supply/power cord
- Do not do anything that could damage the power cord.– Do not place it near a heater.– Do not bend it excessively or alter it.– Do not scratch it.– Do not place it under a heavy object.Using the power cord with the core of the cord exposed could cause electric shocks or a fire.
- Never charge this unit if it is wet. Failure to observe this may cause electric shocks or a terminal circuit shortage and cause a fire or malfunctions.
- Do not touch the power plug or cord if there is a chance of lightning. Failure to observe this may cause electric shocks.
- Use this unit with the power supply voltage printed on it. Failure to connect to an appropriate AC outlet may cause a fire, electric shocks, or malfunctions.
- Check the electric plug periodically and remove any dirt or dust which may have accumulated on it. Failure to observe this may cause a fire or electric shocks.
- When setting up the unit, make sure that the AC outlet you are using is easily accessible. If some trouble or malfunction occurs, immediately turn off the power switch and disconnect the plug from the AC outlet. Even when the power switch is turned off, as long as the power cord is not unplugged from the wall AC outlet, the unit will not be disconnected from the power source.
- If you hear thunder or suspect approaching lightning, quickly turn off the power switch and pull the power plug from the AC outlet. Failure to observe this may cause a fire or malfunctions.
- If not using the unit for long periods of time, be sure to pull the power plug from the AC outlet. Failure to observe this may cause a fire or malfunctions.
Do not disassemble
• Do not disassemble or modify this unit. Failure to observe this may cause a fire, electric shocks, injury, or malfunctions. If you notice any irregularities, be sure to request an inspection or repair from the dealer where you purchased the unit or from qualified Yamaha service personnel.
Water warning
- Do not expose the unit to rain, use it near water or in damp or wet conditions, or place on it any containers (such as vases, bottles or glasses) containing liquids which might spill into any openings or places where water may drop. A liquid such as water getting into the unit may cause a fire, electric shocks, or malfunctions. If any liquid such as water seeps into the device, turn off the power immediately and unplug the power cord from the AC outlet. Then, request an inspection from the dealer where you purchased the unit or from qualified Yamaha service personnel.
- Never insert or remove an electric plug with wet hands. Do not handle this unit with wet hands. Failure to observe this may cause electric shocks or malfunctions.
Fire warning
- Do not place any burning items or open flames near the unit, since they may cause a fire.
Maintenance and care
- Do not use aerosols or spray-type chemicals that contain combustible gas for cleaning or lubrication. The combustible gas will remain inside the unit, which may cause explosion or fire.
Battery use
- Do not disassemble a battery. If the contents of the battery get on your hands or in your eyes, it can cause blindness or chemical burns.
- Do not dispose of batteries in fire. Doing so may result in the battery bursting, causing a fire or injury.
- Do not attempt to recharge batteries that are not intended to be charged. Charging could cause the battery to burst or leak, which can cause blindness, chemical burns, or injury.
- If the batteries do leak, avoid contact with the leaked fluid. If the battery fluid should come in contact with your eyes, mouth, or skin, wash immediately with water and consult a doctor.Battery fluid is corrosive and may possibly cause loss of sight or chemical burns.
Wireless unit
- Do not use this unit near medical devices or inside medical facilities. Radio waves from this unit may affect electro-medical devices.
- Do not use this unit within 15 cm (6 in) of persons with a heart pacemaker implant or a defibrillator implant. Radio waves from this unit may affect electro-medical devices, such as a heart pacemaker implant or defibrillator implant.
If you notice any abnormality
- If any of the following abnormalities occur, immediately turn off the power and disconnect the power plug.– The power cord/plug is damaged.– An unusual smell or smoke is emitted from the unit.– Foreign material gets into the interior of the unit.– There is a loss of sound during use.– There is a crack or damage in the unit.Continued use could cause electric shocks, a fire, or malfunctions. Immediately request an inspection or repair from the dealer where you purchased the unit or from qualified Yamaha service personnel.
- Be careful not to drop or apply strong impact to this unit. If you suspect the unit may have been damaged due to dropping or impact, immediately turn off the power and pull the power plug from the AC outlet. Failure to observe this may cause electric shocks, a fire, or malfunctions. Immediately request an inspection from the dealer where you purchased the unit or from qualified Yamaha service personnel.
![]() WARNING
WARNING
This content indicates “risk of injury.”
Power supply/power cord
- Do not use an AC outlet where the power plug fits loosely when inserted. Failure to observe this may cause a fire, electric shocks, or burns.
- When removing the electric plug from the unit or an AC outlet, always hold the plug itself and not the cord. Pulling by the cord can damage it and cause electric shocks or a fire.
- Insert the power plug firmly all the way into the AC outlet. Using the unit when it is not plugged in sufficiently can cause dust to accumulate on the plug, causing a fire or burns.
Installation
- Do not place the unit in an unstable position where it might accidentally drop or fall over and cause injuries.
- Do not block this unit’s ventilation holes (cooling slits). This unit has ventilation holes on the side to prevent the internal temperature from becoming too high. Failure to observe this may trap heat inside the unit, causing a fire or malfunctions.
- When installing this unit:– Do not cover it with any cloth.– Do not install it on a carpet or rug.– Make sure the top surface faces up; do not install on its sides or upside down.– Do not use the device in a confined, poorly-ventilated location.Failure to observe the above may trap heat inside the unit, causing a fire or malfunctions.Ensure that there is adequate space around the unit: at least 5 cm (2 in) on top, 5 cm (2 in) on the sides, and 5 cm (2 in) on the rear.
- Do not install the unit in places where it may come into contact with corrosive gases or salt air or places that have excessive smoke or steam. Doing so may result in malfunction.
- Before moving this unit, be sure to turn off the power switch and disconnect all connection cables. Failure to observe this may damage the cables or cause you to trip and fall.
- For proper installation of the outdoor antenna, make sure to have it done by the dealer from where you purchased the unit or by qualified service personnel. Failure to observe this may cause the installation to fall and result in injury. Installation requires special skills and experience.
Hearing loss
- Do not use the unit for a long period of time at a high or uncomfortable volume level, since this can cause permanent hearing loss. If you experience any hearing loss or ringing in the ears, consult a physician.
- Before connecting the unit to other devices, turn off the power for all devices. Also, before turning the power of all devices on or off, make sure that all volume levels are set to the minimum. Failing to do so may result in hearing loss, electric shock, or device damage.
- When turning on the AC power in your audio system, always turn on the unit LAST, to avoid hearing loss and speaker damage. When turning the power off, the unit should be turned off FIRST for the same reason. Failure to observe the above may cause hearing impairment or speaker damage.
Maintenance
- Remove the power plug from the AC outlet before cleaning the unit. Failure to observe this may cause electric shocks.
Handling caution
- Do not insert your hand or fingers into disk slot of this unit. Failure to observe this may cause injury.
- Do not insert foreign materials such as metal or paper into disk slot of this unit. Failure to observe this may cause a fire, electric shocks, or malfunctions. If foreign material gets into the unit, immediately shut off the power and pull the power plug from the AC outlet and request an inspection from the dealer where you purchased the unit or from qualified Yamaha service personnel.
- Do not do the following:– stand on or sit on the equipment.– put heavy items on top of the equipment.– place the equipment in a stack.– apply unreasonable force to buttons, switches, input/output terminals, etc.
- Avoid pulling the connected cables to prevent injuries or damage to the unit by causing it to fall.
- Do not operate the unit if the sound is distorting. Prolonged use in this condition could cause overheating and result in fire.
Battery use
- Always replace all batteries at the same time. Do not use new batteries together with old ones. Using new ones with old ones could cause a fire, burns, or inflammation due to fluid leaks.
- Do not use batteries other than specified batteries. Doing so cause fire, burns, or inflammation due to leakage.
- Do not mix battery types, such as alkaline batteries with manganese batteries, or batteries from different makers, or different types of batteries from the same maker, since this can cause a fire, burns, or inflammation due to fluid leaks.
- Keep batteries away from children. A child could accidentally swallow a battery. Failure to observe this may also cause inflammation due to battery fluid leaks.
- Do not put in a pocket or bag, carry, or store batteries together with pieces of metal. The battery could short, burst, or leak, causing a fire or injury.
- Always make sure all batteries are inserted in conformity with the +/- polarity markings.Failure to do so might result in a fire, burns, or inflammation due to fluid leaks.
- When the batteries run out, or if the unit is not to be used for a long time remove the batteries from the unit to prevent possible leakage of the battery fluid.
- When storing or discarding batteries, insulate the terminal area by applying tape, or some other protection. Mixing them with other batteries or metal objects can cause a fire, burns, or inflammation due to fluid.
NOTICE
Indicates points that you must observe in order to prevent product failure, damage or malfunction and data loss.
Power supply/power cord
- If not using the unit for a long period of time, be sure to pull the power plug from the outlet. Even if the [
 ](Standby/On) switch has been turned off (the screen display is off), a minute current is still flowing.
Installation
- Do not use this unit in the vicinity of other electronic equipment, such as a TV, radio, or mobile phone. Failure to observe this may cause this unit or the TV or radio to produce noise.
- Do not use this unit in a location that is exposed to direct sunlight that becomes extremely hot, such as near a heater, or extremely cold, or that is subject to excessive dust or vibration. Failure to observe this may cause the unit’s panel to become deformed, the internal components to malfunction, or for operation to become unstable.
- Install this unit as far away from other electronic equipment as possible.Digital signals from this unit may interfere with other electronic equipment.
- If using a wireless function, avoid installing this unit near metal walls or desks, microwave ovens, or other wireless network devices.Obstructions could shorten the transmission distance.
Connections
- If connecting external units, be sure to thoroughly read the manual for each unit and connect them in accordance with the instructions.Failure to properly handle a unit in accordance with the instructions could cause malfunctions.
- Do not connect this unit to industrial units.Digital audio interface standards for consumer use and industrial use are different. This unit has been designed to connect to a consumer-use digital audio interface. Connections to an industrial-use digital audio interface could not only cause this unit to malfunction, but could also damage the speakers.
Handling
- Do not place vinyl, plastic, or rubber products on this unit. Failure to observe this may cause discoloration or deformation in the panel of this unit.
- If the ambient temperature changes drastically (such as during unit transportation or under rapid heating or cooling) and there is a chance condensation may have formed in the unit, leave the unit for several hours without turning on the power until it is completely dry before use. Using the unit while there is condensation can cause malfunctions.
Maintenance
- When cleaning the unit, use a dry, soft cloth. Using chemicals such as benzine or thinner, cleaning agents, or chemical scrubbing cloths can cause discoloration or deformation.
Batteries
- Be sure to discard used batteries in accordance with local regulations.
About content in this manual
- The illustrations and screens in this manual are for instructional purposes only.
- The company names and product names in this manual are the trademarks or registered trademarks of their respective companies.
- Software may be revised and updated without prior notice.
| LASER SAFETYThis unit employs a laser. Due to possible eye injury, only a qualified service person should remove the cover or attempt to service this device. |
| DANGERThis unit emits visible laser radiation when open. Avoid direct eye exposure to beam. When this unit is plugged into the wall outlet, do not place your eyes close to the opening of the disc tray and other openings to look into inside. |
| CAUTIONUse of controls or adjustments or performance of procedures other than those specified herein may result in hazardous radiation exposure. |
| The laser component in this product is capable of emitting radiation exceeding the limit for Class 1. |
| The model number, serial number, power requirements, etc., may be found on or near the name plate, which is at the rear of the unit. You should note this serial number in the space provided below and retain this manual as a permanent record of your purchase to aid identification in the event of theft.Model No. _____________________________________________________________Serial No. ______________________________________________________________ |
Introduction
Confirm the package contents and useful points of this manual.
About this manual
- How to operate this unit is described mainly using the remote control.
- Illustrations may differ from actual item depicted.
- Symbols:Caution Indicates information that should be read before use to prevent failure or physical damage.Note Indicates precautions and supplementary information that should be read before using the unit. & References another page or pages that provide additional information.
Trademarks
![]() The Bluetooth® word mark and logos are registered trademarks owned by Bluetooth SIG, Inc. and any use of such marks by Yamaha Corporation is under license. Other trademarks and trade names are those of their respective owners.
The Bluetooth® word mark and logos are registered trademarks owned by Bluetooth SIG, Inc. and any use of such marks by Yamaha Corporation is under license. Other trademarks and trade names are those of their respective owners.
![]() Yamaha Eco-Label is a mark that certifies products of high environmental performance.
Yamaha Eco-Label is a mark that certifies products of high environmental performance.
Accessories

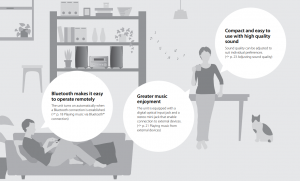
What you can do with this unit
Parts name
Familiarize yourself with all parts and their functions.
Front panel
- (Power) (Check down below)The front panel display turns on when the unit is turned on.
- PHONESConnect headphones to this jack.NoteWhen headphones are connected, there is no sound from the speakers or subwoofer.
- USB jack (Check down below)
- (Check down below)PRESET </> (Check down below)
- (Play/pause) (Check down below)
- (Stop) (Check down below)
- INPUT (Check down below)Change the input source. (The selected input source is shown in the front panel display.)
- Disc tray (Check down below)
- VOLUMEAdjust the volume.
- (Open/close the disc tray) (Check down below)
- Front panel display (Check down below)
- Remote control sensor

Rear panel
- Power cord (Check down below)
- Service only jackUse when the unit requires maintenances.
- DIGITAL IN jack (optical input) (Check down below)
- AUX IN jack (mini jack input) (Check down below)
- SUBWOOFER OUT jack (Check down below)
- ANTENNA jack (Check down below)
- SPEAKERS terminals (Check down below)

Front panel display
- Multi information displayShow various information, such as music information and the radio frequency.Characters shown in the front panel display are alphanumeric only.
- TUNED indicatorGlows when the unit is receiving a signal from an FM station.
- STEREO indicatorGlows when the unit is receiving a signal from an FM stereo broadcast.
- MUTE indicatorGlows when the sound is muted (Check down below).
- SLEEP indicatorGlows when the sleep timer is set (Check down below).
- Shuffle/repeat indicatorGlows when the shuffle or repeat function is enabled for songs in a CD or USB memory device.
- Bluetooth indicatorShow the status of Bluetooth connection.NoteChanging display brightnessEach press of the DIMMER button on the remote control (Check down below) changes the brightness: bright (default), mid dim, or dim.

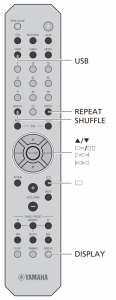
Remote control
- Infrared signal transmitter
- OPEN/CLOSE (Open/close the disc tray) (Check down below)
- Input source buttonsSwitch the input source.
- Numeric buttons (Check down below)
- SHUFFLE(Check down below)
- BASS, TREBLE (Check down below)
- Audio control, cursor control buttons (Check down below)
- OPTION (Check down below)
- VOLUME +/–Adjust the volume.
- TUNER/PRESET (Check down below)
- SLEEP (Check down below)
- DIMMER (Check above)
- (Power) (Check down below)
- REPEAT (Check down below)
- MUTETurn mute on or off.
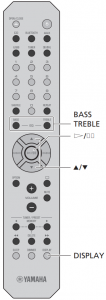
- DISPLAY (Check down below)

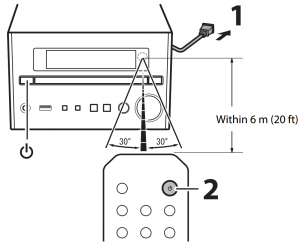
Installing batteries
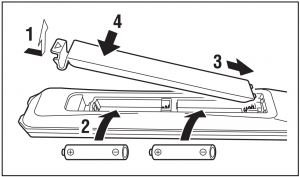 Check the “+” and “-” of the batteries and insert them in the correct directions.
NoteChange both batteries when the operation range of the remote control decreases.
Preparations
Connect speakers, the antenna, etc. and turn the unit on.
Do not connect the power cord of the unit until you have finished connecting all cables.
Connecting speakers
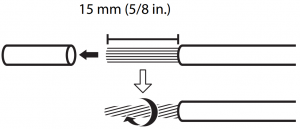
- Remove the insulation from the ends of the speaker cables to expose the bare wires.
- Connect speakers to the unit, as the illustration shows.• Prepare speakers, subwoofer and speaker cables separately.• See documentation provided with the speakers for more information.

Caution
- If the bare speaker wires touch each other or any metal part of the unit, it could damage the unit and/or the speakers.
- Use speakers of at least 6 Ω impedance.
Note
- Make sure that left and right (L, R) connections and polarity (red: +, black: -) are correct. If connections are incorrect, the sound will be unnatural.
- You can also connect a subwoofer to the unit (it must have a built-in amplifier).
Connecting the antenna
- Connect the supplied antenna to the unit.
- Install it with pins where the unit can obtain good reception.
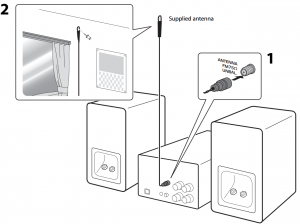
Note
- Be sure to stretch out the antenna as the illustration shows.
- If radio reception with the supplied antenna is not satisfactory, an outdoor antenna (sold separately) may improve reception.
Turning on the power
Plug the power cord into a power outlet, and press ![]() .
.
- The unit turns on.
- Press again to turn the unit off (standby mode).
Reducing power consumptionAuto standbyThe unit will automatically enter standby mode (auto standby) if in any of the following situations:
Eco standbyThe unit minimizes power consumption in eco standby mode. Disable the BT Standby (Bluetooth standby) function to enable eco standby (Check down below). |
Using the sleep timer
You can set the time after which the unit automatically enters standby mode. The time canbe selected from 120/90/60/30 min., or OFF.Press SLEEP repeatedly to select the time.The SLEEP indicator lights up when the sleep timer is set.
Note
- To cancel the sleep timer, press SLEEP again.
Listening to music
Listening to CDs

- Press CD on the remote control.
- Set a CD in the disc tray.Press to open/close the disc tray.
- Press .Playback starts.

Playing music on USB memory devices
- Press USB on the remote control.
- Connect a USB memory device to the USB jack.
- Select a song.Use the following buttons to control audio playback.
Select a folder. Confirm the selected item and proceed to the next level, or start/pause playback. Return to the previous item. Stop SHUFFLE/REPEAT Check down below DISPLAY Display information about the content being played Check down below).

Note
- This unit allows playback from USB memory devices on which music files are saved. For details on playable USB memory devices, see “Supported devices/media and file formats” (Check down below).
- Some USB memory devices may not work properly even if they meet the requirements. Playability of and power supply to all USB memory devices are not guaranteed.
- Stop playback before disconnecting the USB memory device.
- A USB memory device is automatically charged as long as it is connected to the unit except when the unit is in standby mode. However, some devices may not charge when connected.
- Connect a USB storage device directly to the USB jack of the unit. Do not use extension cables.
Playing music via Bluetooth® connection

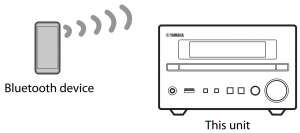
- Enable the Bluetooth function on your Bluetooth device.
- Press BLUETOOTH on the remote control.
- Select this unit from the Bluetooth device list on your Bluetooth device.The indicator glows when a connection is established.
- Play music using your Bluetooth device.
Note
- Decrease the volume of the unit before playback. Otherwise, playback volume may be too loud.
- If a Bluetooth device has been connected before, the unit will connect to the last connected device when BLUETOOTH on the remote control is pressed.
- If the unit is connected to another device via Bluetooth connection, press and hold BLUETOOTH at least three seconds to terminate that connection before connecting to the target device.
- If a passkey is required during the Bluetooth connection, enter the number “0000.”
- See documentation provided with your Bluetooth device for more information on Bluetooth connection.
Unable to connect the unit to a Bluetooth device
If a Bluetooth connection was not established after following the instructions shown at left, try the following.
- If the Bluetooth device has been connected to the unit before, delete the unit from the list of devices registered with your Bluetooth device.
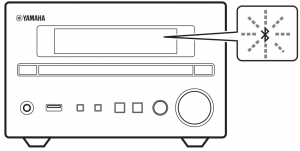
- Press and hold BLUETOOTH on the remote control for at least three seconds.– “Pairing” will be shown in the front panel display.
- Select this unit from the Bluetooth device list on your Bluetooth device.– The will glow in the front panel display when a connection is established.
Listening to FM radio stations
Connect the antenna supplied with the unit (Check above) to receive FM stations.
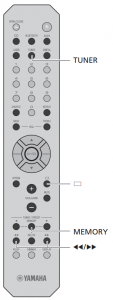
Tuning in FM stations
- Press TUNER.
- Press and hold or until automatic tuning starts.Automatic tuning stops when a station is tuned in.

Note
- If station reception is weak, tune into a station manually by pressing / repeatedly. Sound will be heard in monaural.
Presetting FM stations
Auto preset
The unit tunes in stations with good reception and presets them automatically.
- Press TUNER.
- Press and hold MEMORY at least two seconds.
- Press MEMORY.Auto preset starts, and when it finishes, “Completed!” is shown in the front panel display.
Note
- Auto preset replaces all stations currently stored with new stations.
- Up to 30 FM stations can be preset.
- Press to cancel Auto preset
Manual preset

- Tune into a station you want to preset (check above).
- Press MEMORY.The preset number flashes in the front panel display.
- Press to select the desired preset number.
- Press to preset the station.Note• To cancel manual preset setting, press .

Selecting preset FM stations
- Press TUNER.
- Press to select a station.The number of a registered preset can also be selected using the numeric buttons.
NoteDeleting a preset station
- Press and hold DELETE at least two seconds when FM is selected as the input source.– The preset number flashes in the front panel display.
- Press to select the preset number of the station to be deleted.
- Press .– The station in the selected preset number is deleted.
Playing music from external devices
This unit allows playback from external devices. Use the jacks (DIGITAL IN or AUX IN) according to the device to be connected (Check above).

- Unplug the power cord of the unit and connect the external device to the unit.Use cables sold separately for connection.
- Plug the power cord of the unit back into the wall outlet and press z to turn the unit on.
- Press AUX or DIGITAL to select the input source.
- Play the connected external device.See documentation provided with the external device for information on playback.
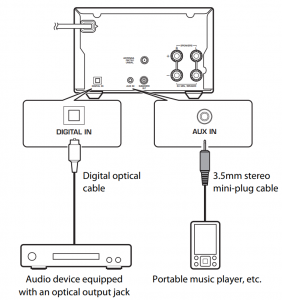
Note
- Decrease the volume of the unit and the connected external device before connection. Otherwise, playback volume may be too loud.
- See documentation provided with the external device for more information on connecting devices.
More on playback
Features such as shuffle/repeat playback, displaying song information, etc. make this unit even more convenient to use.
Shuffle/Repeat playback
Operation is the same for playback of content from USB memory devices and CDs.

Shuffle (Random) playback
Press SHUFFLE during playback.The shuffle indicator in the front panel display switches as shown below each time SHUFFLE is pressed.
 |
Shuffle folders* |
| Shuffle all songs | |
| Goes off | The shuffle function is not applied |
| * The range of shuffle depends on the media being played back. |
Repeat playback
Press REPEAT during playback.
The repeat indicator in the front panel display switches as shown below each time REPEAT is pressed.
 |
Repeat the song being played |
 |
Repeat folders* |
| Repeat all songs | |
| Goes off | The repeat function is not applied. |
| * The range of repeat depends on the playback media. |
Playback information
While content from a USB memory device or CD is being played, the song title, elapsed time, etc. can be shown in the front panel display.
Press DISPLAY during playback.

The display switches in the order shown below each time DISPLAY is pressed.
|
Data CD/USB |
CD |
|
Song title* 1 |
Playing time |
|
Artist name |
Remaining time of the song* 2 |
|
Album title |
Remaining time of the disc* 2 |
|
Playing time |
Song title* 1,* 3 |
 |
Artist name* 3 |
|
Album title* 3 |
*1 If the song title cannot be recognized, the file name may be displayed.*2 Only when an audio CD is played.* 3 Only when an audio CD encoded with information that can be displayed is played.
Note
- Characters shown in the front panel display are alphanumeric only.
Adjusting sound quality
Adjusting tones (default in bold face)Use BASS and TREBLE on the remote control to adjust the level atwhich high (treble) and low (bass) tones are output while listening to sound.(-5 to 0 to +5)
- Press BASS or TREBLE.
- Change the level with and press .
Adjusting balance (default in bold face)Use the option menu to adjust the volume balance of the left and right speakers (Check down below).This setting is not applied when using headphones.(Lch. +5 to –center– to Rch.+5)
The option menu allows you to configure the unit to suit how you will use it.

- Press OPTION.The option menu list is shown in the front panel display. Refer to “Option menu list” (Check Option menu ).
- Select a desired option menu with and press .
- Change the setting with and press .• Repeat step 3 if there is a sub menu.• Press to cancel the setting and return to the previous level.• Repeat steps 2 and 3 if you want to set another menu item.
- Press OPTION to exit the option settings.
Option menu list
|
Menu |
Default |
Function |
| Balance (Check above) | center | Adjust the volume balance of the left and right speakers. |
| AutoPowerStdby (& p. 15) | On | Set the unit to enter standby mode automatically. |
| BT Standby (Bluetooth standby) | On | When a Bluetooth device is connected to this unit while the unit is in standby mode, the unit will be turned on automatically. |
| Bluetooth | On | Enable/disable the Bluetooth function. |
| Initialize Set | Reset to the factory default settings. |
Troubleshooting
Refer to the table below when the unit does not function properly. If your problem is not listed below or if the instruction below does not help, turn off the unit, disconnect the power cord, and contact the nearest authorized Yamaha dealer or service center.
First, check that the connectors of each cable are securely inserted in to jacks on each device. Check also that the power cord is plugged into an outlet.
General
| Problem | Cause | Solution |
|
The unit enters the standby mode soon after the power is turned on.The unit does not operate properly. |
The power cord is not properly connected. | Connect the power cord firmly. |
| The internal microcomputer has frozen due to an external electrical shock (lightning, excessive static electricity, etc.) or a drop in power supply voltage. | Press and hold z on the front panel for more than 10 seconds to initialize and reboot the unit. If the problem persists, unplug the unit from the electrical outlet, wait for at least 30 seconds, and then plug the unit into the electrical outlet again. | |
| No sound. | No appropriate input source has been selected. | Select an appropriate input source with INPUT on the front panel or the input source buttons on the remote control (Check above). |
| Speaker connections are not secure. | Secure the connections (Check above). | |
| The volume is minimum or mute. | Turn up the volume. | |
| Sound is heard from the speaker on one side only. | The external device or speakers are not connected properly. | Connect the external device or speaker cables properly (Check above). If the problem persists, the cables may be defective. |
| Noise is heard. | This unit is too close to digital or radio-frequency equipment. | Move this unit away from such equipment. |
| The audio cable used to connect the unit and external device may be defective. | Connect the audio cable firmly. If the problem persists, use another audio cable. | |
| The power suddenly turns off. | The sleep timer may be set (Check above). | Turn on the unit and play the source again. |
| Auto Power Standby function is activated (Check above). | ||
| There is noise interference from digital or high-frequency equipment. | This unit is too close to the digital or high-frequency equipment. | Place this unit farther away from such equipment. |
| The remote control does not work or does not function properly. | The remote control may be outside its operation range. | Operate the remote control within its operation range (Check above). |
| The remote control does not work or does not function properly. | The remote control sensor on this unit may be exposed to direct sunlight or strong lighting such as an inverter type fluorescent lamp. | Change the orientation of lighting or the unit, or location of the unit. |
| The battery may be worn out. | Replace the batteries with new ones (Check above). | |
| There are obstacles between the sensor of this unit and the remote control. | Remove the obstacles. |
Bluetooth
|
Problem |
Cause |
Solution |
| Unable to connect the unit to a Bluetooth device. | The [Bluetooth] of the option settings is set to [Off]. | Set it to [On]. |
| The unit is already connected to another Bluetooth device. | Terminate the current Bluetooth connection, and then connect to the new device (check above). | |
| The unit and the Bluetooth device are too far apart. | Move the Bluetooth device closer to the unit. | |
| A device that operates in the 2.4 GHz band (microwave oven, wireless network device, etc.) is interfering with wireless communication. | Move the unit and Bluetooth device farther away from the device. If the wireless LAN router supports the 5 GHz band, connect network devices to the network using the 5 GHz band. | |
| The passkey for devices such as a Bluetooth adapter is not “0000”. | Use a Bluetooth device with a passkey of “0000.” | |
| The Bluetooth device does not support the Advanced Audio Distribution Profile (A2DP). | Use a Bluetooth device that supports A2DP. | |
| No sound is played, or sound is interrupted during playback. | The volume level on the Bluetooth device is set too low. | Increase the volume on the Bluetooth device. |
| The Bluetooth device is not configured to transmit audio signal to this unit. | On the Bluetooth device, select this unit as the audio output destination. | |
| The Bluetooth connection has been terminated. | Establish the Bluetooth connection again (Check above). | |
| A device that operates in the 2.4 GHz band (microwave oven, wireless network device, etc.) is interfering with wireless communication. | Move the unit and Bluetooth device farther away from the device. If the wireless LAN router supports the 5 GHz band, connect network devices to the network using the 5 GHz band. | |
| The unit and the Bluetooth device are too far apart. | Move the Bluetooth device closer to the unit. |
Disc
|
Problem |
Cause |
Solution |
| Playback does not start (or stops immediately) after pressing |
The disc may be dirty. | Wipe the disc clean ( Check down below). |
| The disc inserted in the unit may not be supported. | Use a disc supported by the unit ( Check down below). | |
| If the unit was moved from a cold to warm place, condensation may have formed on the disc reading lens. | Wait for an hour or two until the unit adjusts to the room temperature, and try again. | |
| No sound is played, or the sound is interrupted during playback. | The disc may be dirty. | Wipe the disc clean ( Check down below). |
| The disc inserted in the unit may not be supported. | Use a disc supported by the unit (Check down below). |
USB memory devices
|
Problem |
Cause |
Solution |
| The unit does not detect the USB memory device. | The USB memory device is not connected to the USB jack securely. | Turn off the unit, reconnect your USB memory device, and turn the unit on again ( Check above). |
| A USB memory device in a format other than FAT16/32 format is used. | Use a USB memory device with FAT16 or FAT32 format. | |
| Folders and files in the USB memory device cannot be viewed. | The data in the USB memory device is protected by encryption. | Use a USB memory device without an encryption function. |
| No sound is played, or the sound is interrupted during playback. | The music file is not supported by the unit. | Play a music file supported by the unit (check down below). |
FM reception
|
Problem |
Cause |
Solution |
| FM stereo reception is noisy. | The antenna is not connected properly. | Make sure the antenna is connected properly and change the position of the antenna (Check above). |
| The radio station may be far from your area, or the antenna input is poor. | Use a commercially available outdoor antenna. For details, consult a specialist store. | |
| Automatic tuning does not work. |
The radio station may be far from your area, or the antenna input is poor. |
Use a commercially available outdoor antenna. For details, consult a specialist store. |
| Use the manual tuning method (Check above). | ||
| Cannot select a preset radio station. | The preset (memory) may have been erased. | Preset radio stations again (Check above). |
| There is distortion, and clear reception cannot be obtained even with a good FM antenna or an outdoor antenna. | Multipath reflection or other radio interference may be occurring. | Change the height, direction, or placement of the antenna. |
Messages in the front panel display
|
Message |
Cause |
Solution |
| Access Error | The unit cannot access the USB memory device. | Turn off the unit and reconnect your USB memory device. If the problem persists, try another USB memory device. |
| Disc Error | A disc that is not supported by the unit has been inserted. | Insert a disc that is supported by the unit. |
| Loading… | The unit is loading the specified file/content. | Wait until the unit finishes loading. |
| No Content | The disc or USB memory device does not contain files supported by the unit. | Use a disc or USB memory device that contains files supported by the unit. |
| No Disc | The disc inserted in the unit may not be supported. | Use a disc supported by the unit (Check down below). |
| The disc may be dirty, or foreign matter may be attached to it. | Wipe the disc clean. Alternatively, remove foreign matter adhered to the disc. | |
| Disc is set upside-down. | Set the disc with the labeled side facing up. | |
| Overcurrent | The connected USB memory device is not supported by the unit. | Disconnect the USB memory device, turn off the unit, and turn it on again. If this does not solve the problem for the USB memory device, it is not playable on the unit. |
| USB memory device is not connected properly. | ||
| Unknown | The unit cannot access the USB memory device. | Turn off the unit and reconnect your USB memory device. If the problem persists, try another USB memory device. |
| Unknown Disc | A disc that is not recognized by the unit has been inserted. | Insert a disc that can be played the unit. |
| USB Error | The unit cannot play back the songs stored on the USB memory devices for some reason. | Check if the format of files you are trying to play is supported by the unit (Check down below). |
Supported devices/media and file formats
Supported devices/media
USB memory devices
- This unit is compatible with USB memory devices that are in FAT16 or FAT32 format. Do not connect any other type of USB memory devices.
- USB memory devices with encryption cannot be used.
- Operation of all USB memory devices cannot be guaranteed.
Yamaha and suppliers do not accept any liability for the loss of data saved on a USB memory device connected to the unit. As a precaution, it is recommended to make backup copies of important files.
Discs
- This unit is designed for use with audio CD, CD-R/RW (ISO 9660 format) with any of the following logos printed on the disc or the disc jacket.* Discs which bear one of the following.FOR CONSUMERFOR CONSUMER USEFOR MUSIC USE ONLY
- 8-cm discs are playable with this unit. Set a disc in the inner recessed area of the disc tray
 * Discs which bear one of the following.FOR CONSUMERFOR CONSUMER USEFOR MUSIC USE ONLY
Notes on discs
- Do not set any other type of disc other than stated above in this unit. Doing so may damage the unit.
- CD-R/RW cannot be played back unless finalized. Finalization means the process for making a disc to be ready for playback on a compatible device.
- Some discs cannot be played back depending on the disc characteristics or recording conditions.
- Do not use any non-standard shaped discs such as a heart-shaped disc.
- Do not use discs with many scratches or a crack on their surface, or warped/glued discs.
Handling discs
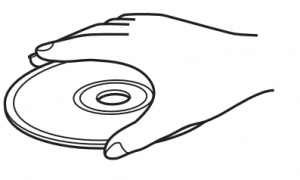
- Do not touch the surface of the disc. Hold a disc by its edge or center hole.
- Use a soft-tipped pen when writing on the label side of a disc.
- Do not put tape, seal, glue, etc., on a disc.
- Do not use a protective cover to prevent scratches.
- Do not set foreign object on the disc tray.
- Do not set more than one disc in this unit at one time. This could cause damage to both this unit and the discs.
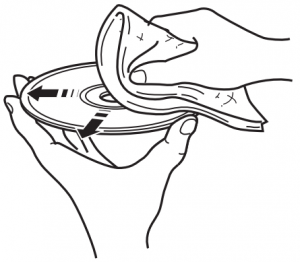
- If a disc becomes dirty, wipe it with a clean, dry soft cloth from the center out to the edge. Do not use record cleaner or paint thinner.
- Do not use any lens cleaners as they may cause malfunction.
- Do not expose discs to direct sunlight, high temperature, high humidity, or dust.
- When a disc is not being used, remove it from this unit and store in an appropriate case.
File format
This unit supports the following file formats.
USB
|
Format |
Sampling frequency (kHz) | Quantization bits (bit) | Bitrate (kbps) |
Number of channels |
|
WAV* |
32/44.1/48/88.2/ 96/176.4/192 | 16/24 | – |
2 |
|
MP3 |
32/44.1/48 | 16 | 8-320 |
2 |
|
WMA |
32/44.1/48 | 16 | 8-320 |
2 |
|
MPEG-4 AAC-LC |
32/44.1/48 | 16 | 8-320 |
2 |
|
FLAC |
32/44.1/48/88.2/ 96/176.4/192 | 16/24 | – |
2 |
|
ALAC |
32/44.1/48 | 16/24 | – |
2 |
|
AIFF |
32/44.1/48/88.2/ 96/176.4/192 | 16/24 | – |
2 |
* Linear PCM format only• Digital Rights Management (DRM) files cannot be played back.
Disc
|
Format |
Sampling frequency (kHz) | Quantization bits (bit) | Bitrate (kbps) |
Number of channels |
|
MP3 |
32/44.1/48 | 16 | 8-320 |
2 |
|
WMA |
32/44.1/48 | 16 | 8-320 |
2 |
Specifications
Input
| AUX IN | 3.5 mm stereo mini jack |
| DIGITAL IN | Optical jack |
Output
| SUBWOOFER OUT | RCA monaural jack |
| SPEAKERS L/R | – |
| PHONES | 6.3 mm in diameter |
CD
| Laser | Type | Semiconductor laser GaAs/GaAlAs |
| Wave length | 790 nm | |
| Output power | 7 mW | |
| Media | CD, CD-R/RW | |
| Audio format | Audio CD, MP3, WMA |
Tuner
| Preset memory | 30 | |
| Tuning range | FM | U.S.A. and Canada models: 87.5 MHz to 107.9 MHzOther models: 87.5 MHz to 108.0 MHz |
Bluetooth
| Bluetooth version | Ver. 4.2 |
| Supported profile | A2DP (Advanced Audio Distribution Profile) AVRCP (Audio/Video Remote Control Profile) |
| Compatible codecs | SBC, AAC |
| Maximum communication range | 10 m (33 ft) (without interference) |
Amplifier section
| Maximum output power | 20 W + 20 W (6 Ω, 1 kHz, 10 % THD) |
| Frequency response | 20 Hz to 30 kHz (0±3 dB) |
| Total harmonic distortion | ≤ 0.05 % (2.5 W/6 Ω) |
General
| Power supply/Frequency | AC 100 to 240 V, 50/60 Hz |
| Power consumption | 18 W |
| Standby power consumption | Bluetooth standby off: 0.3 W (ECO) Bluetooth standby on: 1.5 W |
| Dimensions (W × H × D) | 180 × 118 × 322 mm (7-1/8 x 4-5/8 x 12-5/8 inch ) |
| Weight | 2.7 kg (5.9 lbs.) |
 With an advanced energy saving design, this product achieves a low power consumption of not more than 1.8 watts when in Bluetooth standby mode. With an advanced energy saving design, this product achieves a low power consumption of not more than 1.8 watts when in Bluetooth standby mode. |

[xyz-ips snippet=”download-snippet”]